

Arduino can communicate with other device via Bluetooth using the module HC-06 (slave). It enables the Arduino to be connected and exchange data with other devices such as Smartphone, computer or other microcontrollers. Bluetooth communication can be used to control a robot remotely, Display and store data on your computer or on your smartphone, for instance.
Prerequisite: Arduino Serial communication
Material
- Computer
- Arduino UNO
- USB cable
- Bluetooth module HC-06
- Dupont cables M/F
Module HC-06 overview

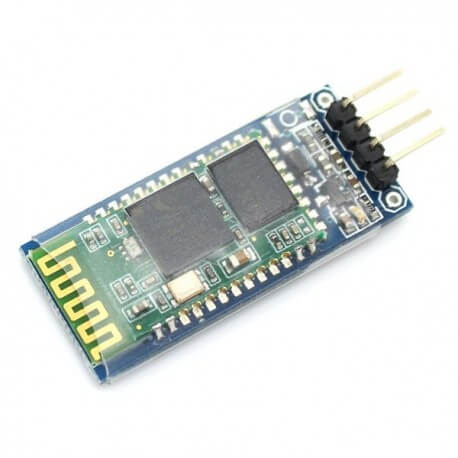
The Bluetooth module HC-06 has 4 pins, 2 for power and 2 to establish connection.
- VCC power supply. Typically hooked up to 5V pin of the Arduino.
- GND ground. Typically hooked up to GND pin of the Arduino
- RX reception pin. Typically hooked up to transmission pin (TX) of the Arduino
- TX transmission pin. Typically hooked up to reception pin (RX) of the Arduino
Check the RX/TX pin of your Arduino board
N.B.: Since the module HC-06 is a slave module it cannot connect to other device on its own. To do so you need a master module such as the Bluetooth module HC-05.
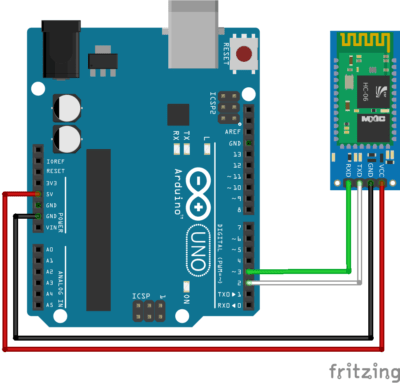
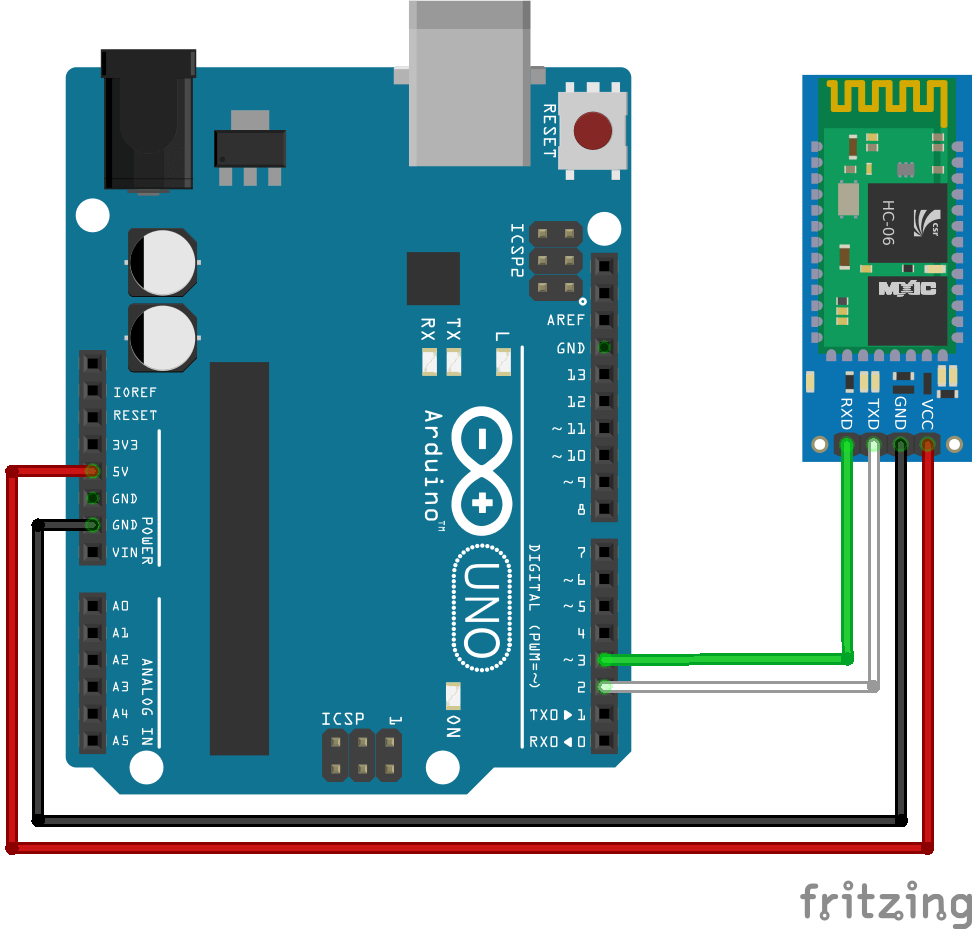
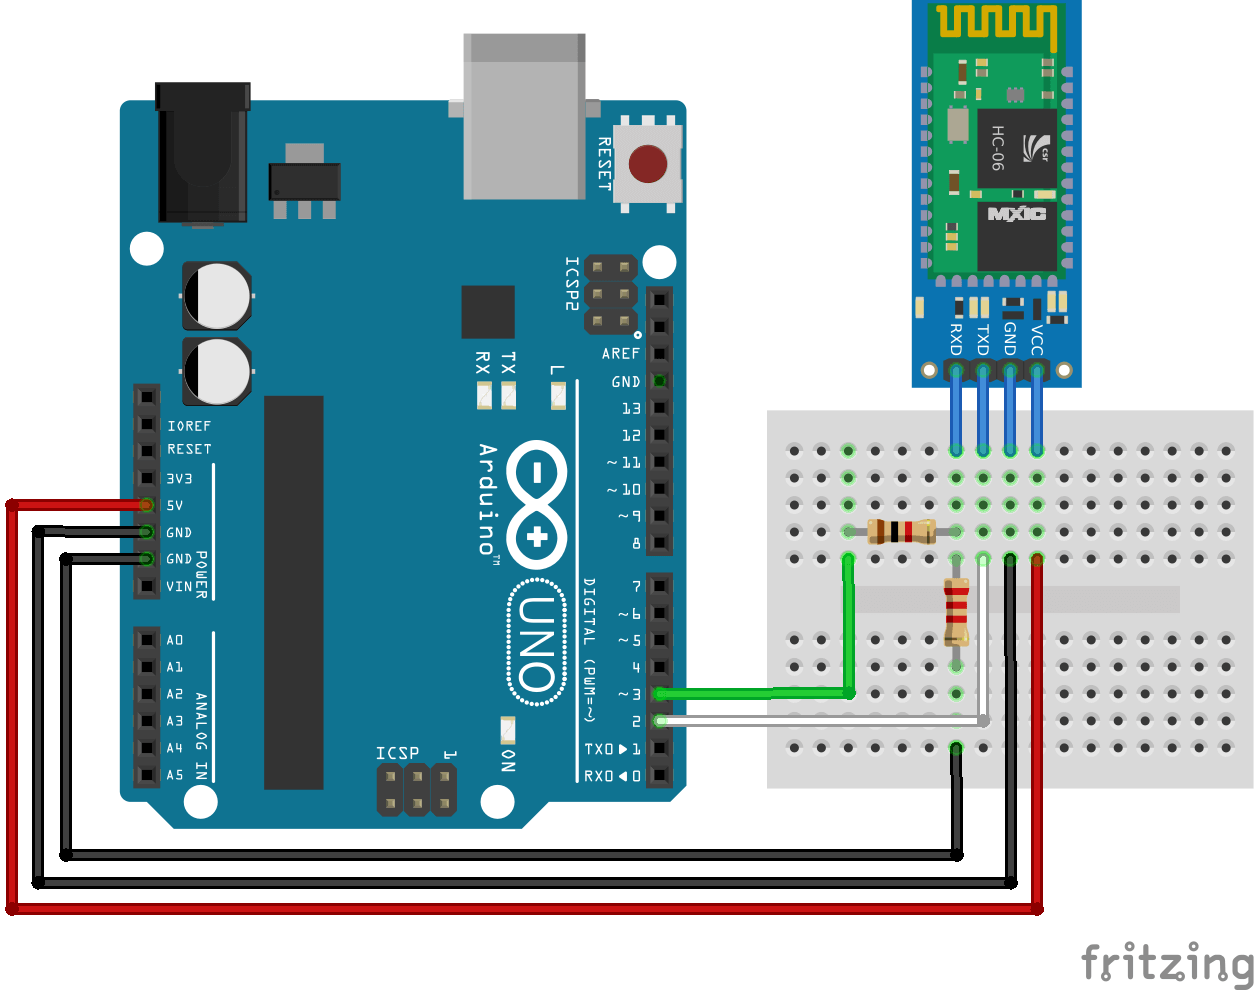
Schematics

Some HC-06 modules operate at 3V3 and do not support the 5V voltage level on pin Rx. In this case, a voltage divider bridge is required to convert the logic signal (1k resistor between pin3 and Rx, and 2k Ohm between Rx and GND).

WARNING : We use pin 2 and 3 of Arduino Uno. Depending on the microcontroller, some pins may not support SoftwareSerial communication. Especially, Arduino Mega, Micro and Leonardo. Check the documentation.
Module HC-06 configuration
Configuring the module HC-06 can be interesting to verify that it is working, hooked up correctly and to modify its parameters such as its name (useful when your are using several modules), PIN code and communication speed (baudrate). To allow configuration, the module HC-06 should be powered but not paired (la LED is blinking).
The following code allows you to modify the parameters using the serial monitor.
#include <SoftwareSerial.h>

SoftwareSerial hc06(2,3);

void setup(){
  //Initialize Serial Monitor
  Serial.begin(9600);
  Serial.println("ENTER AT Commands:");
  //Initialize Bluetooth Serial Port
  hc06.begin(9600);
}

void loop(){
  //Write data from HC06 to Serial Monitor
  if (hc06.available()){
    Serial.write(hc06.read());
  }

  //Write from Serial Monitor to HC06
  if (Serial.available()){
    hc06.write(Serial.read());
  }
}
To test serial communication, enter AT in the serial monitor and click on the send or press enter. Be sure to select “No end line” and the correct baudrate in the communication options. Module should answer OK. If it is not working check the wiring and the module version.
To modify the module name, enter AT+NAMEmodule_name.Module should answer OKsetname. (Ex: If you want to change module name into BTM1 enter AT+NAMEBTM1)
To modify the module PIN code, enter AT+PINxxxx. Module should answer OKsetPIN. (Ex: If you want to change PIN into 0000 enter AT+PIN0000)
To modify the module communication speed (only if required), enter AT+BAUDx. Ex: If you want to change baudrate into 9600 enter AT+BAUD4. Module should answer OK9600. (Note: 1 for 1200, 2 for 2400, 3 for 4800, 4 for 9600, 5 for 19200, 6 for 38400, 7 for 57600, 8 for 115200)
WARNING:Different versions of the Bluetooth module HC-06 exit and the list of AT commands may vary. Check the serial number written on the module and the firmware version by entering AT+VERSION.
For instance, the module HC-06 labelled ZS-040with firmware version 3.0-20170609 returns ERROR(0) when sending command AT+NAMExxxx (with xxxx the new name of the module). The AT commands to configure such module are:
- AT+NAME=xxxx to set the name of the module
- AT+PSWD:”xxxx” to set the pin code of the module
Do not hesitate to leave a comment if you encounter an issue while configuring your Bluetooth module HC-06.
Pairing Bluetooth module HC-06
Once the module is configured as you wish, you can pair the module HC-06 to the device of your choice like any Bluetooth device. Select the name of your module in the list of available Bluetooth device (default is HC-06) and enter the PIN code (default is 1234). When it is done, The LED should stop blinking.
Code
After your module is paired, you can modify the following code to obtain the desired functionality. In this example, we expect the other device (such as an app on smartphone) to send the command ON or OFF to activate a function on the Arduino.
To handle the module HC-06 we use the library SoftwareSerial.h which allows to define Serial port on the Arduino board. Functions to be known are:
- SoftwareSerial hc06(Rx,Tx) to define the pins of the serial port
- hc06.begin() to define the baudrate (value should be the same as your module)
- hc06.available() to test if data are available in the buffer of the module
- hc06.read() to read data one byte at a time
- hc06.print() to send a string in ASCII form
- hc06.write() to send data one byte at a time
#include <SoftwareSerial.h>

SoftwareSerial hc06(2,3);

String cmd="";
float sensor_val=0;

void setup(){
  //Initialize Serial Monitor
  Serial.begin(9600);
  //Initialize Bluetooth Serial Port
  hc06.begin(9600);
}

void loop(){
  //Read data from HC06
  while(hc06.available()>0){
    cmd+=(char)hc06.read();
  }

  //Select function with cmd
  if(cmd!=""){
    Serial.print("Command recieved : ");
    Serial.println(cmd);
    // We expect ON or OFF from bluetooth
    if(cmd=="ON"){
        Serial.println("Function is on");
    }else if(cmd=="OFF"){
        Serial.println("Function is off");
    }else{
        Serial.println("Function is off by default");
    }
    cmd=""; //reset cmd
  }
  // Simulate sensor measurement
  sensor_val=(float)random(256); // random number between 0 and 255

  //Write sensor data to HC06
  hc06.print(sensor_val);
  delay(100);
}
Bonus: Baudrate scanner
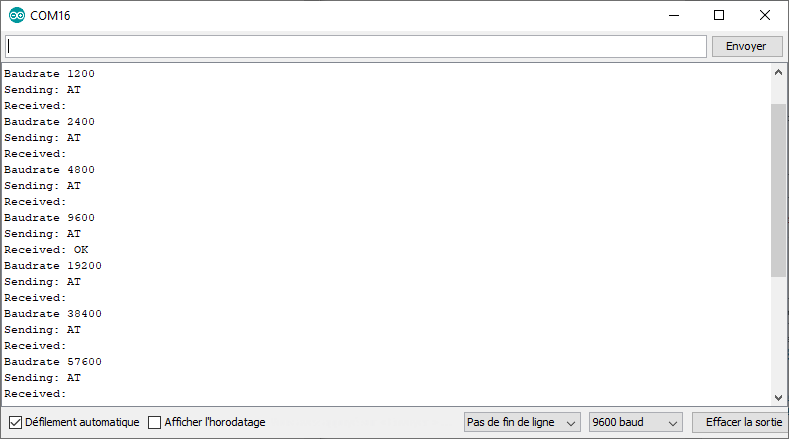
If you have difficulties finding your module baudrate, here is a code that initialize the Bluetooth and send AT command for each baudrate value.
#include <SoftwareSerial.h>
SoftwareSerial hc06(2, 3);

void setup() {
  //Initialize Serial Monitor
  Serial.begin(9600);
  // scan
  scanBaudrate();
}

void loop() {}

void scanBaudrate() {
  unsigned long bauds[12] = {300, 1200, 2400, 4800, 9600, 19200, 38400, 57600, 74880, 115200, 230400, 250000};
  for (int i = 0; i < 12; i++) {
    hc06.begin(bauds[i]);
    delay(10);
    Serial.print(F("Baudrate "));
    Serial.println(bauds[i]);
    command("AT", 2000);

  }
}
String command(const char *toSend, unsigned long milliseconds) {
  String result;
  Serial.print("Sending: ");
  Serial.println(toSend);
  hc06.print(toSend);
  unsigned long startTime = millis();
  Serial.print(F("Received: "));
  while (millis() - startTime < milliseconds) {
    if (hc06.available()) {
      char c = hc06.read();
      Serial.write(c);
      result += c;  // append to the result string
    }
  }
  Serial.println();  // new line after timeout.
  return result;
}
When the communication baudrate is set correctly, the Bluetooth module should answer OK. This code will quickly tell you if the module is working properly and what baudrate it uses.

Application
- Communicate between two Arduino via Bluetooth
- Control your robot with your Smartphone
- Display temperature measurement on your Smartphone
- All our robots can be controlled via Bluetooth
Source
- Communicate with Arduino
- SoftwareSerial Example
- Bluetooth Module HC-06
- Create an application using App Inventor 2
Find other examples and tutorials in our Automatic code generator
Code Architect