
When dealing with several servomotors and an extra number of outputs is needed to operate your robot (to control Hexana, for instance), a practical solution is to use a serial controller such as the Mini Maestro from Pololu.
Prerequisite: Programming with Arduino, Communicate with Arduino, Control a servo with Arduino
Material
- Computer
- Arduino UNO
- USB cable to connect board to computer
- USB cable mini B to connect Maestro to computer
- 3x jumper cable M/M
- Serial Controller Mini Maestro x1
- 1 or several servomoteurs
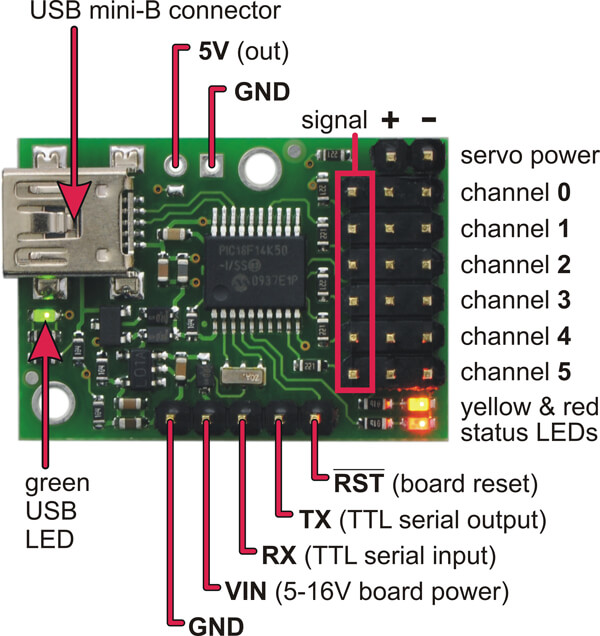
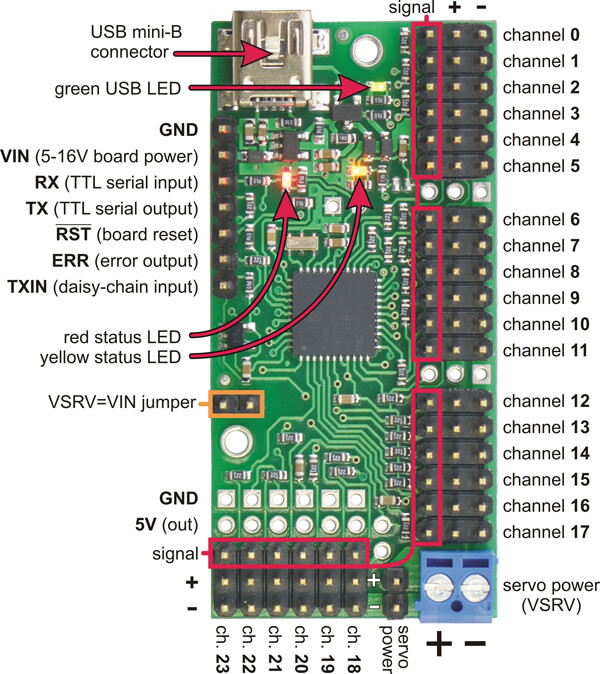
Overview of the serial controller Maestro
When several motors are used in a project, usually the number of outputs needed exceed the capacity of the Arduino board. In that case, it is necessary to use a servo driver (which can control up to 32 servomotors) that communicate with Arduino using a serial port and transmit the PWM to servomotors.
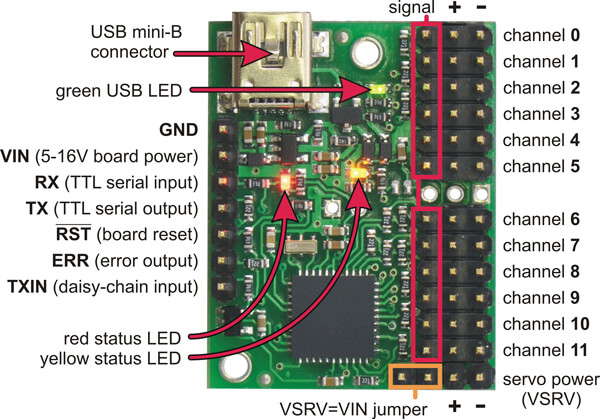
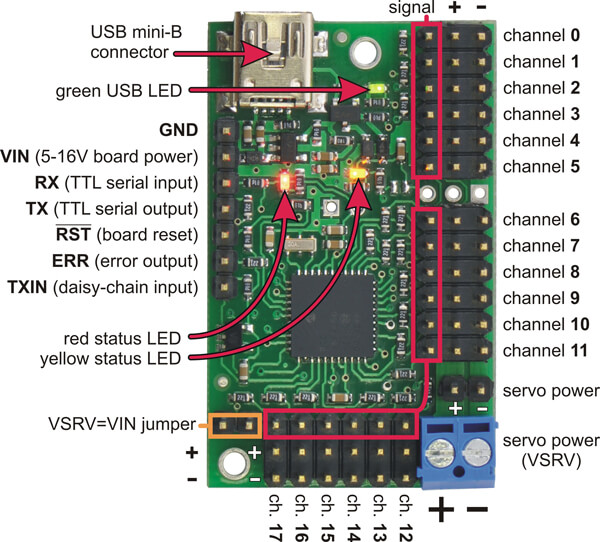
The one we used in this example is a Maestro board proposed by Pololu. It exists in different format 4,12, 18 and 24 channels.
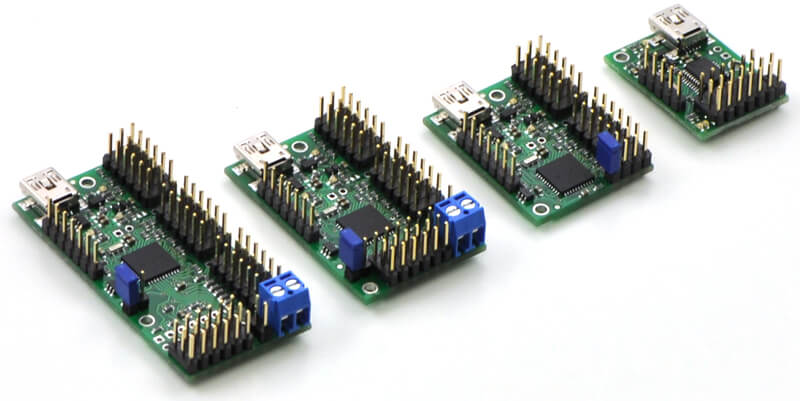

With this solution, the main board ( Arduino or Raspberry Pi) send orders to the controller (Maestro) via the serial port which apply power and commands to the servomotrs.
This presents several advantages :
- protect material by separating high power circuit from logic circuit
- reduce cost by reducing the number of input/output of the main microcontroller
- using a different board to cimmunicate with the servo driver
More information on the Serial Controller Mini Maestro on Pololu website.
Configuration and testing of the serial controller Maestro
To configure the serial controller Maestro, you need to download the drivers and software for Windows (or Linux). You can find the installation guide by following those links Windows and Linux.
Once the Maestro Control Center and drivers are installed, plug the maestro to your computer.
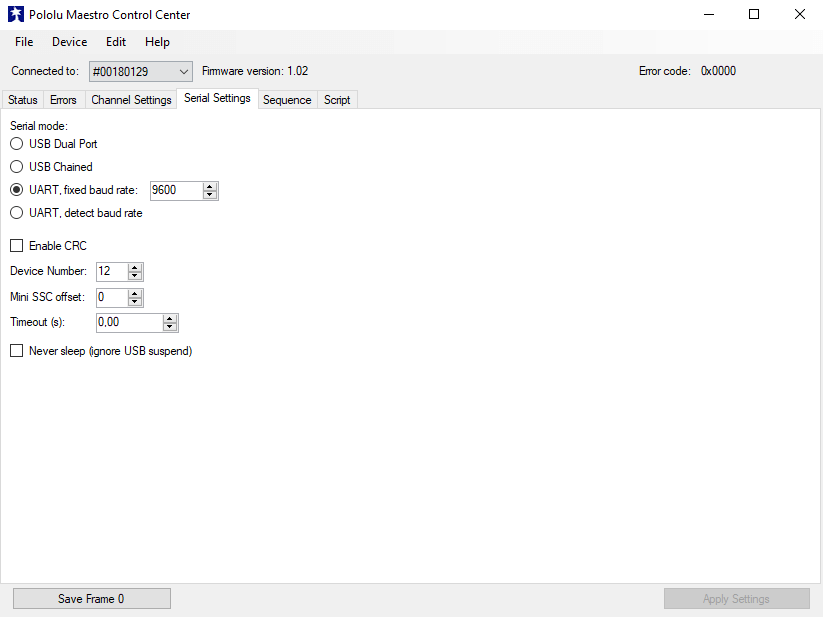
When the controller is connected, is ID will appear on the topp right side. You can find and modify the communication parameters under the tab “Serial Settings”.

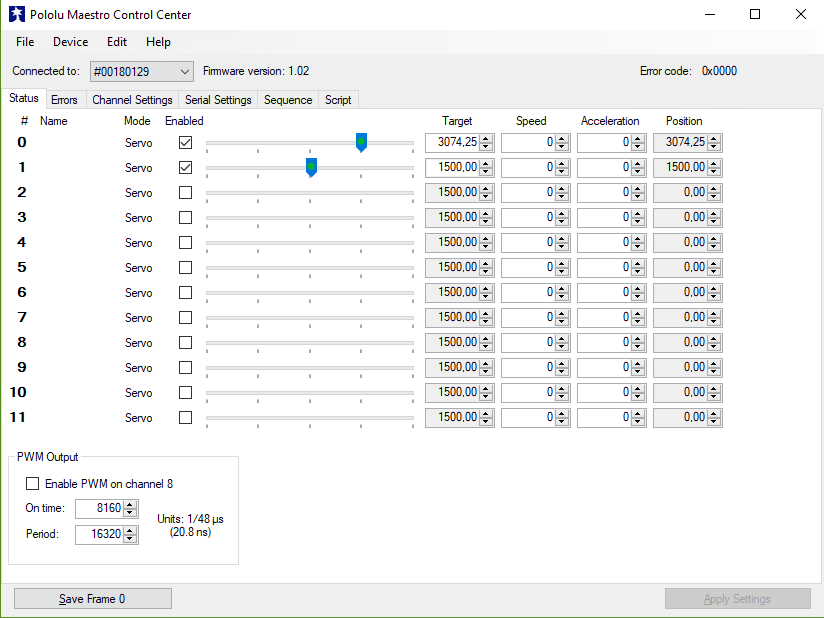
You can test the serial controller Maestro and your servomotors under the tab “Status”.Don’t forget to power your servomotors with a external power supply.

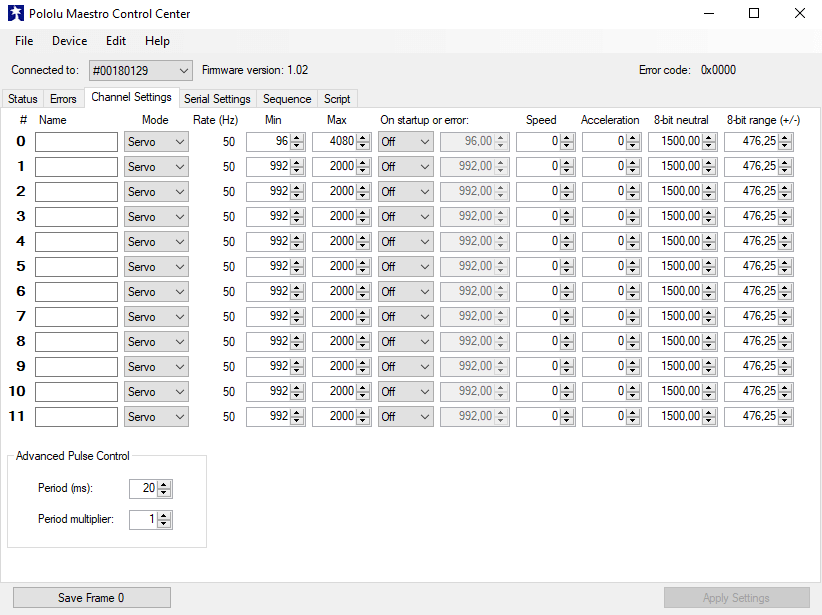
Servomotors may have different parameters. You can modify the Maestro output parameters under the tab “Channel Settings”. You need to test the parameters that are best suited for your servos.

Wiring
The Arduino can be powered with 7 to 12V power supply or via the USB port of the computer. The Maestro logic is powered with the 5V output from the Arduino and the servomotors should be powered with an external battery. If servomotors nominal voltage and battery voltage are too different you will need to use a voltage regulator (for example : A 2-cell LiPo battery supplies 7.4V whereas the nominal voltage of the servomotor SG90 is 5V).
Pins 2(Rx) and 3(Tx) are respectively connected to pins TX and RX of the serial controller Maestro.
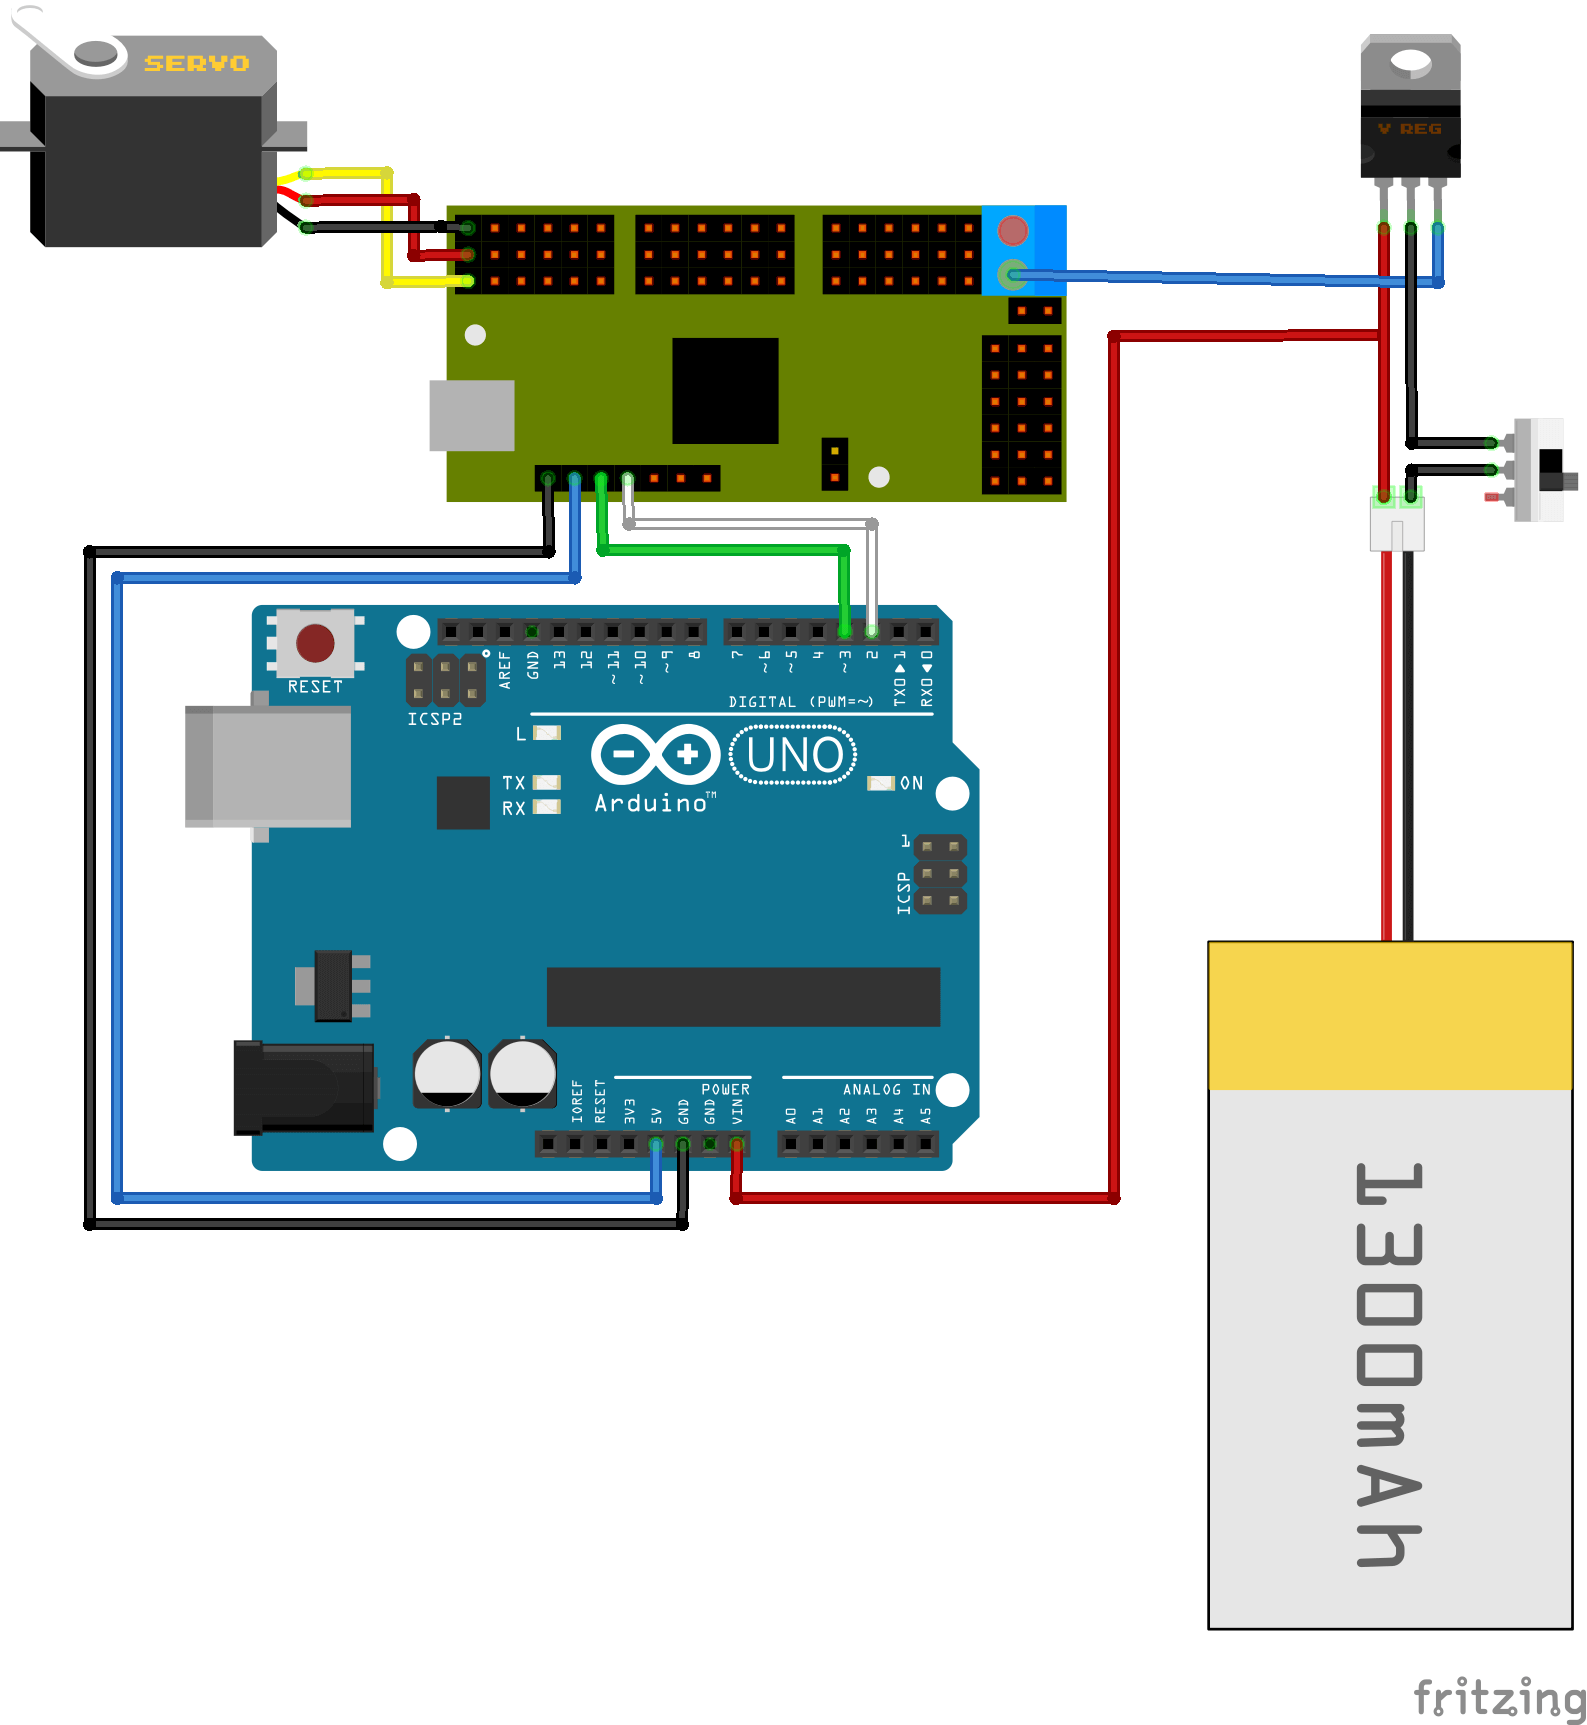

The wiring can easily be adapted to the other members of the Mini Maestro family by following the pinout schematics.


Basic code to use serial controller Maestro
To command the serial controller with an Arduino, a sequence of bytes need to be send via the serial port. The following code let the user send a position command to the several channels of a Mini Maestro with the Arduino serial monitor.
First, the serial port to communicate with the Maestro is intiliazied.
#include <Maestro.h>
Maestro maestro(2,3);
Then, we write a function that receives data from the serial monitor.
void readSerialPort(){
 while (Serial.available()) {
   delay(10);
   if (Serial.available() >0) {
     char c = Serial.read();  //gets one byte from serial buffer
     msg += c;
   }
 }
}
For practical reason, we only send one command from the monitor. A function is needed to separate the servo ID from the position value using the character “x”.
void convertMsgToCmd(){
   if (msg.length() >0) {
     Serial.println(msg);
     sep = msg.indexOf('x');
     m1 = msg.substring(0, sep); //get servo id
     m2 = msg.substring(sep+1, msg.length()); //get servo pos

     servoId=-1;
     servoPos=-1;

     char carray1[6]; //magic needed to convert string to a number
     m1.toCharArray(carray1, sizeof(carray1));
     servoId = atoi(carray1);

     char carray2[6];
     m2.toCharArray(carray2, sizeof(carray2));
     servoPos = atoi(carray2);

     msg="";
 }
}
.
Finally, we send those data to the Maestro using the Pololu protocol which is summarize by a sequence of bytes containing the protocol selection, the board ID, the command selection and the position value.
void setTarget(unsigned char servo, unsigned int target){
  /* envoie la séquence de commande au contrôleur série Maestro pour actionner le servomoteur*/
  const int deviceId = 0x0C; //controller ID 12
  const int startByte = 0xAA; // Protocol selection
  const int targetCmd = 0x04; // Command ID

  maestro.write(startByte); //start byte
  maestro.write(deviceId); //device id
  maestro.write(targetCmd); //command number
  maestro.write(servo); //servo number
  maestro.write(target & 0x7F); // Send first 4bits
  maestro.write((target >> 7) & 0x7F); // Send last 4bits
  delay(3);
}
All together, we obtain the following code:
/*----------------------------------------------------------------------------------------
 Ce programme permet de piloter différents servomoteurs à l'aide du moniteur série.
 Tapez YxZZZZ dans le terminal
 Y entre 0 et 5 pour Mini Maestro 6 voies (selon Maestro)
 ZZZZ entre 4000 et 8000 (selon servomoteur)

 Ex: Tapez 0x6000 dans le moniteur série

  Materiel:
  - 1x servomoteur ou plus
  - 1x Mini Maestro
  - 1x Arduino

 Auteur: Xavier Wiedmer
 http://www.aranacorp.com

----------------------------------------------------------------------------------------*/
#include "SoftwareSerial.h"
SoftwareSerial maestro(2,3);

String msg, m1, m2;
int sep, servoId=-1, servoPos=-1;


void setup() {
 Serial.begin(9600);
 pinMode(2, INPUT);
 pinMode(3, OUTPUT);
 maestro.begin(9600);
 Serial.println("Waiting for command (YxZZZZ): ");
}

void loop() {

 readSerialPort();
 convertMsgToCmd();

    //Apply command to servo
    if (servoId>=0 && servoPos>=0 && servoId<18 && servoPos>=500 && servoPos<=10000) {

       setTarget(servoId, servoPos);
       Serial.print("Command ");
       Serial.print(servoPos);
       Serial.print( " sent ");
       Serial.print("to servo ");
       Serial.println(servoId);

   servoId=-1;
   servoPos=-1;
   Serial.println("Waiting for command ... ");
 }
}

void setTarget(unsigned char servo, unsigned int target){
  /* envoie la séquence de commande au contrôleur série Maestro pour actionner le servomoteur*/
  const int deviceId = 0x0C; //controller ID 12
  const int startByte = 0xAA; // Protocol selection
  const int targetCmd = 0x04; // Command ID

  maestro.write(startByte); //start byte
  maestro.write(deviceId); //device id
  maestro.write(targetCmd); //command number
  maestro.write(servo); //servo number
  maestro.write(target & 0x7F); // Send first 4bits
  maestro.write((target >> 7) & 0x7F); // Send last 4bits
  delay(3);
}

void readSerialPort(){
  /*Permet de lire une commande provenant du terminal Arduino*/
 while (Serial.available()) {
   delay(10);
   if (Serial.available() >0) {
     char c = Serial.read();  //gets one byte from serial buffer
     msg += c;
   }
 }
}

void convertMsgToCmd(){
  /*convertit le message provenant du terminal en commande à envoyer au contrôleur série*/
   if (msg.length() >0) {
     Serial.println(msg);
     sep = msg.indexOf('x');
     // expect a string like 0x0021 containing the two servo positions
     m1 = msg.substring(0, sep); //get servo id
     m2 = msg.substring(sep+1, msg.length()); //get servo pos

     servoId=-1;
     servoPos=-1;

     char carray1[6]; //magic needed to convert string to a number
     m1.toCharArray(carray1, sizeof(carray1));
     servoId = atoi(carray1);

     char carray2[6];
     m2.toCharArray(carray2, sizeof(carray2));
     servoPos = atoi(carray2);

     msg="";
 }
}
Library to manage serial controller Maestro
When using Maestro boards in several projects, the communication rules rules can be easily implemented in a library to be reused in all your projects (more info here https://www.pololu.com/docs/0J40/all). You can either write your own library or use the one written by Ryan Mulligan on Github.
To create a library, we need to write two files and save thel under Documents\Arduino\libraries\Maestro.
File Maestro.h
/*****************************************************************\
* Library header : Maestro.h
* Author : X.Wiedmer
* Version : v00
* Date : 05/03/2015
* Revision :
*   v01 - 05/03/2015
* Description :
* Library to setup Maestro board
* www.aranacorp.com
\*****************************************************************/

#ifndef Maestro_h
#define Maestro_h
// Libraries
#include "Arduino.h"
#include "SoftwareSerial.h"

/******************************************************************\
* CLASS DESCRIPTION
\******************************************************************/
class Maestro
{
  public:
    Maestro(int pinRx, int pinTx);
	 //~Maestro();
    void setTarget(unsigned char servo, unsigned int target);
    void stop(unsigned char servo);
    void begin(unsigned int baudrate);

  private:
    int _pinRx;
    int _pinTx;
    int _id;
    SoftwareSerial *_maestroSerial;
};

#endif
File Maestro.cpp
/*****************************************************************\
* Library : Maestro.cpp
* Author : X.Wiedmer
* Version : v00
* Date : 05/03/2015
* Revision :
* 	v01 - 05/03/2015
* Description :
* Library to setup Maestro board
* www.aranacorp.com
\*****************************************************************/

//Libraries
#include "Arduino.h"
#include "Maestro.h"
#include "SoftwareSerial.h"

// Parameters
#define DELAY_WRITE 3
//set up maestro configuration
#define deviceId 0x0C //12
#define startByte 0xAA //
// Command list
#define targetCmd 0x04 //


/******************************************************************\
* PRIVATE FUNCTION: Constructor
*
* PARAMETERS:
* ~ void
*
* DESCRIPTIONS:
* object constructor
\******************************************************************/
Maestro::Maestro(int pinRx, int pinTx)
{
  pinMode(pinRx, INPUT);
  pinMode(pinTx, OUTPUT);
  _pinRx = pinRx;
  _pinTx = pinTx;
  _maestroSerial = new SoftwareSerial(pinRx,pinTx);
}

/******************************************************************\
* PRIVATE FUNCTION: begin
*
* PARAMETERS:
* ~ baudrate (serial port speed)
*
* DESCRIPTIONS:
* Initialize serial port
\******************************************************************/
void Maestro::begin(unsigned int baudrate)
{
  _maestroSerial->begin(baudrate);
}
/******************************************************************\
* PRIVATE FUNCTION: setTarget
*
* PARAMETERS:
* ~ servo ID number, target specified with integer
*
* DESCRIPTIONS:
* Send sequence of command so that the maestro board send the right
* pwm value to set servo to the desired position
\******************************************************************/
void Maestro::setTarget(unsigned char servo, unsigned int target)
{
  _maestroSerial->write(startByte); //start byte
  _maestroSerial->write(deviceId) ; //device id
  _maestroSerial->write(targetCmd); //command number
  _maestroSerial->write(servo); //servo number
  _maestroSerial->write(target & 0x7F); // Send first 4bits
  _maestroSerial->write((target >> 7) & 0x7F); // Send last 4bits
  delay(DELAY_WRITE);
}

/******************************************************************\
* PRIVATE FUNCTION: stop
*
* PARAMETERS:
* ~ servo ID number
*
* DESCRIPTIONS:
* Send sequence of command so that the maestro send nothing to the
* the servo
\******************************************************************/
void Maestro::stop(unsigned char servo)
{
  _maestroSerial->write(startByte); //start byte
  _maestroSerial->write(deviceId) ; //device id
  _maestroSerial->write(targetCmd); //command number
  _maestroSerial->write(servo); //servo number
  _maestroSerial->write((byte)0x00); // Send first 4bits
  _maestroSerial->write((byte)0x00); // Send last 4bits
  delay(DELAY_WRITE);
}
Which yields to the following code:
/*----------------------------------------------------------------------------------------
 Ce programme permet de piloter différents servomoteurs à l'aide du moniteur série.
 Tapez YxZZZZ dans le terminal
 Y entre 0 et 5 pour Mini Maestro 6 voies (selon Maestro)
 ZZZZ entre 4000 et 8000 (selon servomoteur)

 Ex: Tapez 0x6000 dans le moniteur série

  Materiel:
  - 1 servomoteur ou plus
  - 1x Mini Maestro
  - 1x Arduino

 Auteur: Xavier Wiedmer
 http://www.aranacorp.com

----------------------------------------------------------------------------------------*/

#include <Maestro.h>
Maestro maestro(2,3);

String msg, m1, m2;
int sep, servoId=-1, servoPos=-1;

/************** Main Program **************/
void setup() {
 Serial.begin(9600);
 maestro.begin(9600);
 Serial.println("Waiting for command (YxZZZZ): ");
}

void loop() {

 readSerialPort();
 convertMsgToCmd();

    //Apply command to servo
    if (servoId>=0 && servoPos>=0 && servoId<18 && servoPos>=500 && servoPos<=10000) {

       maestro.setTarget(servoId, servoPos);
       Serial.print("Command ");
       Serial.print(servoPos);
       Serial.print( " sent ");
       Serial.print("to servo ");
       Serial.println(servoId);

   servoId=-1;
   servoPos=-1;
   Serial.println("Waiting for command ... ");
 }
}

/************** Functions **************/
void readSerialPort(){
 while (Serial.available()) {
   delay(10);
   if (Serial.available() >0) {
     char c = Serial.read();  //gets one byte from serial buffer
     msg += c;
   }
 }
}

void convertMsgToCmd(){
   if (msg.length() >0) {
     Serial.println(msg);
     sep = msg.indexOf('x');

     m1 = msg.substring(0, sep); //get servo id
     m2 = msg.substring(sep+1, msg.length()); //get servo pos

     servoId=-1;
     servoPos=-1; //declare as number

     char carray1[6]; //magic needed to convert string to a number
     m1.toCharArray(carray1, sizeof(carray1));
     servoId = atoi(carray1);

     char carray2[6];
     m2.toCharArray(carray2, sizeof(carray2));
     servoPos = atoi(carray2);

     msg="";
 }
}
Do not hesitate to leave a comment or write a message if you have any issue regarding your serial controller.
Applications
- Control multi-legged robot such as quadripode, hexapode or octopode
Sourcesces
- Arduino servo reference
- maestro user guide
- Learn to use the serial port of Arduino
Find other examples and tutorials in our Automatic code generator
Code Architect