
In some projects, it may be interesting to establish I2C communication between Raspberry Pi and Arduino. The computing power and wireless functionality of the Raspberry Pi coupled with the input/output capability of the Arduino, results in a complete control system to drive any project. If the Raspberry Pi card and the Arduino card are in close proximity, the I2C bus is a good choice of communication protocol. This also makes it possible to add several devices on the same bus and increase the capabilities of the RaspberryPi tenfold.
Prerequisites: I2C communication with Arduino, Remote access to Raspberry Pi with VNC
Matériel
- Computer
- Arduino UNO x1
- Raspberry Pi 3B+
- Jumper cables x3
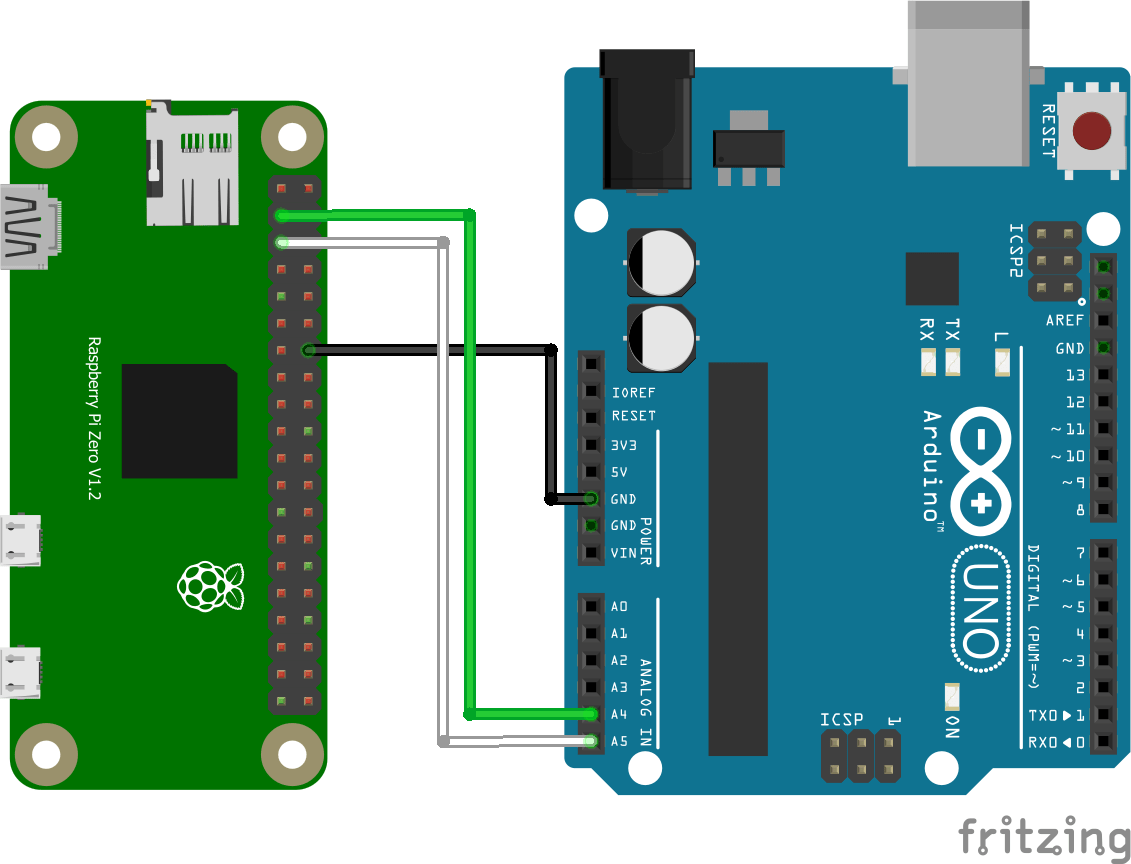
Schematics
To establish I2C communication between Raspberry Pi and Arduino, we need to physically connect the bus which uses 3 pins. An I2C communication is defined by a two-wire bus (sometimes called TWI, Two Wire Interface) and an address. The pins used for I2C communication are usually fixed for each device. One is the Serial Data Line (SDA) and the other synchronization clock (SLC Serial Clock Line). The grounds of the two cards must be connected to establish a common potential reference.
- SDA BCM2(RPI) <-> SDA A4(Arduino)
- SCL BCM3(RPI) <-> SCL A5(Arduino)
- GND (RPI) <-> GND(Arduino)

Raspberry Pi Configuration
To use the Raspberry Pi’s I2C interface, it must be enabled in the configuration menu. To do this enter the following command in a terminal:
sudo raspi-config
In the menu, select “5 – Interfacing Options” then “P5 I2C” and validate.
Once the connection has been made, you can check the devices connected to the bus by typing the command in the terminal:
i2cdetect -y 1
The Raspberry Pi returns the list of addresses detected on the bus.
pi@raspberrypi:~ $ i2cdetect -y 1
     0  1  2  3  4  5  6  7  8  9  a  b  c  d  e  f
00:          -- -- -- -- -- -- -- -- 0b -- -- -- --
10: -- -- -- -- -- -- -- -- -- -- -- -- -- -- -- --
20: -- -- -- -- -- -- -- -- -- -- -- -- -- -- -- --
30: -- -- -- -- -- -- -- -- -- -- -- -- -- -- -- --
40: -- -- -- -- -- -- -- -- -- -- -- -- -- -- -- --
50: -- -- -- -- -- -- -- -- -- -- -- -- -- -- -- --
60: -- -- -- -- -- -- -- -- -- -- -- -- -- -- -- --
70: -- -- -- -- -- -- -- --
We are going to install the smbus2 library which allows to manage I2C communication on the Raspberry Pi side.
pip3 install smbus2Code
Master Code Python
In this tutorial, we will use the Python language on the Raspberry Pi side. The library used to manage I2C communication is the smbus2 library.
#!/usr/bin/env python
# -*- coding: utf-8 -*-
# Raspberry Pi to Arduino I2C Communication
#i2cdetect -y 1

#library
import sys
import smbus2 as smbus#,smbus2
import time

# Slave Addresses
I2C_SLAVE_ADDRESS = 11 #0x0b ou 11
I2C_SLAVE2_ADDRESS = 12
I2C_SLAVE3_ADDRESS = 13

# This function converts a string to an array of bytes.
def ConvertStringsToBytes(src):
  converted = []
  for b in src:
    converted.append(ord(b))
  return converted

def main(args):
    # Create the I2C bus
    I2Cbus = smbus.SMBus(1)
    with smbus.SMBus(1) as I2Cbus:
        slaveSelect = input("Which Arduino (1-3): ")
        cmd = input("Enter command: ")

        if slaveSelect == "1":
            slaveAddress = I2C_SLAVE_ADDRESS
        elif slaveSelect == "2":
            slaveAddress = I2C_SLAVE2_ADDRESS
        elif slaveSelect == "3":
            slaveAddress = I2C_SLAVE3_ADDRESS
        else:
            # quit if you messed up
            print(slaveSelect== "1")
            print(type(slaveSelect))
            print("no slave selected")
            quit()
        BytesToSend = ConvertStringsToBytes(cmd)
        print("Sent " + str(slaveAddress) + " the " + str(cmd) + " command.")
        print(BytesToSend )
        I2Cbus.write_i2c_block_data(slaveAddress, 0x00, BytesToSend)
        time.sleep(0.5)

        while True:
            try:
                data=I2Cbus.read_i2c_block_data(slaveAddress,0x00,16)
                print("recieve from slave:")
                print(data)
            except:
                print("remote i/o error")
                time.sleep(0.5)
    return 0

if __name__ == '__main__':
     try:
        main(sys.argv)
     except KeyboardInterrupt:
        print("program was stopped manually")
     input()
Slave Code Arduino
The library used to manage I2C communication on the Arduino side is the Wire.h library.
#include <Wire.h>

# define I2C_SLAVE_ADDRESS 11 // 12 pour l'esclave 2 et ainsi de suite

#define PAYLOAD_SIZE 2

void setup()
{
  Wire.begin(I2C_SLAVE_ADDRESS);
  Serial.begin(9600);
  Serial.println("-------------------------------------I am Slave1");
  delay(1000);
  Wire.onRequest(requestEvents);
  Wire.onReceive(receiveEvents);
}

void loop(){}

int n = 0;

void requestEvents()
{
  Serial.println(F("---> recieved request"));
  Serial.print(F("sending value : "));
  Serial.println(n);
  Wire.write(n);
}

void receiveEvents(int numBytes)
{
  Serial.println(F("---> recieved events"));
  n = Wire.read();
  Serial.print(numBytes);
  Serial.println(F("bytes recieved"));
  Serial.print(F("recieved value : "));
  Serial.println(n);
}
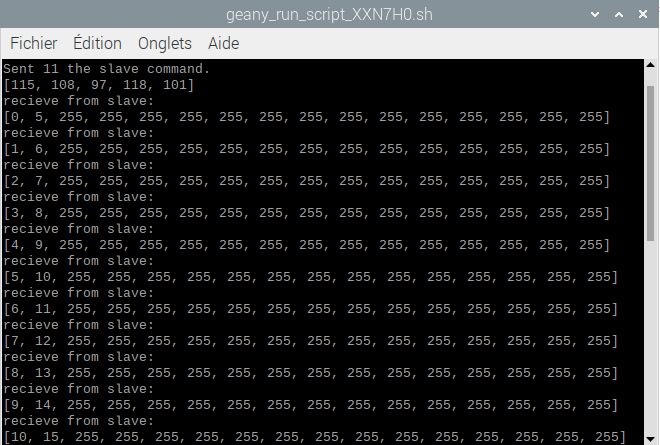
Results
The Raspberry Pi sends the “slave” command to the Arduino, then receives an array of data from the Arduino.

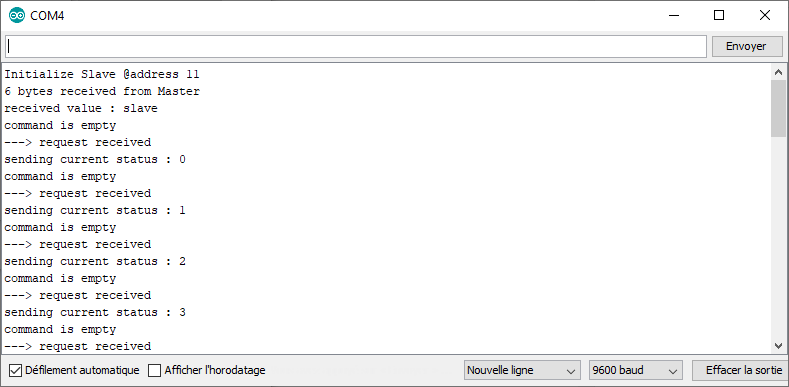
The Arduino receives the “slave” command then sends two updated values as soon as it receives a request from the Raspberry Pi

Application
- Visual recognition managed by the Raspberry Pi, actuators and sensors managed by the Arduino
Sources
Find other examples and tutorials in our Automatic code generator
Code Architect