
There are different ways to communicate with a system. One of the most used, especially with television, is the infrared remote control. We will see how to drive an Arduino using a receiver and an IR remote control.
In this tutorial, we use an IR remote control commonly sold in Arduino kits
Prerequisite: Give senses to your robot
Equipment
- Computer
- Arduino board
- USB cable or serial / USB adapter to connect the Arduino board to the PC
- 1x IR remote control
- 1x IR receiver
- 3x Dupont cables
Principle of operation
An infrared remote control, as the name suggests, uses light to send commands between the transmitter and the receiver. The transmitter consisting of a diode emits infrared rays which travel in the air. These signals are then received by a photodiode, which is capable of transforming the light signal it receives into an electrical signal.
Communication by infrared is limited in distance to a few meters and must be direct, i.e. no object must be in the path of the light signal. It can also be disturbed by neon lights or the sun’s rays.
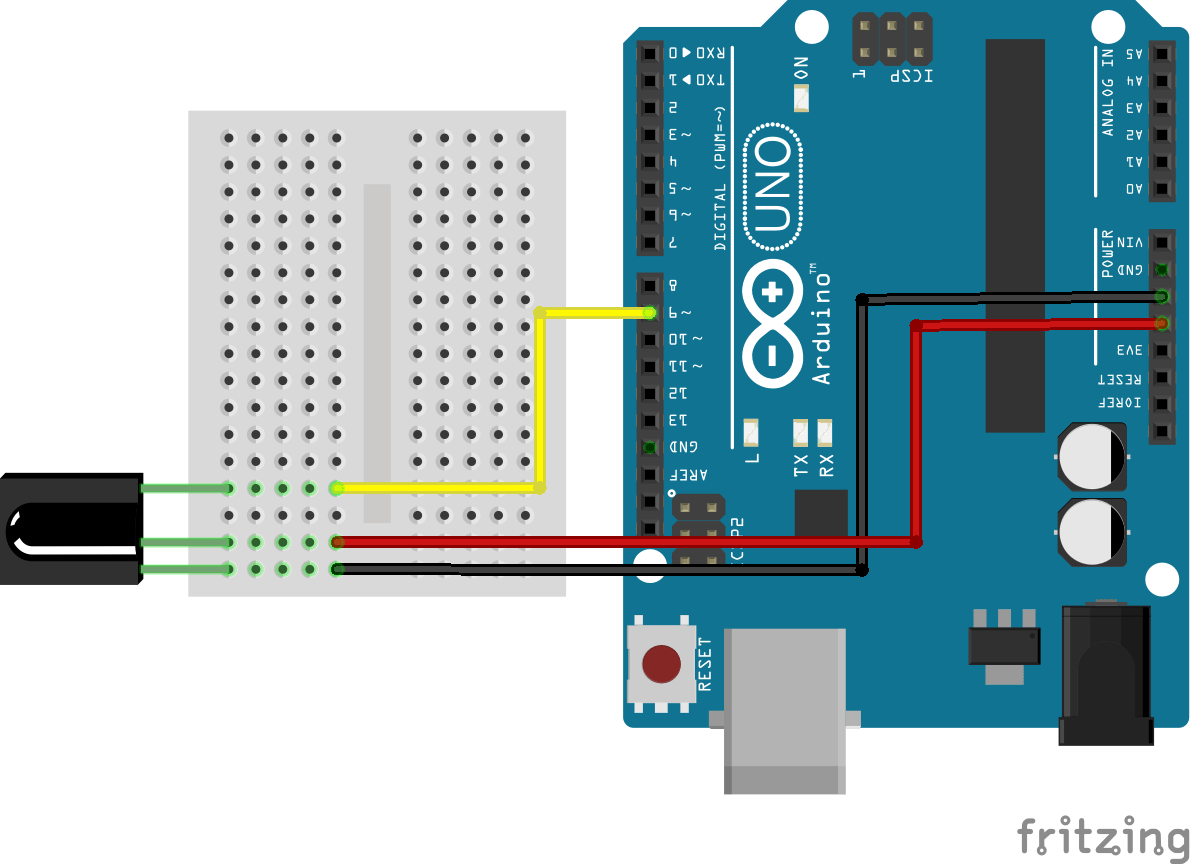
Diagram
The IR receiver is a sensor capable of receiving infrared waves. To read the sensor, it must be supplied with the 5V output from the Arduino and read the signal obtained using a digital input. Here, pin 9.

Code
To decode, the information coming from the remote control we will use the IRremote.h library. It will allow us to detect which button is pressed. Each button corresponds to a hexadecimal code which must be identified for each IR remote control. The following code displays the hexadecimal value when a button is pressed, allowing you to configure your code according to the remote control.
//Library
#include "IRremote.h"

//Variable
int receiverPin = 9;
IRrecv irrecv(receiverPin);
decode_results results;

void setup(){
  Serial.begin(9600);
  Serial.println(F("IR Receiver Decoder"));
  irrecv.enableIRIn(); // Start the receiver
}

void loop() {
  if (irrecv.decode(&results)){ // IR signal received?
    convertIR();
    irrecv.resume(); // receive the next value
  }
}


void convertIR() // convert IR code
{
 Serial.print(results.value);
 Serial.print(F(" -> "));
  switch(results.value)
  {
  case 0xFFA25D: Serial.println(F("POWER")); break;
  case 0xFFE21D: Serial.println(F("FUNC/STOP")); break;
  case 0xFF629D: Serial.println(F("VOL+")); break;
  case 0xFF22DD: Serial.println(F("FAST BACK"));    break;
  case 0xFF02FD: Serial.println(F("PAUSE"));    break;
  case 0xFFC23D: Serial.println(F("FAST FORWARD"));   break;
  case 0xFFE01F: Serial.println(F("DOWN"));    break;
  case 0xFFA857: Serial.println(F("VOL-"));    break;
  case 0xFF906F: Serial.println(F("UP"));    break;
  case 0xFF9867: Serial.println(F("EQ"));    break;
  case 0xFFB04F: Serial.println(F("ST/REPT"));    break;
  case 0xFF6897: Serial.println(F("0"));    break;
  case 0xFF30CF: Serial.println(F("1"));    break;
  case 0xFF18E7: Serial.println(F("2"));    break;
  case 0xFF7A85: Serial.println(F("3"));    break;
  case 0xFF10EF: Serial.println(F("4"));    break;
  case 0xFF38C7: Serial.println(F("5"));    break;
  case 0xFF5AA5: Serial.println(F("6"));    break;
  case 0xFF42BD: Serial.println(F("7"));    break;
  case 0xFF4AB5: Serial.println(F("8"));    break;
  case 0xFF52AD: Serial.println(F("9"));    break;
  case 0xFFFFFFFF: Serial.println(F(" REPEAT"));break;
  default:
    Serial.println(F(" unknown  "));

  }
  delay(500);
}
Application
One of the best known applications is to control the color of an RGB LED using a remote control. For each button on the remote control we will match a color. It is possible to use the other buttons to perform another action such as lowering / increasing the brightness or flashing the LED.


//Library
#include "IRremote.h"

//Constant
const int receiverPin = 9;
#define ledRPin 11
#define ledGPin 5
#define ledBPin 6

//Variable
int power=50;
bool ledState=0;
IRrecv irrecv(receiverPin);
decode_results results;

void setup(){
  Serial.begin(9600);
  Serial.println(F("IR Receiver Decoder"));
  irrecv.enableIRIn(); // Start the receiver
  pinMode(ledRPin,OUTPUT);
  pinMode(ledGPin,OUTPUT);
  pinMode(ledBPin,OUTPUT);
  lightRGB(255,0,0);
}

void loop()   /*----( LOOP: RUNS CONSTANTLY )----*/
{
  if (irrecv.decode(&results)){ // IR signal received?
    convertIR();
    irrecv.resume(); // receive the next value
  }
}


void convertIR() // convert IR code
{
 Serial.print(results.value);
 Serial.print(F(" -> "));
  switch(results.value)
  {
  case 0xFFA25D:
    Serial.print(F("POWER "));
    ledState=!ledState;
    Serial.print(ledState);
    if(!ledState) lightRGB(0,0,0);
    break;
  case 0xFFE21D: Serial.print(F("FUNC/STOP")); break;
  case 0xFF629D:
    Serial.print(F("VOL+ power:"));
    power=power+10;
    power=min(power,100);
    Serial.print(power);
    break;

  case 0xFFA857:
    Serial.print(F("VOL- power:"));
    power=power-10;
    power=max(power,0);
    Serial.print(power);
    break;

  case 0xFF22DD: Serial.print(F("FAST BACK"));    break;
  case 0xFF02FD: Serial.print(F("PAUSE"));    break;
  case 0xFFC23D: Serial.print(F("FAST FORWARD"));   break;
  case 0xFFE01F: Serial.print(F("DOWN"));    break;
  case 0xFF906F: Serial.print(F("UP"));    break;
  case 0xFF9867: Serial.print(F("EQ"));    break;
  case 0xFFB04F: Serial.print(F("ST/REPT"));    break;
  case 0xFF6897:
    Serial.print(F("0"));
    if(ledState) lightRGB(255,255,255);
    break;
  case 0xFF30CF:
    Serial.print(F("1"));
    if(ledState) lightRGB(255,0,0);
    break;
  case 0xFF18E7: Serial.print(F("2"));
    if(ledState) lightRGB(0,255,0);
    break;
  case 0xFF7A85: Serial.print(F("3"));
    if(ledState) lightRGB(0,0,255);
    break;
  case 0xFF10EF: Serial.print(F("4"));
    if(ledState) lightRGB(255,55,55);
    break;
  case 0xFF38C7: Serial.print(F("5"));
    if(ledState) lightRGB(55,255,55);
    break;
  case 0xFF5AA5: Serial.print(F("6"));
    if(ledState) lightRGB(55,55,255);
    break;
  case 0xFF42BD: Serial.print(F("7"));
    if(ledState) lightRGB(255,255,55);
    break;
  case 0xFF4AB5: Serial.print(F("8"));
    if(ledState) lightRGB(255,55,255);
    break;
  case 0xFF52AD: Serial.print(F("9"));
    if(ledState) lightRGB(55,255,255);
    break;
  case 0xFFFFFFFF: Serial.print(F(" REPEAT"));break;
  default:
    Serial.print(F(" unknown  "));
    lightRGB(0,0,0);
  }
  Serial.println();
  delay(500);
}

void lightRGB(int r, int g, int b){
  if(0){
    r=255-r;
    g=255-g;
    b=255-b;
  }
  analogWrite(ledRPin, r*power/100);
  analogWrite(ledGPin, g*power/100);
  analogWrite(ledBPin, b*power/100);
}
Sources
Find other examples and tutorials in our Automatic code generator
Code Architect