

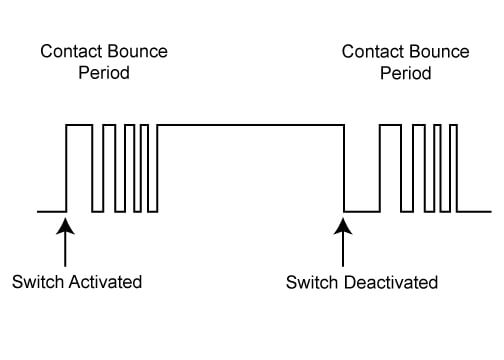
Anti-bounce or debouncing logic prevents the detection of parasitic changes of state of a sensor. When using sensors returning discrete states, such as a push button, it can happen, for mechanical or other reasons, that changes of state are detected that do not correspond to what we want to detect. We can improve the reliability of these measurements by using anti-bounce logic which we will see in this tutorial.
Hardware
- Computer
- Arduino UNO
- USB cable A Male to B Male
- A push button (or other on/off sensor)
Principle of operation
When a physical system changes state, there are often oscillations during the transition period for physical reasons (mechanical, response time, etc.). Sufficient time must therefore be allowed for the state to stabilise. This can be made possible by electronic or mechanical filtering or digitally through the programme processing the measurement.
Schematic
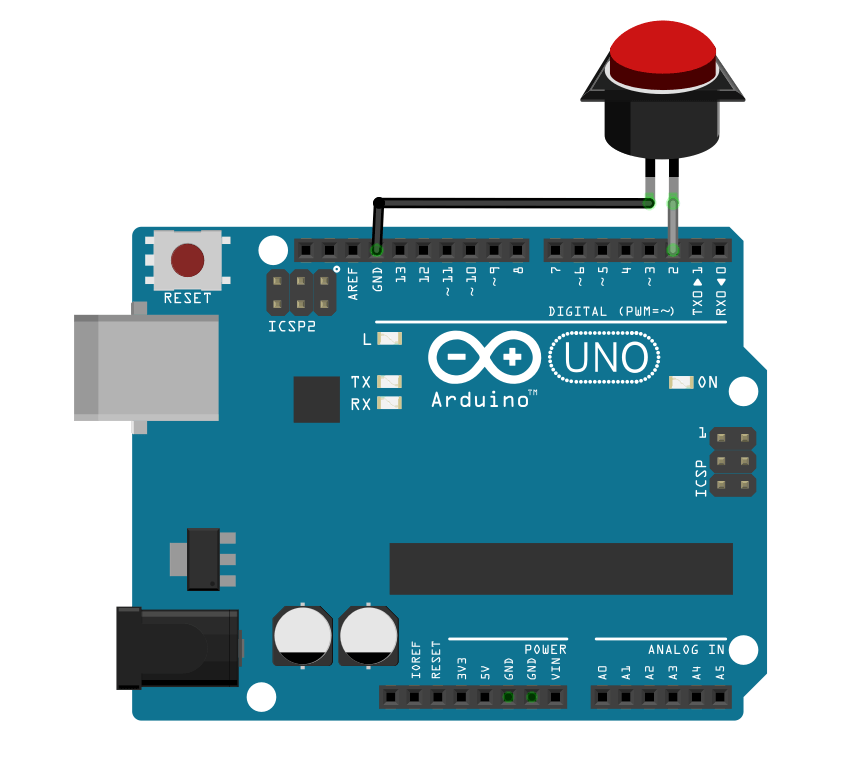
The anti-bounce strategy can be used to improve the detection of the state of a button for example. To test the code, we place a button between pins GND and 2.

Code
We are going to create two variables that will keep in memory the present and past state of the sensor. We are going to read the digital input and validate its state according to the previous state and an anti-bounce delay. This method can be implemented with the delay() function but the use of the millis() function is cleaner and more adequate.
//Parameters
const int didPin  = 2;

//Variables
bool didStatus  = false;
bool oldDidStatus  = false;
unsigned long lastDebounceTime  = 0;
unsigned long debounceDelay  = 50;

void setup() {
  //Init Serial USB
  Serial.begin(9600);
  Serial.println(F("Initialize System"));
  //Init digital input
  pinMode(didPin, INPUT_PULLUP);
}

void loop() {
  debounceDid();
}

void debounceDid( ) { /* function debounceDid */
  ////debounce DigitalDebounce
  int reading = digitalRead(didPin);
  if (reading != oldDidStatus) {
    lastDebounceTime = millis();
  }
  if ((millis() - lastDebounceTime) > debounceDelay) {
    if (reading != didStatus) {
      didStatus = reading;
      Serial.print(F("Sensor state : ")); Serial.println(didStatus);
    }
  }
  oldDidStatus = reading;
}
Result
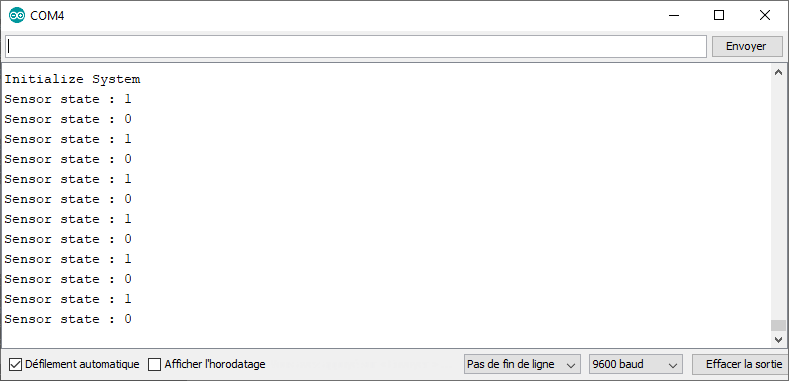
If you vary the debounceDelay parameter, you can see the effect of the anti-bounce logic on the button state. By taking a sufficiently long time, the measurement becomes reliable and there is only one change of state per press.

This tutorial helps to understand and implement the anti-bounce logic. For ease of use, you can write a library or use an existing library like OneButton.h.
Applications
Sources
Find other examples and tutorials in our Automatic code generator
Code Architect