

The Arduino Due board allows multitasking using the Scheduler library. It is based on an ARM Cortex-M3 microcontroller in 32 Bits with 84MHz. It is therefore much more powerful than an Arduino UNO. These characteristics allow it to create more powerful multitasking algorithms. We will see here how to use the Scheduler library which allows to use several loop() functions.
Material
- Arduino Due
- USB A Male / Micro B Male Cable
Description
The Scheduler library allows a microcontroller based on a SAM architecture, such as Arduino Due or the Arduino Zero, to perform several actions without interrupting each other. The library allows to arrange the tasks so that the microprocessor switches from one to another without having to create a dedicated timer. Like other Arduino microcontrollers, the Arduino Due does not allow true multithreading but, thanks to its clock rate, it gives the impression of running tasks in parallel.
Code
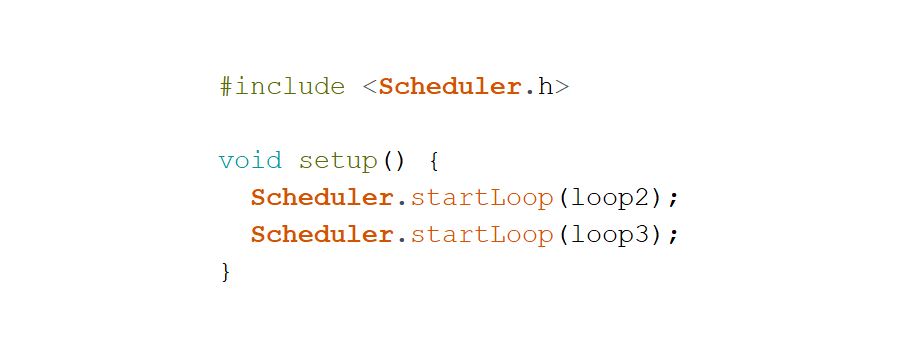
In this code, we will create several loop functions that will run in parallel. To initialize each loop function we use the startLoop command:
  Scheduler.startLoop(loop2);
  Scheduler.startLoop(loop3);
It is worth noting that the delay() function allows another task to be activated. If there is no delay function in one of the loop functions, then the yield() function must be used in order to hand over to the next task.
#include <Scheduler.h>

int counter=0;

void setup() {
  Serial.begin(9600);

  Scheduler.startLoop(loop2);
  Scheduler.startLoop(loop3);
}

void loop() {
  Serial.println(F(" Action 1 LED : HIGH"));
  digitalWrite(13, HIGH);
  delay(500);
  Serial.println(F(" Action 1 LED : LOW"));
  digitalWrite(13, LOW);
  delay(500);
}

void loop2() {
  if(counter<25) {
    counter++;
    Serial.print(F(" Action 2 counter : "));Serial.println(counter);
  }

  delay(100);
}

void loop3() {
  if(counter>=25){

    for(counter;counter>=0;counter--){
      Serial.print(F(" Action 3 Reset counter : "));Serial.println(counter);
    }
  }
  yield();
}
The Arduino Due and the library allow us to simply create functions that will run in parallel and that do not require additional management of the real-time scheduling of tasks such as the creation of timers.
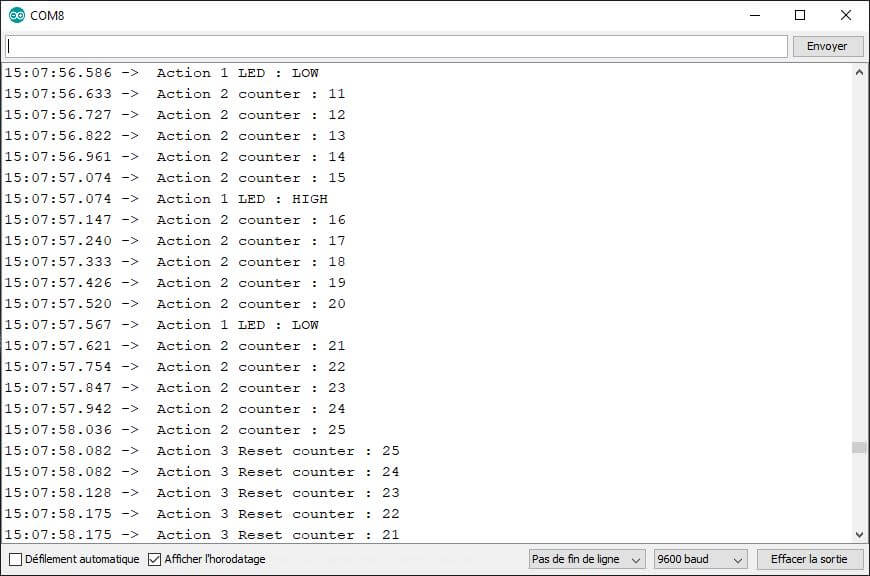
Result
Once the program is launched, we observe the tasks running in an orderly fashion.

Once this code is functional, you can modify it to suit your needs. The Scheduler library allows, for example, to assign a loop function to the management of sensors, motors or even to serial communication.
Sources
Retrouvez nos tutoriels et d’autres exemples dans notre générateur automatique de code
La Programmerie