

One element that displays the most used in the world is information Arduino liquid crystal display (Liquid Crystal Display) LCD 16×2. When an electronic system is made, it may be interesting as it gives us some information about his condition without having to connect to a computer or to connect to another system such as a smartphone. The LCD 16×02 comes with many Arduino kit is sufficient for many applications.
Hardware
- Computer
- ArduinoUNO
- USB A/B
- LCD16x2
- Cables smith x8
Operating principle
Liquid crystal displays use liquid crystal light modulation property. Liquid crystal displays are composed of two layers of polarizers with perpendicular directions of polarisaton sandwiching two glass plates between which the liquid crystals are placed. On the glass sheets is a matrix of electrodes for each pixel. A voltage applied between the electrodes of a pixel causes a change in orientation of the molecules and therefore the transparency of the pixel which can then let the light from the backlight pass through.

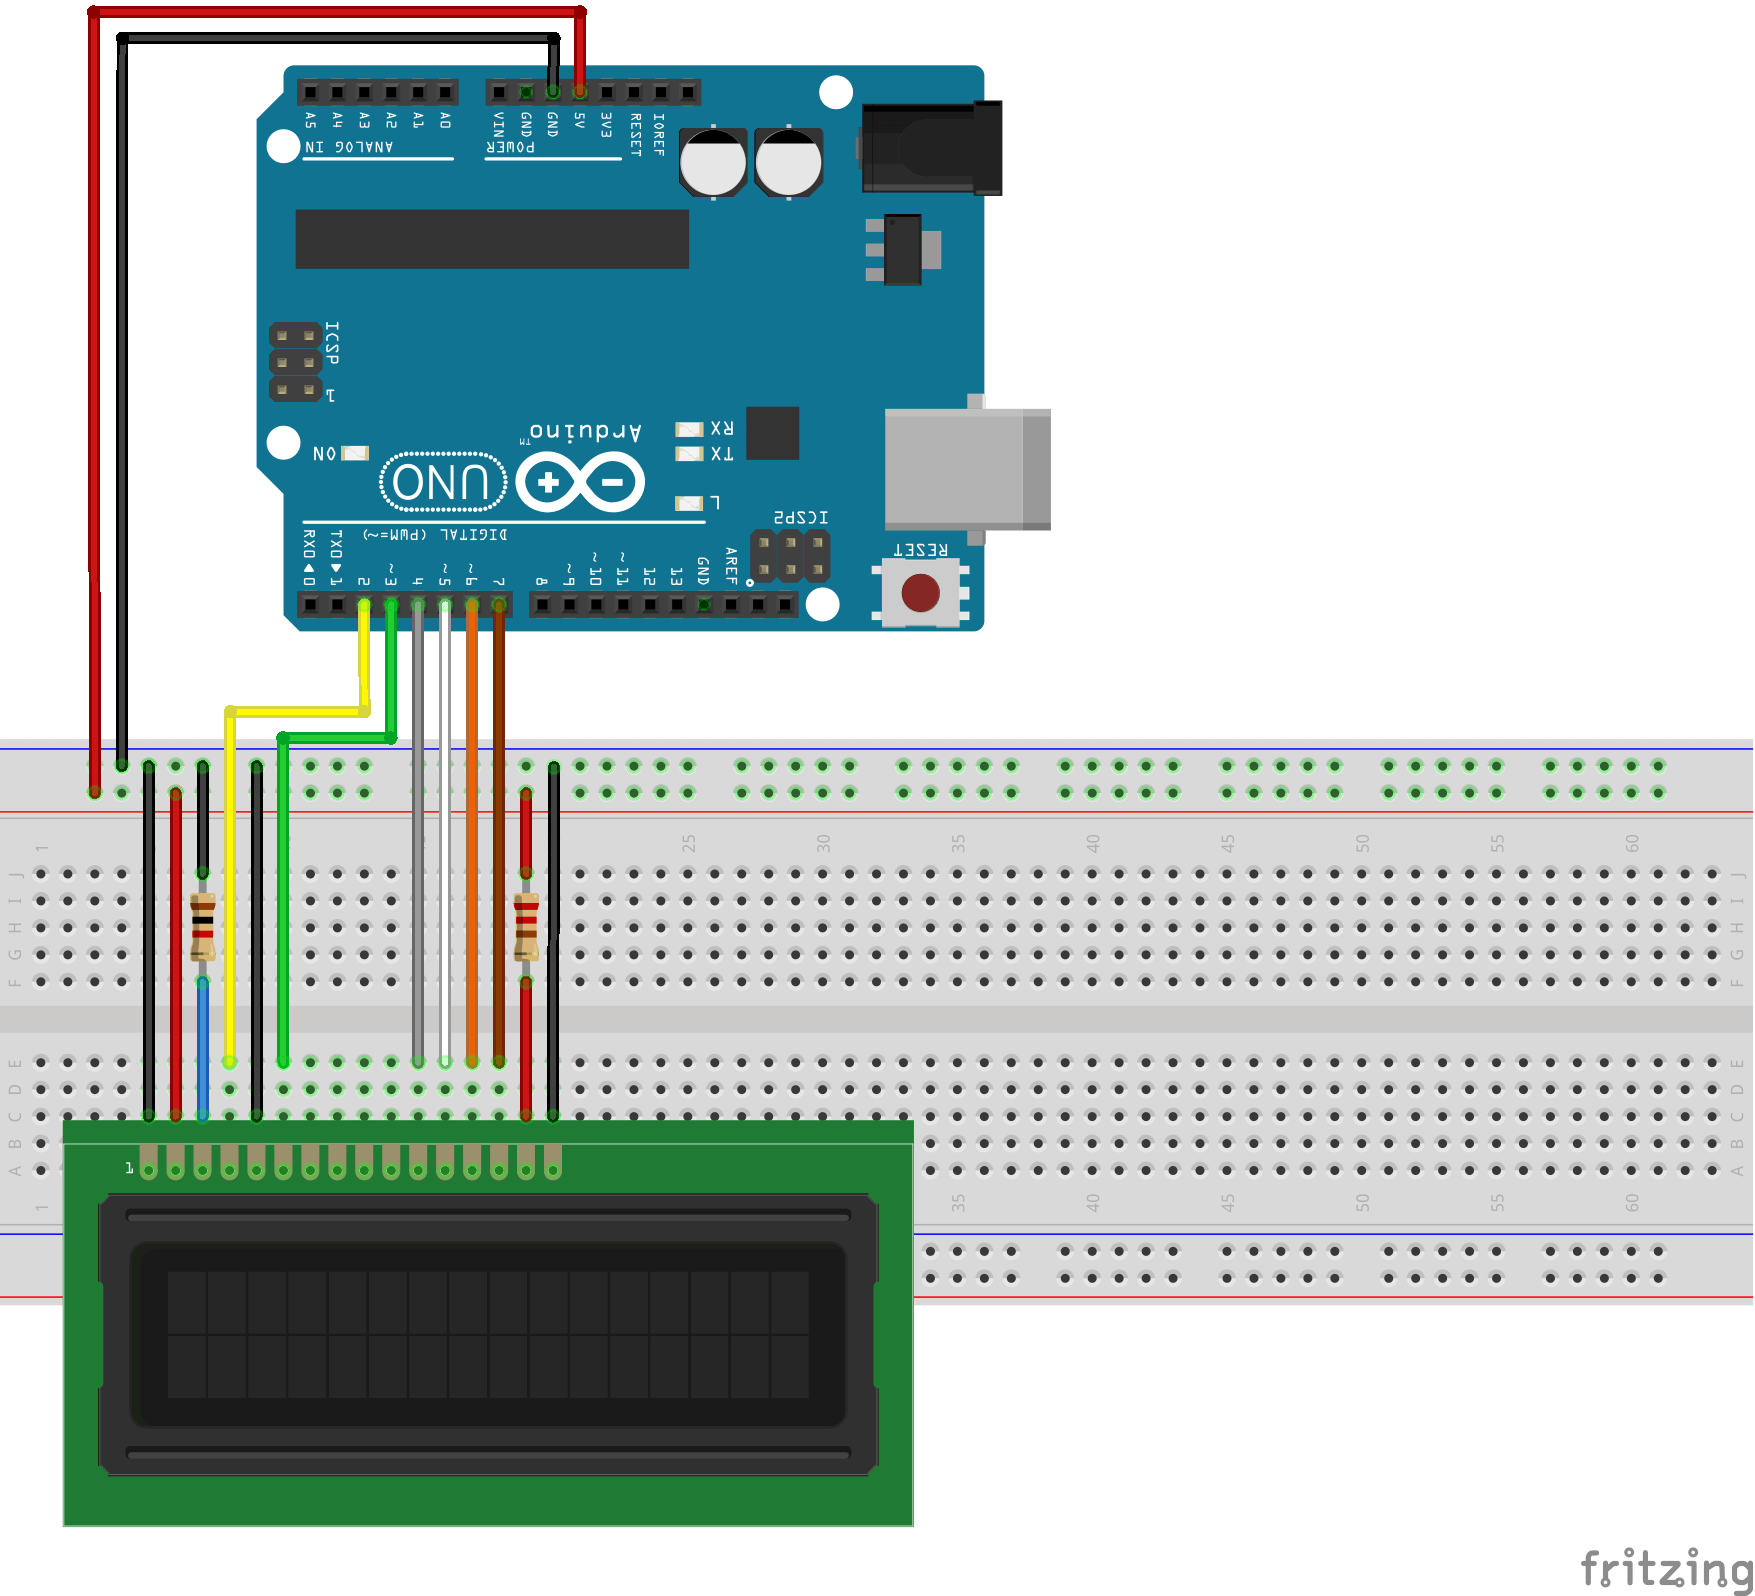
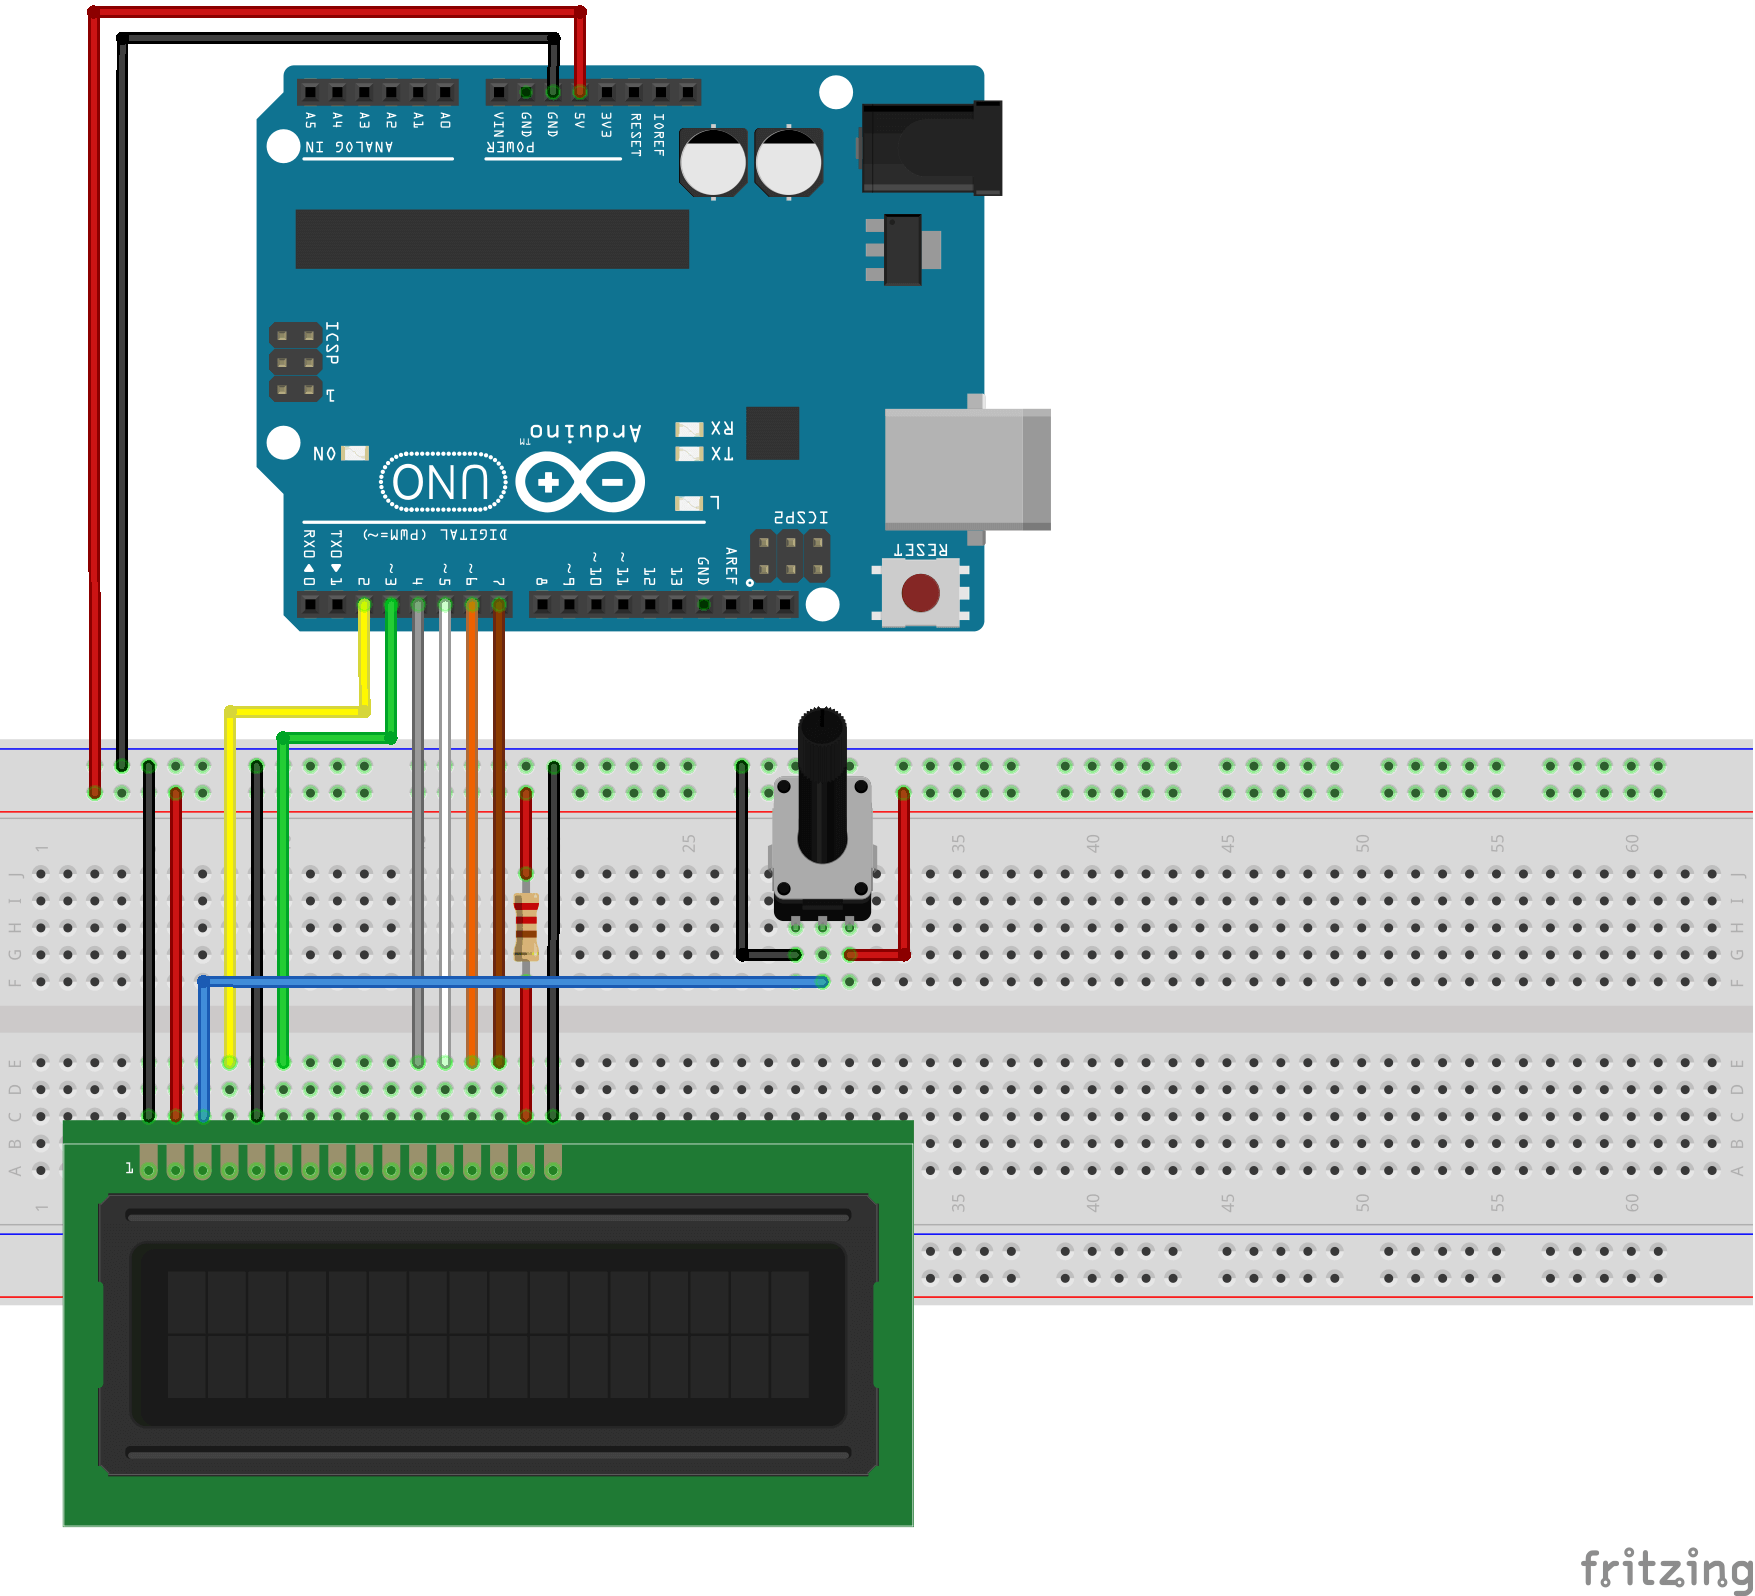
Wiring diagram
The LCD 16×2 has 16 pins to allow the management of the display and contrast.
-VSS Connect to ground of the screen
-VDD Power supply pin. Typically connected to the 5V pin Arduino.
-V0 contrast brooch. Connected to a PWM output or a potentiometer.
-RS Register Select. Select the memory area.
-RW Read or Write. Still grounded.
enable -E. active or not the display
-D0 8bits.4 bit mode weight height of the I2C communication
-D1 8bits.4 bit mode weight height of the I2C communication
-D2 8bits.4 bit mode weight height of the I2C communication
-D3 8bits.4 bit mode weight height of the I2C communication
4-D4 LSB I2C communication
-d5 4 lower bits of the I2C communication
-D6 4 lower bits of the I2C communication
-D7 4 lower bits of the I2C communication
-A
anode. + terminal of the LED backlight
katode -K. – terminal of the LED backlight
LCD16x2 must be connected as shown below.

Code
Once your module is connected properly, you can change the code to achieve the desired functionality. In the following example, we create a countdown.
To manage 16×2 LCD in the program, the library used is LiquidCrystal.h which functions them to know are:
-LiquidCrystal lcd (rs in, d4, d5, d6, d7) to define the I2C communication 4bits
-lcd.begin (16, 2); displays text on both lines
-lcd.print () to display a string in ASCII
-lcd.write () to display data, one byte at a time.
-lcd.setCursor (x, y) to move the cursor (column x: 0-16, y-line: 0-2)
-lcd.clear () clear what is displayed on the screen
/*
 * Liquid cristal counter
 */

// Library
#include <LiquidCrystal.h>


// Initalisation de la librairie
//LiquidCrystal lcd(12, 11, 5, 4, 3, 2);
const int rs = 2, en = 3, d4 = 4, d5 = 5, d6 = 6, d7 = 7;
LiquidCrystal lcd(rs, en, d4, d5, d6, d7);

long timeInit=0; //min
int tHour=1;
int tMin=26;
int tSec=35;


void setup() {
  // set up the LCD's number of columns and rows:
  lcd.begin(16, 2);
  analogWrite(8,15);
  // Affiche un message
  lcd.print("Alarm buzz in : ");
  timeInit=timeToCounter(tHour,tMin,tSec);
}

void loop() {
  // Affichage digitale de l'heure
  counterToTime(timeInit);
  lcd.setCursor(0, 1);// place le curseur au 1er caractère de la 2nde ligne
  lcd.print(tHour);
  lcd.print(" h ");
  lcd.print(tMin);
  lcd.print(" m ");
  lcd.print(tSec);
  lcd.print(" s");

  delay(1000); // Attend 1 second
  timeInit=timeInit-1;
}

int timeToCounter(int h,int m,int s){
  return h*3600+m*60+s;
}

void counterToTime(long cnt){
  tHour=(cnt/3600);
  tMin= (cnt%3600)/60;
  tSec = ((cnt%3600)%60);
}
Applications
- Make a clock
Sources
Find other examples and tutorials in our Automatic code generator
Code Architect