

En este tutorial veremos cómo construir una interfaz gráfica con Processing. Existen varias herramientas para crear una interfaz gráfica:
- lenguaje de programación (C, C++, Python, Java, etc.)
- Lenguaje web (HTML/CSS/PHP/Javascript)
- Software (LabView, Processing, etc.)
El software Processing utiliza un lenguaje similar al de Arduino y puede crear software para PC o aplicaciones para smartphones. Esto hace que sea una herramienta muy potente y fácil de usar cuando ya se trabaja con Arduino.
Instalación de procesamiento
Vaya al sitio de descargas Processing.org y descargue la versión que se adapte a su ordenador.
A continuación, puede descomprimir el archivo zip en la ubicación en la que desee guardar el software. En la carpeta descomprimida, encontrará un archivo EXE ejecutable. Haga doble clic en este archivo para abrir el procesamiento.

Código simple
En cuanto a Arduino, utilizaremos una función de configuración que se ejecutará una vez al inicio del programa y una función de dibujo que se ejecutará en un bucle como la función loop(). De forma nativa, existen funciones para gestionar la ventana del software, mostrar texto o imágenes, crear formas geométricas y gestionar las interacciones del teclado y el ratón.
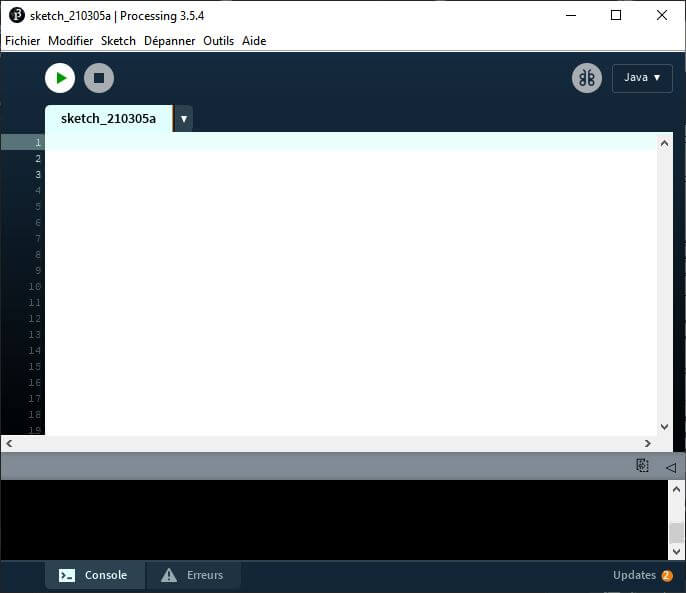
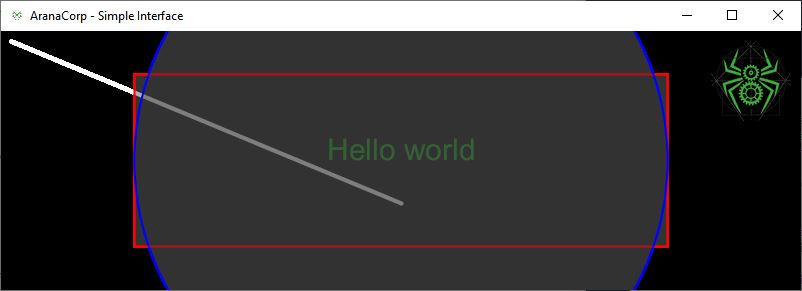
color ac_black=color(51,51,51);
color ac_green=color(58,170,53);

PFont f1;
PImage logo;

void setup()
{

  size(800, 600);   // set the window size

  surface.setTitle("AranaCorp - Simple Interface"); // set window title
  background(0); // set background to black
  //background(ac_black); // set background to color color
  smooth();

  logo = loadImage("https://www.aranacorp.com/wp-content/uploads/logo-100.png");
  //logo = loadImage("/img/logo-araignee1-RVB-72dpi.png");
  surface.setIcon(logo); //ad app icone

  image(logo,width-100,0,100,100); //add image

  // text
  f1 = createFont("Arial",30,true);
  textFont(f1);
  fill(ac_green);
  textAlign(CENTER); //RIGHT LEFT
  text("Hello world",width/2,height/2);


  // line
  stroke(255);     //stroke color
  strokeWeight(4);
  line(10,10,width/2, height*2/3);

  // Rectangle
  fill(ac_black,100);
  stroke(255,0,0);
  strokeWeight(2);
  rectMode(CENTER);
  rect(width/2,height/2,width*2/3,height*2/3);

  // Circle
  fill(ac_black,100);
  stroke(0,0,255);
  strokeWeight(2);
  circle(width/2,height/2,width*2/3);
  println("Interface initialized");
}

void draw(){
  println("draw is running!");
  delay(500);
}
Resultado


Crear una interfaz responsive
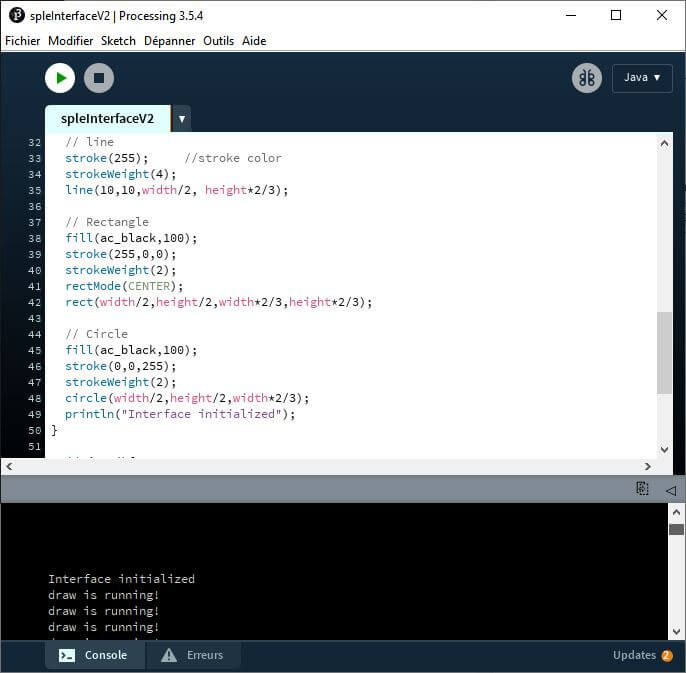
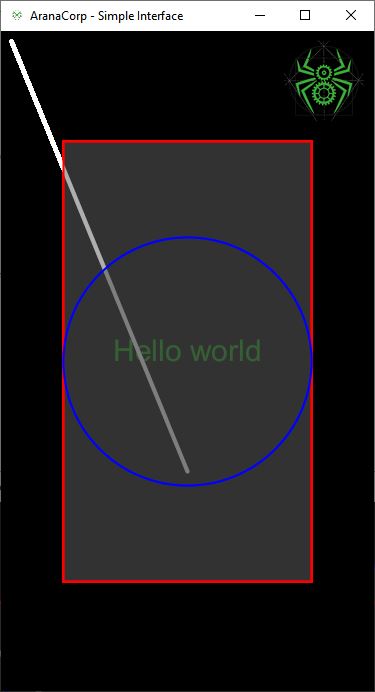
En la interfaz anterior, las dimensiones de la ventana son fijas. Si quieres poder cambiar las dimensiones de la ventana y que la interfaz aparezca correctamente, tendrás que hacer un diseño responsivo. Para ello, hay que definir las dimensiones críticas en función de las dimensiones de la anchura y la altura de la ventana. Además, el código que define las formas debe colocarse en la función draw() para tener en cuenta el cambio de dimensiones.
Código Responsivo
color ac_black=color(51,51,51);
color ac_green=color(58,170,53);

PFont f1;
PImage logo;

void setup()
{

  size(800, 600);   // set the window size
  surface.setResizable(true);
  surface.setTitle("AranaCorp - Simple Interface"); // set window title
  background(0); // set background to black
  //background(ac_black); // set background to color color
  smooth();

  logo = loadImage("https://www.aranacorp.com/wp-content/uploads/logo-100.png");
  //logo = loadImage("/img/logo-araignee1-RVB-72dpi.png");

  println("Interface initialized");
}

void draw(){
  drawInterface();
  println("width : "+str(width));
  println("height : "+str(height));

}

void drawInterface(){
  surface.setIcon(logo); //ad app icone

  image(logo,width-100,0,100,100); //add image

  // text
  f1 = createFont("Arial",30,true);
  textFont(f1);
  fill(ac_green);
  textAlign(CENTER); //RIGHT LEFT
  text("Hello world",width/2,height/2);


  // line
  stroke(255);     //stroke color
  strokeWeight(4);
  line(10,10,width/2, height*2/3);

  // Rectangle
  fill(ac_black,100);
  stroke(255,0,0);
  strokeWeight(2);
  rectMode(CENTER);
  rect(width/2,height/2,width*2/3,height*2/3);

  // Circle
  fill(ac_black,100);
  stroke(0,0,255);
  strokeWeight(2);
  circle(width/2,height/2,width*2/3);
}
Resultado
Si cambia el tamaño de la ventana, las formas geométricas también cambian de tamaño y posición. El tamaño del texto y la imagen no se modifican porque no dependen del tamaño de la ventana.


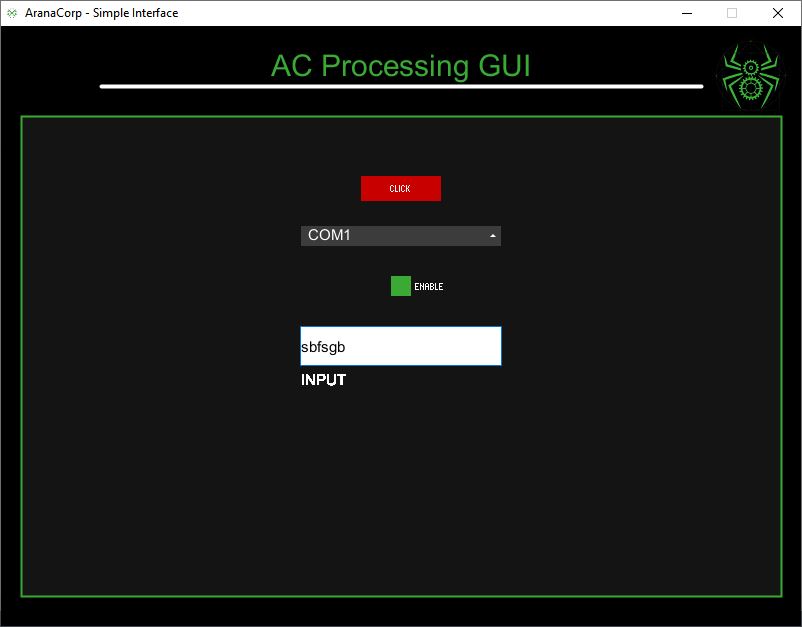
Uso de la biblioteca controlP5
Para crear una interfaz con botones o cuadros de texto, puede crear sus propios objetos con clases. Hay bibliotecas para simplificar tu vida como la biblioteca ControlP5 que contiene widgets.
- botón
- área de texto
- menú desplegable
- casilla de verificación
import controlP5.*;
ControlP5 cp5;

color ac_black=color(51, 51, 51);
color ac_green=color(58, 170, 53);

PFont f1, f2;
PImage logo;

Button btn;
ScrollableList sl;
CheckBox chck;
Textfield txt;

void setup()
{
  cp5 = new ControlP5(this);
  size(800, 600);   // set the window size
  surface.setTitle("AranaCorp - Simple Interface"); // set window title

  logo = loadImage("https://www.aranacorp.com/wp-content/uploads/logo-100.png");
  //logo = loadImage("/img/logo-araignee1-RVB-72dpi.png");

  f1 = createFont("Arial", 30, true);
  f2 = createFont("Arial", 15, true);

  drawInterface();
  drawWidgets();

  println("Interface initialized");
}

void draw() {

}

void drawInterface() {
  background(0); // set background to black
  //background(ac_black); // set background to color color
  smooth();

  surface.setIcon(logo); //ad app icone

  image(logo, width-100, 0, 100, 100); //add image

  // text
  textFont(f1);
  fill(ac_green);
  textAlign(CENTER); //RIGHT LEFT
  text("AC Processing GUI", width/2, 50);

  // line
  stroke(255);     //stroke color
  strokeWeight(4);
  line(100, 50+10, width-100, 50+10);

  // Rectangle
  fill(ac_black, 100);
  stroke(ac_green);
  strokeWeight(2);
  rectMode(CENTER);
  rect(width/2, height/2+30, width-40, height-120);
}

void drawWidgets() {
  // Button
  fill(ac_black, 100);
  stroke(ac_green);
  strokeWeight(2);
  btn=cp5.addButton("Click")
    .setValue(26)
    .setPosition(width/2-80/2, 150)
    .setSize(80, 25)
    .setColorBackground( color( 200, 0, 0 ) ) //default color
    .setColorForeground( color( 255, 0, 0 ) ) // mouse-over
    .setColorActive( color(0, 150, 0 ) ); //button pressed

  //Scrollable List
  String clist[]={"COM1", "COM2", "COM3"};
  sl=cp5.addScrollableList("COM")
    .setPosition(width/2.-200/2, 200)
    .setSize(200, 100)
    .addItems(clist)
    .setItemHeight(22)
    .setBarHeight(20)
    .setBackgroundColor(color(190))
    .setColorBackground(color(60))
    .setColorActive(color(255, 128))
    .setFont(f2)
    .close()
    // .setType(ScrollableList.LIST) // currently supported DROPDOWN and LIST
    ;
  sl.getCaptionLabel().getStyle().marginLeft = 3;
  sl.getCaptionLabel().getStyle().marginTop = 3;


  // Checkbox
  chck = cp5.addCheckBox("checkBox")
    .setPosition(width/2-10, 250)
    //.setColorBackground(color(255))
    .setColorForeground(color(255))
    .setColorActive(ac_green)
    .setColorLabel(color(255))
    .setSize(20, 20)
    .setItemsPerRow(1)
    .setSpacingColumn(30)
    .setSpacingRow(20)
    .addItem("enable", 1)
    ;

  // Text field
  txt=cp5.addTextfield("input")
    .setPosition(width/2-100, 300)
    .setSize(200, 40)
    .setFont(f2)
    .setFocus(true)
    .setColorBackground(color(255, 255, 255))
    .setColor(color(0))
    ;
}

public void Click(int theValue) {
  println("a button was clicked: "+theValue);
}

void COM(int n) {
  print("ScrollableList event :  ");
  println(n, cp5.get(ScrollableList.class, "COM").getItem(n).get("name"));

  drawInterface();
}

void checkBox(float[] a) {
  print("Checkbox event :  ");
  println(a);
}

public void input(String theText) {
  // automatically receives results from controller input
  println("a textfield event : "+theText);
}

Interface initialized
ScrollableList event : 0 COM1
ScrollableList event : 2 COM3
Checkbox event : [0] 1.0
Checkbox event : [0] 0.0
a textfield event : qegert
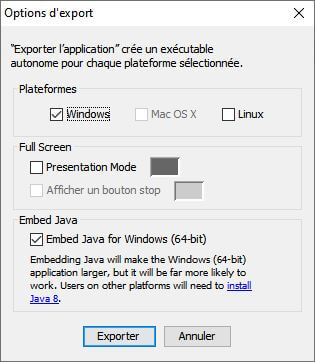
a button was clicked: 26Bonus: Crear un archivo .EXE ejecutable
Una vez desarrollada la interfaz, es fácil compilarla y compartirla mediante la función «Exportar» del software de procesamiento. Para ello, vaya al menú «Archivo» y seleccione «Exportar…». A continuación, puede elegir el sistema operativo que desee y si quiere añadir una distribución de Java en el ejecutable.

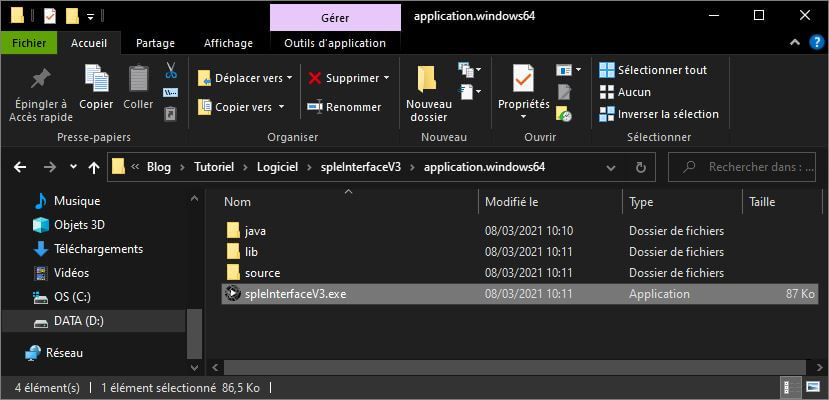
En la carpeta del script aparecerán dos carpetas en las que hay ejecutables para las versiones de 32 y 64 bits de Windows.

De este modo, puedes crear y compartir fácilmente interfaces gráficas con Processing.
Aplicaciones
- Desarrollar interfaces gráficas para comunicarse vía USB con Arduino, Raspberry Pi y NodeMCU
- Cree aplicaciones para teléfonos inteligentes y comuníquese por Bluetooth con las placas Arduino
- Crear interfaces gráficas para la comunicación inalámbrica con Arduino, Raspberry Pi y NodeMCU