

L’un des objectifs principaux de la robotique est d’articuler des objets. Et pour cela, on peut aussi agir avec l’articulation des objets via une action de l’utilisateur directement sur le système. Nous allons voir dans cet article, comment programmer la carte Arduino pour pouvoir piloter des servomoteurs avec un Joystick.
Prérequis : Piloter un servomoteur avec Arduino, Utilisation d’un joystick avec Arduino
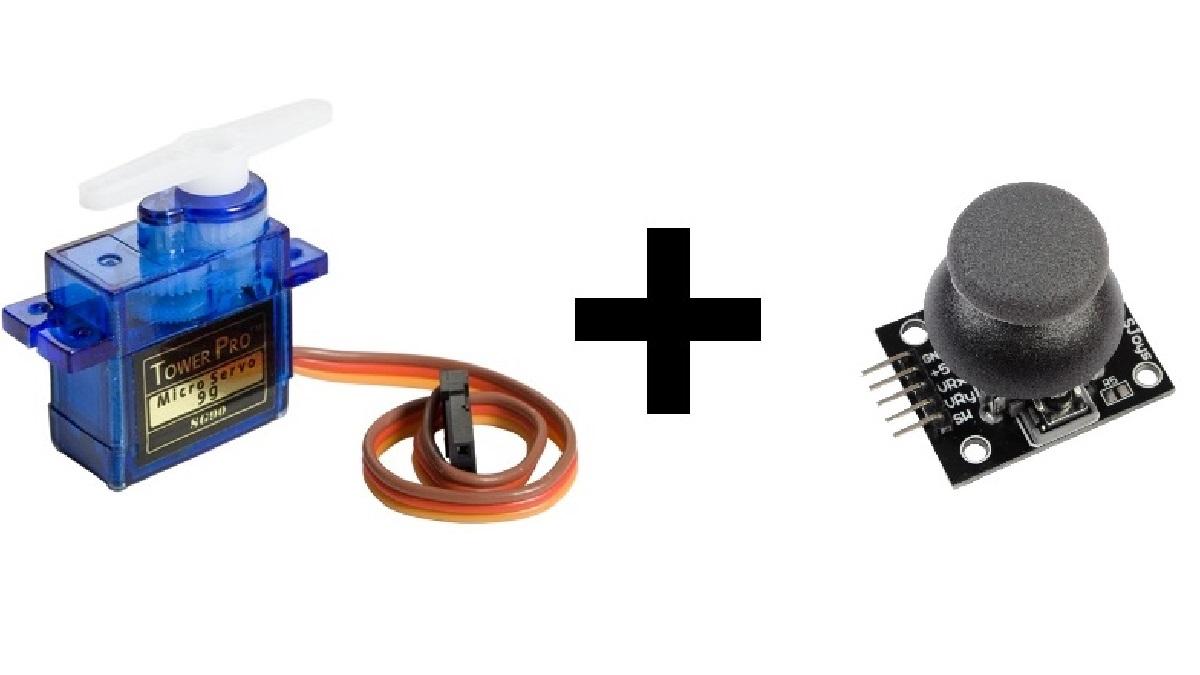
Matériel
- Ordinateur
- Carte Arduino Nano
- Câble USB pour connecter la carte Arduino au PC
- 4x câbles femelles/femelles
- 2x servomoteur SG90 9G
- 1x Joystick Modulo KYO-23
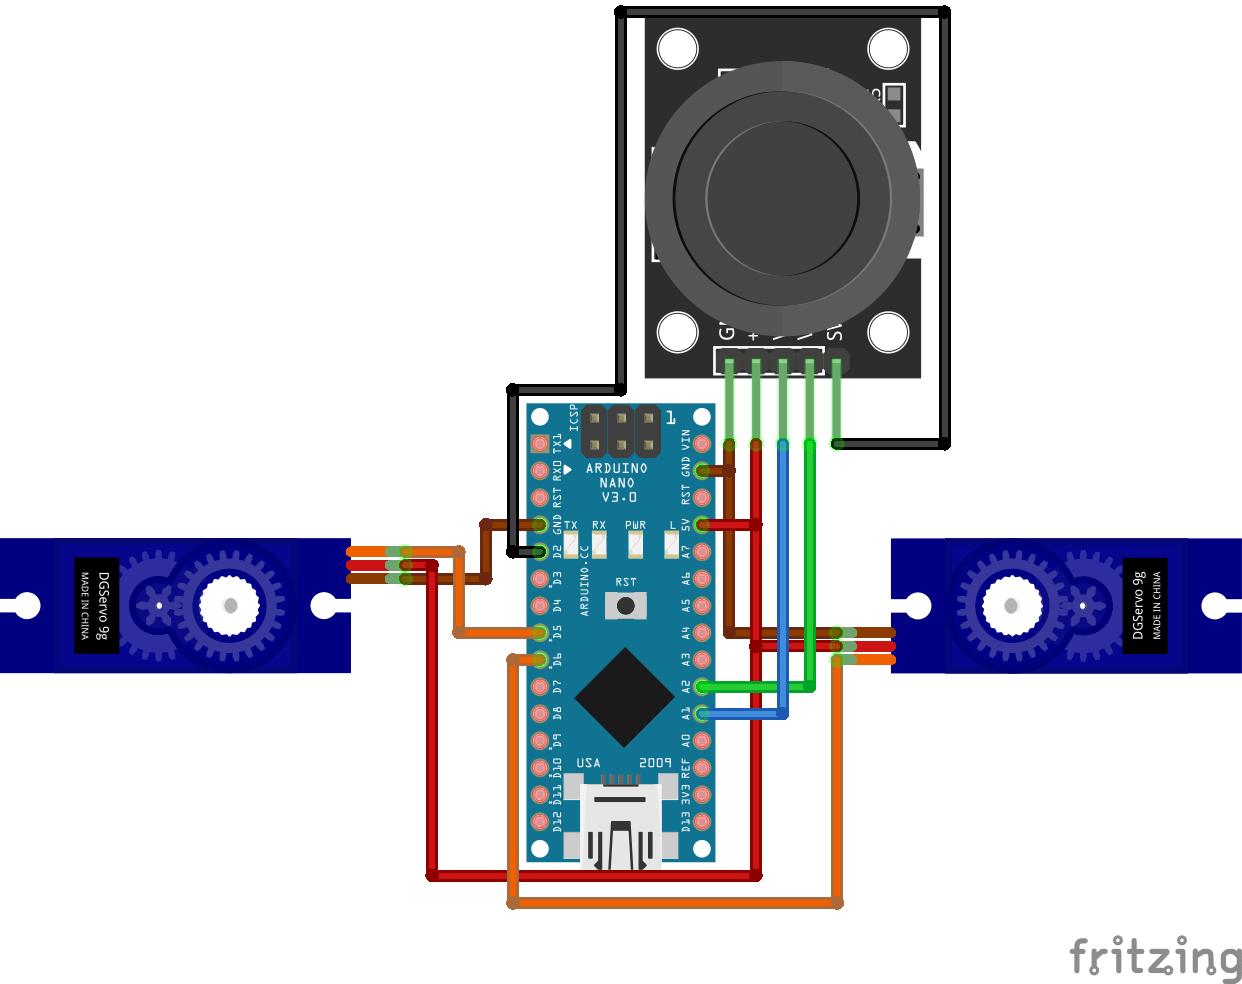
Schéma de connexion
Les servomoteurs sont alimentés par une tension aux bornes des fils marrons de la masse commune (GND) et aux fils rouges de la source de tension (5V). Ici on les branche directement à la source de tension 5V de l’Arduino Nano; et sont pilotés par des signaux PWM envoyés sur les fils oranges (borne 5 et borne 6).
Le joystick, aussi alimenté par une tension 5V et la masse commune (GND), renvoie deux valeurs analogiques que nous brancheront sur les entrées analogiques du microcontrôleur. Il renvoie aussi un valeur digitale que nous branchons sur la broche 2 du microcontrôleur.

Explications et Code
Nous allons programmer la carte Arduino Nano de telle sorte que le Joystick dirige le sens de rotation des moteurs. Pour cela, nous allons interpréter notre branchement de nos 2 servo-moteurs tel que 2 roues motorisés dont la direction dépend des 2 valeurs analogiques renvoyés par le Joystick. Ces deux valeurs correspondent à des coordonnés YX du Joystick, chacun allant de 0 à 1023.
Pour comprendre le logique de notre programme, on peut le représenter avec un schéma sur un plan YX :


Ici, on peut remarquer que les coordonnées du Joystick correspondent à des états de notre système, qui eux même vont correspondre à des directives pour piloter nos servomoteurs.
Ce Joystick possède un bouton poussoir intégré, que l’on programmera simplement pour nous afficher un message lorsqu’il est pressé. Pour piloter les servomoteurs, nous utiliserons la librairie ServoLib.h ( que l’on peut retrouver en fin d’article ).
// headers for library
#include <Arduino.h> //only used on PlatformIO IDE on VSCode. Not needed on Arduino IDE.
#include <ServoLib.h>

// function's prototypes used
void printing_results(int x, int y);
void motor_joystick_controlled(int xValue,int yValue);
void MotorAvancer();
void MotorReculer();
void MotorDroite();
void MotorGauche();
void MotorAvancerDroite();
void MotorAvancerGauche();
void MotorReculerDroite();
void MotorReculerGauche();
void MotorStop();

// declaration of pins used
#define joyX A1
#define joyY A2
const int joyBtn  = 2;

// Motors definition
ServoLib motorG;
const int motorGPin = 5;
const int motorGZero = 1500;
ServoLib motorD;
const int motorDPin = 6;
const int motorDZero = 1400;

// Variables
int Power = 400; //Motor velocity

// initialization
void setup()
{
  Serial.begin(9600); // open to communicate via serial port
  motorG.associePin(motorGPin);// pins assignment ...
  motorD.associePin(motorDPin);// ... for right and left motors
  pinMode(joyBtn,INPUT_PULLUP); // button initialization (TOR = 0 or 1)
  MotorStop(); // stop motors as initial state
}

// main loop
void loop()
{
  int xValue = analogRead(joyX); // read joystick ...
  int yValue = analogRead(joyY); // ... position
  printing_results(xValue, yValue); // display of Joystick coordinates
  motor_joystick_controlled(xValue,yValue); // definition of the state of the motors
                                            //according to the coordinates of the joystick
}

// function to display the position of the joystick as well as the state of the button if pressed
void  printing_results(int x, int y) // only used for debugging/monitoring the response of the joystick
{ Serial.print(x);
  Serial.print("\t");
  Serial.println(y);
  if (!digitalRead(joyBtn))
  {Serial.println(F("Joy Button pressed"));}//if the button is pressed, display "Joy Button pressed"
}

// motor status montoring function based on XY coordinates
void motor_joystick_controlled(int xValue,int yValue)
{
  if(639<xValue && 382<yValue && yValue<639)
  { MotorAvancer();
    Serial.println(F("avancer"));} //only used for debugging/monitoring the state of the motors

  else if(xValue<382 && 382<yValue && yValue<639)
  { MotorReculer();
    Serial.println(F("reculer"));} //only used for debugging/monitoring the state of the motors

  else if(382<xValue && xValue<639 && 639<yValue)
  { MotorDroite();
    Serial.println(F("tourner vers la droite"));} //only used for debugging/monitoring the state of the motors

  else if(382<xValue && xValue<639 && yValue<382)
  { MotorGauche();
    Serial.println(F("tourner vers la gauche"));} //only used for debugging/monitoring the state of the motors

  else if(639<xValue && 639<yValue)
  { MotorAvancerDroite();
    Serial.println(F("avancer et tourner a droite"));} //only used for debugging/monitoring the state of the motors

  else if(639<xValue && yValue<382)
  { MotorAvancerGauche();
    Serial.println(F("avancer et tourner a gauche"));}//only used for debugging/monitoring the state of the motors

  else if(xValue<382 && 639<yValue)
  { MotorReculerDroite();
    Serial.println(F("reculer et tourner à droite"));}//only used for debugging/monitoring the state of the motors

  else if(xValue<382 && yValue<382)
  { MotorReculerGauche();
    Serial.println(F("reculer et tourner a gauche"));}//only used for debugging/monitoring the state of the motors

  else
  { MotorStop();
    Serial.println(F("arret totale"));}//only used for debugging/monitoring the state of the motors
}

// function for forward state
void MotorAvancer()
{ motorG.appliquerImpulsion(motorGZero + Power);
  motorD.appliquerImpulsion(motorDZero - Power);}

// function for backward state
void MotorReculer()
{ motorG.appliquerImpulsion(motorGZero - Power);
  motorD.appliquerImpulsion(motorDZero + Power);}

// function for turn right state
void MotorDroite()
{ motorG.appliquerImpulsion(motorGZero + Power);
  motorD.appliquerImpulsion(motorDZero + Power);}

// function for turn left state
void MotorGauche()
{ motorG.appliquerImpulsion(motorGZero - Power);
  motorD.appliquerImpulsion(motorDZero - Power);}

// function for turn right and forward state
void MotorAvancerDroite()
{ motorG.appliquerImpulsion(motorGZero + Power);
  motorD.appliquerImpulsion(motorDZero);}

// function for turn left and forward state
void MotorAvancerGauche()
{ motorG.appliquerImpulsion(motorGZero);
  motorD.appliquerImpulsion(motorDZero - Power);}

// function for turn right and backward state
void MotorReculerDroite()
{ motorG.appliquerImpulsion(motorGZero - Power);
  motorD.appliquerImpulsion(motorDZero);}

// function for turn left and backward state
void MotorReculerGauche()
{ motorG.appliquerImpulsion(motorGZero);
  motorD.appliquerImpulsion(motorDZero + Power);}

// function for stop state
void MotorStop()
{ digitalWrite(motorDPin,LOW);
  digitalWrite(motorGPin,LOW);}
Résultat
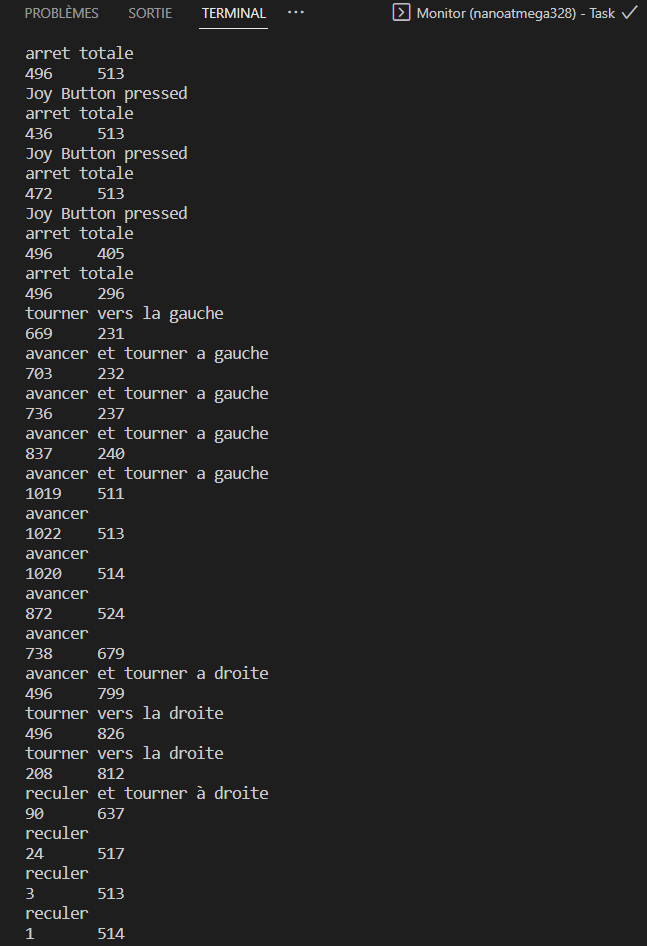
Une fois le code chargé dans le microcontrôleur vous devriez voir les valeurs de X et Y évoluer en fonction de la position du Joystick, ainsi que les états des moteurs correspondant et le message qui s’affiche lorsqu’on appuie sur le bouton, sur le port série.

Librairie ServoLib.h
Pour utiliser cette libraire, il faut créer et places les fichiers suivants dans un dossier créé dans le répertoire librairie de votre logiciel de programmation :

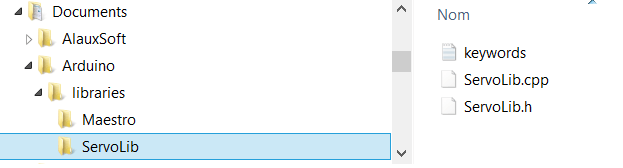
Si vous programmez sous ¨Visual Studio Code avec PlatformIO IDE, vous retrouverez la librairie de votre projet ici : Documents\PlatformIO\Projects\Servo_Joystick_Control\lib\ServoLib

Fichier ServoLib.cpp :
//Librairie
#include <Servo.h>
//Déclaration des constantes
#define UPDATE_TIME 15
#define MAX_POS 180
#define MIN_POS 0
//Déclaration des paramètres
int servoPin = 9;
int pulse = 1500;
//Déclaration des variables
Servo myServo;  // création d'un objet Servo
// Sur la plupart des cartes, on peut créer jusqu'à douze objets
int pos=0;    // variable contenant la position du servomoteur
void setup() {
  myServo.attach(servoPin);
}
void loop() {
  for (pos = MIN_POS; pos <= MAX_POS; pos += 1) {
    myServo.write(pos);
    delay(UPDATE_TIME);
  }
  for (pos = MAX_POS; pos >= MIN_POS; pos -= 1) {
    myServo.write(pos);
    delay(UPDATE_TIME);
  }
}
Fichier ServoLib.h :
#include <ServoLib.h>
ServoLib::ServoLib(){}
void ServoLib::associePin(int pin){
  servoPin=pin;
  pinMode(servoPin,OUTPUT);
}
void ServoLib::envoiePosition(int value){
  int pulse=0;
  if (value<MIN_POS)
    value=MIN_POS;
  else if (value>MAX_POS)
    value=MAX_POS;
  value=map(value,MIN_POS,MAX_POS,MIN_PULSE_WIDTH,MAX_PULSE_WIDTH);
  pulse=this->convertirAngleEnImpulsion(value);
  this->appliquerImpulsion(pulse);
}
void ServoLib::appliquerImpulsion(int pulse){
  digitalWrite(servoPin,HIGH);
  delayMicroseconds(pulse);
  digitalWrite(servoPin,LOW);
  delay(UPDATE_TIME);
}
int ServoLib::convertirAngleEnImpulsion(int ang){
  float a = 2500/180;
  float b = 500;
  return int(a*ang+b);
}
Le fichier keyword.txt est optionnel. Il permet de modifier la couleur des noms de fonction dans le programme.
#######################################
# Syntax Coloring Map ServoLib
#######################################
#######################################
# Datatypes (KEYWORD1)
#######################################
ServoLib  KEYWORD1  ServoLib
#######################################
# Methods and Functions (KEYWORD2)
#######################################
associePin KEYWORD2
envoiePosition  KEYWORD2
convertirAngleEnImpulsion KEYWORD2
appliquerImpulsion KEYWORDS2
#######################################
# Constants (LITERAL1)
#######################################
UPDATE_TIME LITERAL1
MIN_POS LITERAL1
MAX_POS LITERAL1
MIN_PULSE_WIDTH LITERAL1
MAX_PULSE_WIDTH LITERAL1
Applications
- Créer une télécommande pour piloter votre microcontrôleur
- Piloter avec un ou plusieurs Joysticks un bras robot articulé par des servomoteurs