


Une des applications des capteurs capacitifs est la création d’un interrupteur tactile pour allumer une lampe, par exemple. Dans ce projet, nous allons concevoir un capteur capacitif avec Arduino que nous allons utiliser comme un interrupteur tactile pour allumer et éteindre une lampe.
Matériel
- Arduino Nano
- Résistance 10M Ohm
- Relais
- fil électrique ou matériau conducteur
- Convertisseur AC/DC
Schéma de câblage

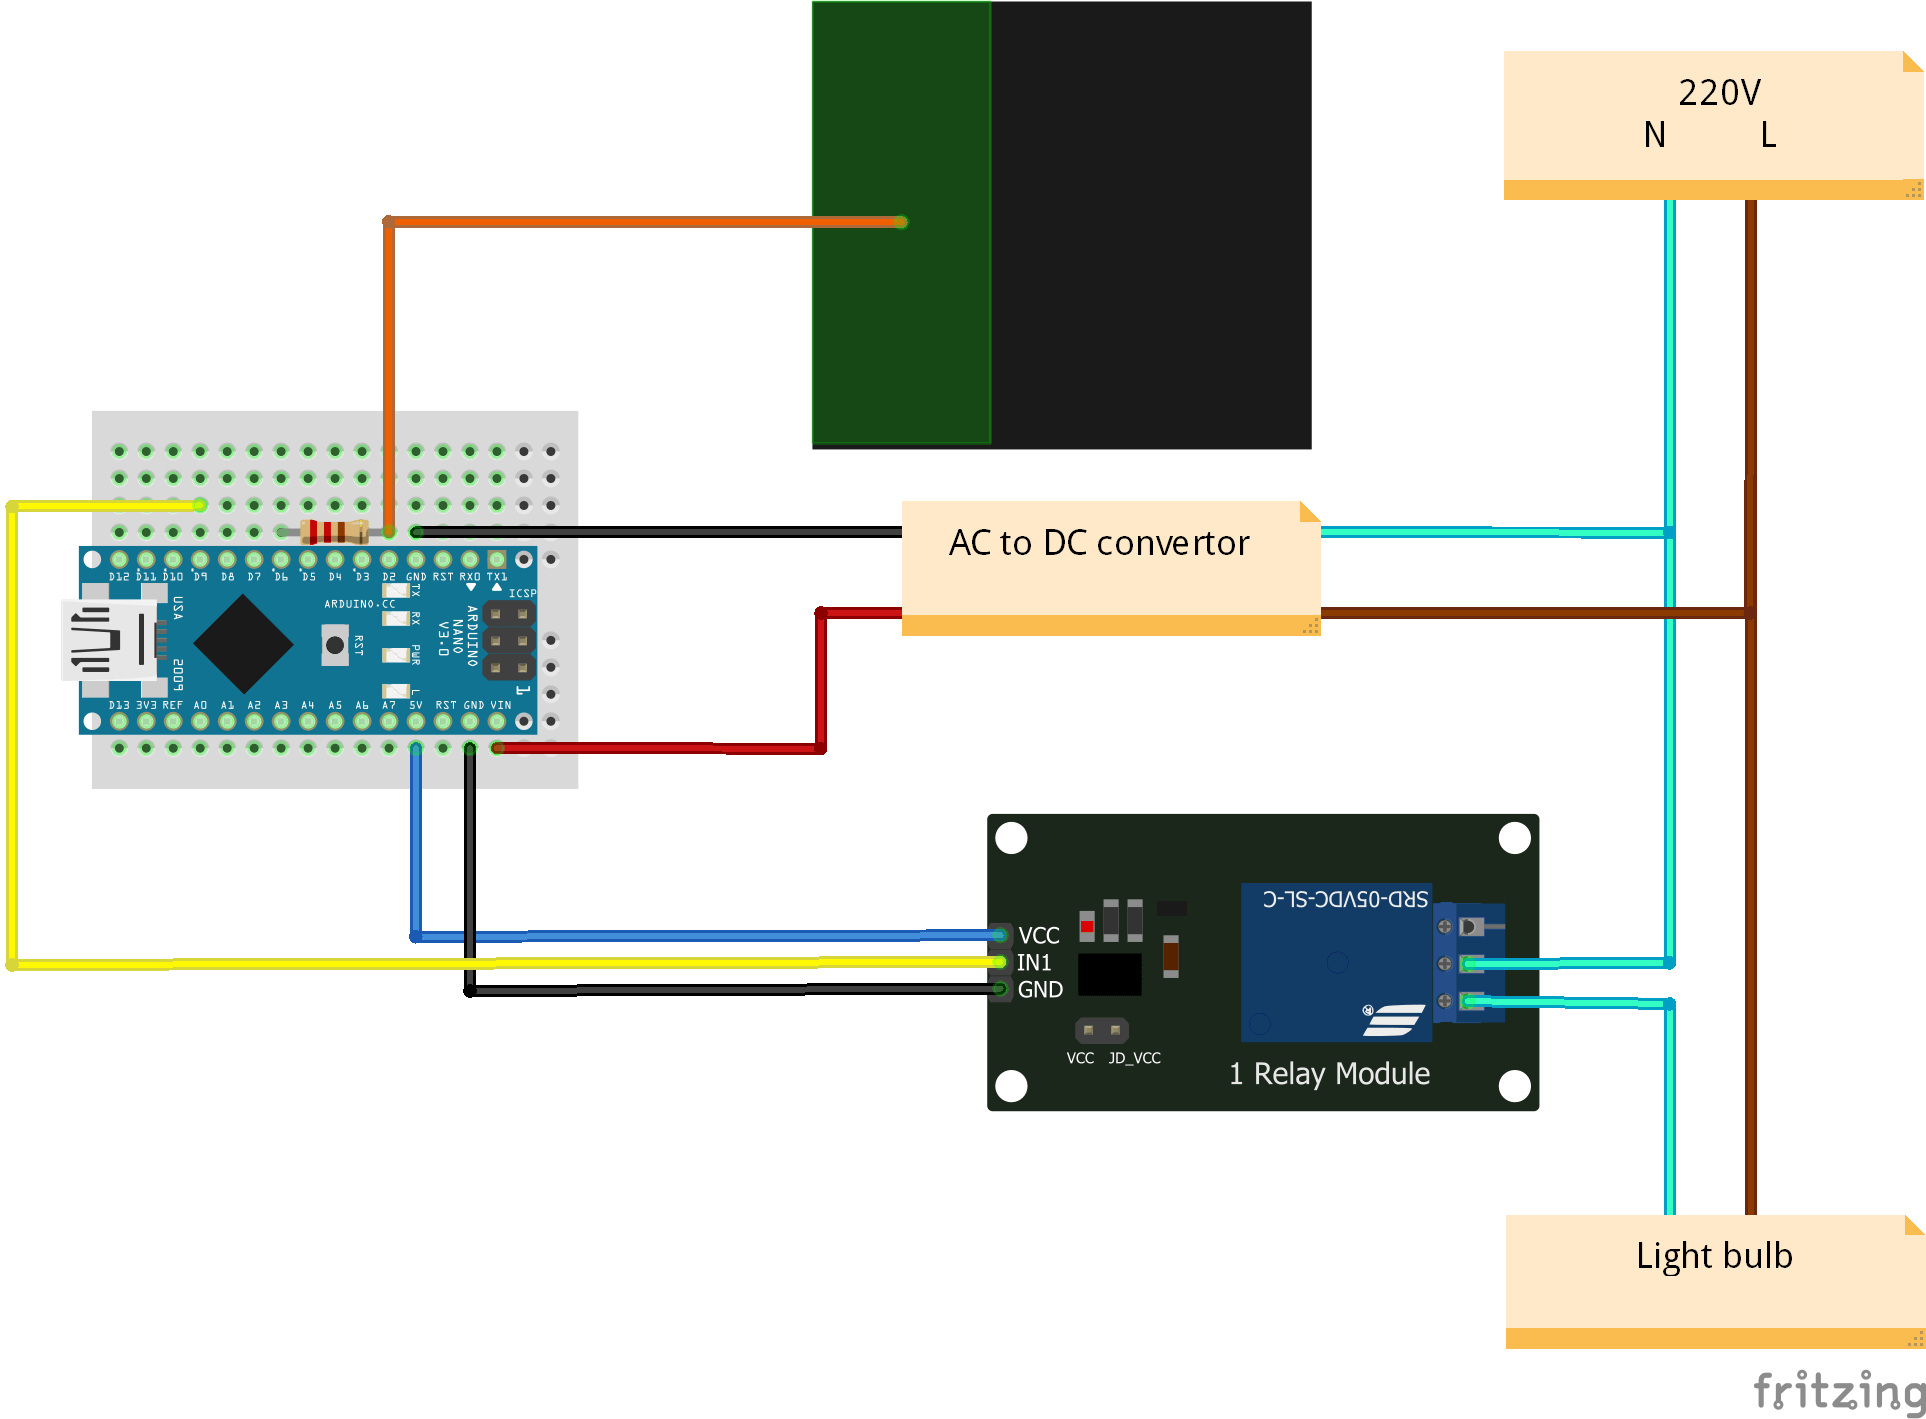
Attention: ce projet utilise la tension 220V. Prenez les précautions nécessaires afin de ne pas vous électrocuter.
Code
Pour créer un capteur capacitif, nous utilisons la librairie CapacitiveSensor. Lorsque le capteur capacitif change d’état, nous modifions l’état envoyer au relais pour ouvrir ou fermer le circuit.
#include <CapacitiveSensor.h>
#define DEBUG 0

//Capacitive sensor
CapacitiveSensor   cs_6_2 = CapacitiveSensor(6, 2);       // 10M resistor between pins 6 & 2, pin 2 is sensor pin, add a wire and or foil if desired
const int sensitivity  = 50;
long val;

//Light
const int lightPin = 9;
bool lightState = false;
bool btnState = false, oldState = false;

//smooth
long smoothval, total;
const int numReadings  = 3;
long readings[numReadings] = {0};
int readIndex;

long threshVal=500;

void setup()
{
  pinMode(lightPin, OUTPUT);
  cs_6_2.set_CS_AutocaL_Millis(0xFFFFFFFF);     // turn off autocalibrate on channel 1 - just as an example
  Serial.begin(9600);
  Serial.println("Touchless lamp initialized");
  delay(2000);

  for (int i = 0; i < numReadings; i++) {
    val =  cs_6_2.capacitiveSensor(sensitivity);// increase for hi
    smoothval = smooth(val);
  }
}

void loop()
{
  val =  cs_6_2.capacitiveSensor(sensitivity);// increase for hi
  smoothval = smooth(val);

  if (DEBUG) {
    //Serial.print(millis() - timeStart);        // check on performance in milliseconds
    Serial.print("\t");                    // tab character for debug window spacing
    Serial.print(val);                  // print sensor output 1
    Serial.print("\t");
    Serial.print(smoothval);                  // print sensor smooth output
    Serial.println();                  // print sensor smooth output
  }

  // condition
  if (btnState == false && smoothval > threshVal) {
    btnState = true;
  }
  if (btnState == true && smoothval <= threshVal*0.8) {
    btnState = false;
  }

  if (oldState != btnState) {
    if (oldState == false) {
      lightState = !lightState;
    }
    digitalWrite(lightPin, lightState);
    delay(200);
  }
  oldState = btnState;

  delay(100);         // arbitrary delay to limit data to serial port
}

long smooth(long val) { /* function smooth */
  ////Write data on device

  long average;
  // subtract the last reading:
  total = total - readings[readIndex];
  // read from the sensor:
  readings[readIndex] = val;//cs.capacitiveSensor(sensitivity);
  // add the reading to the total:
  total = total + readings[readIndex];
  // advance to the next position in the array:
  readIndex = readIndex + 1;

  // if we're at the end of the array...
  if (readIndex >= numReadings) {
    // ...wrap around to the beginning:
    readIndex = 0;
  }

  // calculate the average:
  average = total / numReadings;
  // send it to the computer as ASCII digits

  return average;
}
Résultat
Lorsqu’on approche la main du fil conducteur qui sert d’interrupteur tactile, la lampe devrait s’allumer ou s’éteindre. A vous de régler la sensibilité (sensitivity) du capteur, la résistance et la valeur seuil (threshVal) afin d’obtenir le comportement voulu.

Prochaines étapes
- Améliorer la robustesse du capteur capacitif aux perturbations extérieures
- Ajouter une fonctionnalité pour éteindre la lampe automatiquement après un certain temps