

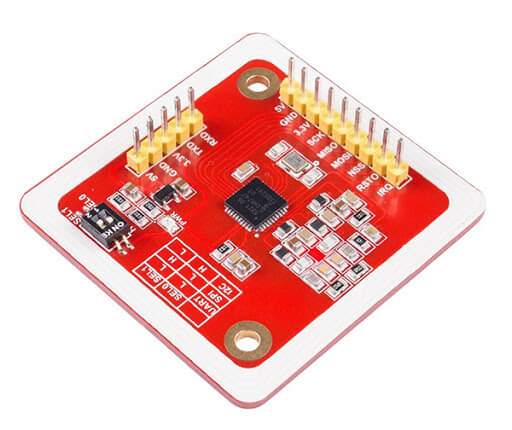
Le module NFC PN532 est un lecteur de carte à puce qui, permet entre autre, d’activer un mécanisme lorsque la bonne carte est présentée au lecteur. On peut le retrouver dans les smartphones, par exemple. Le module RC522 est certainement le module RFID le plus connu dans le monde Arduino mais nous allons voir dans ce tutoriel comment utiliser le lecteur RFID PN532 qui présente certains avantages notamment sur les options de communication. Nous allons voir ici comment utiliser le module en fonction des différentes méthodes de communication UART, SPI, I2C.
Matériel
- Ordinateur
- Arduino UNO
- Câble USB A Mâle/B Mâle
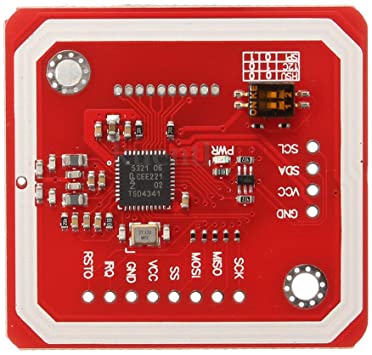
- Module NFC PN532
- Câble Dupont M/F

Sélection du mode de communication
Un des gros avantages du module NFC est qu’il peut utiliser différents protocoles pour communiquer avec Arduino, UART, I2C ou SPI. Ces différents protocoles utilisent des broches et des librairies spécifiques du microcontrôleur.
Pour sélectionner le mode de communication, il faut configurer le PN532 à l’aide des interrupteurs DIP (0-Low, 1-High):
| SEL0 | SEL1 | |
| UART | 0 | 0 |
| SPI | 0 | 1 |
| I2C | 1 | 0 |

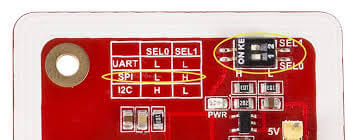
Vérifiez bien que la configuration des interrupteurs DIP correspond aux schéma de cablâge.
Utilisation du module avec la communication Serial
Schéma
Pour la communication série ou UART, Le brochage se fait comme suit (à gauche côté PN532, à droite côté Arduino UNO):
- Vcc (Alimentation) <-> 5V
- GND (Masse) <-> GND
- Rx (Data) <-> Tx
- Tx (Clock) <-> Rx

Code
Comme il y a différentes options de communication, il faudra utiliser la bonne librairie dans chaque cas. Dans le cas d’un port UART, PN532_HSU.h , pour un port SoftwareSerial , PN532_SWHSU.h . Les fonctions permettant la lecture NFC restent identiques dans chaque cas.
// for Hardware Serial
/*#include <PN532_HSU.h>
  #include <PN532.h>
  PN532_HSU pn532hsu( Serial );
  PN532 nfc( pn532hsu );
*/

// for Software Serial
#include <SoftwareSerial.h>
#include <PN532_SWHSU.h>
#include <PN532.h>
SoftwareSerial SWSerial( 2, 3 ); // RX, TX
PN532_SWHSU pn532swhsu( SWSerial );
PN532 nfc( pn532swhsu );


String tagId = "None", dispTag = "None";
byte nuidPICC[4];

void setup(void) {

  Serial.begin(115200);
  Serial.println("Hello Maker!");
  //  Serial2.begin(115200, SERIAL_8N1, RXD2, TXD2);

  nfc.begin();

  uint32_t versiondata = nfc.getFirmwareVersion();
  if (! versiondata) {
    Serial.print("Didn't Find PN53x Module");
    while (1); // Halt
  }

  // Got valid data, print it out!
  Serial.print("Found chip PN5"); Serial.println((versiondata >> 24) & 0xFF, HEX);
  Serial.print("Firmware ver. "); Serial.print((versiondata >> 16) & 0xFF, DEC);
  Serial.print('.'); Serial.println((versiondata >> 8) & 0xFF, DEC);

  // Configure board to read RFID tags
  nfc.SAMConfig();

  Serial.println("Waiting for an ISO14443A Card ...");

}

void loop() {
  readNFC();
}

void readNFC() {

  boolean success;
  uint8_t uid[] = { 0, 0, 0, 0, 0, 0, 0 };  // Buffer to store the returned UID
  uint8_t uidLength;                       // Length of the UID (4 or 7 bytes depending on ISO14443A card type)
  success = nfc.readPassiveTargetID(PN532_MIFARE_ISO14443A, &uid[0], &uidLength);

  if (success) {
    Serial.print("UID Length: "); Serial.print(uidLength, DEC); Serial.println(" bytes");
    Serial.print("UID Value: ");

    for (uint8_t i = 0; i < uidLength; i++) {
      nuidPICC[i] = uid[i];
      Serial.print(" "); Serial.print(uid[i], DEC);
    }
    Serial.println();
    tagId = tagToString(nuidPICC);
    dispTag = tagId;
    Serial.print(F("tagId is : "));
    Serial.println(tagId);
    Serial.println("");

    delay(1000);  // 1 second halt

  } else {
    // PN532 probably timed out waiting for a card
    //Serial.println("Timed out! Waiting for a card...");
  }
}

String tagToString(byte id[4]) {
  String tagId = "";
  for (byte i = 0; i < 4; i++) {
    if (i < 3) tagId += String(id[i]) + ".";
    else tagId += String(id[i]);
  }
  return tagId;
}
Utilisation du module avec I2C
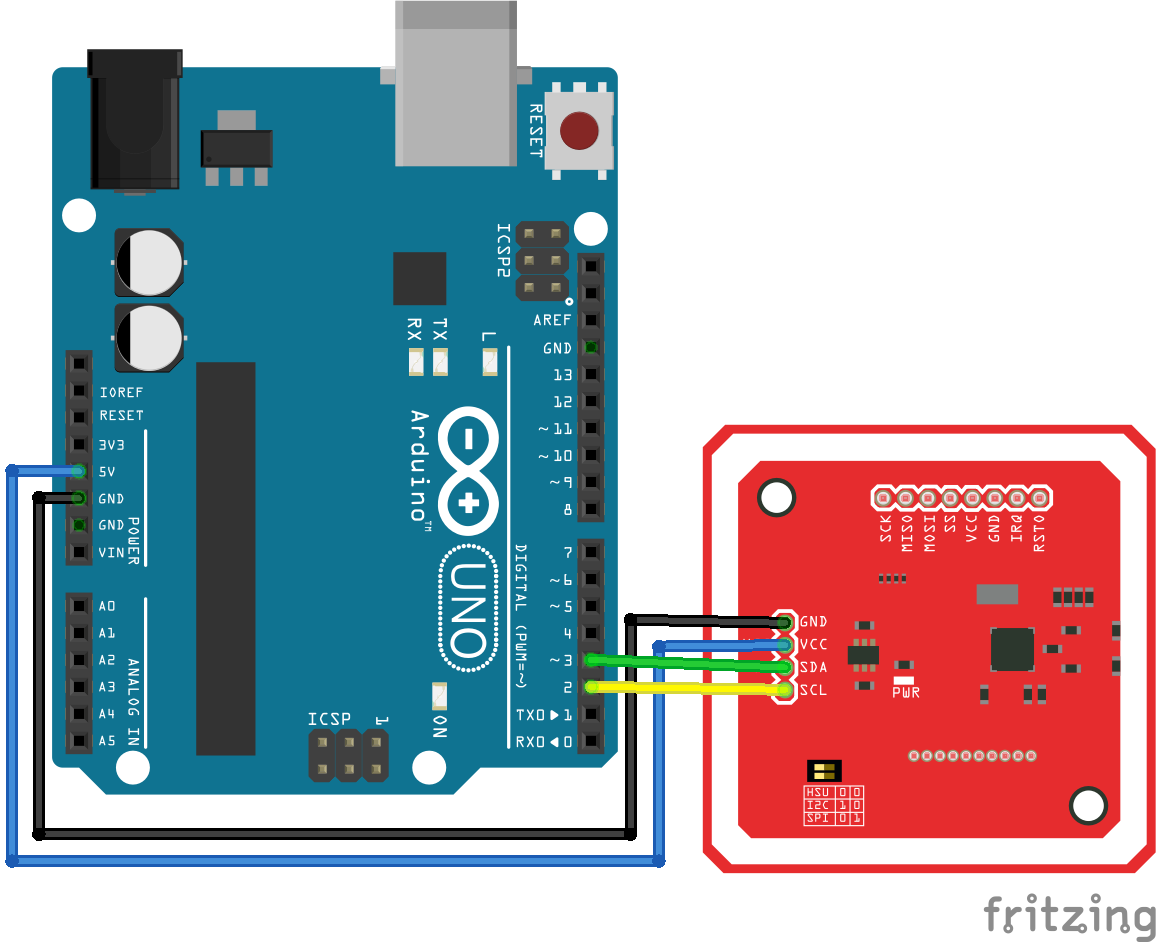
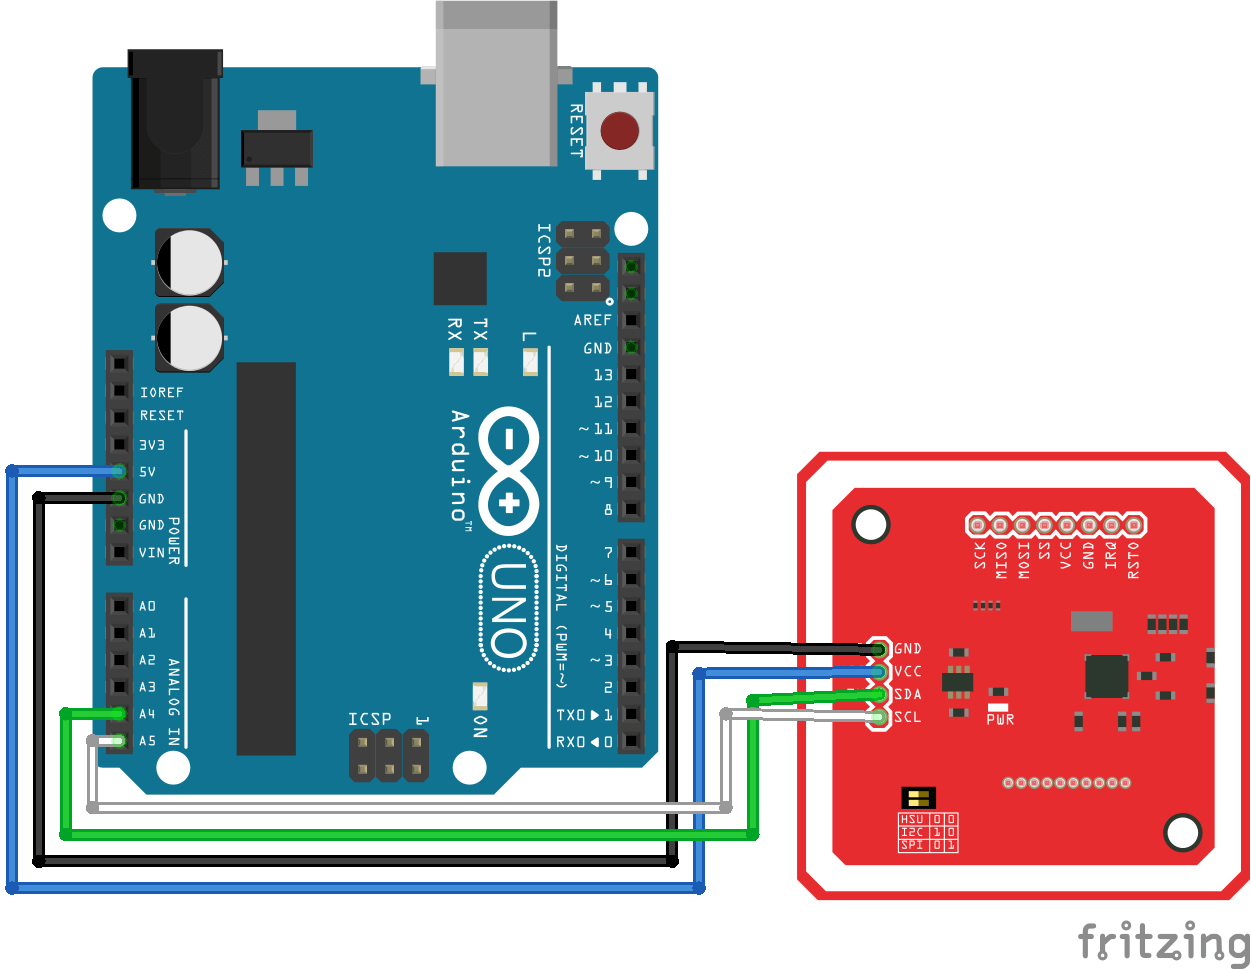
Schéma
Pour la communication I2C, Le brochage se fait comme suit :
- Vcc (Alimentation) <-> 5V
- GND (Masse) <-> GND
- SDA (Data) <-> A4
- SCL (Clock) <-> A5

Code pour la communication I2C
La librairie PN532_I2C.h pour la communication I2C
// for I2C Communication
#include <Wire.h>
#include <PN532_I2C.h>
#include <PN532.h>
#include <NfcAdapter.h>
PN532_I2C pn532_i2c(Wire);
NfcAdapter nfc = NfcAdapter(pn532_i2c);

String tagId = "None";
byte nuidPICC[4];

void setup(void) {
  Serial.begin(115200);
  Serial.println("System initialized");

  nfc.begin();
}

void loop() {
  readNFC();
}

void readNFC() {
  if (nfc.tagPresent())
  {
    NfcTag tag = nfc.read();
    tag.print();
    tagId = tag.getUidString();
  }
  delay(5000);
}
Utilisation du module avec SPI
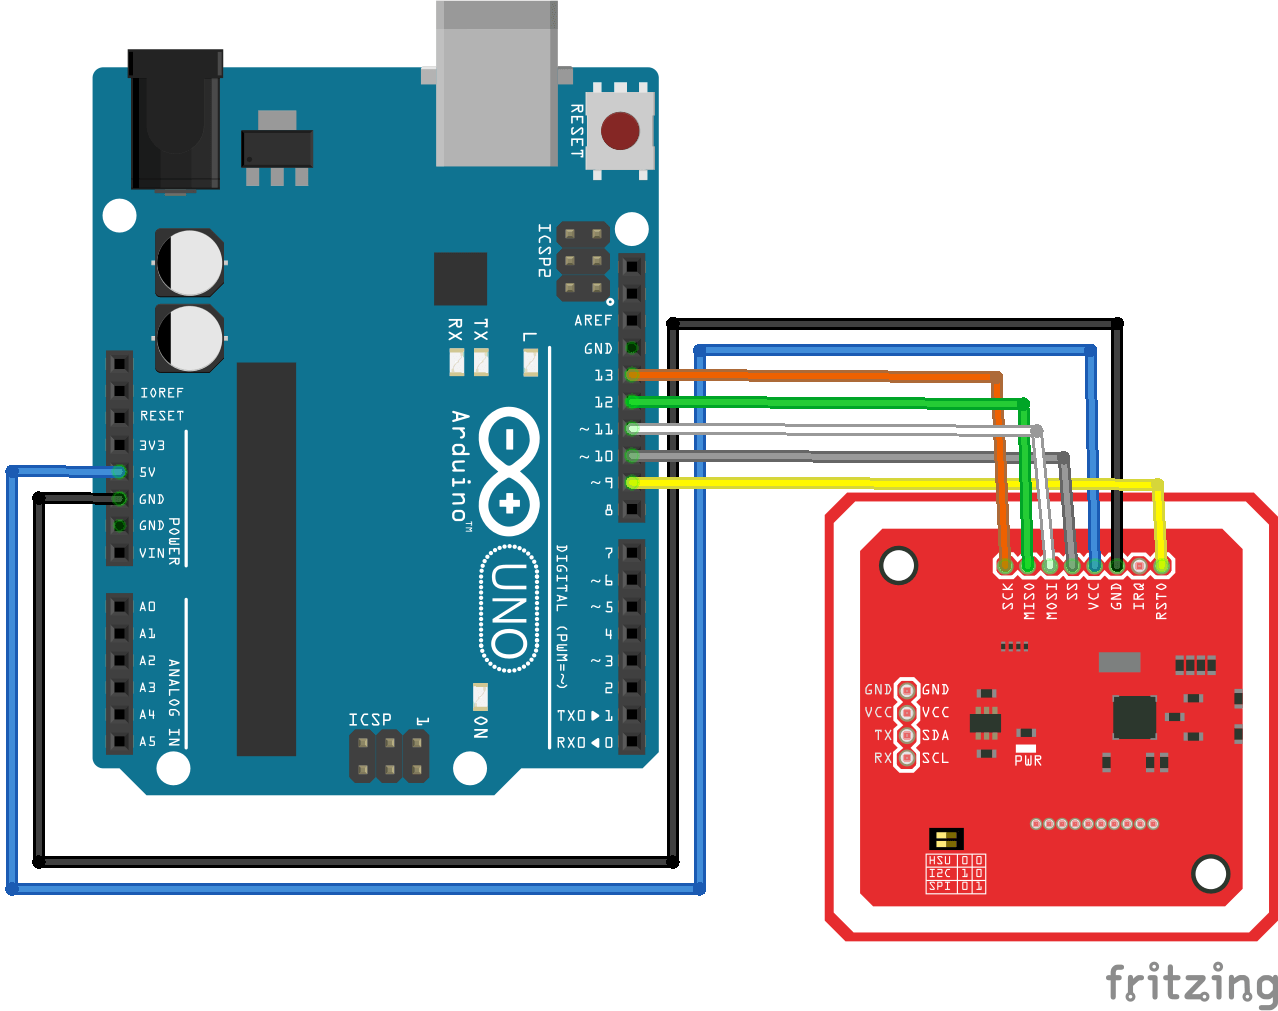
Schéma
Pour la communication SPI, Le brochage se fait comme suit:
- Vcc (Alimentation) <-> 5V/3V3
- RST (Reset) <-> 9
- GND (Masse) <-> GND
- MISO (Master Input Slave Output) <-> 11
- MOSI (Master Output Slave Input) <-> 12
- SCK (Serial Clock) <-> 13
- SS (Slave select) <-> 10

Code pour la communication SPI
PN532_SPI.h pour la communication via le port SPI.
// for SPI Communication
#include <SPI.h>
#include <PN532_SPI.h>
#include <PN532.h>
#include <NfcAdapter.h>
PN532_SPI interface(SPI, 10); // create a PN532 SPI interface with the SPI CS terminal located at digital pin 10
NfcAdapter nfc = NfcAdapter(interface); // create an NFC adapter object


String tagId = "None";

void setup(void) {
  Serial.begin(115200);
  Serial.println("System initialized");

  nfc.begin();
}

void loop() {
  readNFC();
}

void readNFC() {
  if (nfc.tagPresent())
  {
    NfcTag tag = nfc.read();
    tag.print();
    tagId = tag.getUidString();
  }
  delay(5000);
}
Applications
- Ouverture de serrure par carte magnétique
Sources
- https://github.com/elechouse/PN532
- https://github.com/elechouse/PN532/tree/PN532_HSU/PN532_HSU
- https://github.com/elechouse/PN532/tree/PN532_HSU/PN532_SWHSU
- https://github.com/elechouse/PN532/tree/PN532_HSU/PN532_SPI
- https://github.com/elechouse/PN532/tree/PN532_HSU/PN532_I2C
- https://github.com/elechouse/PN532/tree/PN532_HSU/NDEF
- https://www.arduino.cc/en/reference/wire
- https://www.arduino.cc/en/reference/SPI
Retrouvez nos tutoriels et d’autres exemples dans notre générateur automatique de code
La Programmerie