

Neste tutorial, veremos como configurar um menu de navegação com diferentes telas no React Native. Para fazer isso, vamos usar a biblioteca React Navigation
N.B.: Existe outra alternativa react-native-navigation, mas não funciona no meu ambiente.
Configurar o projeto React Native
npm install @react-navigation/native
npm install @react-navigation/native-stack
Em seguida, instale os seguintes pacotes
npm install --save react-native-screens react-native-safe-area-context
Para utilizar a navegação, é necessário atualizar o ficheiro MainActivity.java
android/app/src/main/java/<your package name>/MainActivity.javaAdicionar import android.os.Bundle; no início do ficheiro
e a função onCreate na classe MainActivity
  @Override
  protected void onCreate(Bundle savedInstanceState) {
    super.onCreate(null);
  }
MainActivity.java
package com.menuapp;

import com.facebook.react.ReactActivity;
import com.facebook.react.ReactActivityDelegate;
import com.facebook.react.defaults.DefaultNewArchitectureEntryPoint;
import com.facebook.react.defaults.DefaultReactActivityDelegate;

import android.os.Bundle;

public class MainActivity extends ReactActivity {

  /**
   * Returns the name of the main component registered from JavaScript. This is used to schedule
   * rendering of the component.
   */
  @Override
  protected String getMainComponentName() {
    return "MenuApp";
  }

  /**
   * Returns the instance of the {@link ReactActivityDelegate}. Here we use a util class {@link
   * DefaultReactActivityDelegate} which allows you to easily enable Fabric and Concurrent React
   * (aka React 18) with two boolean flags.
   */
  @Override
  protected ReactActivityDelegate createReactActivityDelegate() {
    return new DefaultReactActivityDelegate(
        this,
        getMainComponentName(),
        // If you opted-in for the New Architecture, we enable the Fabric Renderer.
        DefaultNewArchitectureEntryPoint.getFabricEnabled());
  }

  @Override
  protected void onCreate(Bundle savedInstanceState) {
    super.onCreate(null);
  }
}
Código da aplicação principal
No código principal da aplicação, index.js ou App.tsx, importamos o objeto NavigationContainer. Para o utilizar, basta rodear o código de renderização com a etiqueta correspondente. Neste exemplo, definimos duas páginas, cada uma com um botão que lhe permite ir para a outra página.
import * as React from 'react';
import { View, Button, Text } from 'react-native';
import { NavigationContainer } from '@react-navigation/native';
import { createNativeStackNavigator } from '@react-navigation/native-stack';

function HomeScreen({ navigation }) {
  return (
    <View style={{ flex: 1, alignItems: 'center', justifyContent: 'center' }}>
      <Text>Home Screen</Text>
      <Button
        title="Go to Details"
        onPress={() => navigation.navigate('Details')}
      />
    </View>
  );
}

function DetailsScreen({ navigation }) {
  return (
    <View style={{ flex: 1, alignItems: 'center', justifyContent: 'center' }}>
      <Text>Details Screen</Text>
      <Button
        title="Go to Details... again"
        onPress={() => navigation.push('Details')}
      />
      <Button title="Go to Home" onPress={() => navigation.navigate('Home')} />
      <Button title="Go back" onPress={() => navigation.goBack()} />
    </View>
  );
}
const Stack = createNativeStackNavigator();

function App() {
  return (
    <NavigationContainer>
      <Stack.Navigator initialRouteName="Home">
        <Stack.Screen name="Home" component={HomeScreen} options={{ headerShown: false }}/>
        <Stack.Screen name="Details" component={DetailsScreen} />
      </Stack.Navigator>
    </NavigationContainer>
  );
}

export default App;
Nota: pode escolher se quer ou não mostrar a barra de navegação utilizando a opção headerShown: false.
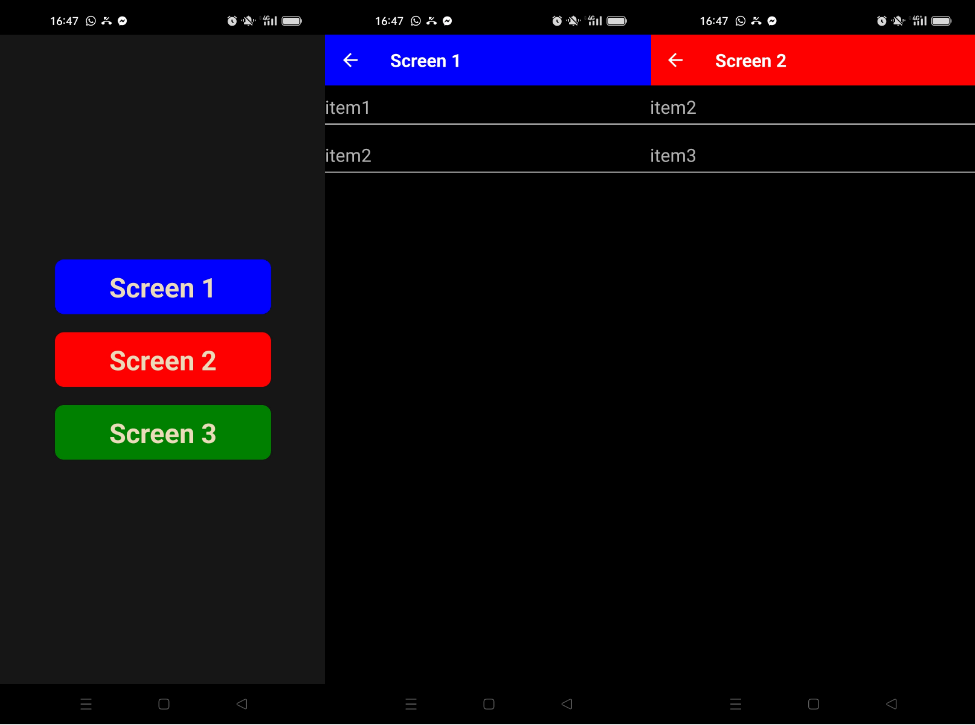
Exemplo: Criar um menu
Neste exemplo, vamos criar uma aplicação simples para apresentar diferentes ecrãs. Estes ecrãs baseiam-se no mesmo componente, que é adaptado de acordo com a informação contida numa lista.
Primeiro, criamos uma matriz que contém todas as informações de que precisamos
const screensArr = [
  {
    id: 1,
    color: "blue",
    text: "Screen 1",
    items: ["item1","item2"]
  },
  {
    id: 2,
    color: "red",
    text: "Screen 2",
    items: ["item2","item3"]
  },
  {
    id: 3,
    color: "green",
    text: "Screen 3",
    items: ["item1","item2","item3"]
  },
];
Componente principal
No componente principal, criamos uma lista de ecrãs Stack.Screen a partir do Array screensArr
const Stack = createNativeStackNavigator();

function App() {

  const screensListArr = screensArr.map(buttonInfo => (
    <Stack.Screen
    key={buttonInfo.id}
    name={buttonInfo.text}
    component={DetailsScreen}
    options={{
      headerStyle: {
        backgroundColor: buttonInfo.color,
      },
      headerTintColor: '#fff',
      headerTitleStyle: {
        fontWeight: 'bold',
      },
    }}
    />
  ));

  return (
    <NavigationContainer>
      <Stack.Navigator initialRouteName="Home">
        <Stack.Screen name="Home" component={HomeScreen} options={{ headerShown: false }}/>
        {/*<Stack.Screen name="Details" component={DetailsScreen} />*/}
        {screensListArr}
      </Stack.Navigator>
    </NavigationContainer>
  );
}

export default App;
Ecrã inicial
Em seguida, criamos o ecrã principal, que contém os botões para navegar para os outros ecrãs
Neste ecrã, adicionamos um botão para cada ecrã utilizando a função buttonListArr, que personalizamos com os dados contidos em screensArr.
function HomeScreen({ navigation }) {
  const menuItemClick = (buttonInfo: { id: any; color?: string; text: any; }) => {
    console.log(buttonInfo.id,' clicked :',buttonInfo.text);
    navigation.navigate(buttonInfo.text,buttonInfo); //'Details')
  };

  const buttonsListArr = screensArr.map(buttonInfo => (
    <Button
    key={buttonInfo.id}
    text={buttonInfo.text}
    onPress={() => menuItemClick(buttonInfo)}
    btnStyle={[styles.menuBtn,{backgroundColor:buttonInfo.color}]}
    btnTextStyle={styles.menuText}
    />
  ));


  return (
      <ScrollView>
        <View style={styles.mainBody}>
        {buttonsListArr}
        </View>
      </ScrollView>

  );
}
N.B.: note-se que existe uma única função para gerir vários botões menuItemClick(buttonInfo).
Ecrã de pormenor
Por fim, criamos a função DetailsScreen, que conterá as informações a apresentar para cada página.
Passamos os parâmetros da página quando chamamos a mudança de página
navigation.navigate(buttonInfo.text,buttonInfo);
const buttonInfo = route.params;
function DetailsScreen({ route, navigation }) {
  const buttonInfo = route.params;

  const itemsListArr = buttonInfo.items.map(item => (
    <View key={item} style={{marginTop:10,marginBottom:10,flexDirection:'row', width: "100%", borderBottomWidth: 1,borderBottomColor:"white",}} >
      <Text style={{marginBottom:5,fontSize: 20,}}>{item}</Text>
    </View>
  ));

  return (
    <View style={{
      flex: 1,
      //justifyContent: 'center',
      alignItems: 'center',
      //minHeight: windowHeight,
      color: "white",
      backgroundColor: "black",
    }}>
      {itemsListArr}
      {/*<Button text="Go back" btnStyle={styles.deviceButton} btnTextStyle={styles.buttonText} onPress={() => navigation.goBack()} />*/}
    </View>
  );
}
Resultados
Depois de a aplicação ter sido compilada e carregada no dispositivo, podemos navegar de um ecrã para outro.

Código de exemplo completo
App.tsx
/**
 * npm install --save react-native-navigation NOK
 * npm install @react-navigation/native
 * npm install @react-navigation/native-stack
 * https://reactnavigation.org/docs/getting-started
 */

import React from 'react';
import {
  View,
  Text,
  ScrollView,
} from 'react-native';
import { NavigationContainer } from '@react-navigation/native';
import { createNativeStackNavigator } from '@react-navigation/native-stack';

import Button from './src/ui_comp';
import {styles} from './src/styles/styles';

const screensArr = [
  {
    id: 1,
    color: "blue",
    text: "Screen 1",
    items: ["item1","item2"]
  },
  {
    id: 2,
    color: "red",
    text: "Screen 2",
    items: ["item2","item3"]
  },
  {
    id: 3,
    color: "green",
    text: "Screen 3",
    items: ["item1","item2","item3"]
  },
];

function HomeScreen({ navigation }) {
  const menuItemClick = (buttonInfo: { id: any; color?: string; text: any; }) => {
    console.log(buttonInfo.id,' clicked :',buttonInfo.text);
    navigation.navigate(buttonInfo.text,buttonInfo); //'Details')
  };


  const buttonsListArr = screensArr.map(buttonInfo => (
    <Button
    key={buttonInfo.id}
    text={buttonInfo.text}
    onPress={() => menuItemClick(buttonInfo)}
    btnStyle={[styles.menuBtn,{backgroundColor:buttonInfo.color}]}
    btnTextStyle={styles.menuText}
    />
  ));


  return (
      <ScrollView>
        <View style={styles.mainBody}>
        {buttonsListArr}
        </View>
      </ScrollView>

  );
}

function DetailsScreen({ route, navigation }) {
  const buttonInfo = route.params;

  const itemsListArr = buttonInfo.items.map(item => (
    <View key={item} style={{marginTop:10,marginBottom:10,flexDirection:'row', width: "100%", borderBottomWidth: 1,borderBottomColor:"white",}} >
      <Text style={{marginBottom:5,fontSize: 20,}}>{item}</Text>
    </View>
  ));

  return (
    <View style={{
      flex: 1,
      //justifyContent: 'center',
      alignItems: 'center',
      //minHeight: windowHeight,
      color: "white",
      backgroundColor: "black",
    }}>
      {itemsListArr}
      {/*<Button text="Go back" btnStyle={styles.deviceButton} btnTextStyle={styles.buttonText} onPress={() => navigation.goBack()} />*/}
    </View>
  );
}

const Stack = createNativeStackNavigator();

function App() {

  const screensListArr = screensArr.map(buttonInfo => (
    <Stack.Screen
    key={buttonInfo.id}
    name={buttonInfo.text}
    component={DetailsScreen}
    options={{
      headerStyle: {
        backgroundColor: buttonInfo.color,
      },
      headerTintColor: '#fff',
      headerTitleStyle: {
        fontWeight: 'bold',
      },
    }}
    />
  ));

  return (
    <NavigationContainer>
      <Stack.Navigator initialRouteName="Home">
        <Stack.Screen name="Home" component={HomeScreen} options={{ headerShown: false }}/>
        {/*<Stack.Screen name="Details" component={DetailsScreen} />*/}
        {screensListArr}
      </Stack.Navigator>
    </NavigationContainer>
  );
}

export default App;
styles.jsx
/* ./src/styles/styles.jsx */
import {StyleSheet, Dimensions} from 'react-native';

//parameters
let BACKGROUND_COLOR = "#161616"; //191A19
let BUTTON_COLOR = "#346751"; //1E5128
let ERROR_COLOR = "#C84B31"; //4E9F3D
let TEXT_COLOR = "#ECDBBA"; //D8E9A8

const windowHeight = Dimensions.get('window').height;
const windowWidth = Dimensions.get('window').width;

export const styles = StyleSheet.create({
  mainBody: {
    flex: 1,
    justifyContent: 'center',
    alignItems: 'center',
    minHeight: windowHeight,
    color:TEXT_COLOR,
    backgroundColor: BACKGROUND_COLOR,
  },

  menuBtn: {
    backgroundColor: BUTTON_COLOR,
    paddingBottom: 10,
    paddingTop: 10,
    borderRadius: 10,
    margin: 10,
    //height: windowHeight/3,
    width: windowHeight/3,
    justifyContent: 'center',
  },

  menuText: {
    color: TEXT_COLOR,
    fontWeight: 'bold',
    fontSize: 30,
	  textAlign: 'center',
  },


  buttonText: {
    color: TEXT_COLOR,
    fontWeight: 'bold',
    fontSize: 12,
	  textAlign: 'center',
    textAlignVertical: 'center',
  },

  noDevicesText: {
    color: TEXT_COLOR,
    textAlign: 'center',
    marginTop: 10,
    fontStyle: 'italic',
  },
  deviceItem: {
    flexDirection: 'row',
    justifyContent: 'space-between',
    marginBottom: 2,
  },
  deviceName: {
    color: TEXT_COLOR,
    fontSize: 14,
    fontWeight: 'bold',
  },
  deviceInfo: {
    color: TEXT_COLOR,
    fontSize: 10,
  },
  deviceButton: {
    backgroundColor: BUTTON_COLOR,
    padding: 10,
    borderRadius: 10,
    margin: 2,
    paddingHorizontal: 20,
    fontWeight: 'bold',
    fontSize: 12,
  },

  inputBar:{
    flexDirection: 'row',
    justifyContent: 'space-between',
    margin: 5,
  },

  textInput:{
    backgroundColor: '#888888',
    margin: 2,
    borderRadius: 15,
    flex:3,
  },

  sendButton: {
  backgroundColor: BUTTON_COLOR,
  padding: 15,
  borderRadius: 15,
  margin: 2,
  paddingHorizontal: 20,
  },

  textOutput:{
    backgroundColor: '#333333',
    margin: 10,
    borderRadius: 2,
    borderWidth: 1,
    borderColor: '#EEEEEE',
    textAlignVertical: 'top',
  }

});
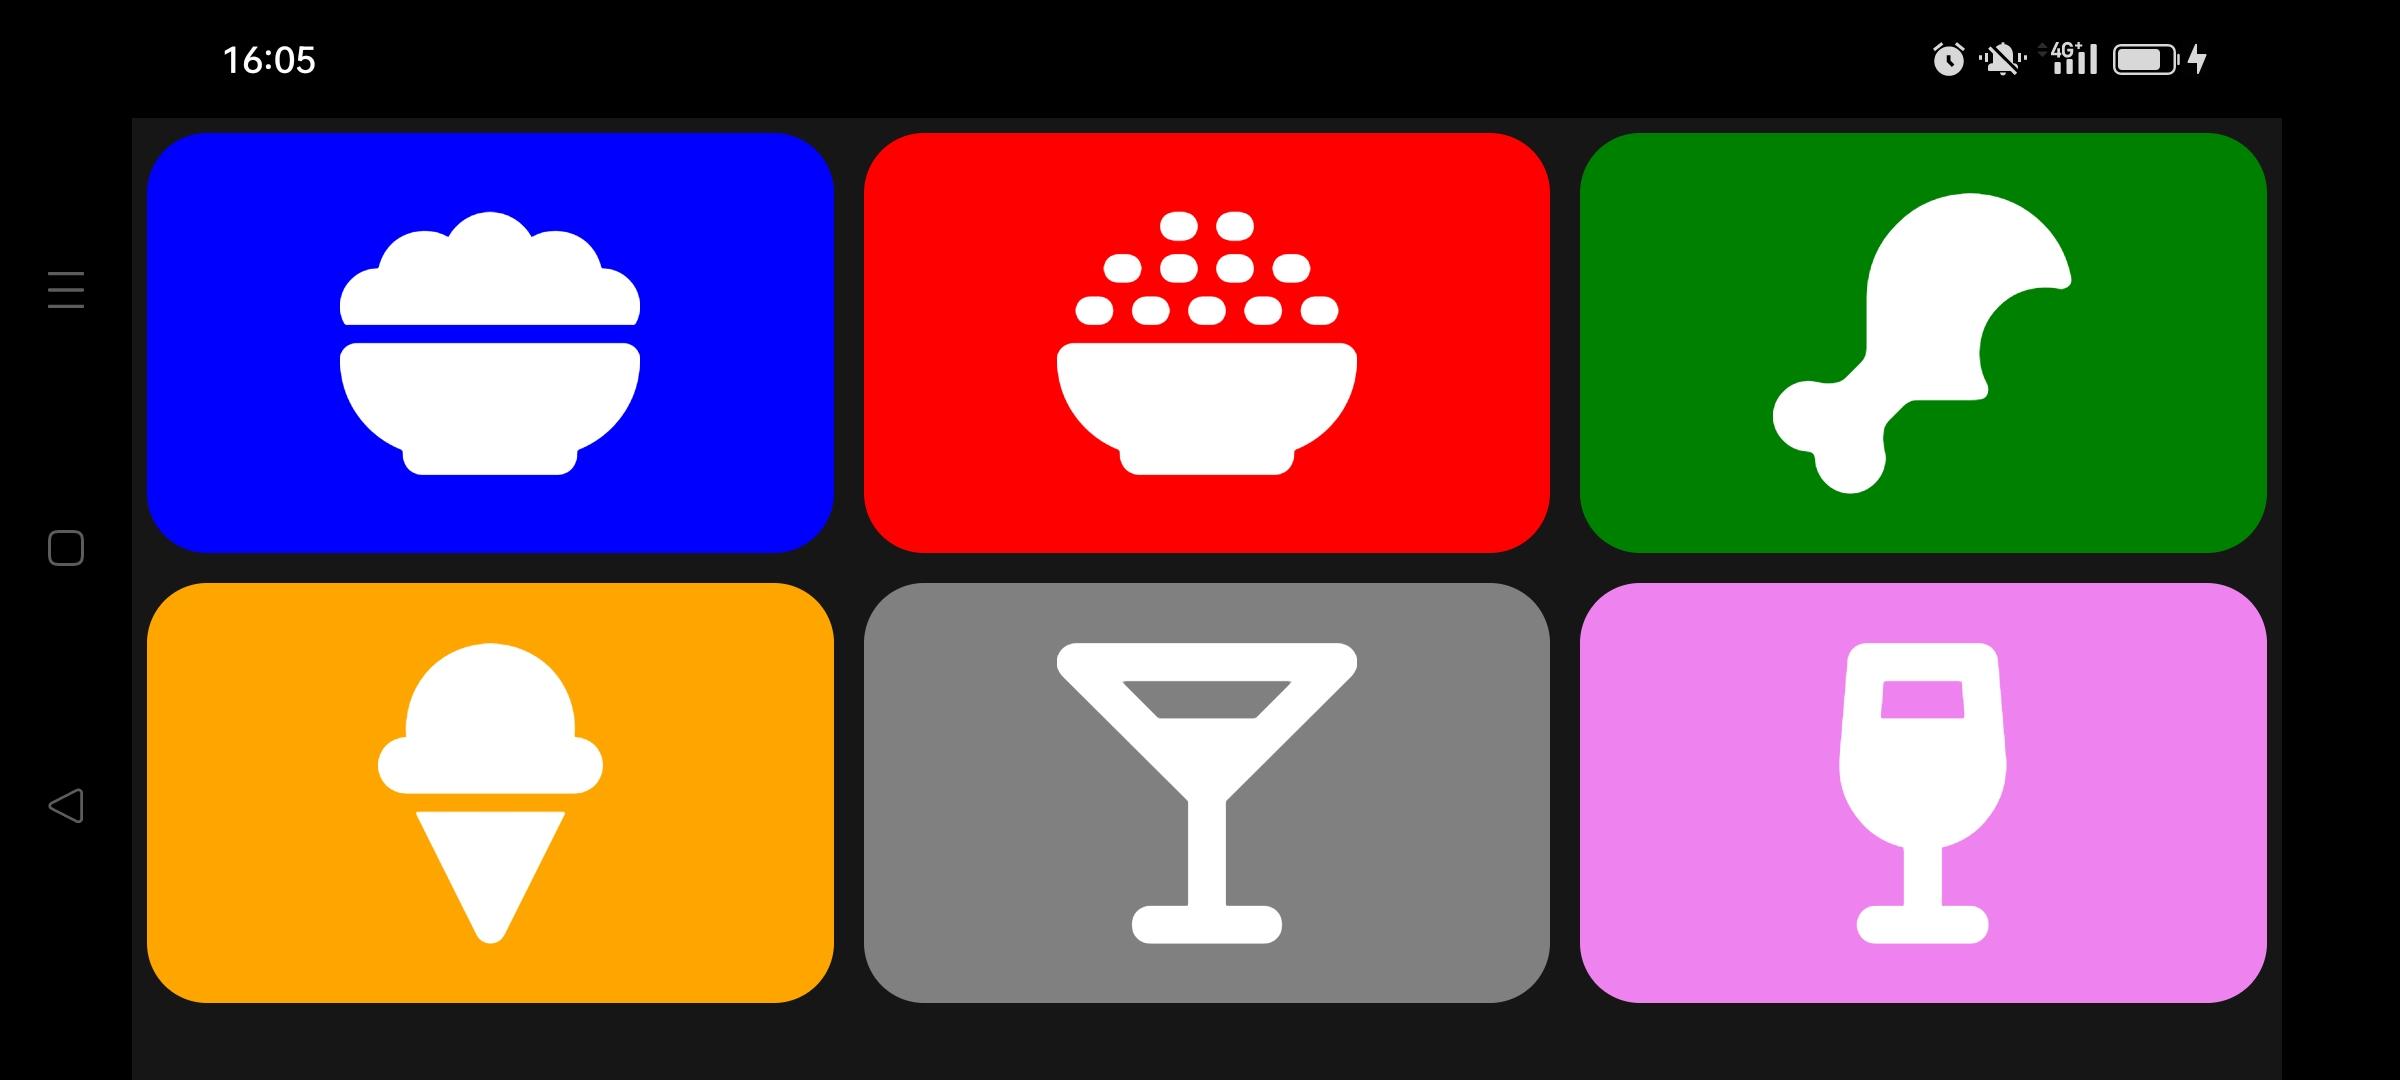
Bónus: Apresentar um ícone no botão
Pode adicionar ou substituir o texto por um ícone.
npm install react-native-vector-icons --save
Para tal, é necessário importar cada banco de ícones. Localize os ícones que pretende adicionar e em que banco
import Icon from 'react-native-vector-icons/FontAwesome6';
import IonIcon from 'react-native-vector-icons/Ionicons'
import MaterialIcon from 'react-native-vector-icons/MaterialIcons'
Pode então colocar o objeto Ícone correspondente ao banco que contém o ícone
<Button>
    <Icon name="ice-cream" size={icon_size} color={'white'} />
</Button>