

Todo computador é equipado com um relógio interno de tempo real (Real Time Clock) que lhe permite saber a data. Os microcontroladores Arduino não possuem RTC. O módulo DS3231 dá ao Arduino a capacidade de calcular a data, o que lhe permite um controle mais preciso do tempo.

Material
- Computador
- Arduino UNO
- Cabo USB A Macho/B Macho
- Real Time Clock DS3231
Princípio de funcionamento
Um módulo de relógio de tempo real é normalmente equipado com um oscilador de quartzo que mede o tempo, e com uma bateria que permite manter o registro desta medição quando a fonte de alimentação principal está desligada.
Esquema
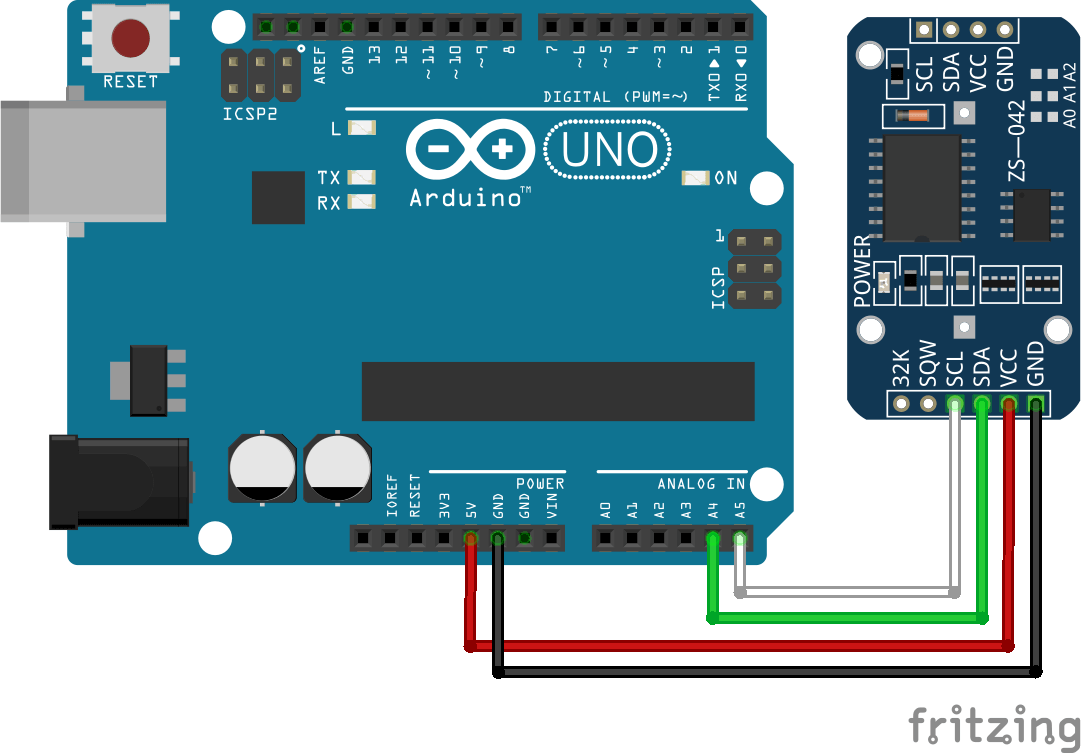
O módulo DS3231 utiliza comunicação I2C para fazer interface com o microcontrolador. As ligações são:
- SDA no pino A4
- SCL no pino A5
- VCC no pino 5V
- GND no pino GND

Código
Para comunicar com o módulo DS3231 usamos a biblioteca DS3231.h, que deve ser instalada no gerenciador de bibliotecas. Na primeira utilização do módulo ou quando a bateria é trocada, a hora e a data não estarão ajustadas. No código a seguir, é possível definir a data (incluindo a hora) introduzindo-a no monitor serial no formato YYMMDDwHHMMSSx. Depois de introduzi-la, reinicie a placa para que o módulo a leve em conta.
Com a data corretamente definida, pode recarregar o código suprimindo as partes setDate e getDateStuff.
//Libraries
#include <Wire.h>//https://www.arduino.cc/en/reference/wire
#include <DS3231.h>//https://github.com/NorthernWidget/DS3231

//Variables
byte Year ;
byte Month ;
byte Date ;
byte DoW ;
byte Hour ;
byte Minute ;
byte Second ;
bool Century  = false;
bool h12 ;
bool PM ;

//Objects
DS3231 Clock;

void setup() {
  //Init Serial USB
  Serial.begin(9600);
  Serial.println(F("Initialize System"));
  Wire.begin();
}

void loop() {
  setDate();//Comment once the date is set
  readRTC();
}

void readRTC( ) { /* function readRTC */
  ////Read Real Time Clock
  Serial.print(Clock.getYear(), DEC);
  Serial.print("-");
  Serial.print(Clock.getMonth(Century), DEC);
  Serial.print("-");
  Serial.print(Clock.getDate(), DEC);
  Serial.print(" ");
  Serial.print(Clock.getHour(h12, PM), DEC); //24-hr
  Serial.print(":");
  Serial.print(Clock.getMinute(), DEC);
  Serial.print(":");
  Serial.println(Clock.getSecond(), DEC);
  delay(1000);
}

void setDate( ) { /* function setDate */
  ////Set Real Time Clock
  if (Serial.available()) {

    //int _start = millis();

    GetDateStuff(Year, Month, Date, DoW, Hour, Minute, Second);

    Clock.setClockMode(false);  // set to 24h

    Clock.setSecond(Second);
    Clock.setMinute(Minute);
    Clock.setHour(Hour);
    Clock.setDate(Date);
    Clock.setMonth(Month);
    Clock.setYear(Year);
    Clock.setDoW(DoW);

  }
}

void GetDateStuff(byte& Year, byte& Month, byte& Day, byte& DoW, byte& Hour, byte& Minute, byte& Second) { /* function GetDateStuff */
  ////Get date data
  // Call this if you notice something coming in on
  // the serial port. The stuff coming in should be in
  // the order YYMMDDwHHMMSS, with an 'x' at the end.
  boolean GotString = false;
  char InChar;
  byte Temp1, Temp2;
  char InString[20];

  byte j = 0;
  while (!GotString) {
    if (Serial.available()) {
      InChar = Serial.read();
      InString[j] = InChar;
      j += 1;
      if (InChar == 'x') {
        GotString = true;
      }
    }
  }
  Serial.println(InString);
  // Read Year first
  Temp1 = (byte)InString[0] - 48;
  Temp2 = (byte)InString[1] - 48;
  Year = Temp1 * 10 + Temp2;
  // now month
  Temp1 = (byte)InString[2] - 48;
  Temp2 = (byte)InString[3] - 48;
  Month = Temp1 * 10 + Temp2;
  // now date
  Temp1 = (byte)InString[4] - 48;
  Temp2 = (byte)InString[5] - 48;
  Day = Temp1 * 10 + Temp2;
  // now Day of Week
  DoW = (byte)InString[6] - 48;
  // now Hour
  Temp1 = (byte)InString[7] - 48;
  Temp2 = (byte)InString[8] - 48;
  Hour = Temp1 * 10 + Temp2;
  // now Minute
  Temp1 = (byte)InString[9] - 48;
  Temp2 = (byte)InString[10] - 48;
  Minute = Temp1 * 10 + Temp2;
  // now Second
  Temp1 = (byte)InString[11] - 48;
  Temp2 = (byte)InString[12] - 48;
  Second = Temp1 * 10 + Temp2;
}
Resultado
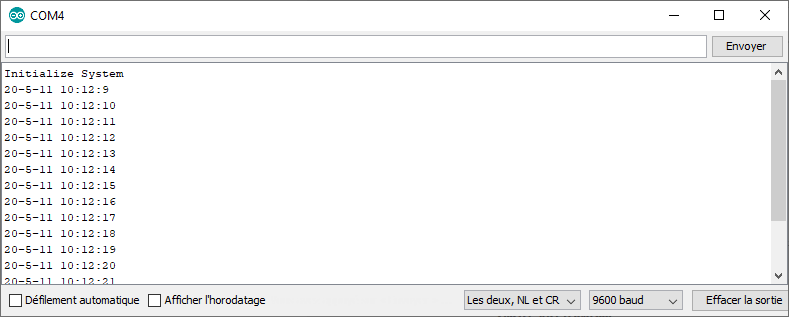
Depois de definir hora e data e de reinicializar a placa, a data é exibida a cada segundo. A função delay() foi adicionada para simplificar a visualização no monitor serial. Na prática, a função não é necessária quando se utiliza o módulo DS3231.

Aplicações
- Criar um despertador com o Arduino
Fontes
Retrouvez nos tutoriels et d’autres exemples dans notre générateur automatique de code
La Programmerie