In this tutorial we will see how to address each relay individually with a NodeMCU32S microcontroller and 74HC595 shift registers. At the end of this tutorial you will also be able to control each relay using the serial monitor. This tutorial follows on from the project Pilot 8 relays using an ESP32 and a shift register.
Ce tutoriel peut être appliqué à n’importe quel microcontrôleur. Il faudra faire attention à modifier le schéma de connexion et le code pour qu’ils correspondent à votre usage.
Material
- NodeMCU 32S
- Breadboard
- Jumper cable
- 8 relay module
- Shift register 74hc595
Principle
In the previous tutorial, we saw how to manage 8 relays using a shift register. We will now come to address each relay independently using the Arduino IDE’s serial monitor. It is possible to communicate with the microcontroller via the USB port using the serial port. We will therefore define a message structure to tell the microcontroller which relay to switch on.
Schematic
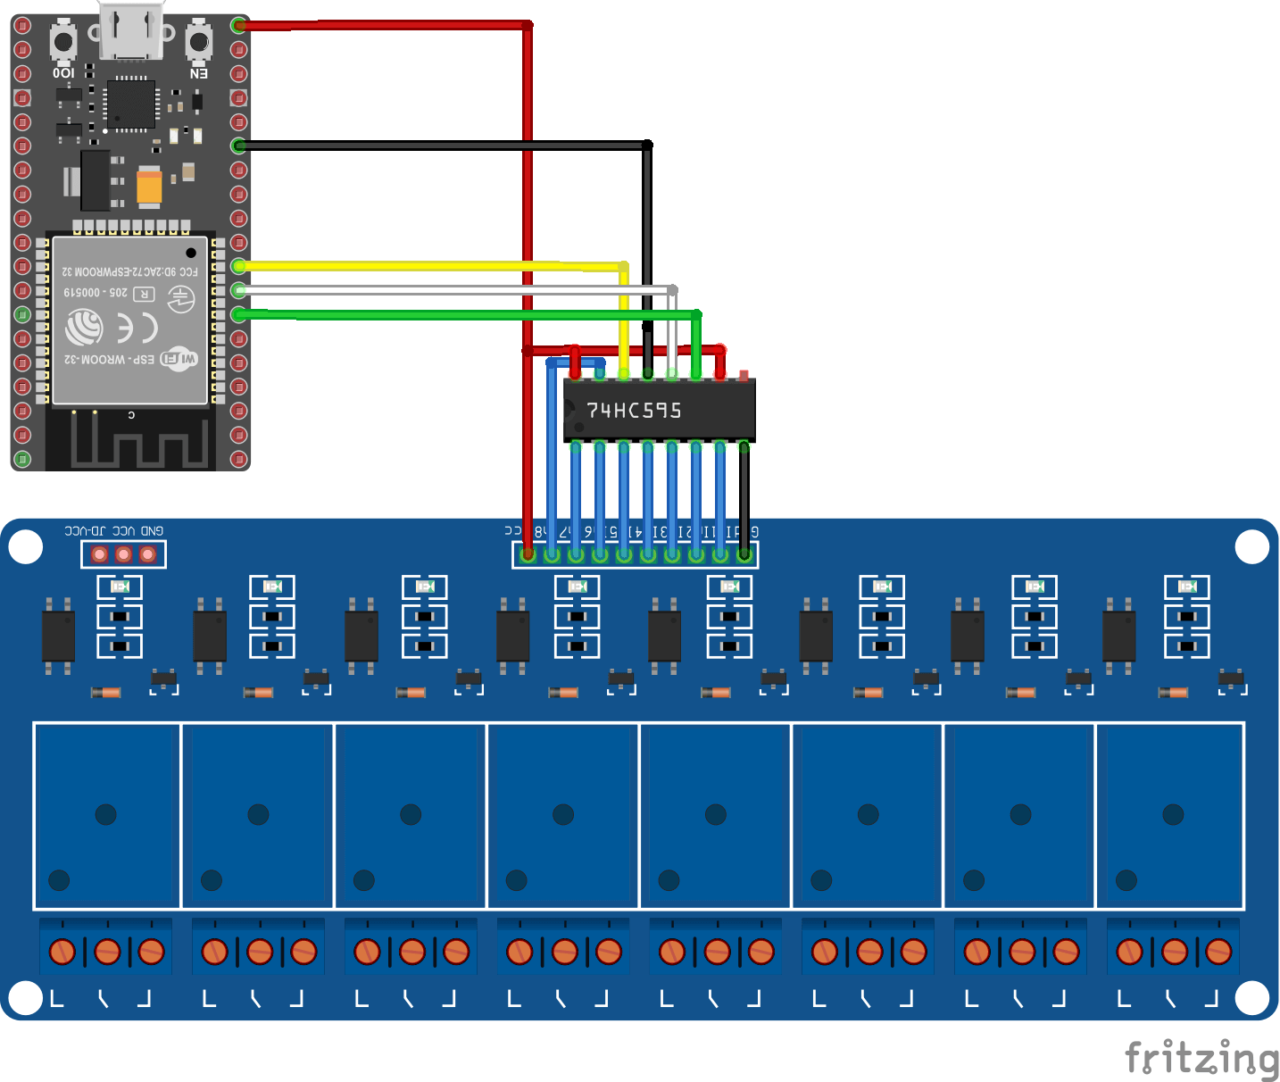
As a reminder, here is the connection diagram of the project
- GND integrated circuit ground
- Vcc power supply pin. Usually connected to 5V
- SH_CP or RCLK connected to pin 33
- ST_CP or SRCLK connected to pin 32
- DS or SER connected to pin 25

Code
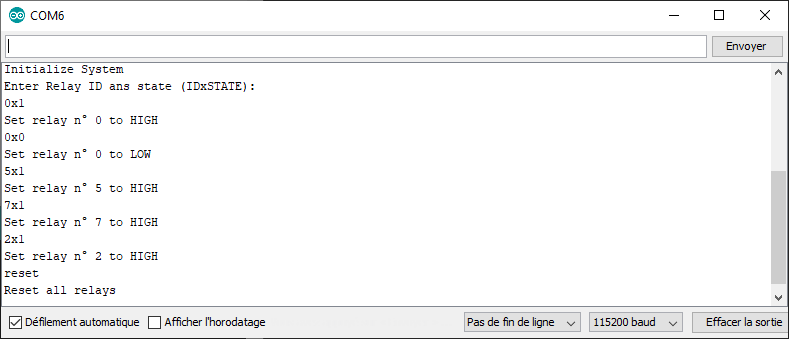
We are going to take the code from the previous tutorial and add the functions to receive messages from the serial monitor and recover the relay control commands. For the command messages, we choose the form “YYxZ”, with YY, the relay identifier, a number from 0 to 7; and Z, the relay status 0-open, 1-close.
The readSerialPort function, retrieves the characters sent by the serial monitor in the character string “msg”.
the convertMsgToCmd function will translate the string into a relayId identification number and the status of the relayState.
void readSerialPort() {
  while (Serial.available()) {
    delay(10);
    if (Serial.available() > 0) {
      char c = Serial.read();  //gets one byte from serial buffer
      msg += c;
    }
  }
}

void convertMsgToCmd() {
  relayId = -1;
  relayState = -1;
  if (msg.length() > 0) {
    Serial.println(msg);
    sep = msg.indexOf('x');
    if (sep > 0) {
      m1 = msg.substring(0, sep); //get servo id
      m2 = msg.substring(sep + 1, msg.length()); //get servo pos

      char carray1[6]; //magic needed to convert string to a number
      m1.toCharArray(carray1, sizeof(carray1));
      relayId = atoi(carray1);

      char carray2[6];
      m2.toCharArray(carray2, sizeof(carray2));
      relayState = atoi(carray2);

      relayState = 1 - relayState;
      Serial.print(F("Set relay n° ")); Serial.print(relayId); Serial.print(F(" to ")); Serial.println(!relayState ? "HIGH" : "LOW");
    }

    sep = msg.indexOf("reset");
    if (sep == 0) {
      m1 = "reset";
    }

    sep = msg.indexOf("states");
    if (sep == 0) {
      m1 = "states";
    }
    msg = "";
  }
}
Once the values relayId and relayState have been retrieved, they can be set as the input for the setRegisterPin function (relayId, relayState); in order to activate or deactivate the relay. It is possible to create as many messages as you wish. Here, for example, I have added the “reset” command to open all the relays and the “states” command to display the states of each relay.
//Constants
#define number_of_74hc595s 1
#define numOfRegisterPins number_of_74hc595s * 8
#define SER_Pin 25
#define RCLK_Pin 33
#define SRCLK_Pin 32

//Variables
boolean registers[numOfRegisterPins];
String msg, m1, m2;
int sep, relayId, relayState;

void setup() {
  delay(100);
  //Init Serial USB
  Serial.begin(115200);
  Serial.println(F("Initialize System"));
  //Init register
  pinMode(SER_Pin, OUTPUT);
  pinMode(RCLK_Pin, OUTPUT);
  pinMode(SRCLK_Pin, OUTPUT);
  clearRegisters();
  writeRegisters();
  delay(500);
  Serial.println(F("Enter Relay ID ans state (IDxSTATE):"));
}

void loop() {
  readSerialPort();
  convertMsgToCmd();
  if (relayId >= 0 and relayState >= 0) {
    setRegisterPin(relayId, relayState);
    writeRegisters();
  }
  if (m1 == "reset") {
    Serial.println(F("Reset all relays"));
    clearRegisters();
    writeRegisters();
  }
  if (m1 == "states") {
    Serial.println(F("print relays states"));
    printRegisters();
  }
  m1 = "";
}

void clearRegisters() { /* function clearRegisters */
  //// Clear registers variables
  for (int i = numOfRegisterPins - 1; i >=  0; i--) {
    registers[i] = HIGH;
  }
  printRegisters();
}

void writeRegisters() { /* function writeRegisters */
  //// Write register after being set
  digitalWrite(RCLK_Pin, LOW);
  for (int i = numOfRegisterPins - 1; i >=  0; i--) {
    digitalWrite(SRCLK_Pin, LOW);
    digitalWrite(SER_Pin, registers[i]);
    digitalWrite(SRCLK_Pin, HIGH);
  }
  digitalWrite(RCLK_Pin, HIGH);
}

void setRegisterPin(int index, int value) { /* function setRegisterPin */
  ////Set register variable to HIGH or LOW
  registers[index] = value;
}

void printRegisters() { /* function clearRegisters */
  //// Clear registers variables
  for (int i = 0; i < numOfRegisterPins; i++) {
    Serial.print(registers[i]); Serial.print(F(" ,"));
  }
  Serial.println();
}

void readSerialPort() {
  while (Serial.available()) {
    delay(10);
    if (Serial.available() > 0) {
      char c = Serial.read();  //gets one byte from serial buffer
      msg += c;
    }
  }
}

void convertMsgToCmd() {
  relayId = -1;
  relayState = -1;
  if (msg.length() > 0) {
    Serial.println(msg);
    sep = msg.indexOf('x');
    if (sep > 0) {
      m1 = msg.substring(0, sep); //get servo id
      m2 = msg.substring(sep + 1, msg.length()); //get servo pos

      char carray1[6]; //magic needed to convert string to a number
      m1.toCharArray(carray1, sizeof(carray1));
      relayId = atoi(carray1);

      char carray2[6];
      m2.toCharArray(carray2, sizeof(carray2));
      relayState = atoi(carray2);

      relayState = 1 - relayState;
      Serial.print(F("Set relay n° ")); Serial.print(relayId); Serial.print(F(" to ")); Serial.println(!relayState ? "HIGH" : "LOW");
    }

    sep = msg.indexOf("reset");
    if (sep == 0) {
      m1 = "reset";
    }

    sep = msg.indexOf("states");
    if (sep == 0) {
      m1 = "states";
    }
    msg = "";
  }
}
Result
Once the code has been loaded into the microcontroller, open the serial monitor. You can enter the relay ID (0 – 7) and the desired state (0-open, 1-closed). For example, to close relay 2, type 2×1 and then “enter” or “send”.