

One of the most common examples when learning programming with Arduino is the management of a push button. Indeed, one of the most useful functions to develop is to be able to interact with the Arduino board. The most minimalist interface is a push button input and the serial monitor output. In addition, the functionality that can be developed on a push button can be applied to many sensors (switch, magnetic sensor, RFID, etc.). We will see here some of these features.
Equipment
- Computer
- Arduino UNO
- USB cable to connect the Arduino to the computer
- Pushbutton
Connection diagram
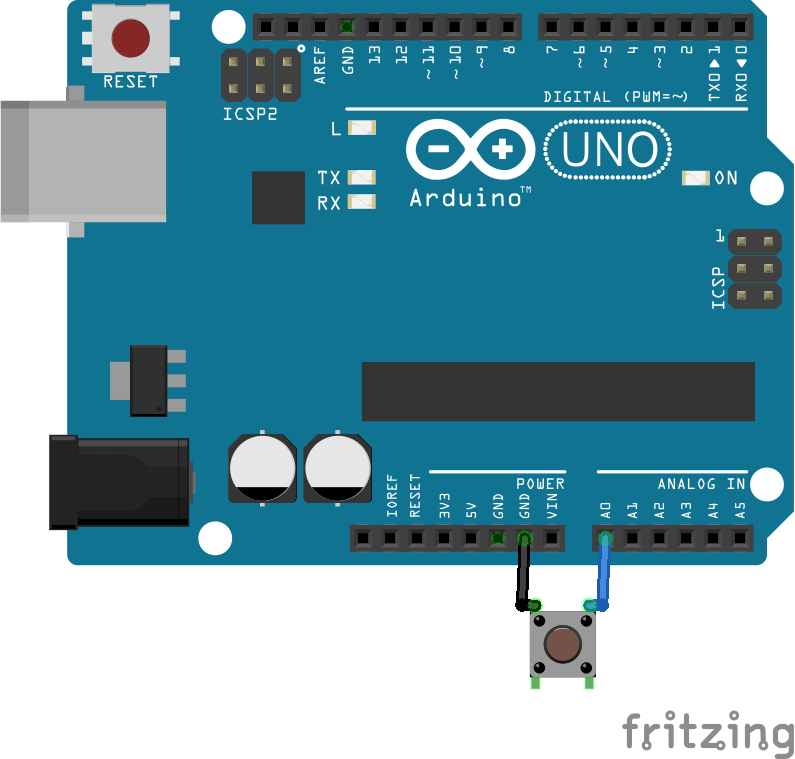
There are different ways to connect a button to the Arduino board. The easiest way is to connect it between ground and an analog input on the Arduino. For the button press to be detected correctly, we will add a pullup resistor available by the code. Thus, the state will be high (1024) when the button is released (0) and low when the button is pressed.
Basic code
In this example, we will detect whether the button is pressed or not.
//Parameters
const int btnPin  = A0;

//Variables
int btnVal  = 0;

void setup(){
//Init Serial USB
Serial.begin(9600);
Serial.println(F("Initialize System"));
//Init btn
pinMode(btnPin,INPUT_PULLUP);
}

void loop() {
  ////Read pushbutton
  btnVal=analogRead(btnPin);
  Serial.print(btnVal);
  Serial.print(F("-->"));
  if(btnVal<200){
    Serial.println(F("Button is pressed"));
  }else{
    Serial.println(F("Button is released"));
  }
  delay(100);
}
The code will constantly read the analog input and write “button pressed” or “released” which is not very clean or easy to debug.
Button state detection code
One way to improve this code is to add a variable that records the state of the button. This allows the result to be displayed only once when the button has changed state.
//Parameters
const int btnPin  = A0;

//Variables
int btnVal  = 0;
bool btnState  = false;
bool oldbtnState  = false;

void setup(){
//Init Serial USB
Serial.begin(9600);
Serial.println(F("Initialize System"));
//Init btn
pinMode(btnPin,INPUT_PULLUP);
}

void loop(){
testPushBtn();
}

void testPushBtn( ){/* function testPushBtn */
////Read pushbutton
btnVal=analogRead(btnPin);
if(btnVal<200){
  btnState=true;
  if(oldbtnState!=btnState) Serial.print(btnVal);Serial.print(F("-->"));Serial.println(F("Button was pressed"));
}else{
  btnState=false;
  if(oldbtnState!=btnState) Serial.print(btnVal);Serial.print(F("-->"));Serial.println(F("Button was released"));
}
oldbtnState=btnState;
}
Code to transform a push button into a switch
Once the state of the button is in memory, it is easy to transform the push button into a switch. In this example, the LED lights up when the button is pressed and goes out when the button is pressed again.
//Parameters
const int btnPin  = A0;
const int ledPin = 13;

//Variables
int btnVal  = 0;
bool btnState  = false;
bool oldbtnState  = false;
bool ledState  = LOW;


void setup() {
  //Init Serial USB
  Serial.begin(9600);
  Serial.println(F("Initialize System"));
  //Init btn
  pinMode(btnPin, INPUT_PULLUP);
  pinMode(ledPin, OUTPUT);
}

void loop() {
  testPushBtn();
}

void testPushBtn( ) { /* function testPushBtn */
  ////Read pushbutton
  btnVal = analogRead(btnPin);
  if (btnVal < 200) {
    btnState = true;
  } else {
    btnState = false;
  }

  if (oldbtnState != btnState) {
    if(btnState==true){
      Serial.print(F("Button was pressed")); Serial.print(F("-->")); Serial.print(F("LED "));
      ledState = !ledState;
      Serial.println(ledState);
      digitalWrite(ledPin, ledState);
    }
  }

  oldbtnState = btnState;
}
Mix and modify these examples to get the functionality you want. It is also necessary in some cases to add sliding average or debounce functions.
For a more advanced management of the push button, you can use an interrupt to detect the state of the button.
Application
- Create a minimalist interface for your project
Sources
Find other examples and tutorials in our Automatic code generator
Code Architect