
Uma das aplicações dos sensores capacitivos é a criação de um interrutor tátil para acender uma lâmpada, por exemplo. Neste projeto, vamos conceber um sensor capacitivo com o Arduino que vamos utilizar como interrutor tátil para ligar e desligar uma lâmpada.
Hardware
- Arduino Nano
- Resistência de 10M Ohm
- Relé
- fio elétrico ou material condutor
- Conversor AC
Esquema elétrico
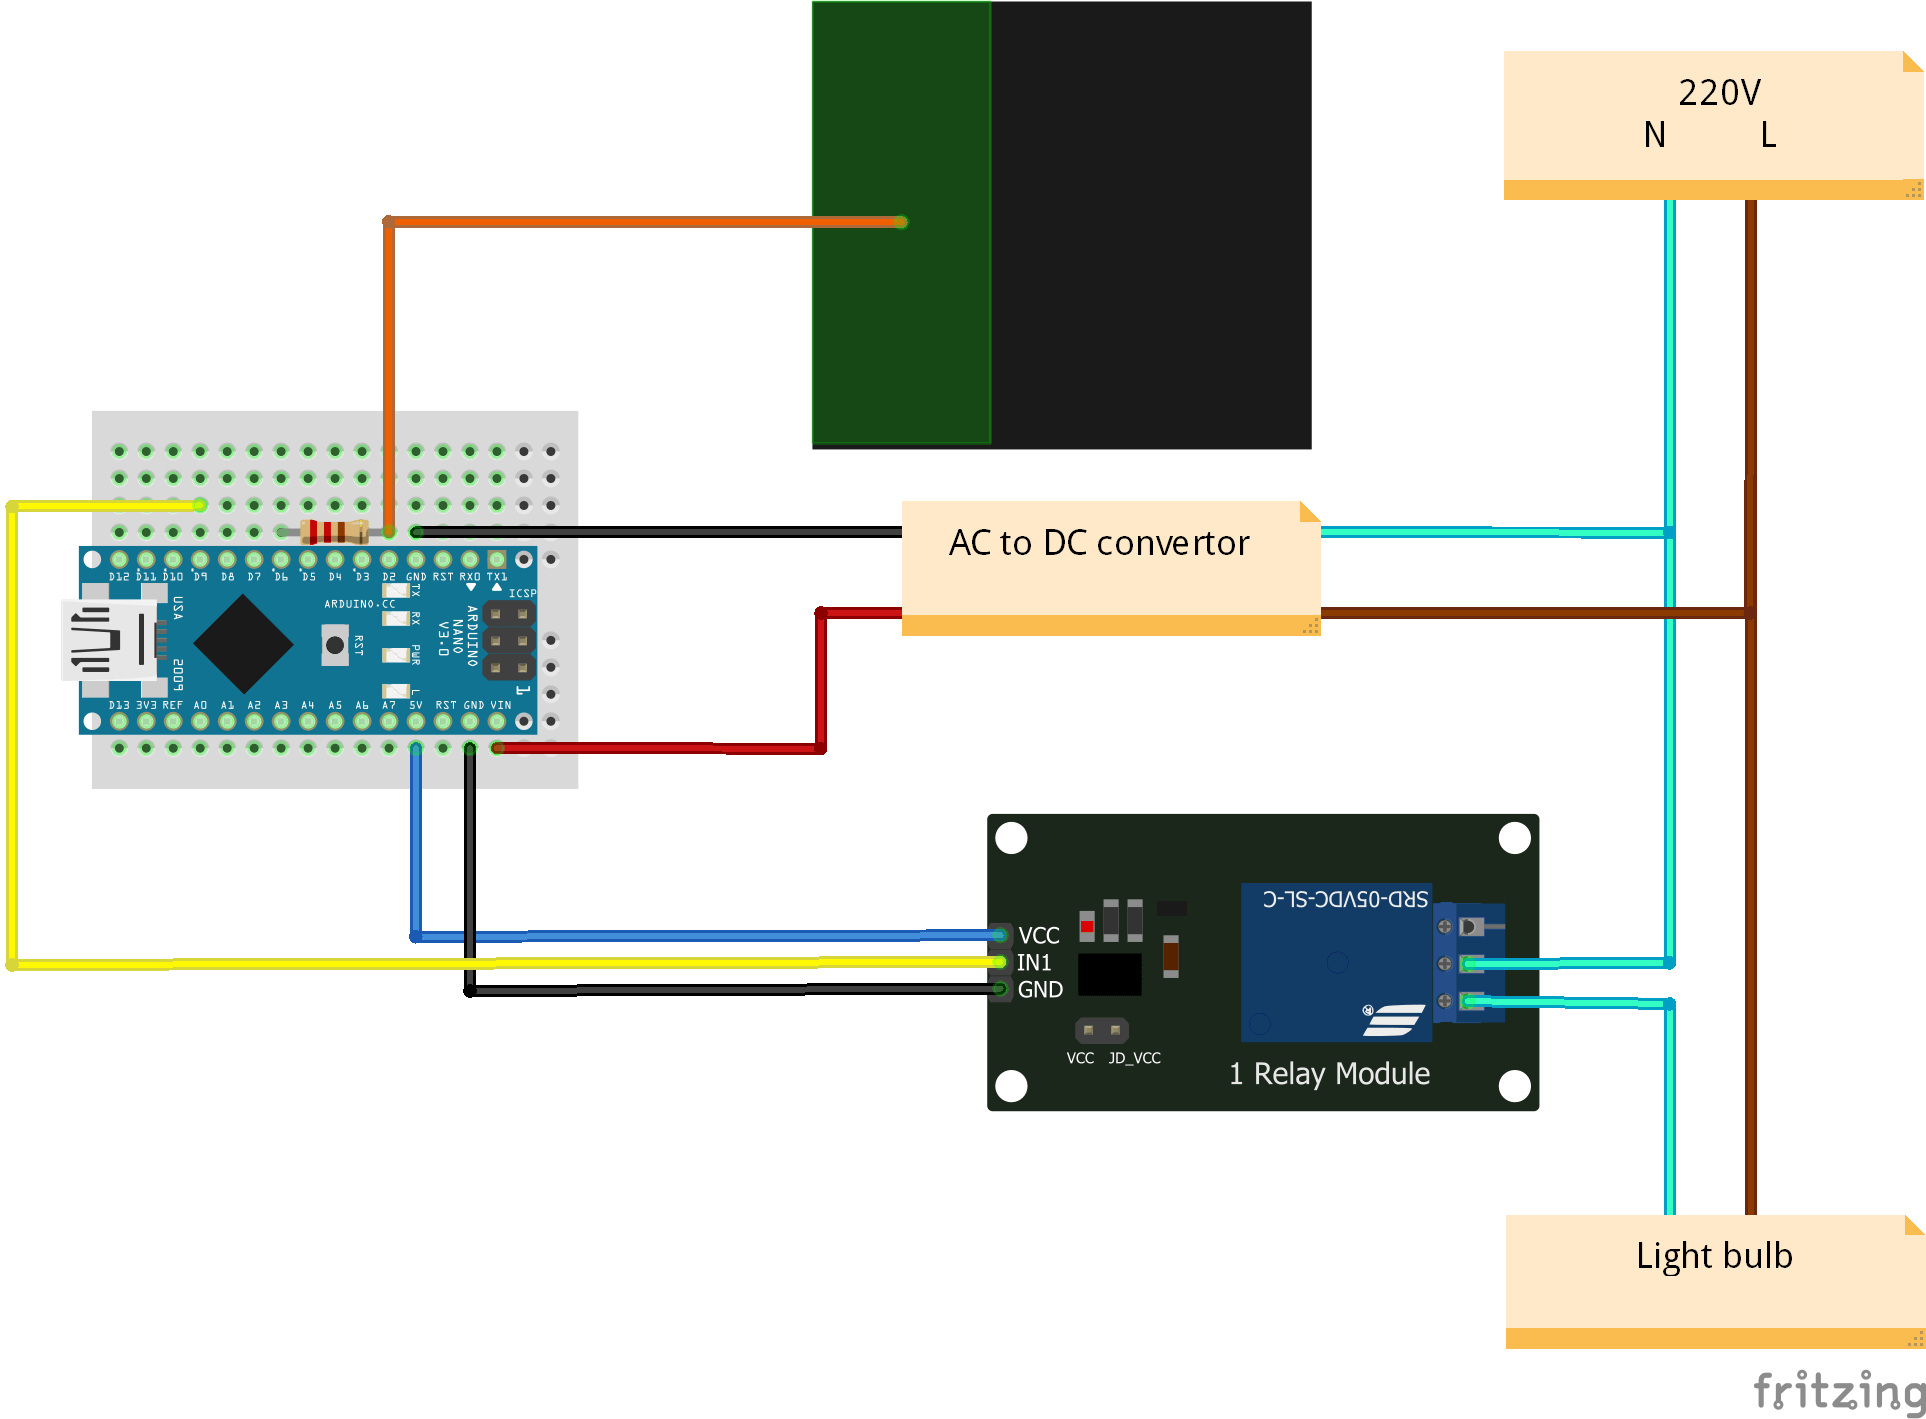
Atenção: este projeto utiliza 220V. Tome as precauções necessárias para evitar eletrocussão.
Código
Para criar um sensor capacitivo, utilizamos a biblioteca CapacitiveSensor. Quando o sensor capacitivo muda de estado, modificamos o estado enviado ao relé para abrir ou fechar o circuito.
#include <CapacitiveSensor.h>
#define DEBUG 0

//Capacitive sensor
CapacitiveSensor   cs_6_2 = CapacitiveSensor(6, 2);       // 10M resistor between pins 6 & 2, pin 2 is sensor pin, add a wire and or foil if desired
const int sensitivity  = 50;
long val;

//Light
const int lightPin = 9;
bool lightState = false;
bool btnState = false, oldState = false;

//smooth
long smoothval, total;
const int numReadings  = 3;
long readings[numReadings] = {0};
int readIndex;

long threshVal=500;

void setup()
{
  pinMode(lightPin, OUTPUT);
  cs_6_2.set_CS_AutocaL_Millis(0xFFFFFFFF);     // turn off autocalibrate on channel 1 - just as an example
  Serial.begin(9600);
  Serial.println("Touchless lamp initialized");
  delay(2000);

  for (int i = 0; i < numReadings; i++) {
    val =  cs_6_2.capacitiveSensor(sensitivity);// increase for hi
    smoothval = smooth(val);
  }
}

void loop()
{
  val =  cs_6_2.capacitiveSensor(sensitivity);// increase for hi
  smoothval = smooth(val);

  if (DEBUG) {
    //Serial.print(millis() - timeStart);        // check on performance in milliseconds
    Serial.print("\t");                    // tab character for debug window spacing
    Serial.print(val);                  // print sensor output 1
    Serial.print("\t");
    Serial.print(smoothval);                  // print sensor smooth output
    Serial.println();                  // print sensor smooth output
  }

  // condition
  if (btnState == false && smoothval > threshVal) {
    btnState = true;
  }
  if (btnState == true && smoothval <= threshVal*0.8) {
    btnState = false;
  }

  if (oldState != btnState) {
    if (oldState == false) {
      lightState = !lightState;
    }
    digitalWrite(lightPin, lightState);
    delay(200);
  }
  oldState = btnState;

  delay(100);         // arbitrary delay to limit data to serial port
}

long smooth(long val) { /* function smooth */
  ////Write data on device

  long average;
  // subtract the last reading:
  total = total - readings[readIndex];
  // read from the sensor:
  readings[readIndex] = val;//cs.capacitiveSensor(sensitivity);
  // add the reading to the total:
  total = total + readings[readIndex];
  // advance to the next position in the array:
  readIndex = readIndex + 1;

  // if we're at the end of the array...
  if (readIndex >= numReadings) {
    // ...wrap around to the beginning:
    readIndex = 0;
  }

  // calculate the average:
  average = total / numReadings;
  // send it to the computer as ASCII digits

  return average;
}
Resultados
Quando aproxima a sua mão do fio que funciona como interrutor tátil, a lâmpada deve acender-se ou apagar-se. Cabe-lhe a si ajustar a sensibilidade do sensor, a resistência e o valor limite (threshVal) para obter o comportamento desejado.
Próximas etapas
- Melhorar a robustez do sensor capacitivo face a perturbações externas
- Adicionar uma função para desligar a lâmpada automaticamente após um determinado período de tempo