,
A biblioteca OpenCV é utilizada para o processamento de imagens, nomeadamente para o reconhecimento de formas e cores. A biblioteca tem funções de aquisição e algoritmos de processamento de imagem que tornam o reconhecimento de imagem bastante simples, sem necessidade de inteligência artificial. É sobre isso que vamos debruçar-nos neste tutorial.
Este tutorial pode ser aplicado a qualquer computador com uma instalação Python com OpenCV e uma câmara. Em particular o Raspberry Pi.
Hardware
- Computador com uma instalação python3
Preparar o ambiente de trabalho
Para criar o script de reconhecimento de formas, instalámos os módulos OpenCV, numpy e imutils para manipular e processar as imagens.
pip3 install opencv-python numpy imutilsA deteção de cores é efectuada utilizando os módulos webcolors e scipy (KDTree)
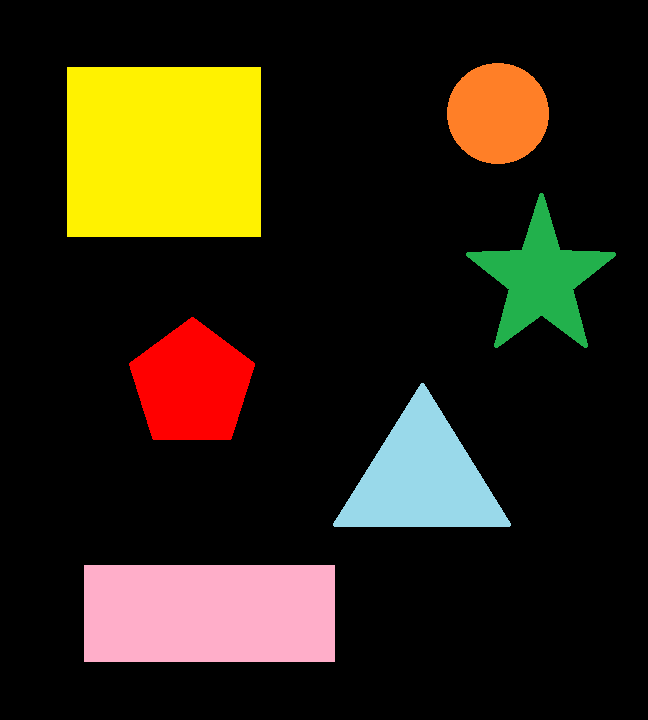
pip3 install webcolors scipyPara testar e validar o algoritmo, criamos uma imagem com objectos de diferentes formas e cores. Pode criar a sua própria imagem com o Paint ou utilizar esta:
Princípio de funcionamento
No código seguinte, vamos criar uma classe de deteção de formas que nos permitirá selecionar uma forma com base no número de contornos encontrados. Depois, vamos definir uma função para encontrar o nome da cor com base no seu código RGB. Por fim, vamos utilizar o OpenCV para carregar, filtrar e mascarar a imagem de modo a detetar as formas e as cores contidas na imagem.
Código completo para reconhecimento simples de formas e cores
É necessário criar o ficheiro python ObjectDetection.py na mesma pasta que a imagem que pretende analisar.
#!/usr/bin/env python
# -*- coding: utf-8 -*-

# import the necessary packages
import cv2
import numpy as np
import imutils

#colors
from webcolors import rgb_to_name,CSS3_HEX_TO_NAMES,hex_to_rgb #python3 -m pip install webcolors
from scipy.spatial import KDTree

def convert_rgb_to_names(rgb_tuple):
    # a dictionary of all the hex and their respective names in css3
    css3_db = CSS3_HEX_TO_NAMES#css3_hex_to_names
    names = []
    rgb_values = []
    for color_hex, color_name in css3_db.items():
        names.append(color_name)
        rgb_values.append(hex_to_rgb(color_hex))

    kdt_db = KDTree(rgb_values)
    distance, index = kdt_db.query(rgb_tuple)
    return names[index]

class ShapeDetector:
	def __init__(self):
		pass
	def detect(self, c):
		# initialize the shape name and approximate the contour
		shape = "unidentified"
		peri = cv2.arcLength(c, True)
		approx = cv2.approxPolyDP(c, 0.04 * peri, True)

		# if the shape is a triangle, it will have 3 vertices
		if len(approx) == 3:
			shape = "triangle"
		# if the shape has 4 vertices, it is either a square or
		# a rectangle
		elif len(approx) == 4:
			# compute the bounding box of the contour and use the
			# bounding box to compute the aspect ratio
			(x, y, w, h) = cv2.boundingRect(approx)
			ar = w / float(h)
			# a square will have an aspect ratio that is approximately
			# equal to one, otherwise, the shape is a rectangle
			shape = "square" if ar >= 0.95 and ar <= 1.05 else "rectangle"
		# if the shape is a pentagon, it will have 5 vertices
		elif len(approx) == 5:
			shape = "pentagon"
		elif len(approx) == 6:
			shape = "hexagon"
		elif len(approx) == 10 or len(approx) == 12:
			shape = "star"
		# otherwise, we assume the shape is a circle
		else:
			shape = "circle"
		# return the name of the shape
		return shape

if __name__ == '__main__':
	# load the image and resize it to a smaller factor so that
	# the shapes can be approximated better
	image = cv2.imread('python_shapes_detection_base.PNG')
	resized = imutils.resize(image, width=300)
	ratio = image.shape[0] / float(resized.shape[0])

	# convert the resized image to grayscale, blur it slightly,
	# and threshold it
	gray = cv2.cvtColor(resized, cv2.COLOR_BGR2GRAY)
	blurred = cv2.GaussianBlur(gray, (5, 5), 0)
	thresh = cv2.threshold(blurred, 60, 255, cv2.THRESH_BINARY)[1]

	# find contours in the thresholded image and initialize the
	# shape detector
	cnts = cv2.findContours(thresh.copy(), cv2.RETR_EXTERNAL,
		cv2.CHAIN_APPROX_SIMPLE)
	cnts = imutils.grab_contours(cnts)
	sd = ShapeDetector()

	# loop over the contours
	for c in cnts:
		# compute the center of the contour
		M = cv2.moments(c)
		cX = int((M["m10"] / M["m00"]) * ratio)
		cY = int((M["m01"] / M["m00"]) * ratio)

		#detect shape from contour
		shape = sd.detect(c)

		# resize the contour
		c = c.astype("float")
		c *= ratio
		c = c.astype("int")
		cv2.drawContours(image, [c], -1, (0, 255, 0), 2)

		#draw contour with mask
		mask = np.zeros(image.shape[:2], np.uint8)
		cv2.drawContours(mask, [c], -1, 255, -1)
		img = cv2.cvtColor(image, cv2.COLOR_BGR2HSV)

		#Convert to RGB and get color name
		imgRGB = cv2.cvtColor(image, cv2.COLOR_BGR2RGB)
		mean=cv2.mean(imgRGB, mask=mask)[:3]
		named_color = convert_rgb_to_names(mean)

		#get complementary color for text
		mean2 = (255-mean[0],255-mean[1],255-mean[2])

		#display shape name and color
		objLbl=shape+" {}".format(named_color)
		textSize = cv2.getTextSize(objLbl,cv2.FONT_HERSHEY_SIMPLEX,0.5,2)[0]
		cv2.putText(image, objLbl, (int(cX-textSize[0]/2),int(cY+textSize[1]/2)), cv2.FONT_HERSHEY_SIMPLEX,0.5,mean2, 2)

		#show image
		cv2.imshow("Image", image)
		#cv2.waitKey(0)
	cv2.waitKey(0)
Resultados
Para executar o script, pode executá-lo a partir do seu editor de código (como o Geany) ou executar o seguinte comando num terminal de comandos aberto na sua pasta de trabalho.
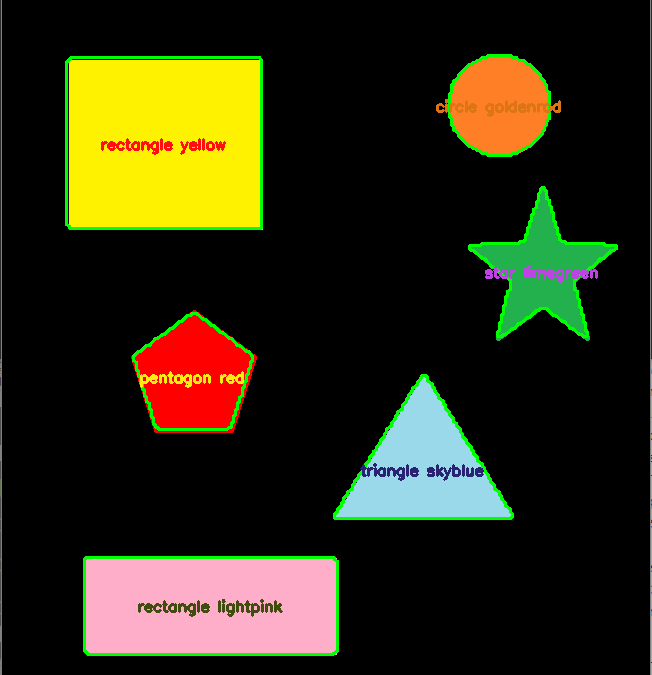
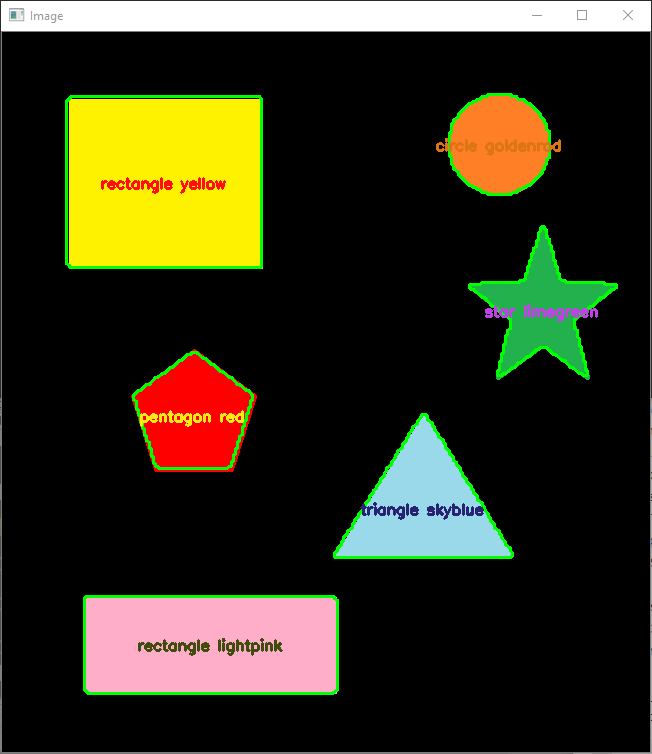
python3 ObjectDetection.pyQuando o código tiver sido executado, a imagem será apresentada com cada uma das formas rodeada de verde e com texto no centro da forma contendo o nome e a cor da forma.
Nota: este algoritmo não funciona para todas as formas. Para detetar outras formas, é necessário adaptar a função de deteção da classe ShapeDetector para identificar todos os casos possíveis ou utilizar inteligência artificial.
Aplicações
- Fazer uma máquina de seleção com base na cor ou na forma
- Detetar objectos em tempo real a partir de imagens da câmara