,
The OpenCV library is used for image processing, in particular shape and color recognition. The library has acquisition functions and image processing algorithms that make image recognition fairly straightforward, without the need for artificial intelligence. This is what we’ll be looking at in this tutorial.
This tutorial can be applied to any computer with a Python installation with OpenCV and a Camera. In particular, the Raspberry Pi.
Hardware
- Computer with a python3 installation
Preparing the working environment
To implement the shape recognition script, we install the OpenCV, numpy and imutils modules to manipulate and process the images.
pip3 install opencv-python numpy imutilsColor detection using webcolors and scipy modules (KDTree)
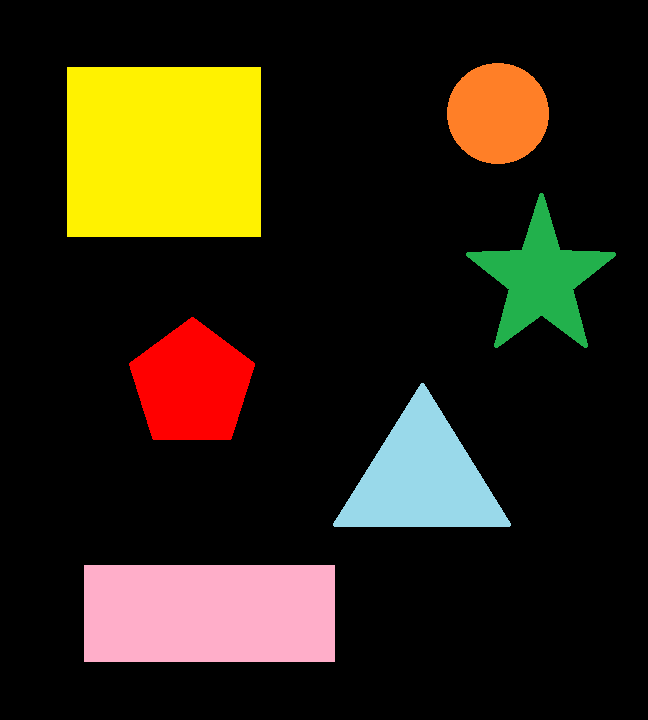
pip3 install webcolors scipyTo test and validate the algorithm, we create an image containing objects of different shapes and colors. You can create your own image with Paint, or use this one:
Operating principle
In the following code, we’ll create a shape detection class that will allow us to select a shape based on the number of contours found. Then we’ll define a function to retrieve the name of the color based on its RGB code. Finally, we’ll use OpenCV to load, filter and mask the image in order to detect the shapes and colors contained in the image.
Complete code for simple shape and color recognition
You need to create the ObjectDetection.py python file in the same folder as the image you wish to analyze.
#!/usr/bin/env python
# -*- coding: utf-8 -*-

# import the necessary packages
import cv2
import numpy as np
import imutils

#colors
from webcolors import rgb_to_name,CSS3_HEX_TO_NAMES,hex_to_rgb #python3 -m pip install webcolors
from scipy.spatial import KDTree

def convert_rgb_to_names(rgb_tuple):
    # a dictionary of all the hex and their respective names in css3
    css3_db = CSS3_HEX_TO_NAMES#css3_hex_to_names
    names = []
    rgb_values = []
    for color_hex, color_name in css3_db.items():
        names.append(color_name)
        rgb_values.append(hex_to_rgb(color_hex))

    kdt_db = KDTree(rgb_values)
    distance, index = kdt_db.query(rgb_tuple)
    return names[index]

class ShapeDetector:
	def __init__(self):
		pass
	def detect(self, c):
		# initialize the shape name and approximate the contour
		shape = "unidentified"
		peri = cv2.arcLength(c, True)
		approx = cv2.approxPolyDP(c, 0.04 * peri, True)

		# if the shape is a triangle, it will have 3 vertices
		if len(approx) == 3:
			shape = "triangle"
		# if the shape has 4 vertices, it is either a square or
		# a rectangle
		elif len(approx) == 4:
			# compute the bounding box of the contour and use the
			# bounding box to compute the aspect ratio
			(x, y, w, h) = cv2.boundingRect(approx)
			ar = w / float(h)
			# a square will have an aspect ratio that is approximately
			# equal to one, otherwise, the shape is a rectangle
			shape = "square" if ar >= 0.95 and ar <= 1.05 else "rectangle"
		# if the shape is a pentagon, it will have 5 vertices
		elif len(approx) == 5:
			shape = "pentagon"
		elif len(approx) == 6:
			shape = "hexagon"
		elif len(approx) == 10 or len(approx) == 12:
			shape = "star"
		# otherwise, we assume the shape is a circle
		else:
			shape = "circle"
		# return the name of the shape
		return shape

if __name__ == '__main__':
	# load the image and resize it to a smaller factor so that
	# the shapes can be approximated better
	image = cv2.imread('python_shapes_detection_base.PNG')
	resized = imutils.resize(image, width=300)
	ratio = image.shape[0] / float(resized.shape[0])

	# convert the resized image to grayscale, blur it slightly,
	# and threshold it
	gray = cv2.cvtColor(resized, cv2.COLOR_BGR2GRAY)
	blurred = cv2.GaussianBlur(gray, (5, 5), 0)
	thresh = cv2.threshold(blurred, 60, 255, cv2.THRESH_BINARY)[1]

	# find contours in the thresholded image and initialize the
	# shape detector
	cnts = cv2.findContours(thresh.copy(), cv2.RETR_EXTERNAL,
		cv2.CHAIN_APPROX_SIMPLE)
	cnts = imutils.grab_contours(cnts)
	sd = ShapeDetector()

	# loop over the contours
	for c in cnts:
		# compute the center of the contour
		M = cv2.moments(c)
		cX = int((M["m10"] / M["m00"]) * ratio)
		cY = int((M["m01"] / M["m00"]) * ratio)

		#detect shape from contour
		shape = sd.detect(c)

		# resize the contour
		c = c.astype("float")
		c *= ratio
		c = c.astype("int")
		cv2.drawContours(image, [c], -1, (0, 255, 0), 2)

		#draw contour with mask
		mask = np.zeros(image.shape[:2], np.uint8)
		cv2.drawContours(mask, [c], -1, 255, -1)
		img = cv2.cvtColor(image, cv2.COLOR_BGR2HSV)

		#Convert to RGB and get color name
		imgRGB = cv2.cvtColor(image, cv2.COLOR_BGR2RGB)
		mean=cv2.mean(imgRGB, mask=mask)[:3]
		named_color = convert_rgb_to_names(mean)

		#get complementary color for text
		mean2 = (255-mean[0],255-mean[1],255-mean[2])

		#display shape name and color
		objLbl=shape+" {}".format(named_color)
		textSize = cv2.getTextSize(objLbl,cv2.FONT_HERSHEY_SIMPLEX,0.5,2)[0]
		cv2.putText(image, objLbl, (int(cX-textSize[0]/2),int(cY+textSize[1]/2)), cv2.FONT_HERSHEY_SIMPLEX,0.5,mean2, 2)

		#show image
		cv2.imshow("Image", image)
		#cv2.waitKey(0)
	cv2.waitKey(0)
Results
To launch the script, you can either run it from your code editor (such as Geany) or issue the following command in a command terminal opened in your working folder.
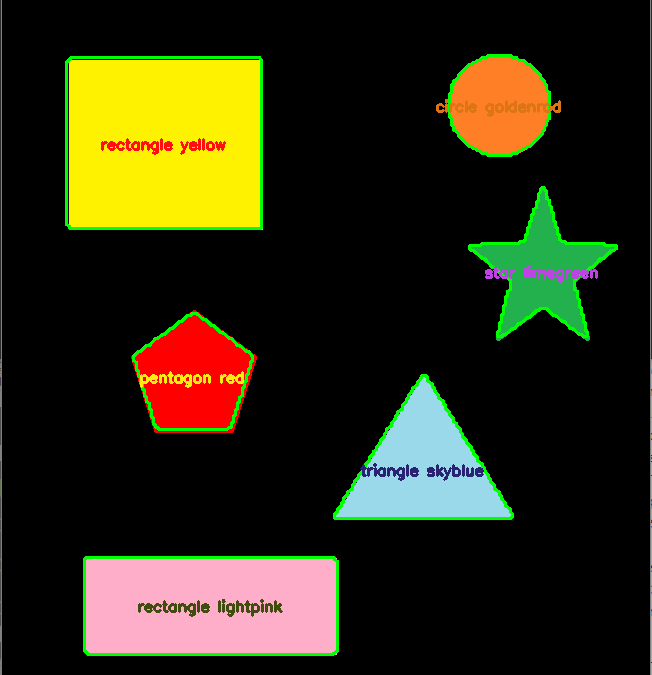
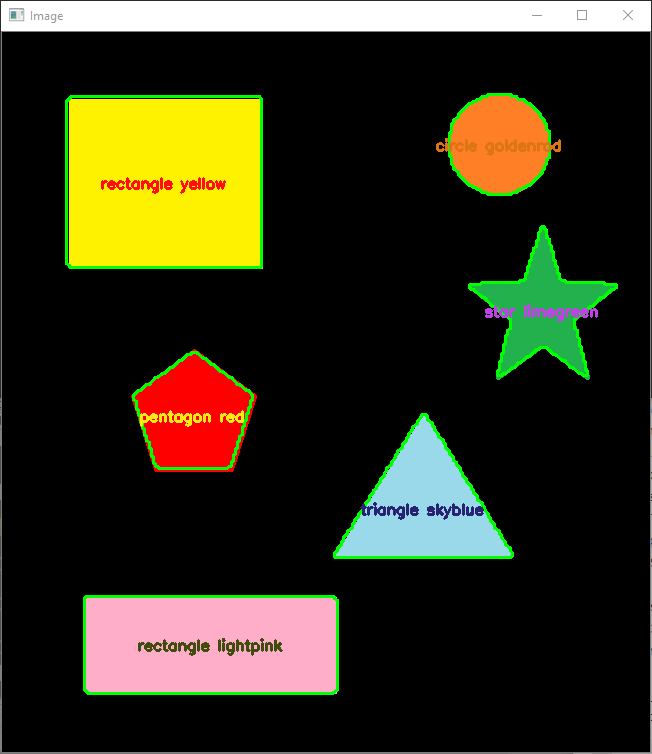
python3 ObjectDetection.pyOnce the code has been executed, the image will be displayed with each of the shapes surrounded by green and text in the center of the shape containing the name and color of the shape.
N.B.: This algorithm won’t work for all shapes. To detect other shapes, you must either adapt the detect function of the ShapeDetector class to identify all possible cases, or use artificial intelligence.
Applications
- Build a sorting machine based on color or shape
- Real-time object detection from camera images


