Uma das melhores formas de começar a aprender programação e eletrônica com o Arduino é utilizando LEDs. Neste tutorial, veremos como controlar os LEDs e como ativar várias funções com um botão de pressão. Isto é um bom resumo do que pode ser encontrado num robô: o cérebro (placa Arduino), os sensores (o botão) e as saídas (LEDs), que também poderiam ser motores, por exemplo.
Material
- Computador
- Arduino UNO
- Cabo USB para ligar o Arduino ao computador
- 3 LEDs
- Breadboard
- Cabos Dupont M/M
- Botão de pressão
- 4 Resistências
Objetivo
Vamos definir várias funções que farão com que os LEDs se iluminem de diferentes maneiras, dependendo das ações no botão de pressão. Este é o princípio (simplificado) da programação robótica: realizar uma ação de acordo com as informações provenientes de sensores.
Esquema de ligação
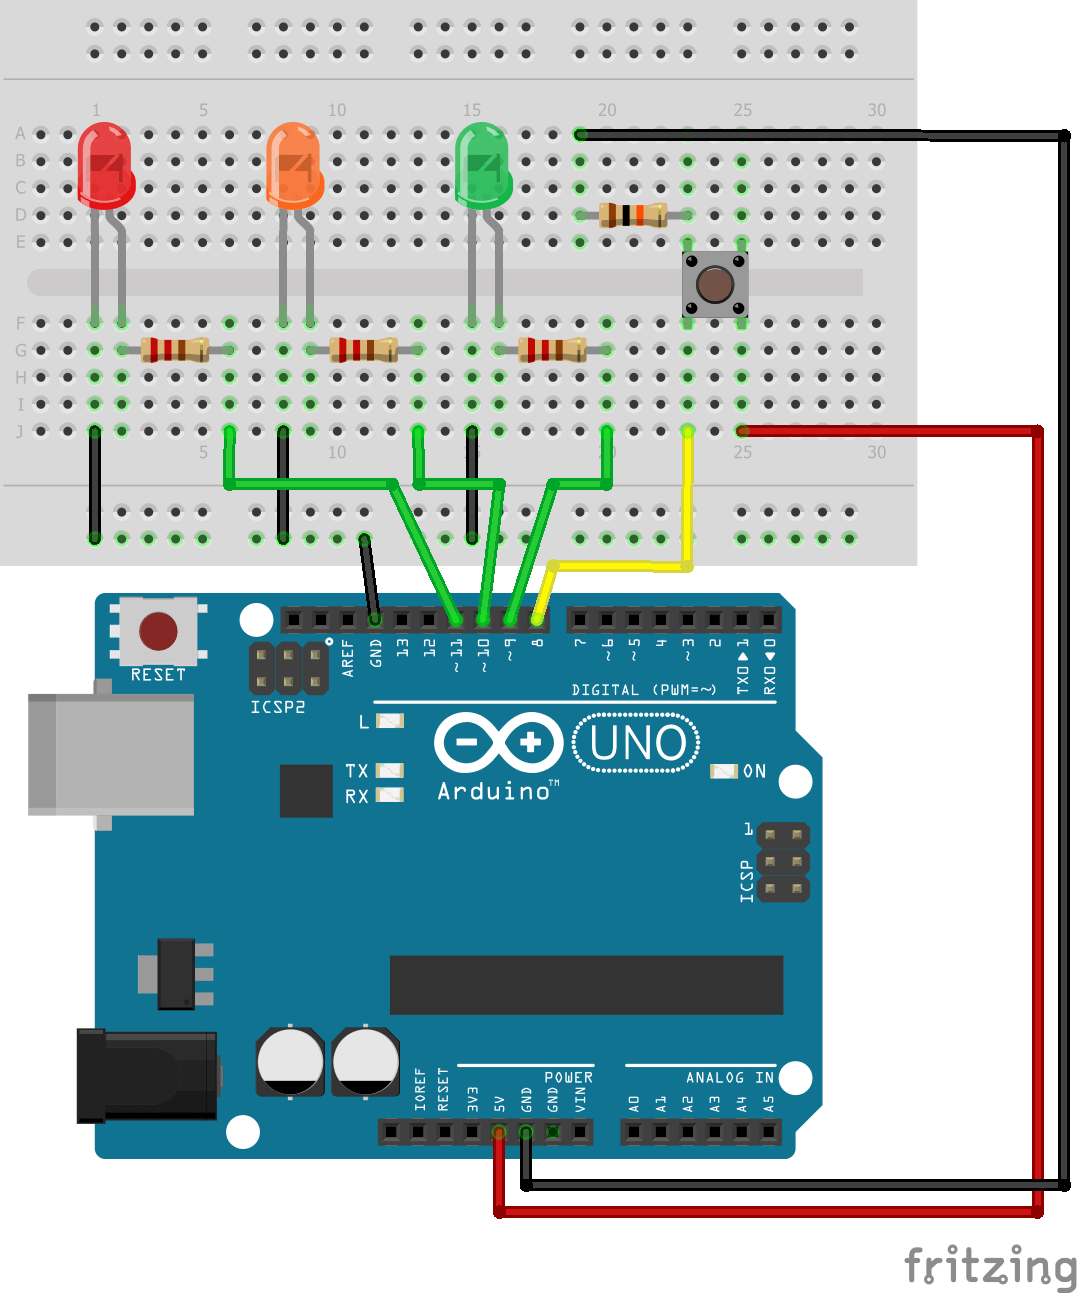
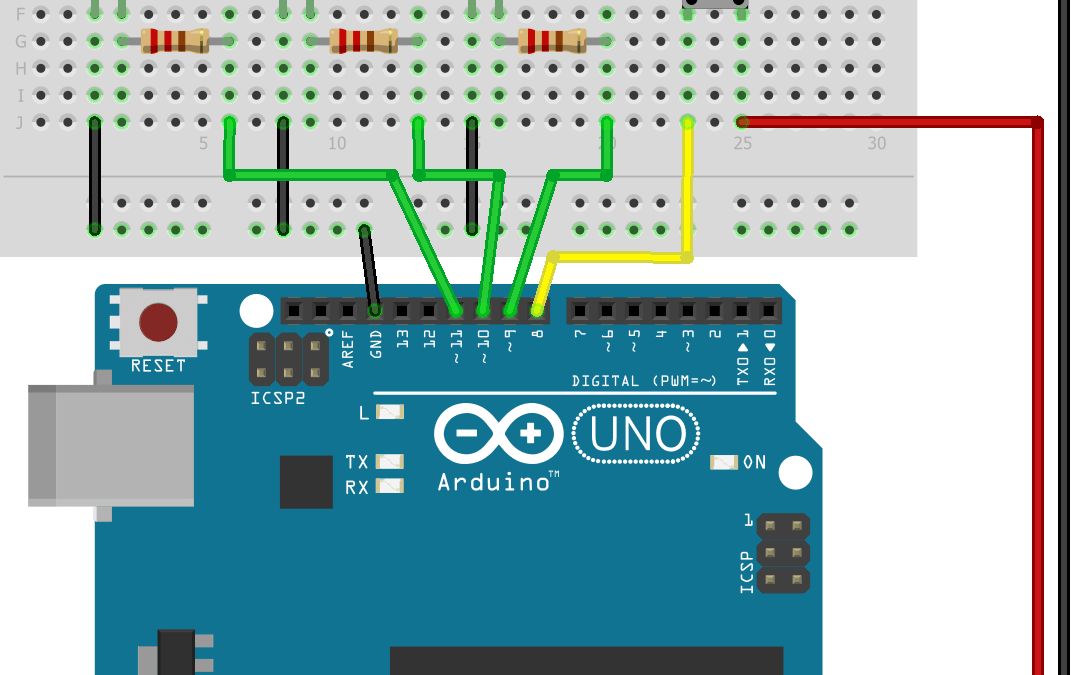
O botão é ligado ao pino 8, o LED 1 ao pino 9, o LED 2 ao pino 10 e o LED 3 ao pino 11. Note a presença de resistências para evitar danificar os componentes. Conforme os componentes utilizados, as resistências podem ser desnecessárias. Verifique as especificações técnicas dos seus componentes.

Código
A função utilizada para controlar um díodo é digitalWrite(), sendo HIGH e LOW os parâmetros para ligar e desligar.
  digitalWrite(led1Pin,HIGH);
  delay(30);
  digitalWrite(led1Pin,LOW);
  delay(30);
Também se pode modular o brilho do LED usando a função analogWrite().
  int brightness = 0;
  int fadeAmount = 5;

 for (brightness=0;brightness<=255;brightness+=fadeAmount){
    analogWrite(led1Pin, brightness);
    delay(30);
  }
Essas funções básicas são utilizadas nos exemplos Blink e Fade da IDE do Arduino. Com elas, podemos criar várias funções para controlar os LEDs de diferentes formas conforme o modo selecionado.
Para ler o estado de um botão, a função utilizada é normalmente digitalRead(). Aqui, queremos que o botão possa ativar várias funções. Para isso, contaremos quantas vezes o botão é pressionado. Utilizamos desse modo a função pulseIn(), que mede o comprimento de um pulso.
unsigned long buttonState = 0;
int funcState=0;

void buttonPressed() {
    buttonState = pulseIn(btnPin,HIGH,1000000);
    if (buttonState > 50){
      funcState += 1;
      Serial.print("Button state n: ");
      Serial.println(funcState);
    }
    funcState=funcState%NBSTATE;
  }
A variável funcState contém o modo selecionado. Em seguida, podemos definir esses modos e associar as funções correspondentes. Utilizamos a palavra-chave enum, que permite criar facilmente uma lista de inteiros, e switch..case, que permite executar um código de acordo com uma variável.
enum fcnMode {
  OFF,
  LED1,
  LED2,
  LED3,
  FADE1,
  ALL,
  BLINK,
  NBSTATE
  }; // OFF = 0 and NBSTATE=7

  switch(funcState){
    case OFF:
    break;
    case LED1:
      digitalWrite(led1Pin,HIGH);
    break;
    case LED2:
      digitalWrite(led2Pin,HIGH);
    break;
    case LED3:
       digitalWrite(led3Pin,HIGH);
    break;
    case FADE1:
      fade1();
      break;
    case ALL:
      digitalWrite(led1Pin,HIGH);
      digitalWrite(led2Pin,HIGH);
      digitalWrite(led3Pin,HIGH);
    break;
    case BLINK:
      blinkLed1();
      blinkLed2();
      blinkLed3();
    break;
  }
Código completo
Aqui está o código completo, que pode ser adaptado ao seu projeto.
// Pin assignement
const int btnPin = 8;
const int led1Pin = 9;
const int led2Pin = 10;
const int led3Pin = 11;

enum fcnMode {
  OFF,
  LED1,
  LED2,
  LED3,
  FADE1,
  ALL,
  BLINK,
  NBSTATE
}; // OFF = 0 and NBSTATE=7

int ledState1 = LOW, ledState2 = LOW, ledState3 = LOW;           // ledState used to set the LED
unsigned long buttonState = 0;
int funcState = 0;
unsigned long currentMillis1, currentMillis2, currentMillis3;      // will store current time
unsigned long previousMillis1, previousMillis2, previousMillis3;      // will store last time LED was updated
const long interval1 = 100;           // interval at which to blink (milliseconds)
const long interval2 = 300;
const long interval3 = 500;
/******************************************************************\
  PRIVATE FUNCTION: setup

  PARAMETERS:
  ~ void

  RETURN:
  ~ void

  DESCRIPTIONS:
  Initiate inputs/outputs

  \******************************************************************/
void setup() {
  Serial.begin(9600); // initialize serial port
  pinMode(btnPin, INPUT_PULLUP);
  pinMode(led1Pin, OUTPUT);
  pinMode(led2Pin, OUTPUT);
  pinMode(led3Pin, OUTPUT);
}

/******************************************************************\
  PRIVATE FUNCTION: loop

  PARAMETERS:
  ~ void

  RETURN:
  ~ void

  DESCRIPTIONS:
  Main Function of the code
  \******************************************************************/
void loop() {
  buttonPressed();
  setMode();
}

/******************************************************************
  SUBFUNCTIONS
  \******************************************************************/
void buttonPressed() {
  buttonState = pulseIn(btnPin, HIGH, 1000000);
  if (buttonState > 50) {
    funcState += 1;
    Serial.print("Button state n: ");
    Serial.println(funcState);
  }
  funcState = funcState % NBSTATE;
}
void setMode() {
  // All Off
  digitalWrite(led1Pin, LOW);
  digitalWrite(led2Pin, LOW);
  digitalWrite(led3Pin, LOW);

  Serial.print("Function : ");
  Serial.println(funcState);

  switch (funcState) {
    case OFF:
      break;
    case LED1:
      digitalWrite(led1Pin, HIGH);
      break;
    case LED2:
      digitalWrite(led2Pin, HIGH);
      break;
    case LED3:
      digitalWrite(led3Pin, HIGH);
      break;
    case FADE1:
      fade1();
      break;
    case ALL:
      digitalWrite(led1Pin, HIGH);
      digitalWrite(led2Pin, HIGH);
      digitalWrite(led3Pin, HIGH);
      break;
    case BLINK:
      blinkLed1();
      blinkLed2();
      blinkLed3();
      break;
  }
}

void fade1() {
  int brightness = 0;
  int fadeAmount = 5;

  for (brightness = 0; brightness <= 255; brightness += fadeAmount) {
    analogWrite(led1Pin, brightness);
    delay(30);
  }
  for (brightness = 255; brightness >= 0; brightness -= fadeAmount) {
    analogWrite(led1Pin, brightness);
    delay(30);
  }

}
void blinkLed1() {
  currentMillis1 = millis();
  if (currentMillis1 - previousMillis1 >= interval1) {
    // save the last time you blinked the LED
    previousMillis1 = currentMillis1;
    // if the LED is off turn it on and vice-versa:
    if (ledState1 == LOW) {
      ledState1 = HIGH;
    } else {
      ledState1 = LOW;
    }
    // set the LED with the ledState of the variable:
    digitalWrite(led1Pin, ledState1);
  }
}

void blinkLed2() {
  currentMillis2 = millis();
  if (currentMillis2 - previousMillis2 >= interval2) {
    // save the last time you blinked the LED
    previousMillis2 = currentMillis2;
    // if the LED is off turn it on and vice-versa:
    if (ledState2 == LOW) {
      ledState2 = HIGH;
    } else {
      ledState2 = LOW;
    }
    // set the LED with the ledState of the variable:
    digitalWrite(led2Pin, ledState2);
  }
}

void blinkLed3() {
  currentMillis3 = millis();
  if (currentMillis3 - previousMillis3 >= interval3) {
    // save the last time you blinked the LED
    previousMillis3 = currentMillis3;
    // if the LED is off turn it on and vice-versa:
    if (ledState3 == LOW) {
      ledState3 = HIGH;
    } else {
      ledState3 = LOW;
    }
    // set the LED with the ledState of the variable:
    digitalWrite(led3Pin, ledState3);
  }
}
Escreva um comentário abaixo para compartilhar as suas realizações ou nos deixar o seu feedback. Também fique à vontade para nos contactar caso tenha dúvidas.
Aplicação
- Criar um semáforo em miniatura
Source
Retrouvez nos tutoriels et d’autres exemples dans notre générateur automatique de code
La Programmerie
