Una de las formas más fáciles y rápidas para aprender programación y electrónica con Arduino es usar LED. Aquí veremos cómo controlar los LED y cómo seleccionar diferentes funcionalidades del código con solo un botón. Esto resume de manera simple lo que podría encontrar trabajando en un robot: Cerebro (placa Arduino), Sentidos (sensores, aquí un botón) y Ouputs o actuadores (aquí simbolizados por LED).
Material
- Computadora
- Arduino UNO
- USB cable
- LEDs x3
- Breadboard
- Dupont cable M/M
- botón pulsador x1
- Resistancias x4
Objetivo
En este tutorial, crearemos varias funciones para controlar los LED según el modo seleccionado. Este es el objetivo de cualquier programa de robot: ejecutar una acción dependiendo de las entradas de los sensores.
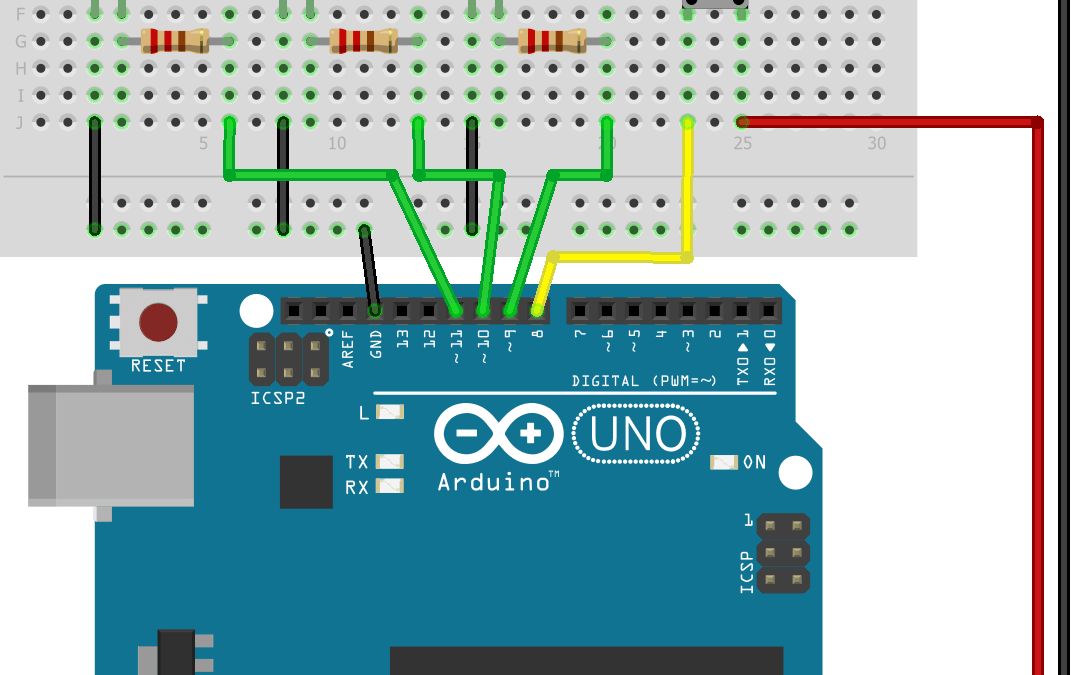
Alambrado
El botón pulsador está conectado al pin 8, LED1 en 9, LED2 en 10 y LED3 en 11. Agregamos algo de resistencia eléctrica para proteger los componentes, pero no siempre son necesarios. Consulte la hoja de datos de sus componentes antes de usarlos.

Código
Para controlar un LED, podemos usar la función digitalWrite() con el parámetro HIGH (ALTO) para encenderlo, LOW (BAJO) para apagarlo.
  digitalWrite(led1Pin,HIGH);
  delay(30);
  digitalWrite(led1Pin,LOW);
  delay(30);
También podemos modular el brillo del LED usando analogWrite().
  int brightness = 0;
  int fadeAmount = 5;

 for (brightness=0;brightness<=255;brightness+=fadeAmount){
    analogWrite(led1Pin, brightness);
    delay(30);
  }
Esas funciones básicas se usan en los ejemplos de Arduino IDE, Blink and Fade. A partir de ellos, podemos crear subfunciones que controlarán los LED de manera diferente según el modo seleccionado.
Para leer el estado de un botón, usamos la función digitalRead(). En esta aplicación, queremos contar la cantidad de veces que se presiona el botón. Para hacerlo, la función dedicada es pulseIn() que mide la longitud de un pulso.
unsigned long buttonState = 0;
int funcState=0;

void buttonPressed() {
    buttonState = pulseIn(btnPin,HIGH,1000000);
    if (buttonState > 50){
      funcState += 1;
      Serial.print("Button state n: ");
      Serial.println(funcState);
    }
    funcState=funcState%NBSTATE;
  }
El modo seleccionado se almacena en la variable funcState. Podemos definir los modos y asociar las funciones correspondientes. Usamos las palabras clave enum, que crea una lista de enteros, y switch..case, que selecciona un fragmento de código para ejecutar según una variable.
enum fcnMode {
  OFF,
  LED1,
  LED2,
  LED3,
  FADE1,
  ALL,
  BLINK,
  NBSTATE
  }; // OFF = 0 and NBSTATE=7

  switch(funcState){
    case OFF:
    break;
    case LED1:
      digitalWrite(led1Pin,HIGH);
    break;
    case LED2:
      digitalWrite(led2Pin,HIGH);
    break;
    case LED3:
       digitalWrite(led3Pin,HIGH);
    break;
    case FADE1:
      fade1();
      break;
    case ALL:
      digitalWrite(led1Pin,HIGH);
      digitalWrite(led2Pin,HIGH);
      digitalWrite(led3Pin,HIGH);
    break;
    case BLINK:
      blinkLed1();
      blinkLed2();
      blinkLed3();
    break;
  }
Código completo
Puede modificar el código completo para adaptarlo a su proyecto.
// Pin assignement
const int btnPin = 8;
const int led1Pin = 9;
const int led2Pin = 10;
const int led3Pin = 11;

enum fcnMode {
  OFF,
  LED1,
  LED2,
  LED3,
  FADE1,
  ALL,
  BLINK,
  NBSTATE
}; // OFF = 0 and NBSTATE=7

int ledState1 = LOW, ledState2 = LOW, ledState3 = LOW;           // ledState used to set the LED
unsigned long buttonState = 0;
int funcState = 0;
unsigned long currentMillis1, currentMillis2, currentMillis3;      // will store current time
unsigned long previousMillis1, previousMillis2, previousMillis3;      // will store last time LED was updated
const long interval1 = 100;           // interval at which to blink (milliseconds)
const long interval2 = 300;
const long interval3 = 500;
/******************************************************************\
  PRIVATE FUNCTION: setup

  PARAMETERS:
  ~ void

  RETURN:
  ~ void

  DESCRIPTIONS:
  Initiate inputs/outputs

  \******************************************************************/
void setup() {
  Serial.begin(9600); // initialize serial port
  pinMode(btnPin, INPUT_PULLUP);
  pinMode(led1Pin, OUTPUT);
  pinMode(led2Pin, OUTPUT);
  pinMode(led3Pin, OUTPUT);
}

/******************************************************************\
  PRIVATE FUNCTION: loop

  PARAMETERS:
  ~ void

  RETURN:
  ~ void

  DESCRIPTIONS:
  Main Function of the code
  \******************************************************************/
void loop() {
  buttonPressed();
  setMode();
}

/******************************************************************
  SUBFUNCTIONS
  \******************************************************************/
void buttonPressed() {
  buttonState = pulseIn(btnPin, HIGH, 1000000);
  if (buttonState > 50) {
    funcState += 1;
    Serial.print("Button state n: ");
    Serial.println(funcState);
  }
  funcState = funcState % NBSTATE;
}
void setMode() {
  // All Off
  digitalWrite(led1Pin, LOW);
  digitalWrite(led2Pin, LOW);
  digitalWrite(led3Pin, LOW);

  Serial.print("Function : ");
  Serial.println(funcState);

  switch (funcState) {
    case OFF:
      break;
    case LED1:
      digitalWrite(led1Pin, HIGH);
      break;
    case LED2:
      digitalWrite(led2Pin, HIGH);
      break;
    case LED3:
      digitalWrite(led3Pin, HIGH);
      break;
    case FADE1:
      fade1();
      break;
    case ALL:
      digitalWrite(led1Pin, HIGH);
      digitalWrite(led2Pin, HIGH);
      digitalWrite(led3Pin, HIGH);
      break;
    case BLINK:
      blinkLed1();
      blinkLed2();
      blinkLed3();
      break;
  }
}

void fade1() {
  int brightness = 0;
  int fadeAmount = 5;

  for (brightness = 0; brightness <= 255; brightness += fadeAmount) {
    analogWrite(led1Pin, brightness);
    delay(30);
  }
  for (brightness = 255; brightness >= 0; brightness -= fadeAmount) {
    analogWrite(led1Pin, brightness);
    delay(30);
  }

}
void blinkLed1() {
  currentMillis1 = millis();
  if (currentMillis1 - previousMillis1 >= interval1) {
    // save the last time you blinked the LED
    previousMillis1 = currentMillis1;
    // if the LED is off turn it on and vice-versa:
    if (ledState1 == LOW) {
      ledState1 = HIGH;
    } else {
      ledState1 = LOW;
    }
    // set the LED with the ledState of the variable:
    digitalWrite(led1Pin, ledState1);
  }
}

void blinkLed2() {
  currentMillis2 = millis();
  if (currentMillis2 - previousMillis2 >= interval2) {
    // save the last time you blinked the LED
    previousMillis2 = currentMillis2;
    // if the LED is off turn it on and vice-versa:
    if (ledState2 == LOW) {
      ledState2 = HIGH;
    } else {
      ledState2 = LOW;
    }
    // set the LED with the ledState of the variable:
    digitalWrite(led2Pin, ledState2);
  }
}

void blinkLed3() {
  currentMillis3 = millis();
  if (currentMillis3 - previousMillis3 >= interval3) {
    // save the last time you blinked the LED
    previousMillis3 = currentMillis3;
    // if the LED is off turn it on and vice-versa:
    if (ledState3 == LOW) {
      ledState3 = HIGH;
    } else {
      ledState3 = LOW;
    }
    // set the LED with the ledState of the variable:
    digitalWrite(led3Pin, ledState3);
  }
}
Deja un comentario para compartir tus proyectos o para decirnos qué piensas de este tutorial. No dude en contact us para cualquier pregunta que pueda tener.
Application
- Build a traffic light
Source
Encuentre otros tutoriales y ejemplos en el generador de código automático
Arquitecto de Código


