One of the easiest and quickest way to start learning programming and electronics with Arduino is to use LEDs. We’ll see here how to control LEDs and how to select different functionalities of the code using only one button. This summarize in a simple way what you could encounter working on a robot: Brain (Arduino board), Senses (sensors, here a button) and Ouputs or actuators (here symbolized by LEDs).
Material
- Computer
- Arduino UNO
- USB cable
- LEDs x3
- Breadboard
- Dupont cable M/M
- Pushbutton x1
- Resistances x4
Objective
In this tutorial, we will create several function to control the LEDs in different manners according to the selected mode. This is the goal of any robot program: execute an action depending on the inputs from sensors.
Wiring
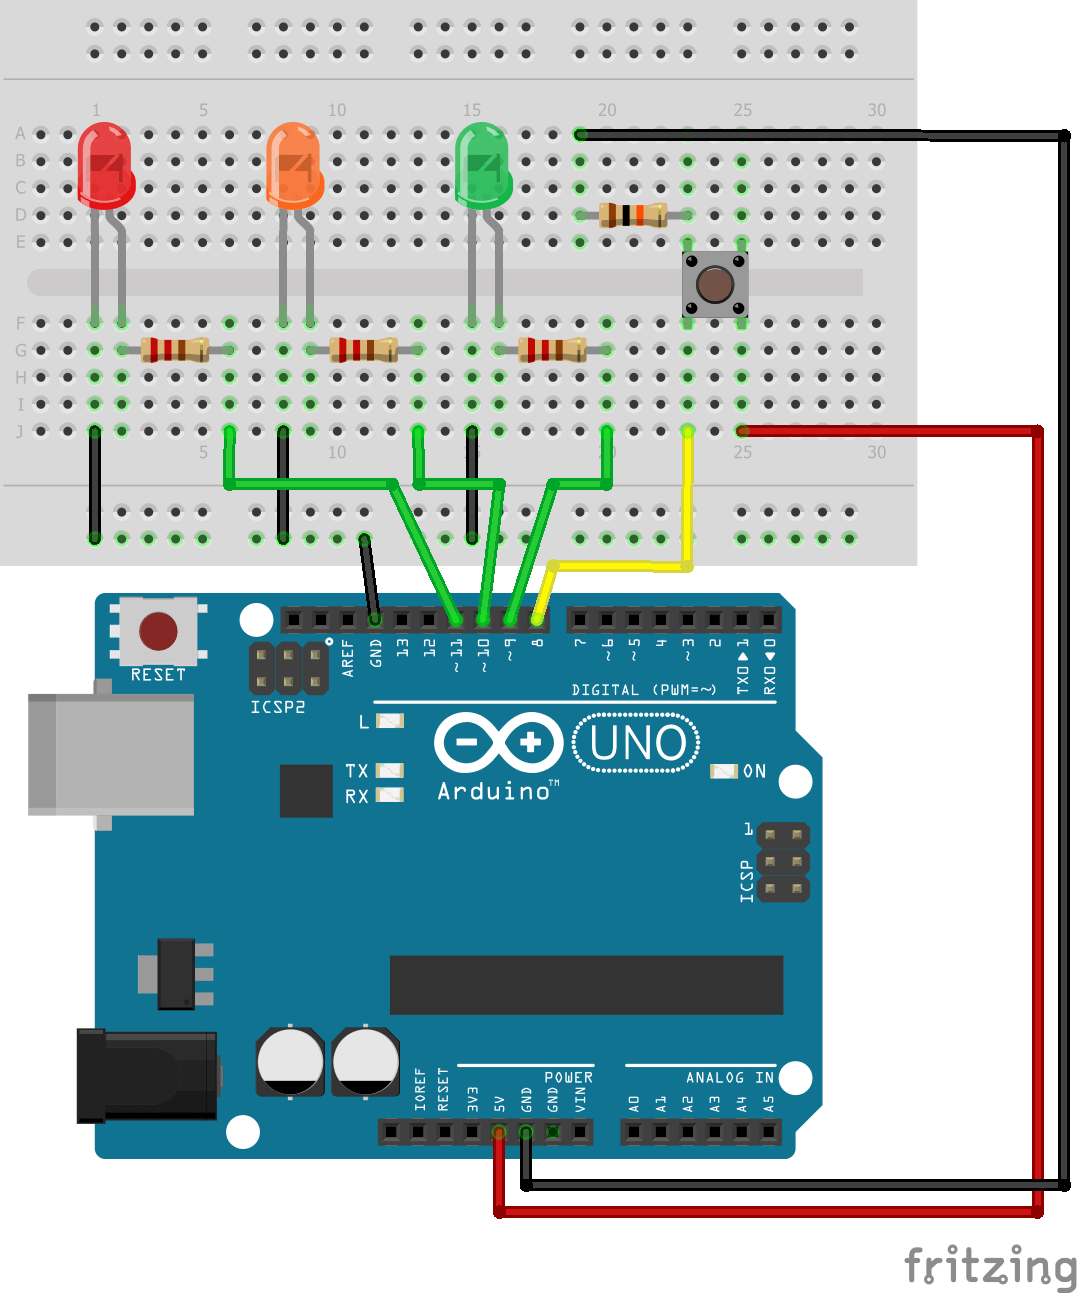
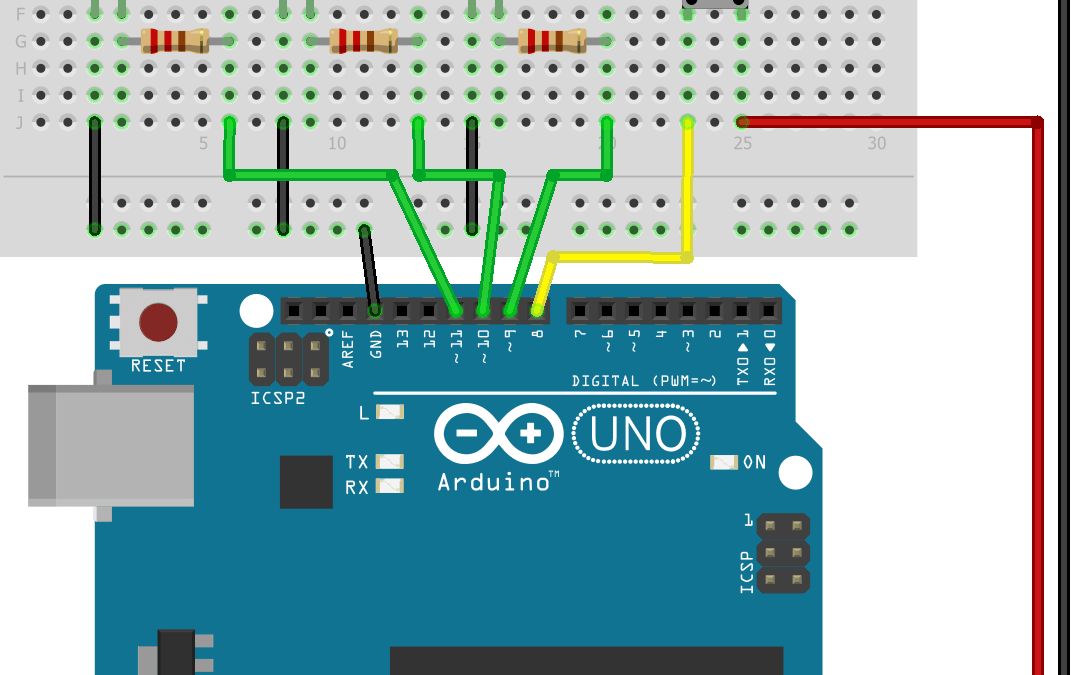
Pushbutton is hooked up on pin 8, LED1 on 9, LED2 on 10 and LED3 on 11. We added some electrical resistance to protect the components but they are not always necessary. Check your components datasheet before using them.

Code
To control a LED, we can use the function digitalWrite() with parameter HIGH to turn it on, LOW to turn it off.
  digitalWrite(led1Pin,HIGH);
  delay(30);
  digitalWrite(led1Pin,LOW);
  delay(30);
We can also modulate the brightness of the LED using analogWrite().
  int brightness = 0;
  int fadeAmount = 5;

 for (brightness=0;brightness<=255;brightness+=fadeAmount){
    analogWrite(led1Pin, brightness);
    delay(30);
  }
Those basic functions are used in the examples from the Arduino IDE, Blink and Fade. From those, we can create subfunctions that will control the LEDs differently depending on the selected mode.
To read a button state, we use the function digitalRead(). In this application, we want to count the number of time the button is pressed. To do so, the dedicated function is pulseIn() which measure the length of a pulse.
unsigned long buttonState = 0;
int funcState=0;

void buttonPressed() {
    buttonState = pulseIn(btnPin,HIGH,1000000);
    if (buttonState > 50){
      funcState += 1;
      Serial.print("Button state n: ");
      Serial.println(funcState);
    }
    funcState=funcState%NBSTATE;
  }
The selected mode is stored in the variable funcState. We can the defined the modes and associate the corresponding functions. We use the keywords enum, that creates a list of integers, and switch..case, that select a piece of code to execute depending on a variable.
enum fcnMode {
  OFF,
  LED1,
  LED2,
  LED3,
  FADE1,
  ALL,
  BLINK,
  NBSTATE
  }; // OFF = 0 and NBSTATE=7

  switch(funcState){
    case OFF:
    break;
    case LED1:
      digitalWrite(led1Pin,HIGH);
    break;
    case LED2:
      digitalWrite(led2Pin,HIGH);
    break;
    case LED3:
       digitalWrite(led3Pin,HIGH);
    break;
    case FADE1:
      fade1();
      break;
    case ALL:
      digitalWrite(led1Pin,HIGH);
      digitalWrite(led2Pin,HIGH);
      digitalWrite(led3Pin,HIGH);
    break;
    case BLINK:
      blinkLed1();
      blinkLed2();
      blinkLed3();
    break;
  }
Complete code
You can modify the complete code to adapt it to your project.
// Pin assignement
const int btnPin = 8;
const int led1Pin = 9;
const int led2Pin = 10;
const int led3Pin = 11;

enum fcnMode {
  OFF,
  LED1,
  LED2,
  LED3,
  FADE1,
  ALL,
  BLINK,
  NBSTATE
}; // OFF = 0 and NBSTATE=7

int ledState1 = LOW, ledState2 = LOW, ledState3 = LOW;           // ledState used to set the LED
unsigned long buttonState = 0;
int funcState = 0;
unsigned long currentMillis1, currentMillis2, currentMillis3;      // will store current time
unsigned long previousMillis1, previousMillis2, previousMillis3;      // will store last time LED was updated
const long interval1 = 100;           // interval at which to blink (milliseconds)
const long interval2 = 300;
const long interval3 = 500;
/******************************************************************\
  PRIVATE FUNCTION: setup

  PARAMETERS:
  ~ void

  RETURN:
  ~ void

  DESCRIPTIONS:
  Initiate inputs/outputs

  \******************************************************************/
void setup() {
  Serial.begin(9600); // initialize serial port
  pinMode(btnPin, INPUT_PULLUP);
  pinMode(led1Pin, OUTPUT);
  pinMode(led2Pin, OUTPUT);
  pinMode(led3Pin, OUTPUT);
}

/******************************************************************\
  PRIVATE FUNCTION: loop

  PARAMETERS:
  ~ void

  RETURN:
  ~ void

  DESCRIPTIONS:
  Main Function of the code
  \******************************************************************/
void loop() {
  buttonPressed();
  setMode();
}

/******************************************************************
  SUBFUNCTIONS
  \******************************************************************/
void buttonPressed() {
  buttonState = pulseIn(btnPin, HIGH, 1000000);
  if (buttonState > 50) {
    funcState += 1;
    Serial.print("Button state n: ");
    Serial.println(funcState);
  }
  funcState = funcState % NBSTATE;
}
void setMode() {
  // All Off
  digitalWrite(led1Pin, LOW);
  digitalWrite(led2Pin, LOW);
  digitalWrite(led3Pin, LOW);

  Serial.print("Function : ");
  Serial.println(funcState);

  switch (funcState) {
    case OFF:
      break;
    case LED1:
      digitalWrite(led1Pin, HIGH);
      break;
    case LED2:
      digitalWrite(led2Pin, HIGH);
      break;
    case LED3:
      digitalWrite(led3Pin, HIGH);
      break;
    case FADE1:
      fade1();
      break;
    case ALL:
      digitalWrite(led1Pin, HIGH);
      digitalWrite(led2Pin, HIGH);
      digitalWrite(led3Pin, HIGH);
      break;
    case BLINK:
      blinkLed1();
      blinkLed2();
      blinkLed3();
      break;
  }
}

void fade1() {
  int brightness = 0;
  int fadeAmount = 5;

  for (brightness = 0; brightness <= 255; brightness += fadeAmount) {
    analogWrite(led1Pin, brightness);
    delay(30);
  }
  for (brightness = 255; brightness >= 0; brightness -= fadeAmount) {
    analogWrite(led1Pin, brightness);
    delay(30);
  }

}
void blinkLed1() {
  currentMillis1 = millis();
  if (currentMillis1 - previousMillis1 >= interval1) {
    // save the last time you blinked the LED
    previousMillis1 = currentMillis1;
    // if the LED is off turn it on and vice-versa:
    if (ledState1 == LOW) {
      ledState1 = HIGH;
    } else {
      ledState1 = LOW;
    }
    // set the LED with the ledState of the variable:
    digitalWrite(led1Pin, ledState1);
  }
}

void blinkLed2() {
  currentMillis2 = millis();
  if (currentMillis2 - previousMillis2 >= interval2) {
    // save the last time you blinked the LED
    previousMillis2 = currentMillis2;
    // if the LED is off turn it on and vice-versa:
    if (ledState2 == LOW) {
      ledState2 = HIGH;
    } else {
      ledState2 = LOW;
    }
    // set the LED with the ledState of the variable:
    digitalWrite(led2Pin, ledState2);
  }
}

void blinkLed3() {
  currentMillis3 = millis();
  if (currentMillis3 - previousMillis3 >= interval3) {
    // save the last time you blinked the LED
    previousMillis3 = currentMillis3;
    // if the LED is off turn it on and vice-versa:
    if (ledState3 == LOW) {
      ledState3 = HIGH;
    } else {
      ledState3 = LOW;
    }
    // set the LED with the ledState of the variable:
    digitalWrite(led3Pin, ledState3);
  }
}
Leave a comment to share your projects or to let us know what you think of this tutorial. Do not hesitate to contact us for any question that you may have.
Application
- Build a traffic light
Source
Find other examples and tutorials in our Automatic code generator
Code Architect


Great tutorial! Thanks It is easier follow and helped me to complete my demo project Home Automation
hi, I was wondering if someone would get back to me on this, I used the code and followed the schematic but the only led that will work is the one at the end and I don’t even know what turns it on, I just keep clicking it until it does. Sometimes it blinks or it stays on until I press it again. Anyways, how do I get them all on at the same time? How many times do I press the button? did I put the wires in wrong?
/
Hi,
to got them all on, you should push on the button 5 times according to the code.
Did you open the serial monitor to see what was the output “Button state n:”?
You might have a wiring issue as well. Did you try to switch the leds to see if one is malfunctioning?