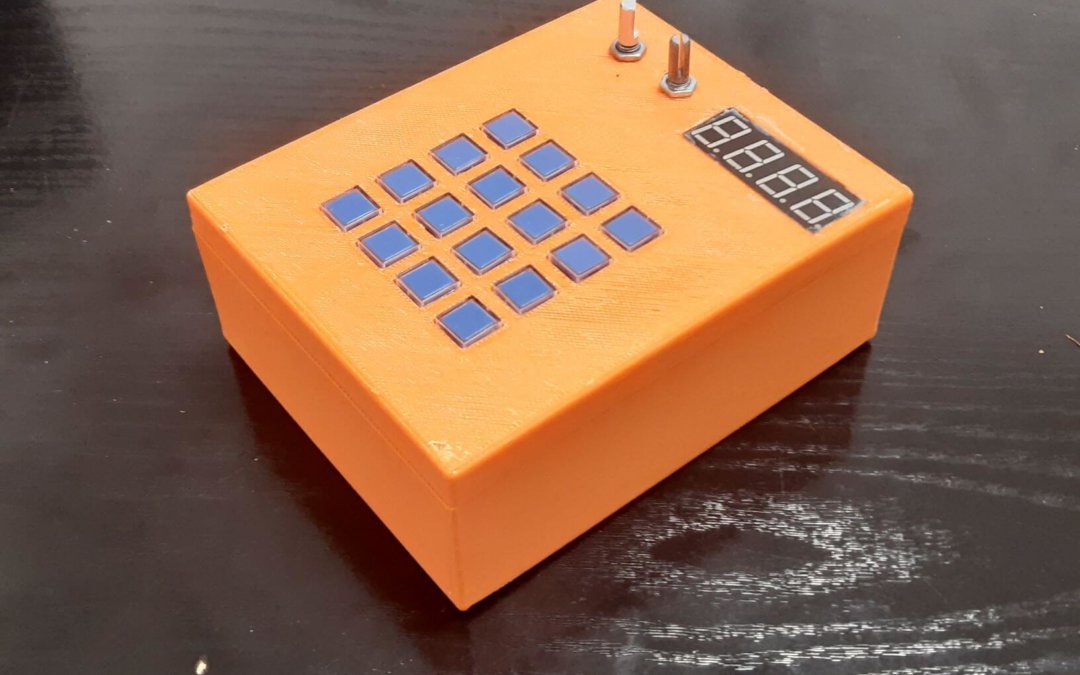
Dans ce projet, nous allons fabriquer un boitier MIDI afin de tester les instruments du synthétiseur CoolSoft. et jouer quelques notes. Nous allons utiliser trois capteurs nous permettant de modifier les messages MIDI. Libre à vous de rajouter des éléments afin d’obtenir un contrôleur MIDI plus complet.
Prérequis: Créer une interface MIDI avec Arduino
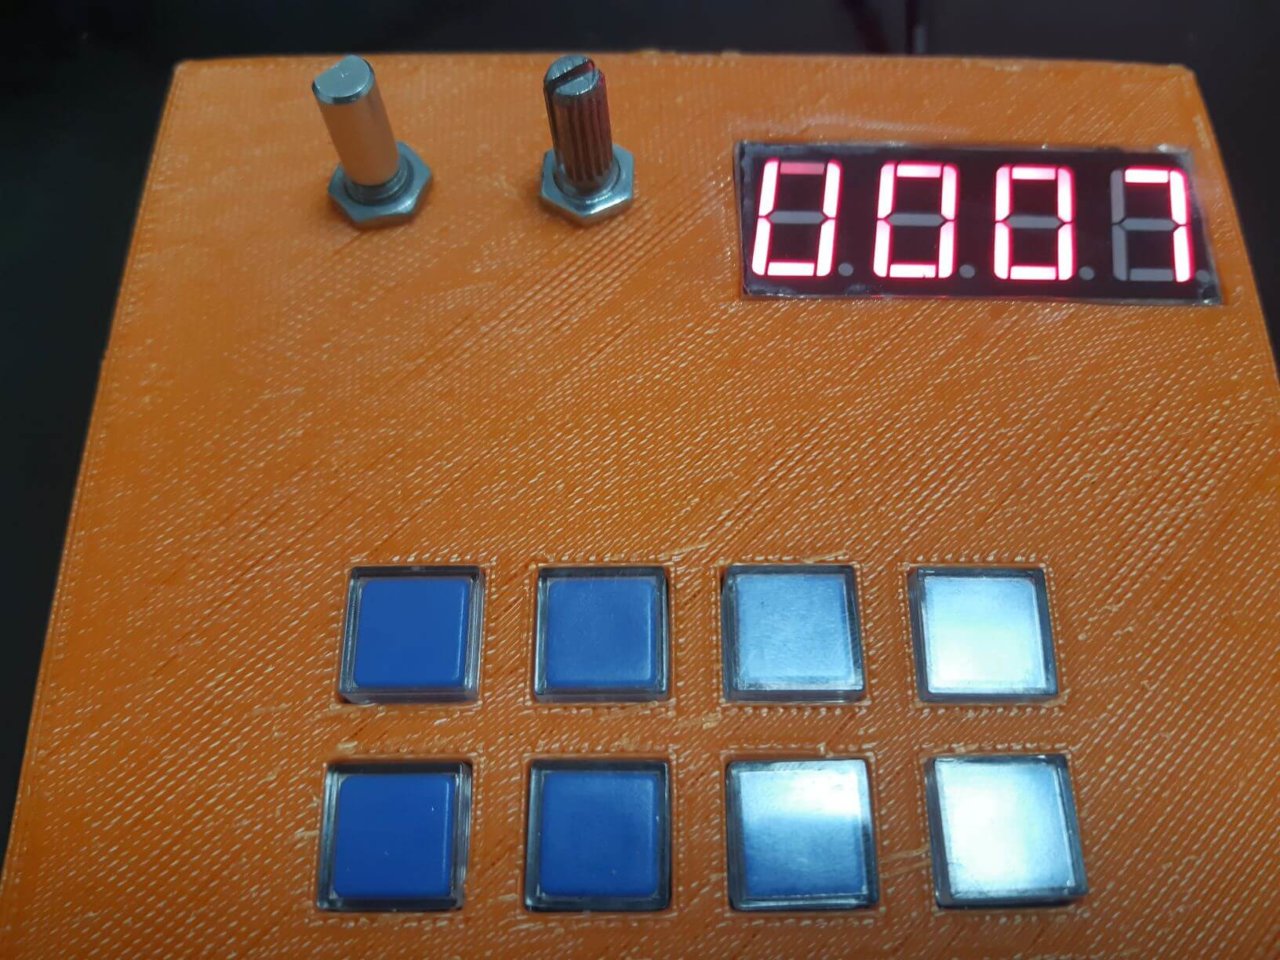
Materiel
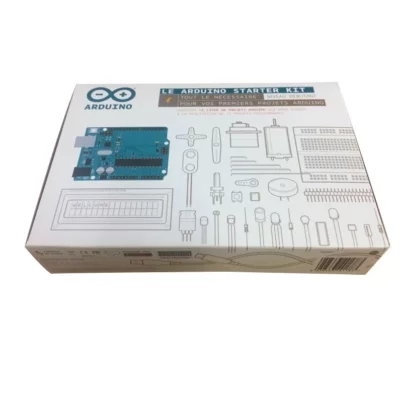
- Arduino UNO
- potentiomètre
- encodeur rotatif
- clavier 4×4 analogique
Fonctionnalités
Afin de tester la communication MIDI ainsi que le synthétiseur. Nous allons définir quelques fonctionnalités simples:
- A l’aide du clavier nous allons envoyer des notes de musique
- Le potentiomètre permet d’ajuster la vitesse de la note
- Et l’encodeur va modifier l’instrument synthétisé
N.B.:Nous avons choisi un clavier analogique pour ce projet pour sa facilité de câblage afin de tester rapidement le synthétiseur. L’inconvénient est qu’on ne peut appuyer que sur une seule touche à la fois. Pour un contrôleur MIDI plus efficace, vous pouvez opter pour un clavier numérique ou encore des boutons d’arcade afin d’avoir un retour sur les notes jouées.
Schéma
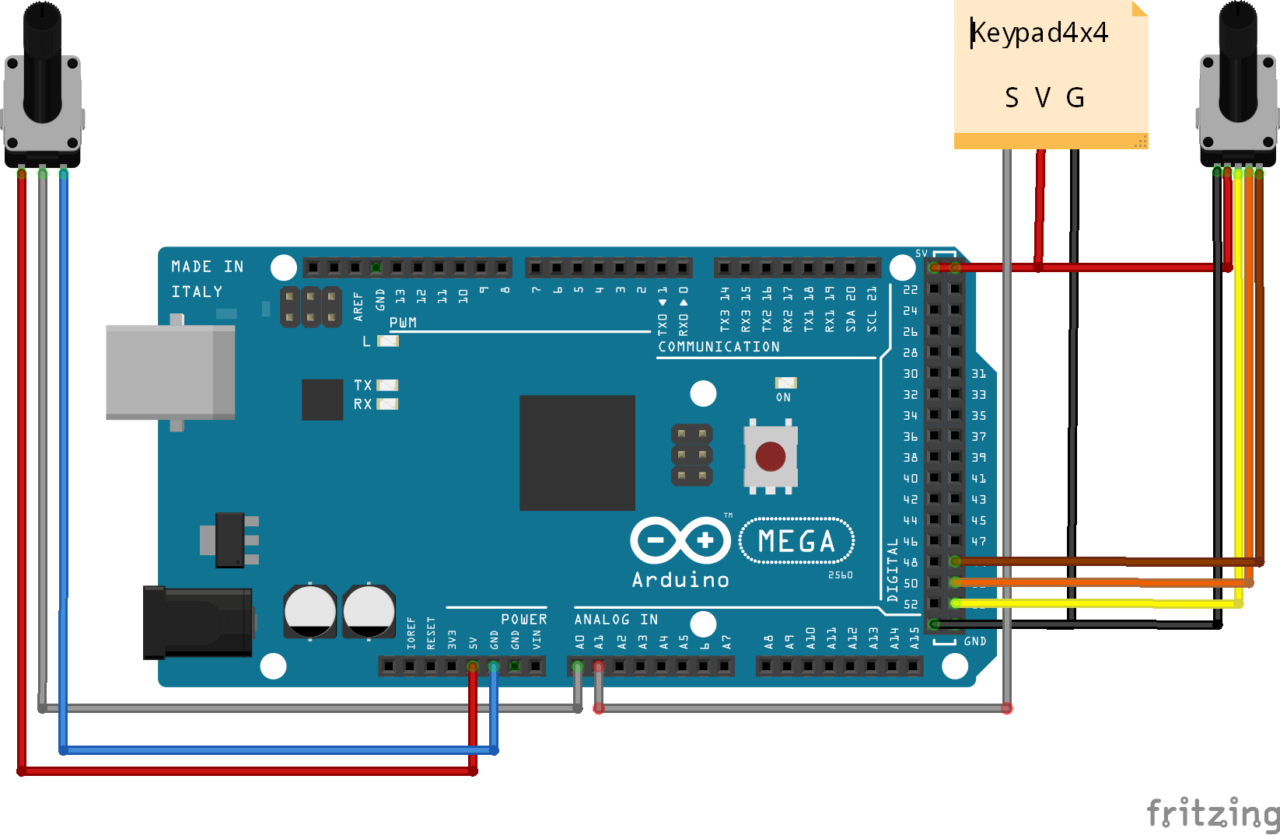
N.B.: Pour faciliter la lecture, nous avons retiré l’afficheur 7-segment. Vous pouvez retrouver la connexion dans ce tutoriel.
Description du code
Dans un premier temps, nous allons définir des fonctions afin de gérer chacun des capteurs.
Pour le clavier 4×4, nous affectons à chaque touches un identifiant qui correspondra à une notes. Nous créons une fonction qui retourne l’identifiant lorsqu’une touche est pressée.
const int valThresh[nbABtn] = {1000, 900, 820, 750, 660, 620, 585, 540, 500, 475, 455, 425, 370, 300, 260, 200};
const int pitches[nbABtn] = {50, 52, 54, 56, 58, 60, 62, 64, 66, 68, 70, 72, 74, 76, 78, 80 }int getABtn() { /* function getABtn */
  //// Read button states from keypad
  int val = analogRead(abtnPin);
  if (val <= 200) {
    return 0;
  } else {
    for (int i = 0; i < 16; i++) {
      if (val > valThresh[i]) {
        delay(100);
        return i + 1;
      }
    }
  }
}
Nous définissons une fonction readPot qui va modifier la valeur de vitesse velocity en fonction de la valeur du potentiomètre velVal.
void readPot(){
  velVal = map(int(analogRead(potPin) / 10) * 10, 0, 1023, 0, 127);
  if (oldVel != velVal) {
    //Serial.println(velVal);
    velocity = velVal;
  }
  oldVel = velVal;
}
La fonction qui gère l’encodeur, quant à elle, va nous permettre de modifier l’instrument de musique (identifiant rotVal entre 0 et 127).
void readRotary( ) { /* function readRotary */
  ////Test routine for Rotary
  // gestion position
  clkState = digitalRead(clkPin);
  if ((clkLast == LOW) && (clkState == HIGH)) {//rotary moving
    if (digitalRead(dtPin) == HIGH) {
      rotVal = rotVal - 1;
      if ( rotVal < 0 ) {
        rotVal = 0;
      }
    }
    else {
      rotVal++;
      if ( rotVal > 127 ) {
        rotVal = 127;
      }
    }
    MIDImessage(prgmChg, rotVal, 0);
    number = rotVal;
    for (int i = 0; i < NUM_OF_DIGITS; i++)
    {
      digit_data[i] = number % 10;
      number /= 10;
    }
    delay(200);

  }
  clkLast = clkState;

  //gestion bouton
  swState = digitalRead(swPin);
  if (swState == LOW && swLast == HIGH) {
    delay(100);//debounce
  }
  swLast = swState;
}
Une fois la modification de l’instrument prise en compte, nous affichons sa valeur sur le module 7 Segment.
void Display(int id, unsigned char num)
{
  digitalWrite(latch, LOW);
  shiftOut(data, cs, MSBFIRST, table[num]);
  digitalWrite(latch, HIGH);
  for (int j = 0; j < NUM_OF_DIGITS; j++) digitalWrite(dPins[j], LOW);
  digitalWrite(dPins[id], HIGH);
}

void updateDigits() {
  for (int j = 0; j < NUM_OF_DIGITS; j++){
    Display(j, digit_data[j]);
    delay(2);
  }
}
Enfin, nous reprenons la fonction qui nous permet d’envoyer les messages MIDI
void MIDImessage(byte command, byte MIDInote, byte MIDIvelocity) {
  Serial.write(command);//send note on or note off command
  Serial.write(MIDInote);//send pitch data
  if (command == noteON || command == noteOFF) {
    Serial.write(MIDIvelocity);//send velocity data
  }
}
Il ne nous reste plus qu’à envoyer le message lorsqu’un bouton est pressé
void readAbtn() { /* function readAbtn */
  //// Read button states from keypad
  btnId = getABtn();
  if (btnId) {
    if (lastBtnId != btnId) {
      MIDImessage(noteOFF, pitches[lastBtnId - 1], velocity);
    }
    MIDImessage(noteON, pitches[btnId - 1], velocity); //turn note on
    lastBtnId = btnId;
  }
}
Code Complet de la MIDIbox
byte velocity = 50;//velocity of MIDI notes, must be between 0 and 127
byte noteON = 144;// = 10010000 , Note On
byte noteOFF = 128;// = 10000000 , Note Off
byte pitchBend = 224; // = 11100000, Pitch Bender Change
byte polyKey = 160; // = 10100000, Polyphonic Key Pressure
byte overallPr = 208; // = 11010000, Overall Pressure
byte prgmChg = 192; // = 11000000, Program Change
byte ctrlChg = 176; // = 10110000,  Control Change

//Keypad
#define nbABtn 16
const int abtnPin = A1;
const int valThresh[nbABtn] = {1000, 900, 820, 750, 660, 620, 585, 540, 500, 475, 455, 425, 370, 300, 260, 200};
const int pitches[nbABtn] = {50, 52, 54, 56, 58, 60, 62, 64, 66, 68, 70, 72, 74, 76, 78, 80 };
bool btnPressed = false;

//Potentiometer
const int potPin = A0; // Pin connected to sensor
int velVal = 0, oldVel = 0; // Analog value from the sensor

//rotary var
const int clkPin  = 53;
const int dtPin  = 51;
const int swPin  = 49;
int rotVal  = 0, btnId = 0, lastBtnId = 0;
bool clkState  = LOW;
bool clkLast  = HIGH;
bool swState  = HIGH;
bool swLast  = HIGH;

//4x7Segment
#define NUM_OF_DIGITS 4
int latch = 4; //74HC595  pin 9 STCP
int cs = 5; //74HC595  pin 10 SHCP
int data = 3; //74HC595  pin 8 DS
int dPins[4] = {8, 9, 10, 11};
//  DP G F E D C B A
//0: 1 1 0 0 0 0 0 0 0xc0
//1: 1 1 1 1 1 0 0 1 0xf9
//2: 1 0 1 0 0 1 0 0 0xa4
//3: 1 0 1 1 0 0 0 0 0xb0
//4: 1 0 0 1 1 0 0 1 0x99
//5: 1 0 0 1 0 0 1 0 0x92
//6: 1 0 0 0 0 0 1 0 0x82
//7: 1 1 1 1 1 0 0 0 0xf8
//8: 1 0 0 0 0 0 0 0 0x80
//9: 1 0 0 1 0 0 0 0 0x90
unsigned char table[] =
{0xc0, 0xf9, 0xa4, 0xb0, 0x99, 0x92, 0x82, 0xf8, 0x80, 0x90};
int digit_data[NUM_OF_DIGITS] = {0};
unsigned int number = 0;
unsigned long previousUpdate = 0, updateTime = 200;

void setup() {
  Serial.begin(115200);
  pinMode(potPin, INPUT);

  pinMode(clkPin, INPUT);
  pinMode(dtPin, INPUT);
  pinMode(swPin, INPUT_PULLUP);

  pinMode(latch, OUTPUT);
  pinMode(cs, OUTPUT);
  pinMode(data, OUTPUT);
  for (int j = 0; j < NUM_OF_DIGITS; j++) pinMode(dPins[j], OUTPUT);
}

void loop() {
  readRotary();
  updateDigits();
  readAbtn();
  readPot();
}

void MIDImessage(byte command, byte MIDInote, byte MIDIvelocity) {
  Serial.write(command);//send note on or note off command
  Serial.write(MIDInote);//send pitch data
  if (command == noteON || command == noteOFF) {
    Serial.write(MIDIvelocity);//send velocity data
  }
}


void readAbtn() { /* function readAbtn */
  //// Read button states from keypad
  btnId = getABtn();
  if (btnId) {
    if (lastBtnId != btnId) {
      MIDImessage(noteOFF, pitches[lastBtnId - 1], velocity);
    }
    MIDImessage(noteON, pitches[btnId - 1], velocity); //turn note on
    lastBtnId = btnId;
  }
}

int getABtn() { /* function getABtn */
  //// Read button states from keypad
  int val = analogRead(abtnPin);
  if (val <= 200) {
    return 0;
  } else {
    for (int i = 0; i < 16; i++) {
      if (val > valThresh[i]) {
        delay(100);
        return i + 1;
      }
    }
  }
}

//Potentiometer
void readPot(){
  velVal = map(int(analogRead(potPin) / 10) * 10, 0, 1023, 0, 127);
  if (oldVel != velVal) {
    //Serial.println(velVal);
    velocity = velVal;
  }
  oldVel = velVal;
}

//7Segment
void Display(int id, unsigned char num)
{
  digitalWrite(latch, LOW);
  shiftOut(data, cs, MSBFIRST, table[num]);
  digitalWrite(latch, HIGH);
  for (int j = 0; j < NUM_OF_DIGITS; j++) digitalWrite(dPins[j], LOW);
  digitalWrite(dPins[id], HIGH);
}

void updateDigits() {
  for (int j = 0; j < NUM_OF_DIGITS; j++)
  {
    Display(j, digit_data[j]);
    delay(2);
  }
}

//rotary
void readRotary( ) { /* function readRotary */
  ////Test routine for Rotary
  // gestion position
  clkState = digitalRead(clkPin);
  if ((clkLast == LOW) && (clkState == HIGH)) {//rotary moving
    if (digitalRead(dtPin) == HIGH) {
      rotVal = rotVal - 1;
      if ( rotVal < 0 ) {
        rotVal = 0;
      }
    }
    else {
      rotVal++;
      if ( rotVal > 127 ) {
        rotVal = 127;
      }
    }
    MIDImessage(prgmChg, rotVal, 0);
    number = rotVal;
    for (int i = 0; i < NUM_OF_DIGITS; i++)
    {
      digit_data[i] = number % 10;
      number /= 10;
    }
    delay(200);

  }
  clkLast = clkState;

  //gestion bouton
  swState = digitalRead(swPin);
  if (swState == LOW && swLast == HIGH) {
    delay(100);//debounce
  }
  swLast = swState;
}
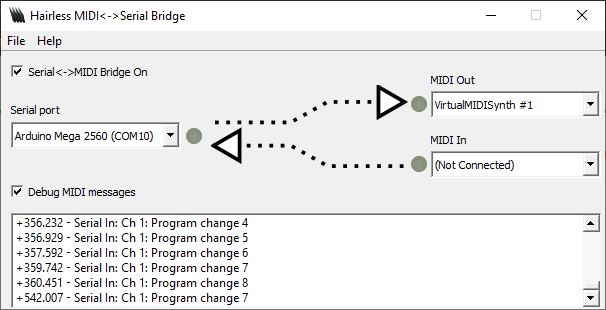
Résultat
Pour tester le code, vous devez ouvrir les programme hairless et VirtualMIDISynth comme décrit dans cet article.
Si tout est bien configuré, vous devriez entendre des sons provenant de votre ordinateur lorsque vous appuyer sur les touches du clavier.
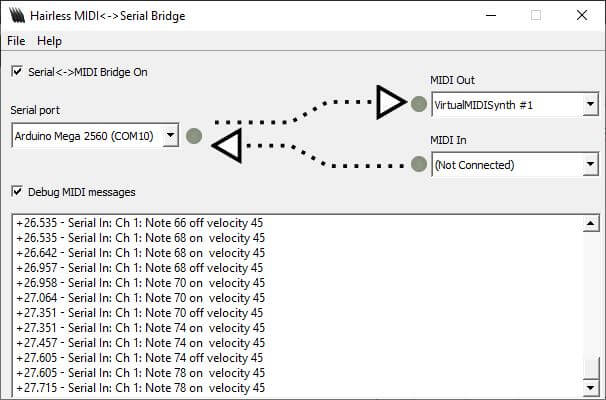
Vous pouvez également modifier la vitesse de la note en jouant sur le potentiomètre.
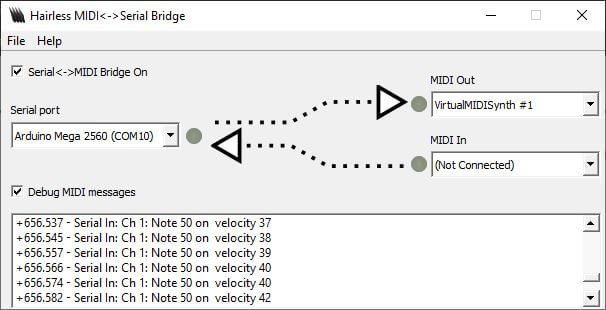
Entre deux notes jouées, vous pouvez ensuite sélectionner un autre instrument du synthétiseur à l’aide de l’encodeur rotatif.
Prochaines étapes
- Utilisation de led ou bouton lumineux
- Gestion du MIDI In afin d’allumer les LEDs
- Utilisation d’un écran OLED afin d’avoir un menu plus complet
Bonjour,
Merci beaucoup pour ce projet qui m’intéresse beaucoup !
Petite question, si je souhaite bénéficier d’une sortie midi din 5 broches, comment dois-je procéder ?
Merci : )
Bonjour,
Il suffit de relier les broches de l’arduino avec les broches du connecteur DIN en suivant ce branchement: