O Motor Shield oficial do Arduino é uma placa de extensão para os microcontroladores Arduino UNO e Mega para controlar motores de corrente contínua e motores de passo. Já vimos como controlar um motor CC utilizando uma ponte H, mas isso pode exigir muita cablagem quando se usa simplesmente o circuito integrado. Para uma aplicação na forma embarcada, como num robô Willy, é necessário controlar vários motores em paralelo. Para este fim, existem shields que simplificam a montagem.
Material
- Computador
- Arduino UNO
- Cabo USB A Macho/B Macho
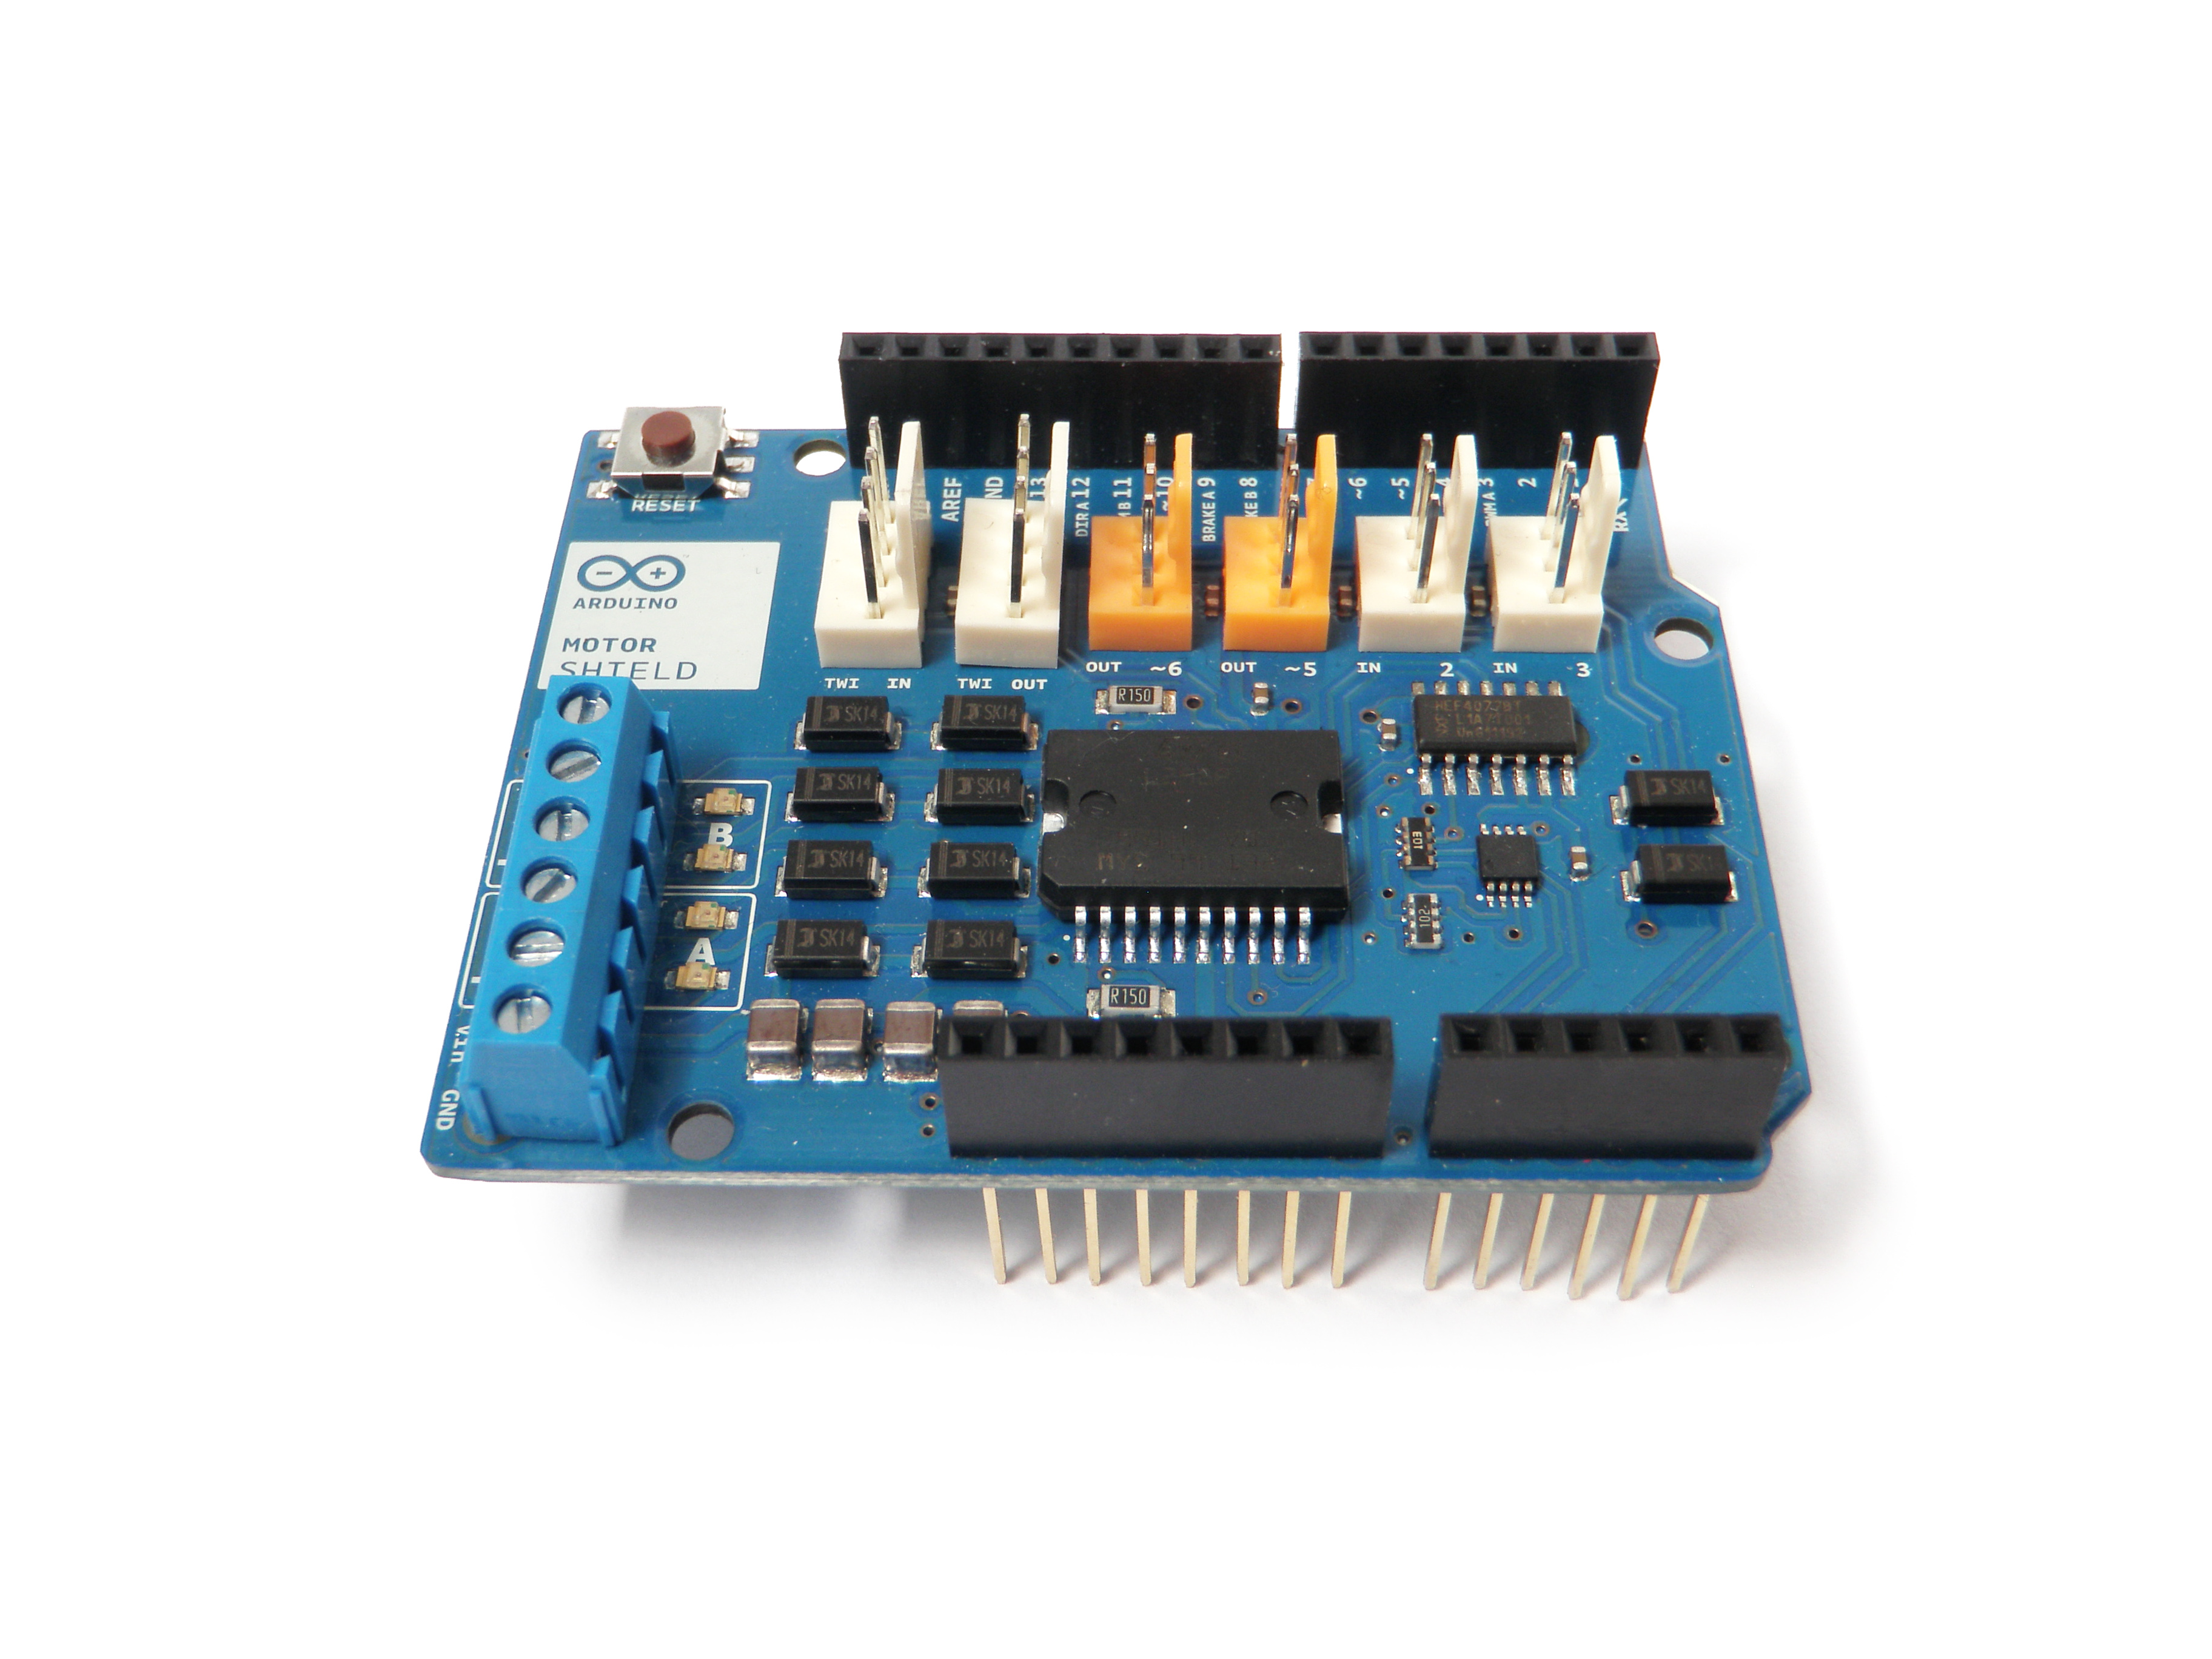
- Arduino Motor Shield
- Motor CC ou motor de passo
Princípio de funcionamento
O Arduino Motor Shield utiliza a ponte H dupla L298. Ele permite controlar a direção e velocidade de motores com uma tensão nominal entre 5 e 12V e uma corrente de 2A, podendo chegar a 4A com uma fonte de tensão externa.
Com este shield, é possível pilotar:
- até dois motores CC ou um motor de passo bipolar;
- dois sensores analógicos;
- duas saídas PWM, como servomotores;
- há um barramento I2C disponível, o que permite conectar módulos compatíveis.
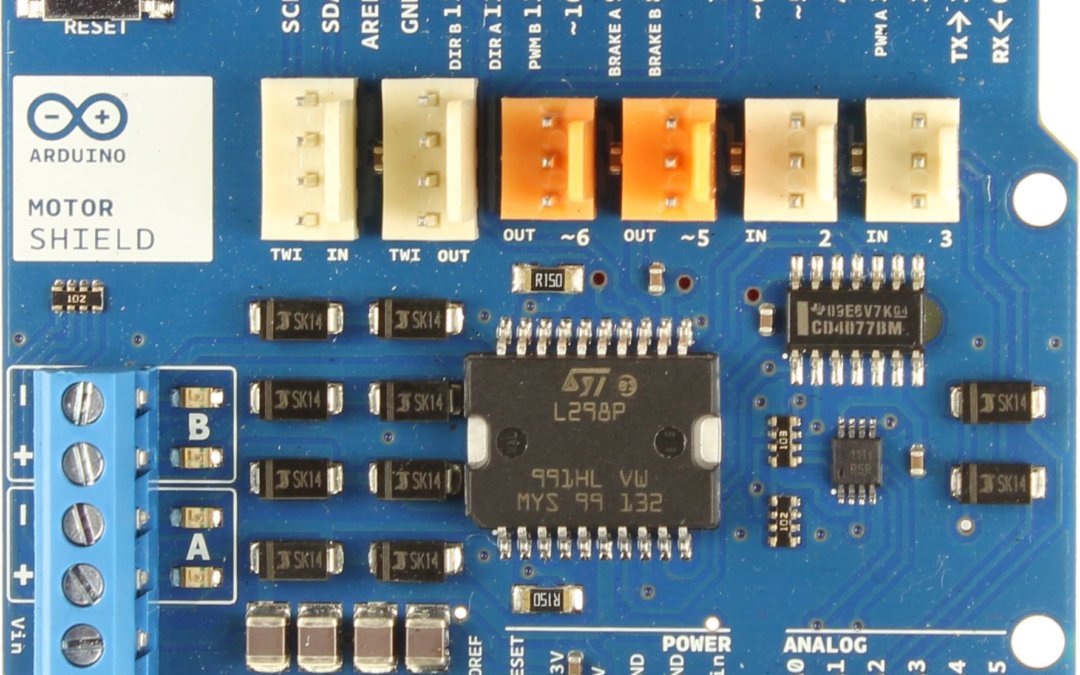
Esquema
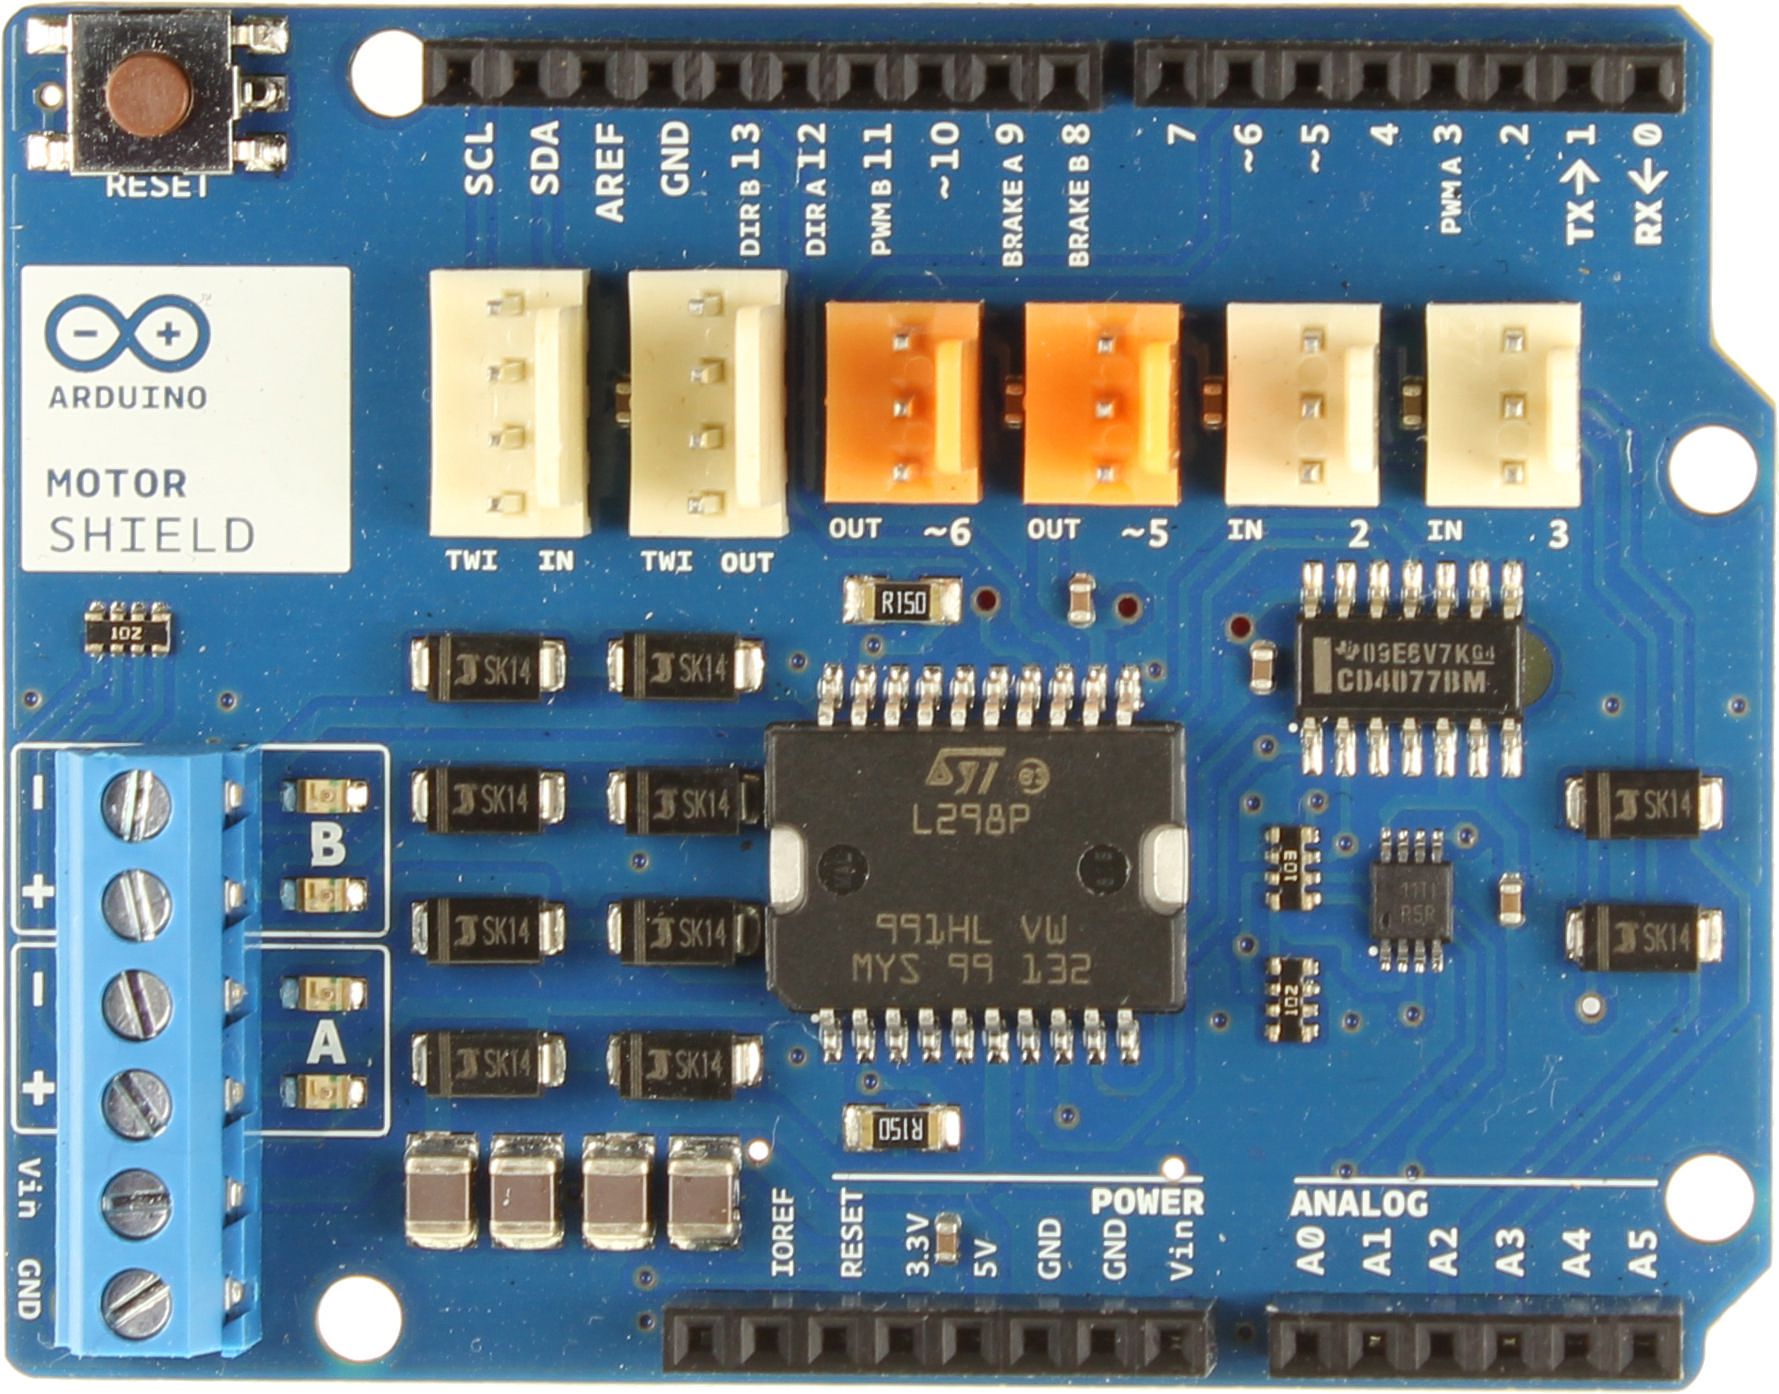
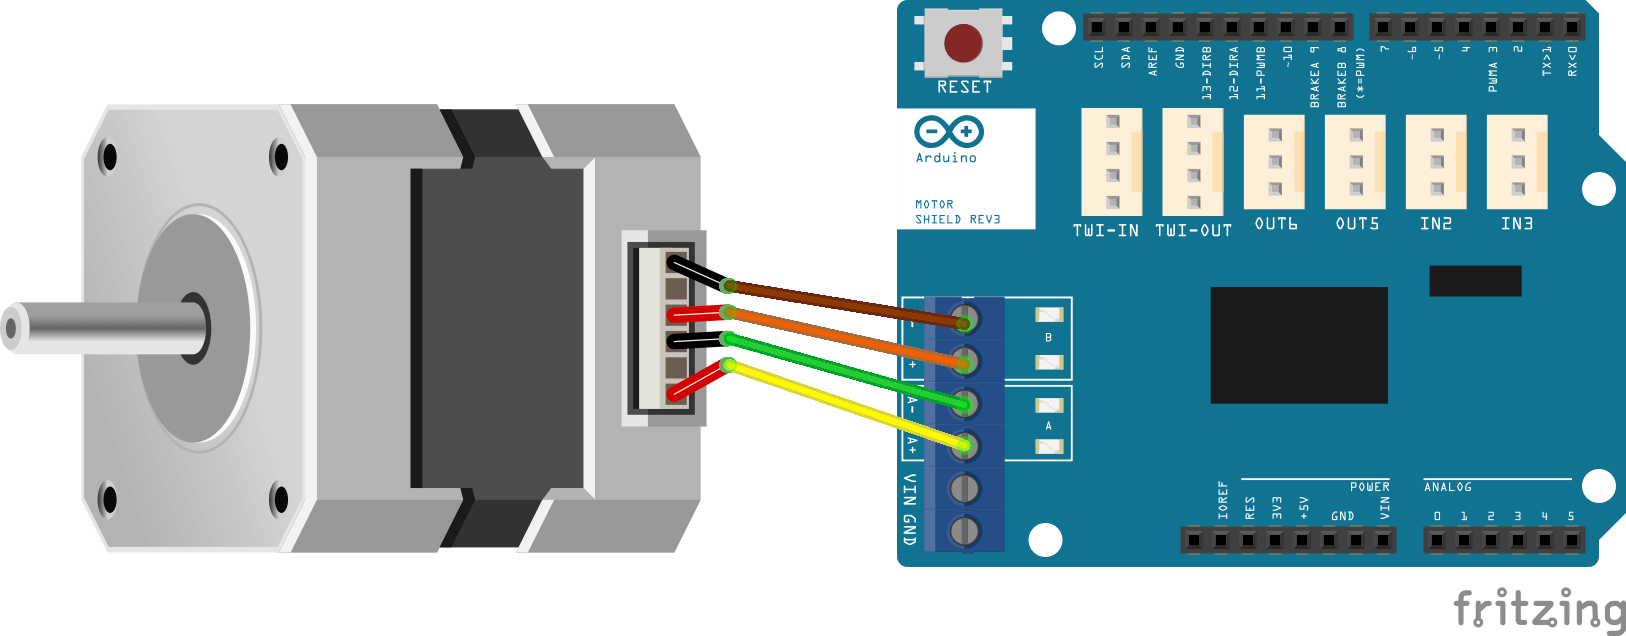
Compatível com as placas UNO e Mega, o shield é colocado diretamente sobre a placa Arduino. A fonte de alimentação é ligada ao bloco terminal Power. Os motores são ligados aos terminais A+,A-,B+,B-. Os pinos do Arduino são diretamente ligados aos pinos do circuito integrado:
- Digital pin 12: direção DC Motor #A / Stepper #A
- Digital pin 13: direção DC Motor #B / Stepper #B
- Digital pin 3: velocidade DC Motor #A / Stepper #A
- Digital pin 11: velocidade DC Motor #B / Stepper #B
- Digital pin 9: ativação break DC Motor #A
- Pino digital 8: ativação break DC Motor #B
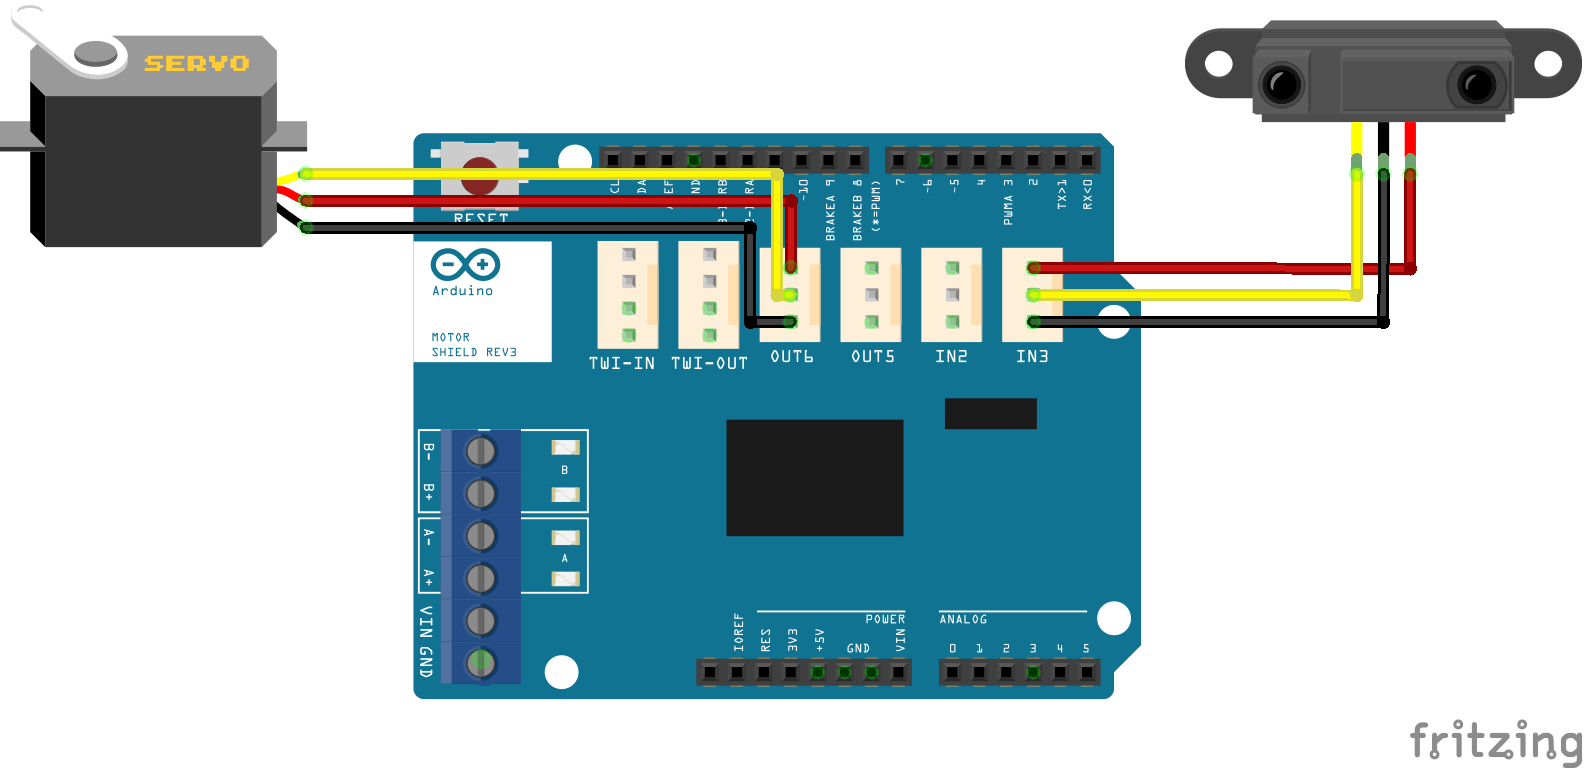
- Entradas disponíveis In2 In3 ligadas às entradas analógicas A2 e A3
- Saídas disponíveis Out5, Out6 ligadas às saídas PWM 5 e 6
No caso de um shield, as ligações são pré-definidas. Verifique a documentação técnica do componente.
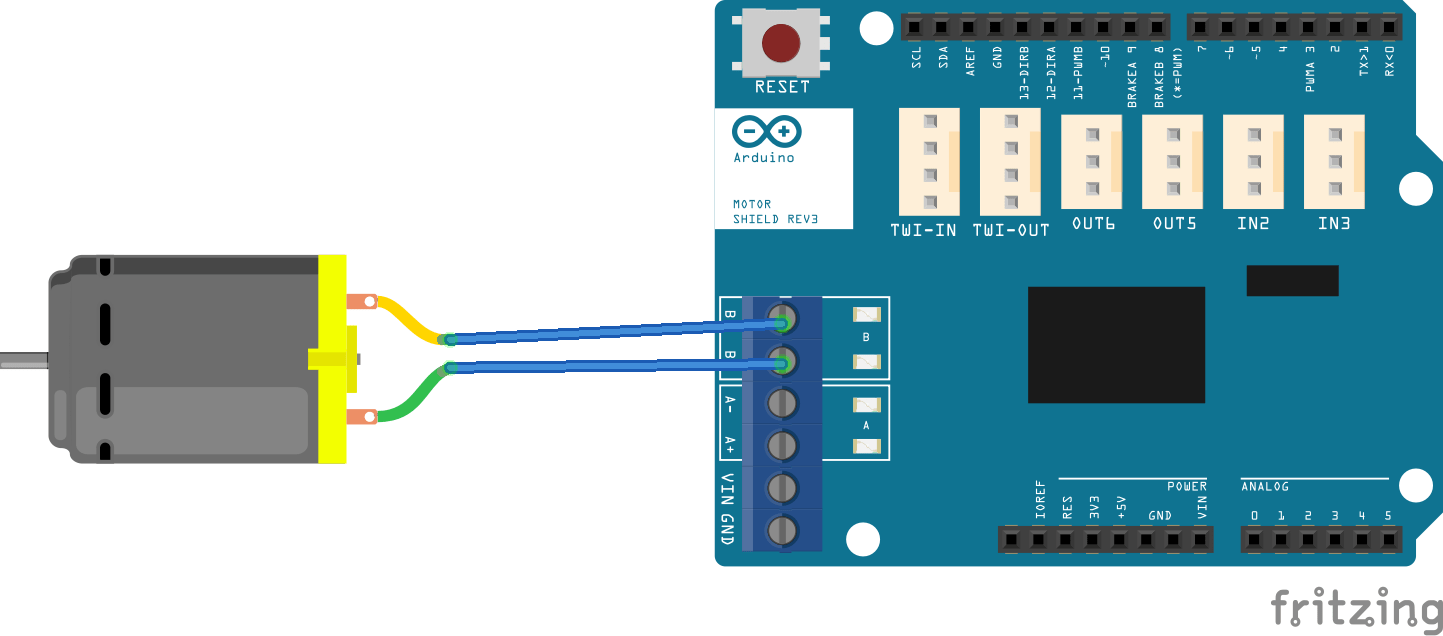
As ligações dos motores são detalhadas nos diagramas a seguir.
Código
Para interagir com o Motor Shield, não precisamos de nenhuma biblioteca específica, porque ele se liga diretamente aos pinos do Arduino. Pode ser interessante criar a sua própria biblioteca para simplificar o seu código.
//Parameters
const int input_voltage  = 9;//V
const int nominal_voltage  = 5;////V
const int MAX_SPEED  = int(nominal_voltage * 255 / input_voltage);
const int directionA  = 12;
const int directionB  = 13;
const int brakeA  = 9;
const int brakeB  = 8;
const int speedA  = 3;
const int speedB  = 11;
const int in2  = A2;
const int in3  = A3;

void setup() {
  //Init Serial USB
  Serial.begin(9600);
  Serial.println(F("Initialize System"));
  //Init Motor Shield
  pinMode(directionA, OUTPUT); //Initiates Motor Channel A pin
  pinMode(brakeA, OUTPUT); //Initiates Brake Channel A pin
  pinMode(directionB, OUTPUT); //Initiates Motor Channel B pin
  pinMode(brakeB, OUTPUT); //Initiates Brake Channel B pin
}

void loop() {
  readSensorMS();
  testMotorMS();
  //testStepperMS();
}

void testStepperMS() { /* function testStepperMS */
  //// Test stepper
  Serial.println("Move stepper 1 step clockwise");
  stpCW(1);
  Serial.println("Move stepper 1 step counter clockwise");
  stpCCW(1);
}

void testMotorMS() { /* function testMotorMS */
  //// Test DC motor
  Serial.println(F("-------------------------------------"));
  Serial.println(F("Avant "));
  dcForward();
  delay(500);
  Serial.println(F("Arrière "));
  dcBackward();
  delay(500);
  Serial.println(F("Arrêt "));
  dcStop();
  delay(1000);
}

void readSensorMS() { /* function readSensorMS */
  //// Read sensors
  Serial.print(F("In2 : ")); Serial.println(analogRead(in2));
  Serial.print(F("In3 : ")); Serial.println(analogRead(in3));
}

void dcForward() { /* function dcForward */
  //// set forward motion for A and B
  digitalWrite(directionA, HIGH); //Establishes forward direction of Channel A
  digitalWrite(brakeA, LOW);   //Disengage the Brake for Channel A
  analogWrite(speedA, MAX_SPEED);
  digitalWrite(directionB, HIGH); //Establishes forward direction of Channel B
  digitalWrite(brakeB, LOW);   //Disengage the Brake for Channel B
  analogWrite(speedB, MAX_SPEED);
}

void dcBackward() { /* function dcBackward */
  //// set backward motion for A and B
  digitalWrite(directionA, LOW); //Establishes forward direction of Channel A
  digitalWrite(brakeA, LOW);   //Disengage the Brake for Channel A
  analogWrite(speedA, MAX_SPEED);
  digitalWrite(directionB, LOW); //Establishes forward direction of Channel B
  digitalWrite(brakeB, LOW);   //Disengage the Brake for Channel B
  analogWrite(speedB, MAX_SPEED);
}

void dcStop() { /* function dcStop */
  //// stop motors A and B
  digitalWrite(brakeA, HIGH);   //Engage the Brake for Channel A
  analogWrite(speedA, 0);
  digitalWrite(brakeB, HIGH);   //Engage the Brake for Channel B
  analogWrite(speedB, 0);
}

void stpCW(int nbstep) { /* function stpCW */
  //// Move stepper clockwise
  for (int i = 0; i < nbstep; i++) {
    digitalWrite(brakeA, LOW);  //Disable brake A
    digitalWrite(brakeB, HIGH); //Enable brake B
    digitalWrite(directionA, HIGH);   //Set direction of CH A
    analogWrite(speedA, MAX_SPEED);   //Set speed for CH A
    delay(30);

    digitalWrite(brakeA, HIGH);  //Enable brake A
    digitalWrite(brakeB, LOW); //Disable brake B
    digitalWrite(directionB, LOW);   //Set direction of CH B
    analogWrite(speedB, MAX_SPEED);   //Set speed for CH B
    delay(30);

    digitalWrite(brakeA, LOW);  //Disable brake A
    digitalWrite(brakeB, HIGH); //Enable brake B
    digitalWrite(directionA, LOW);   //Set direction of CH A
    analogWrite(speedA, MAX_SPEED);   //Set speed for CH A
    delay(30);

    digitalWrite(brakeA, HIGH);  //Enable brake A
    digitalWrite(brakeB, LOW); //Disable brake B
    digitalWrite(directionB, HIGH);   //Set direction of CH B
    analogWrite(speedB, MAX_SPEED);   //Set speed for CH B
    delay(30);
  }
}

void stpCCW(int nbstep) { /* function stpCCW */
  //// Move stepper counter-clockwise
  for (int i = 0; i < nbstep; i++) {
    digitalWrite(brakeA, LOW);  //Disable brake A
    digitalWrite(brakeB, HIGH); //Enable brake B
    digitalWrite(directionA, HIGH);   //Set direction of CH A
    analogWrite(speedA, MAX_SPEED);   //Set speed for CH A
    delay(30);

    digitalWrite(brakeA, HIGH);  //Enable brake A
    digitalWrite(brakeB, LOW); //Disable brake B
    digitalWrite(directionB, HIGH);   //Set direction of CH B
    analogWrite(speedB, MAX_SPEED);   //Set speed for CH B
    delay(30);

    digitalWrite(brakeA, LOW);  //Disable brake A
    digitalWrite(brakeB, HIGH); //Enable brake B
    digitalWrite(directionA, LOW);   //Set direction of CH A
    analogWrite(speedA, MAX_SPEED);   //Set speed for CH A
    delay(30);

    digitalWrite(brakeA, HIGH);  //Enable brake A
    digitalWrite(brakeB, LOW); //Disable brake B
    digitalWrite(directionB, LOW);   //Set direction of CH B
    analogWrite(speedB, MAX_SPEED);   //Set speed for CH B
    delay(30);
  }
}

void dcStop() { /* function dcStop */
  //// stop motors A and B
  digitalWrite(brakeA, HIGH);   //Engage the Brake for Channel A
  analogWrite(speedA, 0);
  digitalWrite(brakeB, HIGH);   //Engage the Brake for Channel B
  analogWrite(speedB, 0);
}
Aplicações
- Controlar um robô de duas rodas como o Willy
Fontes
- Documentação técnica do módulo L298
- Controlar um motor CC com o Arduino
- Controlar um motor de passo com o Arduino
Retrouvez nos tutoriels et d’autres exemples dans notre générateur automatique de code
La Programmerie