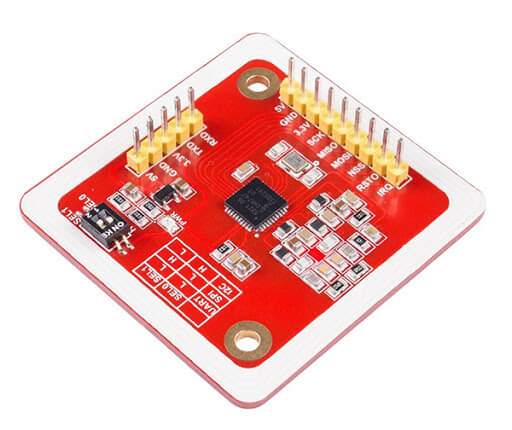
O módulo NFC PN532 é um leitor de cartões inteligentes que, entre outras coisas, ativa um mecanismo quando o cartão correto lhe é apresentado. Ele pode ser encontrado em smartphones, por exemplo. O módulo RFID mais conhecido no mundo Arduino é certamente o RC522, mas veremos neste tutorial como usar o leitor RFID PN532, que tem algumas vantagens, especialmente nas opções de comunicação. Veremos aqui como usar o módulo de acordo com os diferentes métodos de comunicação: UART, SPI e I2C.
Material
- Computador
- Arduino UNO
- Cabo USB A Macho/B Macho
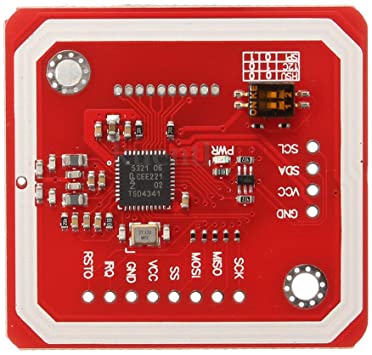
- Módulo NFC PN532
- Cabo Dupont M/F
Seleção do modo de comunicação
Uma das grandes vantagens do módulo NFC é poder usar diferentes protocolos para comunicar com o Arduino: UART, I2C ou SPI. Cada protocolo utiliza pinos e bibliotecas específicas do microcontrolador.
Para selecionar o modo de comunicação, é preciso configurar o PN532 utilizando os interruptores DIP (0-Low, 1-High):
| SEL0 | SEL1 | |
| UART | 0 | 0 |
| SPI | 0 | 1 |
| I2C | 1 | 0 |
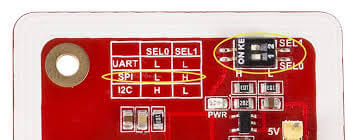
Certifique-se de que a configuração do interruptor DIP corresponde ao esquema de ligação (pinout).
Utilização do módulo com comunicação serial
Esquema
Para comunicação serial, ou UART, o pinout é o seguinte (lado esquerdo PN532, lado direito Arduino UNO):
- Vcc (Fonte de alimentação) <-> 5V
- GND (Terra) <-> GND
- Rx (Receive) <-> Tx
- Tx (Transmit) <-> Rx
Código
Como existem diferentes opções de comunicação, é preciso utilizar a biblioteca certa para cada caso. No caso de uma porta UART, a biblioteca é a PN532_HSU.h; para uma porta SoftwareSerial, usamos a biblioteca PN532_SWHSU.h . As funções que permitem a leitura NFC permanecem as mesmas.
// for Hardware Serial
/*#include <PN532_HSU.h>
  #include <PN532.h>
  PN532_HSU pn532hsu( Serial );
  PN532 nfc( pn532hsu );
*/

// for Software Serial
#include <SoftwareSerial.h>
#include <PN532_SWHSU.h>
#include <PN532.h>
SoftwareSerial SWSerial( 2, 3 ); // RX, TX
PN532_SWHSU pn532swhsu( SWSerial );
PN532 nfc( pn532swhsu );


String tagId = "None", dispTag = "None";
byte nuidPICC[4];

void setup(void) {

  Serial.begin(115200);
  Serial.println("Hello Maker!");
  //  Serial2.begin(115200, SERIAL_8N1, RXD2, TXD2);

  nfc.begin();

  uint32_t versiondata = nfc.getFirmwareVersion();
  if (! versiondata) {
    Serial.print("Didn't Find PN53x Module");
    while (1); // Halt
  }

  // Got valid data, print it out!
  Serial.print("Found chip PN5"); Serial.println((versiondata >> 24) & 0xFF, HEX);
  Serial.print("Firmware ver. "); Serial.print((versiondata >> 16) & 0xFF, DEC);
  Serial.print('.'); Serial.println((versiondata >> 8) & 0xFF, DEC);

  // Configure board to read RFID tags
  nfc.SAMConfig();

  Serial.println("Waiting for an ISO14443A Card ...");

}

void loop() {
  readNFC();
}

void readNFC() {

  boolean success;
  uint8_t uid[] = { 0, 0, 0, 0, 0, 0, 0 };  // Buffer to store the returned UID
  uint8_t uidLength;                       // Length of the UID (4 or 7 bytes depending on ISO14443A card type)
  success = nfc.readPassiveTargetID(PN532_MIFARE_ISO14443A, &uid[0], &uidLength);

  if (success) {
    Serial.print("UID Length: "); Serial.print(uidLength, DEC); Serial.println(" bytes");
    Serial.print("UID Value: ");

    for (uint8_t i = 0; i < uidLength; i++) {
      nuidPICC[i] = uid[i];
      Serial.print(" "); Serial.print(uid[i], DEC);
    }
    Serial.println();
    tagId = tagToString(nuidPICC);
    dispTag = tagId;
    Serial.print(F("tagId is : "));
    Serial.println(tagId);
    Serial.println("");

    delay(1000);  // 1 second halt

  } else {
    // PN532 probably timed out waiting for a card
    //Serial.println("Timed out! Waiting for a card...");
  }
}

String tagToString(byte id[4]) {
  String tagId = "";
  for (byte i = 0; i < 4; i++) {
    if (i < 3) tagId += String(id[i]) + ".";
    else tagId += String(id[i]);
  }
  return tagId;
}
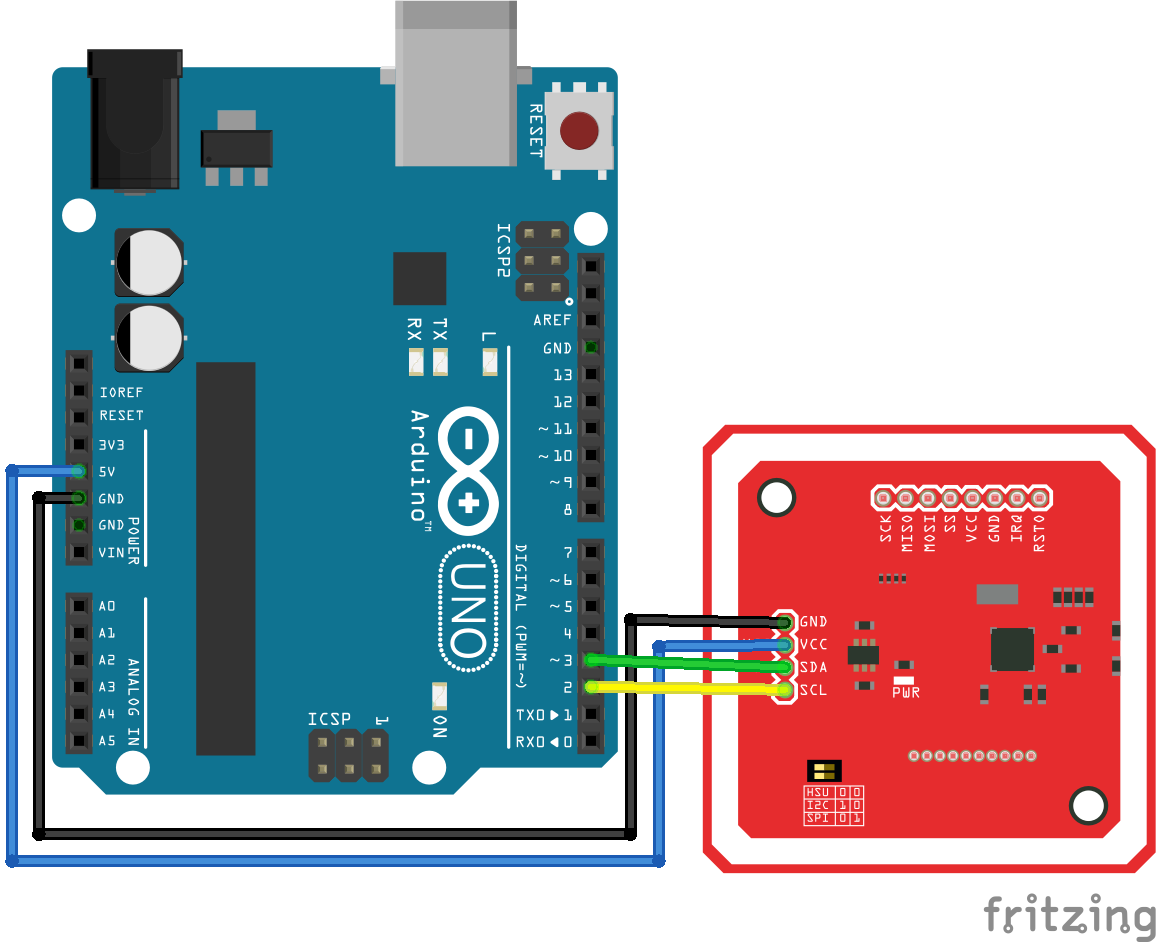
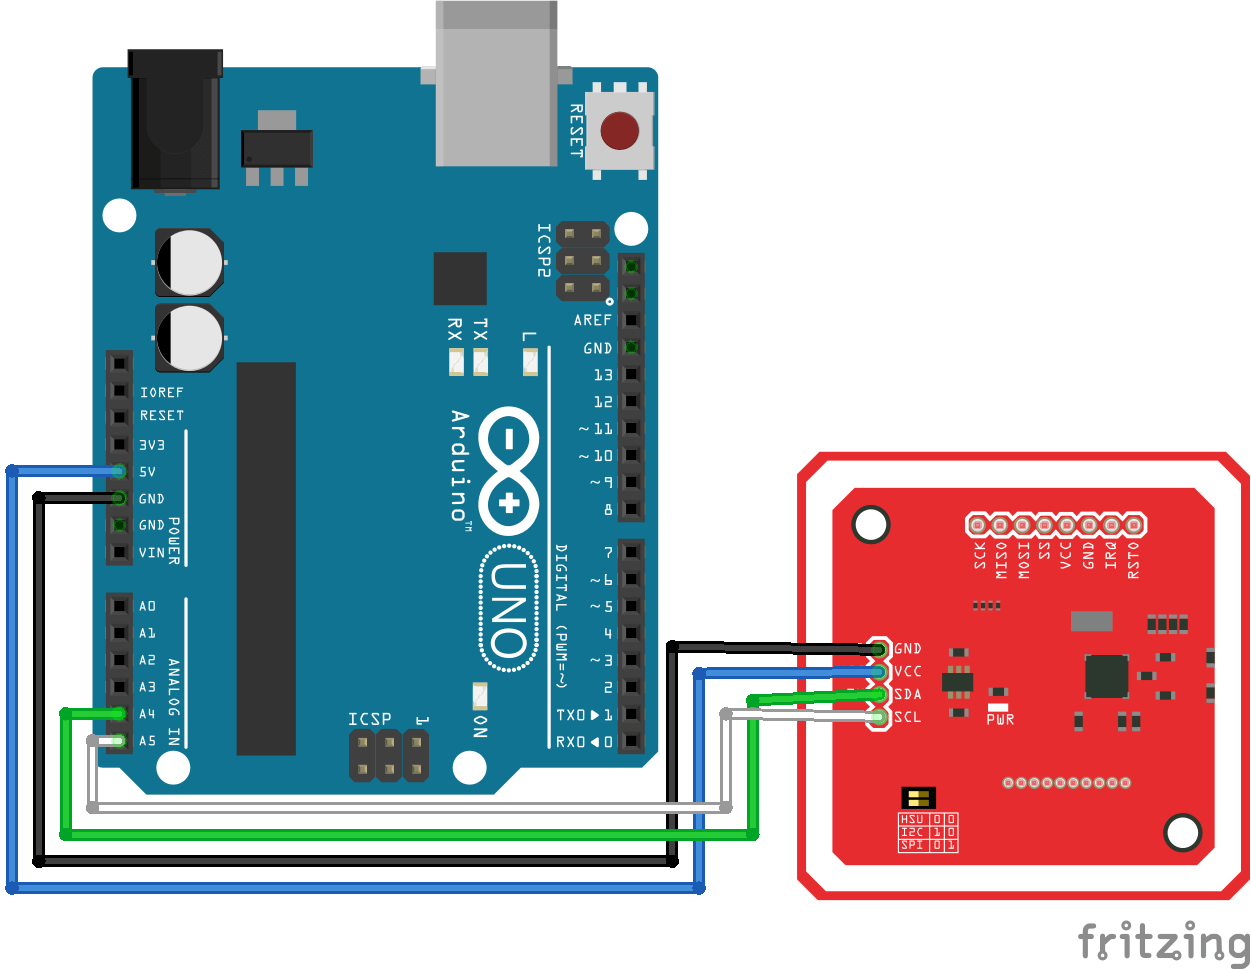
Utilização do módulo com I2C
Esquema
Para a comunicação I2C, o esquema de ligação é:
- Vcc (Fonte de alimentação) <-> 5V
- GND (Terra) <-> GND
- SDA (Data) <-> A4
- SCL (Clock) <-> A5
Código para comunicação I2C
Para a comunicação I2C, usamos a biblioteca PN532_I2C.h.
// for I2C Communication
#include <Wire.h>
#include <PN532_I2C.h>
#include <PN532.h>
#include <NfcAdapter.h>
PN532_I2C pn532_i2c(Wire);
NfcAdapter nfc = NfcAdapter(pn532_i2c);

String tagId = "None";
byte nuidPICC[4];

void setup(void) {
  Serial.begin(115200);
  Serial.println("System initialized");

  nfc.begin();
}

void loop() {
  readNFC();
}

void readNFC() {
  if (nfc.tagPresent())
  {
    NfcTag tag = nfc.read();
    tag.print();
    tagId = tag.getUidString();
  }
  delay(5000);
}
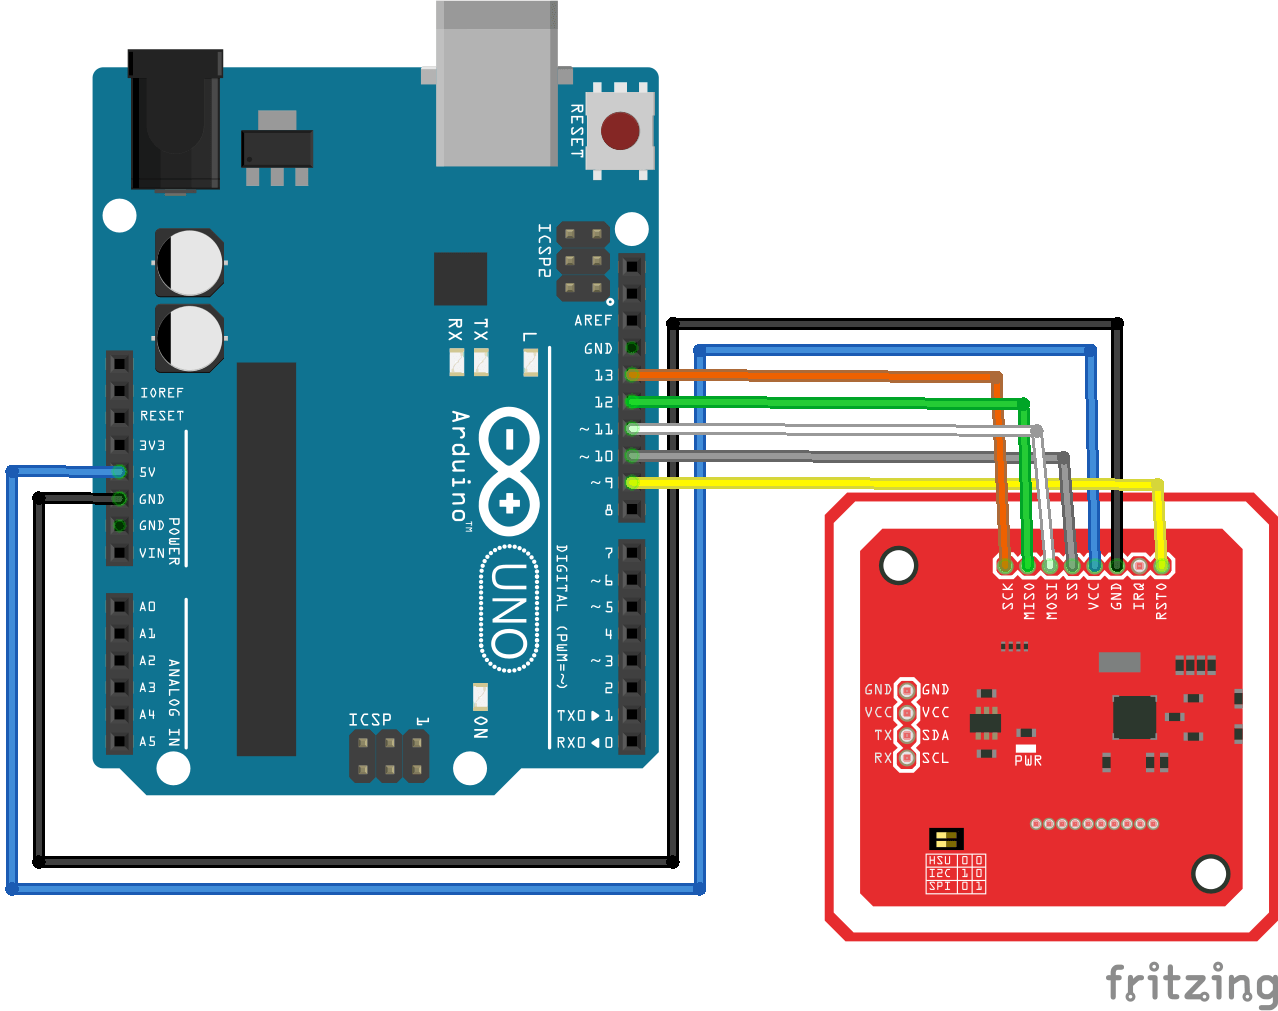
Utilização do módulo com SPI
Esquema
Para comunicação SPI, as ligações são as seguintes:
- Vcc (Fonte de alimentação) <-> 5V/3V3
- RST (Reset) <-> 9
- GND (Terra) <-> GND
- MISO (Master Input Slave Output) <-> 11
- MOSI (Master Output Slave Input) <-> 12
- SCK (Serial Clock) <-> 13
- SS (Slave select) <-> 10
Código para comunicação SPI
A biblioteca PN532_SPI.h é usada para comunicação pela porta SPI.
// for SPI Communication
#include <SPI.h>
#include <PN532_SPI.h>
#include <PN532.h>
#include <NfcAdapter.h>
PN532_SPI interface(SPI, 10); // create a PN532 SPI interface with the SPI CS terminal located at digital pin 10
NfcAdapter nfc = NfcAdapter(interface); // create an NFC adapter object


String tagId = "None";

void setup(void) {
  Serial.begin(115200);
  Serial.println("System initialized");

  nfc.begin();
}

void loop() {
  readNFC();
}

void readNFC() {
  if (nfc.tagPresent())
  {
    NfcTag tag = nfc.read();
    tag.print();
    tagId = tag.getUidString();
  }
  delay(5000);
}
Aplicações
- Abrir uma fechadura com um cartão magnético
Fontes
- https://github.com/elechouse/PN532
- https://github.com/elechouse/PN532/tree/PN532_HSU/PN532_HSU
- https://github.com/elechouse/PN532/tree/PN532_HSU/PN532_SWHSU
- https://github.com/elechouse/PN532/tree/PN532_HSU/PN532_SPI
- https://github.com/elechouse/PN532/tree/PN532_HSU/PN532_I2C
- https://github.com/elechouse/PN532/tree/PN532_HSU/NDEF
- https://www.arduino.cc/en/reference/wire
- https://www.arduino.cc/en/reference/SPI
Retrouvez nos tutoriels et d’autres exemples dans notre générateur automatique de code
La Programmerie