Uno de los puntos débiles del Arduino es el espacio de memoria. Al jugar con datos (guardar mediciones, leer o escribir en un archivo, etc.), es necesario tener mucho espacio disponible. Puede agregar fácilmente memoria al Arduino con una tarjeta Secure Digital o una tarjeta SD.
Material
- Computadora
- Arduino UNO x1
- Cable USB para conectar Arduino a la computadora x1
- Blindaje o módulo SD x1
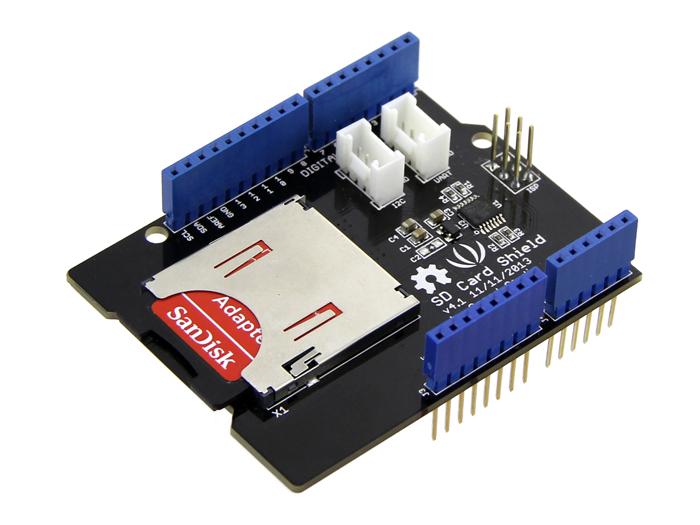
Descripción general del módulo de tarjeta SD
Cualquiera sea el módulo que seleccione. La idea es la misma: una ranura para la tarjeta SD y algunos pines para conectar el microcontrolador con la tarjeta SD.

El módulo de la tarjeta SD tiene 6 pines para establecer la conexión: 2 para alimentación y 4 para establecer una conexión SPI (Serial Peripheral Interface).
- 5V o 3.3V para alimentar el módulo
- GND para el suelo
- CS o ChipSelect para activar la comunicación
- MISO (Master Input, Slave Output) Pin de transmisión, equivalente al pin del puerto serie Tx. Módulo de salida.
- MOSI (Master Output, Slave Input) Pin de recepción equivalente al pin de puerto serie Rx. Módulo de entrada.
- SCK Clock para sincronizar los dispositivos
En caso de blindaje, el cableado está predefinido. Asegúrese de revisar la hoja de datos y modificar el código en consecuencia.
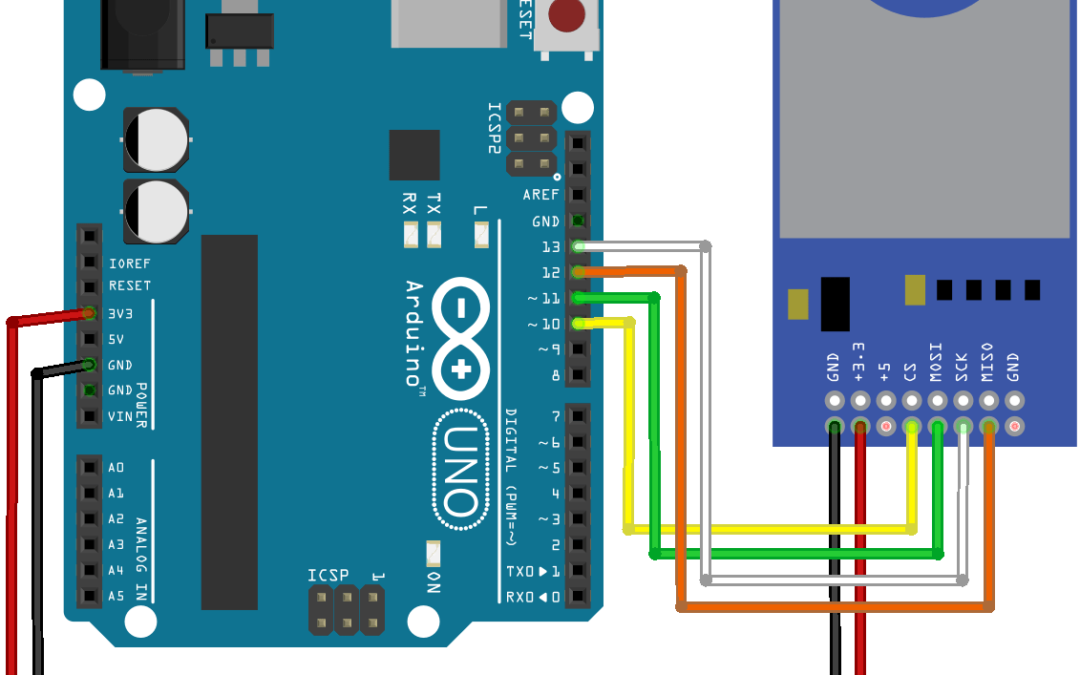
Cableado del módulo de tarjeta SD
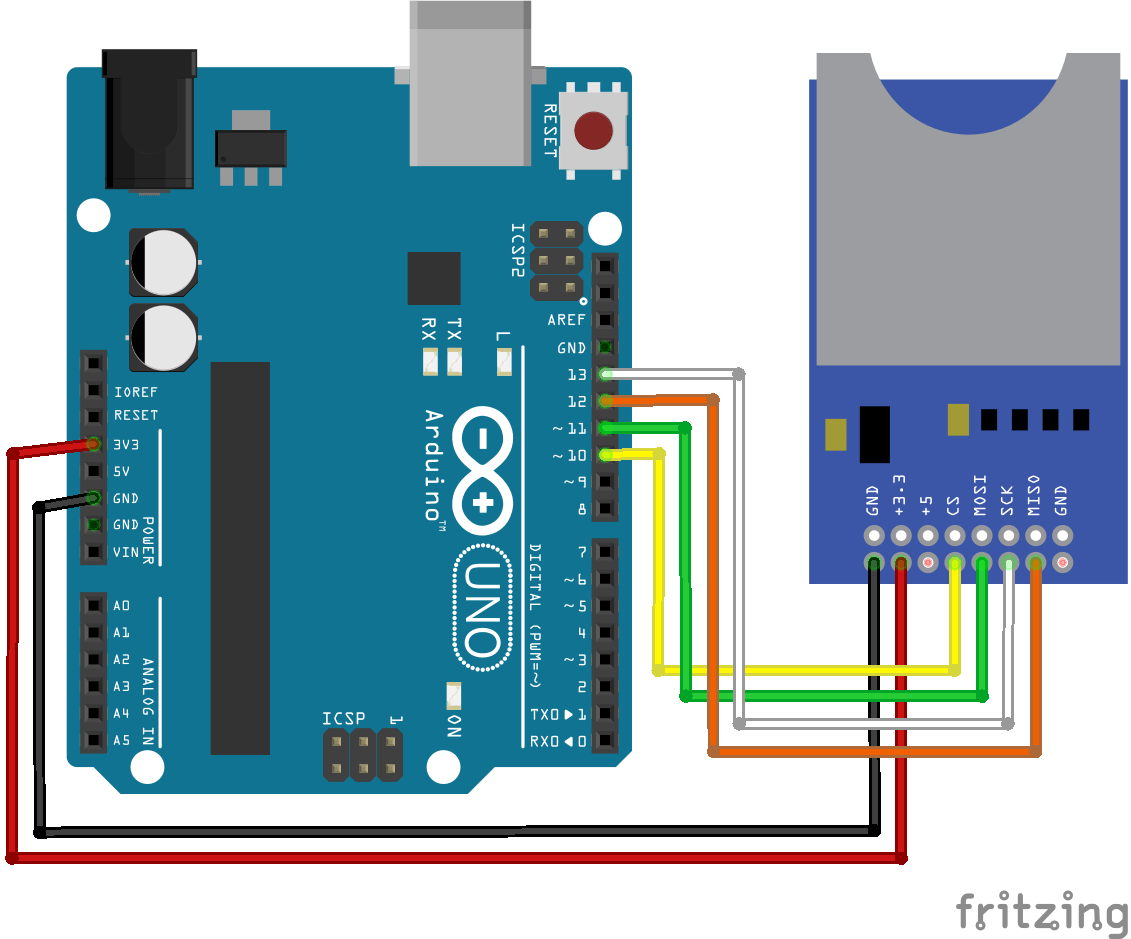
- 3.3V en 3.3V
- GND en GND
- CS generalmente conectado hasta 4 (aquí en10)
- MISO generalmente en 12
- MOSI generalmente en 11
- SCK generalmente en 13
Código para obtener información sobre la tarjeta SD
Para interactuar con el módulo o escudo de su tarjeta SD, hay una biblioteca Arduino: SD.h. Hay ejemplos disponibles en Arduino IDE.
// include the SD library:
#include <SPI.h>
#include <SD.h>

// set up variables using the SD utility library functions:
Sd2Card card;
SdVolume volume;
SdFile root;

// change this to match your SD shield or module;
// Arduino Ethernet shield: pin 4
// Adafruit SD shields and modules: pin 10
// Sparkfun SD shield: pin 8
// MKRZero SD: SDCARD_SS_PIN
// VELLEMAN I/O VMA304: SD shield: pin 10
const int chipSelect = 10;

void setup() {
  // Open serial communications and wait for port to open:
  Serial.begin(9600);
  while (!Serial) {
    ; // wait for serial port to connect. Needed for native USB port only
  }


  Serial.print("\nInitializing SD card...");

  // we'll use the initialization code from the utility libraries
  // since we're just testing if the card is working!
  if (!card.init(SPI_HALF_SPEED, chipSelect)) {
    Serial.println("initialization failed. Things to check:");
    Serial.println("* is a card inserted?");
    Serial.println("* is your wiring correct?");
    Serial.println("* did you change the chipSelect pin to match your shield or module?");
    return;
  } else {
    Serial.println("Wiring is correct and a card is present.");
  }

  // print the type of card
  Serial.print("\nCard type: ");
  switch (card.type()) {
    case SD_CARD_TYPE_SD1:
      Serial.println("SD1");
      break;
    case SD_CARD_TYPE_SD2:
      Serial.println("SD2");
      break;
    case SD_CARD_TYPE_SDHC:
      Serial.println("SDHC");
      break;
    default:
      Serial.println("Unknown");
  }

  // Now we will try to open the 'volume'/'partition' - it should be FAT16 or FAT32
  if (!volume.init(card)) {
    Serial.println("Could not find FAT16/FAT32 partition.\nMake sure you've formatted the card");
    return;
  }


  // print the type and size of the first FAT-type volume
  uint32_t volumesize;
  Serial.print("\nVolume type is FAT");
  Serial.println(volume.fatType(), DEC);
  Serial.println();

  volumesize = volume.blocksPerCluster();    // clusters are collections of blocks
  volumesize *= volume.clusterCount();       // we'll have a lot of clusters
  volumesize *= 512;                            // SD card blocks are always 512 bytes
  Serial.print("Volume size (bytes): ");
  Serial.println(volumesize);
  Serial.print("Volume size (Kbytes): ");
  volumesize /= 1024;
  Serial.println(volumesize);
  Serial.print("Volume size (Mbytes): ");
  volumesize /= 1024;
  Serial.println(volumesize);


  Serial.println("\nFiles found on the card (name, date and size in bytes): ");
  root.openRoot(volume);

  // list all files in the card with date and size
  root.ls(LS_R | LS_DATE | LS_SIZE);
}


void loop(void) {

}
Código para leer o escribir un archivo en la tarjeta SD
/*
  SD card read/write

 This example shows how to read and write data to and from an SD card file
 The circuit:
 * SD card attached to SPI bus as follows:
 ** MOSI - pin 11
 ** MISO - pin 12
 ** CLK - pin 13
 ** CS - pin 4 (for MKRZero SD: SDCARD_SS_PIN)

 created   Nov 2010
 by David A. Mellis
 modified 9 Apr 2012
 by Tom Igoe

 This example code is in the public domain.

 */

#include <SPI.h>
#include <SD.h>

File myFile;
const int chipSelect = 10;

void setup() {
  // Open serial communications and wait for port to open:
  Serial.begin(9600);
  while (!Serial) {
    ; // wait for serial port to connect. Needed for native USB port only
  }


  Serial.print("Initializing SD card...");

  if (!SD.begin(chipSelect)) {
    Serial.println("initialization failed!");
    return;
  }
  Serial.println("initialization done.");

  // open the file. note that only one file can be open at a time,
  // so you have to close this one before opening another.
  myFile = SD.open("test.txt", FILE_WRITE);

  // if the file opened okay, write to it:
  if (myFile) {
    Serial.print("Writing to test.txt...");
    myFile.println("testing 1, 2, 3.");
    // close the file:
    myFile.close();
    Serial.println("done.");
  } else {
    // if the file didn't open, print an error:
    Serial.println("error opening test.txt");
  }

  // re-open the file for reading:
  myFile = SD.open("test.txt");
  if (myFile) {
    Serial.println("test.txt:");

    // read from the file until there's nothing else in it:
    while (myFile.available()) {
      Serial.write(myFile.read());
    }
    // close the file:
    myFile.close();
  } else {
    // if the file didn't open, print an error:
    Serial.println("error opening test.txt");
  }
}

void loop() {
  // nothing happens after setup
}
Precaución: Si no se reconocen sus archivos, intente utilizar un nombre corto para el archivo guardado en la tarjeta SD (máximo 8 caracteres). De hecho, el número de caracteres para un archivo en una tarjeta SD está limitado con Arduino.
Pruebe y mezcle esos ejemplos para obtener la funcionalidad que desea. Si tiene algún problema al interactuar con su módulo de tarjeta SD. No dude en dejar un comentario o enviarnos un mensaje.
Bono: Muestra los archivos almacenados en la tarjeta SD
Para comprobar que los archivos están almacenados en la tarjeta SD, puede ver los archivos almacenados en la raíz. Para hacerlo, simplemente usa el objeto File que te permite navegar por los directorios de la tarjeta SD.
//Libraries
#include <SD.h>//https://www.arduino.cc/en/reference/SD
#include <SPI.h>//https://www.arduino.cc/en/Reference/SPI

//Constants
#define SD_ChipSelectPin 4

//Objects
File root;

void setup() {
  //Init Serial USB
  Serial.begin(9600);
  Serial.println(F("Initialize System"));
  //Init sd shield
  if (!SD.begin(SD_ChipSelectPin)) {
    Serial.println(F("SD fail"));
    return;
  }
  printFilenames();
}

void loop() {

}

void printFilenames(void ) { /* function printFilenames */
  ////find files in SD card
  root = SD.open("/");
  while (true) {
    File entry =  root.openNextFile();
    if (! entry) {
      break;// no more files
    }
    Serial.println(entry.name());
    entry.close();
  }
}
Solicitud
- Agregue memoria a sus robots
- Dale voz a tu proyecto
Fuente
Encuentre otros tutoriales y ejemplos en el generador de código automático
Arquitecto de Código


El codigo me sirve pero solo me esta guardando el ultimo dato generado por mis sensores en la SD, pero en el puerto serial si me imprime la información bien cada 2 segundos. Me podrias ayudar
pruebe FILE_APPEND en lugar de FILE_WRITE