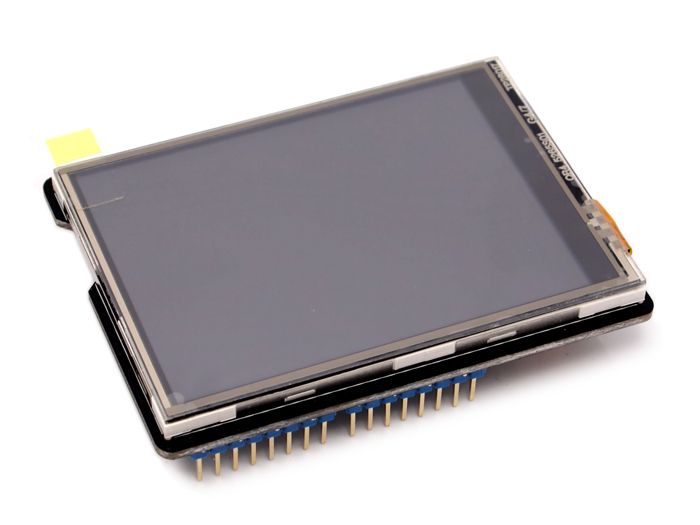
Les Shields TFT sont des écrans LCD tactiles permettant d’afficher des images et de créer des interfaces utilisateurs, avec des graphismes plus ou moins complexes, pour piloter les microcontrôleurs Arduino. Dans ce tutoriel, nous utilisons le shield Kuman TFT 3.5″ (très proche du shield 2.8″) mais ce tutoriel peut être appliqué à d’autre Shield ou module LCD. Vérifiez bien les broches utilisées et la compatibilité de la librairie.
Matériel
- Ordinateur
- Arduino UNO ou Mega
- Câble USB A Mâle/B Mâle
- TFT LCD Shield
- Carte SD
Principe de fonctionnement
Le shield TFT est muni d’un écran LCD tactile permettant d’afficher des images en couleurs et de créer des interfaces avec des courbes et des boutons, pour interagir et visualiser des données provenant de l’Arduino. Il est aussi muni d’un lecteur de carte micro SD qui peut servir à sauvegarder des images ou autres données.
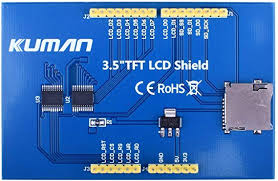
N.B.: Même si le shield est compatible avec Arduino Mega et que l’écran fonctionne, le module SD ne fonctionne pas directement avec une carte Arduino Mega.
Schéma
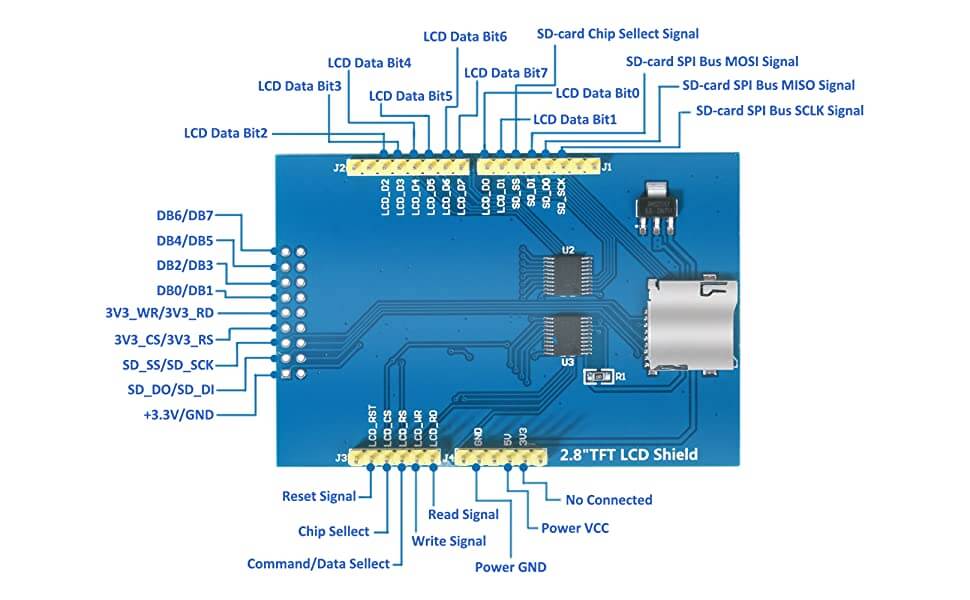
Le shield TFT se place directement sur une carte Arduino UNO ou Mega. Le shield utilise quasiment toutes les broches de l’Arduino UNO. Assurez-vous de ne pas utiliser les mêmes pour d’autres modules.
A titre d’information les broches disponibles sont:
- broche analogique A5
- broche digitale 0
- broche digitale 1
Si vous n’utilisez pas la fonctionnalité tactile de l’écran, vous pouvez aussi utiliser les broches: A1, A2, 6 et 7.
Si vous utilisez un autre Shield ou module LCD vérifiez bien les broches utilisées (pinout).
Calibration du TouchScreen
Tous les écrans sont différents pour pouvoir les utiliser correctement, il faut récupérer les bonnes valeurs de dimensions afin d’adapter l’affichage et la détection de pression. Pour cela, vous pouvez charger le code TouchScreen_Calibr_native.ino, présent dans les exemples de la librairie MCUFRIEND_kbv.h.
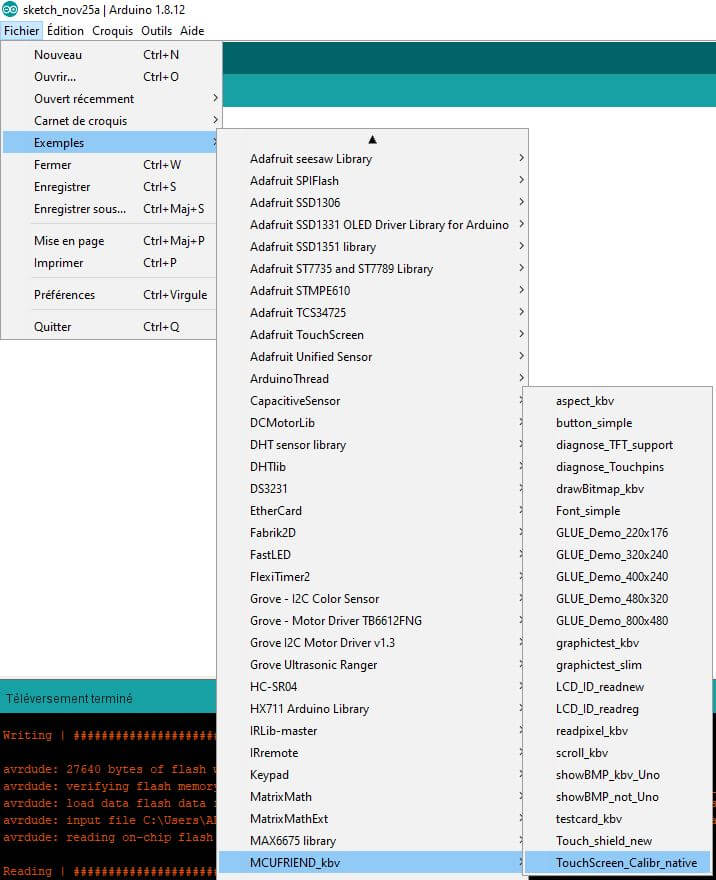
Une fois, le code chargé il va vous être demandé d’utiliser le stylet pour appuyer, maintenir et relacher à différents endroits de l’écran afin de le calibrer. Une fois cette opération effectuée, les paramètres de configuration s’affiche sur le moniteur série et sur l’écran.
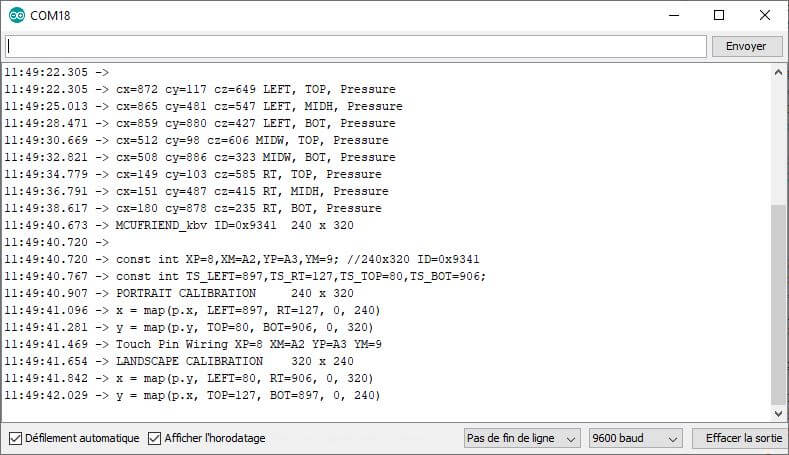
Voici les résultats pour l’écran 3.5″ TFT LCD Shield
//3.5 Calibration
const int XP = 8, XM = A2, YP = A3, YM = 9; //320x480 ID=0x9486
const int TS_LEFT = 144, TS_RT = 887, TS_TOP = 936, TS_BOT = 87;
Voici les résultats pour l’écran 2.8″ TFT LCD Shield
//2.8 Calibration
const int XP=8,XM=A2,YP=A3,YM=9; //240x320 ID=0x9341
const int TS_LEFT=907,TS_RT=120,TS_TOP=74,TS_BOT=913;
Code
Pour utiliser l’objet TftScreen, nous utilisons les librairies SD.h, Adafruit_GFX.h, MCUFRIEND_kbv.h, et TouchScreen.h qui permettent de gérer la communication avec la carte SD, la création de graphique, la gestion de l’écran et l’écran tactile. Cet exemple propose une prise en main très simple de l’écran
N.B.: Pensez à utiliser les paramètres de l’écran tactile que vous utilisez.
//Libraries
#include <SD.h>//https://www.arduino.cc/en/reference/SD
#include <Adafruit_GFX.h>//https://github.com/adafruit/Adafruit-GFX-Library
#include <MCUFRIEND_kbv.h>//https://github.com/prenticedavid/MCUFRIEND_kbv
#include <TouchScreen.h> //https://github.com/adafruit/Adafruit_TouchScreen

//Constants
#define SD_CS 10
#define BLACK 0
#define GREY 21845
#define BLUE 31
#define RED 63488
#define GREEN 2016
#define DARKGREEN 1472
#define CYAN 2047
#define MAGENTA 63519
#define YELLOW 65504
#define GOLD 56768
#define WHITE 65535

//Touch screen configuration
#define MINPRESSURE 200
#define MAXPRESSURE 1000
// ALL Touch panels and wiring is DIFFERENT
// copy-paste results from TouchScreen_Calibr_native.ino
//3.5 Parameters
const int XP = 8, XM = A2, YP = A3, YM = 9; //320x480 ID=0x9486
const int TS_LEFT = 144, TS_RT = 887, TS_TOP = 936, TS_BOT = 87;
//2.8 Parameters
//const int XP = 8, XM = A2, YP = A3, YM = 9; //240x320 ID=0x9341
//const int TS_LEFT = 907, TS_RT = 120, TS_TOP = 74, TS_BOT = 913;

TouchScreen ts = TouchScreen(XP, YP, XM, YM, 300);
TSPoint p;
bool down;
int pixel_x, pixel_y;     //Touch_getXY() updates global vars

//Variables
int currentPage  = 0, oldPage = -1;

//Objects
MCUFRIEND_kbv tft;

// Button calibration
Adafruit_GFX_Button page1_btn, page2_btn;
int margin = 5;
int btnWidth = 100;
int btnHeight = 40;
int btnY = 200;

void setup() {
  //Init Serial USB
  Serial.begin(9600);
  Serial.println(F("Initialize System"));
  //Init tft screen
  uint16_t ID = tft.readID();
  if (ID == 0xD3D3) ID = 0x9486;  //for 3.5" TFT LCD Shield , 0x9341 for 2.8" TFT LCD Shield
  tft.begin(ID);
  tft.setRotation(1);//0-PORTRAIT 1-PAYSAGE 2-REVERSE PORTRAIT 3-REVERSE PAYSAGE
  //Uncomment if you are using SD
  /*if (!SD.begin(SD_CS)) {
    Serial.println(F("initialization failed!"));
    return;
  }*/
  currentPage = 0; // Indicates that we are at Home Screen
}

void loop() {
  down = Touch_getXY();
  switch (currentPage) {
    case 0:
      if (currentPage != oldPage) {
        Serial.println(F("Page 1"));
        drawPage1();
      }
      page2_btn.press(down && page2_btn.contains(pixel_x, pixel_y));
      //if (page2_btn.justReleased()) page2_btn.drawButton();

      if (page2_btn.justPressed()) {
        currentPage = 1;
      }
      break;

    case 1:
      if (currentPage != oldPage) {
        Serial.println(F("Page 2"));
        drawPage2();
      }
      page1_btn.press(down && page1_btn.contains(pixel_x, pixel_y));
      //if (page1_btn.justReleased()) page1_btn.drawButton();

      if (page1_btn.justPressed()) {
        currentPage = 0;
      }
      break;
  }
}

void drawPage1() { /* function drawHomePage */
  tft.setRotation(1);
  tft.fillScreen(BLACK);
  //Title
  tft.setCursor(0, 10);
  tft.setTextSize(3);
  tft.setTextColor(WHITE, BLACK);
  tft.print("This is page 1"); // Prints the string on the screen
  tft.drawLine(0, 32, 319, 32, DARKGREEN); // Draws the red line

  //text
  tft.setTextSize(3);
  tft.setTextColor(RED, BLACK);
  tft.setCursor(tft.width() / 2. -  14 * 3 * 3, 80);
  tft.print(" Go to page 2 ");

  //Button
  page2_btn.initButton(&tft, tft.width() / 2., 200, 2 * btnWidth, btnHeight, WHITE, GREEN, BLACK, "Page 2", 2);
  page2_btn.drawButton(false);
  oldPage = currentPage;
}

void drawPage2() { /* function drawHomePage */
  tft.setRotation(1);
  tft.fillScreen(GREY);
  //Title
  tft.setCursor(0, 10);
  tft.setTextSize(3);
  tft.setTextColor(WHITE, GREY);
  tft.print("This is page 2"); // Prints the string on the screen
  tft.drawLine(0, 32, 319, 32, DARKGREEN); // Draws the red line

  //text
  tft.setTextSize(3);
  tft.setTextColor(GREEN, BLACK);
  tft.setCursor(tft.width() / 2. - 14 * 3 * 3, 80);
  tft.print(" Go to page 1 ");

  //Button
  page1_btn.initButton(&tft, tft.width() / 2., 200, 2 * btnWidth, btnHeight, WHITE, RED, BLACK, "Page 1", 2);
  page1_btn.drawButton(false);
  oldPage = currentPage;
}
/************************************************************************************
    UTILITY FUNCTION
*************************************************************************************/
bool Touch_getXY(void)
{
  p = ts.getPoint();
  pinMode(YP, OUTPUT);      //restore shared pins
  pinMode(XM, OUTPUT);
  digitalWrite(YP, HIGH);
  digitalWrite(XM, HIGH);
  bool pressed = (p.z > MINPRESSURE && p.z < MAXPRESSURE);
  if (pressed) {
    if (tft.width() <= tft.height()) { //Portrait
      pixel_x = map(p.x, TS_LEFT, TS_RT, 0, tft.width()); //.kbv makes sense to me
      pixel_y = map(p.y, TS_TOP, TS_BOT, 0, tft.height());
    } else {
      pixel_x = map(p.y, TS_TOP, TS_BOT, 0, tft.width());
      pixel_y = map(p.x, TS_RT, TS_LEFT, 0, tft.height());
    }
  }
  return pressed;
}
Bonus : Exemple d’interface graphique
Dans cet exemple, nous allons créer une interface graphique pour montrer différentes fonctionnalités que l’on peut développer avec le shield TFT.
Pensez à utiliser les paramètres de l’écran que vous utilisez.
#include <Adafruit_GFX.h>
#include <MCUFRIEND_kbv.h>
MCUFRIEND_kbv tft;
#include <TouchScreen.h>

#include <Fonts/FreeSans9pt7b.h>
#include <Fonts/FreeSans12pt7b.h>
#include <Fonts/FreeSerif12pt7b.h>
#include <FreeDefaultFonts.h>

#define MINPRESSURE 200
#define MAXPRESSURE 1000

// ALL Touch panels and wiring is DIFFERENT
// copy-paste results from TouchScreen_Calibr_native.ino
//3.5 Calibration
const int XP = 8, XM = A2, YP = A3, YM = 9; //320x480 ID=0x9486
const int TS_LEFT = 144, TS_RT = 887, TS_TOP = 936, TS_BOT = 87;
/*PORTRAIT CALIBRATION     320 x 480
  x = map(p.x, LEFT=144, RT=887, 0, 320)
  y = map(p.y, TOP=936, BOT=87, 0, 480)
  Touch Pin Wiring XP=8 XM=A2 YP=A3 YM=9
  LANDSCAPE CALIBRATION    480 x 320
  x = map(p.y, LEFT=936, RT=87, 0, 480)
  y = map(p.x, TOP=887, BOT=144, 0, 320)*/
//2.8 Calbiration
//const int XP=8,XM=A2,YP=A3,YM=9; //240x320 ID=0x9341
//const int TS_LEFT=907,TS_RT=120,TS_TOP=74,TS_BOT=913;
/*PORTRAIT CALIBRATION     240 x 320
  x = map(p.x, LEFT=907, RT=120, 0, 240)
  y = map(p.y, TOP=74, BOT=913, 0, 320)
  Touch Pin Wiring XP=8 XM=A2 YP=A3 YM=9
  LANDSCAPE CALIBRATION    320 x 240
  x = map(p.y, LEFT=74, RT=913, 0, 320)
  y = map(p.x, TOP=120, BOT=907, 0, 240)*/


TouchScreen ts = TouchScreen(XP, YP, XM, YM, 300);
TSPoint p;

Adafruit_GFX_Button on_btn, off_btn, page1_btn, page2_btn, page3_btn;
Adafruit_GFX_Button ok_btn, cncl_btn, plus_btn, minus_btn;
Adafruit_GFX_Button menu_btn, info_btn, back_btn;

int pixel_x, pixel_y;     //Touch_getXY() updates global vars

// Button calibration
int margin = 5;
int btnWidth = 100;
int btnHeight = 40;
int btnY = 200;

// Software variable
bool enable_nuit = false;
int parameter = 50, old_parameter = 50;

long temp0 = 60;
long temp1 = 25.5;
long temp2 = 40;
long temp3 = 35.6;


#define BLACK   0x0000
#define GREY    0x5555
#define BLUE    0x001F
#define RED     0xF800
#define GREEN   0x07E0
#define DARKGREEN   0x05C0
#define CYAN    0x07FF
#define MAGENTA 0xF81F
#define YELLOW  0xFFE0
#define GOLD    0xDDC0
#define WHITE   0xFFFF

enum pageId {
  MENU,
  SENSOR,
  CMD,
  PARAM,
  INFO
};
unsigned int currentPage = MENU, oldPage = -1;

void setup(void)
{
  Serial.begin(9600);
  //init TFTTouch
  uint16_t ID = tft.readID();
  Serial.print("TFT ID = 0x");
  Serial.println(ID, HEX);
  Serial.println(F("Calibrate for your Touch Panel"));
  if (ID == 0xD3D3) ID = 0x9486;  //for 3.5" TFT LCD Shield , 0x9341 for 2.8" TFT LCD Shield
  tft.begin(ID);
  tft.setRotation(1); //0-PORTRAIT 1-PAYSAGE 2-REVERSE PORTRAIT 3-REVERSE PAYSAGE
  //tft.setFont(&FreeSmallFont);
  /*if (!SD.begin(SD_CS)) {
    Serial.println(F("initialization failed!"));
    return;
    }*/
  currentPage = MENU; // Indicates that we are at Home Screen
  Serial.println("Home Page");
}

bool down ;
void loop(void) {
  switch (currentPage) {
    case MENU: //Menu page
      if (currentPage != oldPage)   drawMenuScreen();
      page1_btn.press(down && page1_btn.contains(pixel_x, pixel_y));
      page2_btn.press(down && page2_btn.contains(pixel_x, pixel_y));
      page3_btn.press(down && page3_btn.contains(pixel_x, pixel_y));

      if (page1_btn.justReleased())
        page1_btn.drawButton();
      if (page2_btn.justReleased())
        page2_btn.drawButton();
      if (page3_btn.justReleased())
        page3_btn.drawButton();

      if (page1_btn.justPressed()) {
        page1_btn.drawButton(true);
        currentPage = SENSOR;
      }
      if (page2_btn.justPressed()) {
        page2_btn.drawButton(true);
        currentPage = CMD;
      }
      if (page3_btn.justPressed()) {
        page3_btn.drawButton(true);
        currentPage = PARAM;
      }
      break;

    case SENSOR:
      if (currentPage != oldPage)   drawSensorScreen();
      readSensor();
      updateTemp();
      menu_btn.press(down && menu_btn.contains(pixel_x, pixel_y));
      info_btn.press(down && info_btn.contains(pixel_x, pixel_y));

      if (menu_btn.justReleased())
        menu_btn.drawButton();
      if (info_btn.justReleased())
        info_btn.drawButton();

      if (menu_btn.justPressed()) {
        menu_btn.drawButton(true);
        currentPage = MENU;
      }
      if (info_btn.justPressed()) {
        info_btn.drawButton(true);
        currentPage = INFO;
      }
      break;

    case CMD:
      if (currentPage != oldPage)   drawCmdScreen();
      on_btn.press(down && on_btn.contains(pixel_x, pixel_y));
      off_btn.press(down && off_btn.contains(pixel_x, pixel_y));
      back_btn.press(down && back_btn.contains(pixel_x, pixel_y));

      if (back_btn.justReleased())
        back_btn.drawButton();
      if (on_btn.justReleased())
        on_btn.drawButton();
      if (off_btn.justReleased())
        off_btn.drawButton();

      if (back_btn.justPressed()) {
        back_btn.drawButton(true);
        currentPage = MENU;
      }
      if (on_btn.justPressed()) {
        on_btn.drawButton(true);
        tft.fillRect(tft.width() / 2. - (btnWidth + 40) / 2, btnY - 4 * margin - (btnHeight) / 2 - (btnHeight + 40), btnWidth + 40, btnHeight + 40, GREEN);
        Serial.println(F("Set ON"));
      }
      if (off_btn.justPressed()) {
        off_btn.drawButton(true);
        tft.fillRect(tft.width() / 2. - (btnWidth + 40) / 2, btnY - 4 * margin - (btnHeight) / 2 - (btnHeight + 40), btnWidth + 40, btnHeight + 40, RED);
        Serial.println(F("Set OFF"));
      }
      break;

    case PARAM: //consigne
      if (currentPage != oldPage)   drawParamScreen();
      plus_btn.press(down && plus_btn.contains(pixel_x, pixel_y));
      minus_btn.press(down && minus_btn.contains(pixel_x, pixel_y));
      ok_btn.press(down && ok_btn.contains(pixel_x, pixel_y));
      cncl_btn.press(down && cncl_btn.contains(pixel_x, pixel_y));

      if (plus_btn.justReleased())
        plus_btn.drawButton();
      if (minus_btn.justReleased())
        minus_btn.drawButton();

      if (ok_btn.justReleased())
        ok_btn.drawButton();
      if (cncl_btn.justReleased())
        cncl_btn.drawButton();
      if (plus_btn.justPressed()) {
        plus_btn.drawButton(true);
        parameter += 1;
        Serial.print(F("Consigne : "));
        Serial.println(parameter);

        drawTextInRect(tft.width() / 2., 60 + 3 * 4 + 6 * 8, parameter, 4, RED, BLACK);
      }
      if (minus_btn.justPressed()) {
        minus_btn.drawButton(true);
        parameter -= 1;
        Serial.print(F("Consigne : "));
        Serial.println(parameter);

        drawTextInRect(tft.width() / 2., 60 + 3 * 4 + 6 * 8, parameter, 4, RED, BLACK);
      }

      if (ok_btn.justPressed()) {
        ok_btn.drawButton(true);
        Serial.println(F("Valider"));
        validateScreen();
        delay(1000);
        currentPage = MENU;

      }
      if (cncl_btn.justPressed()) {
        cncl_btn.drawButton(true);
        parameter = old_parameter;
        Serial.println(F("Annule "));
        cancelScreen();
        delay(1000);
        currentPage = MENU;
      }
      break;

    case INFO:
      if (currentPage != oldPage) drawInfoScreen();
      if (Touch_getXY()) {
        currentPage = MENU;
      }
      break;
  }
  if (oldPage == currentPage){
    down = Touch_getXY();
  }else{
    down=false;
  }
}

/************************************************************************************
    SCREENS DEFINTION
 ************************************************************************************/
void drawMenuScreen() {
  tft.fillScreen(BLACK);
  tft.setTextSize(2);

  // Title
  tft.setTextColor(WHITE, BLACK);
  tft.setCursor(0, 10);
  tft.print("Exemple de menu"); // Prints the string on the screen
  tft.drawLine(0, 32, tft.width() * 0.6, 32, DARKGREEN); // Draws the red line
  tft.setTextColor(WHITE, BLACK);//((255, 255, 255), (0,0,0));
  tft.setCursor(0, 80);
  tft.setTextColor(GREEN, BLACK);//((255, 255, 255), (0,0,0));

  // Button
  page1_btn.initButton(&tft,  tft.width() / 2. , tft.height() / 2. - (1.*btnHeight + margin), 2 * btnWidth, btnHeight, WHITE, GREEN, BLACK, "SENSOR", 2);
  page2_btn.initButton(&tft, tft.width() / 2., tft.height() / 2., 2 * btnWidth, btnHeight, WHITE, GREEN, BLACK, "COMMAND", 2);
  page3_btn.initButton(&tft, tft.width() / 2., tft.height() / 2. + (1.*btnHeight + margin), 2 * btnWidth, btnHeight, WHITE, GREEN, BLACK, "PARAMETER", 2);
  page1_btn.drawButton(false);
  page2_btn.drawButton(false);
  page3_btn.drawButton(false);

  //Button frame
  tft.drawRoundRect(tft.width() / 2. - 1.5 * btnWidth, tft.height() / 2. - (1.5 * btnHeight + 2 * margin), 2 * btnWidth + btnWidth, 3 * btnHeight + 4 * margin, 10, GREEN);
  oldPage = currentPage;
}

void readSensor() {
  temp0 = temp0 + random(-25, 25) / 10;
  temp1 = temp1 + random(-25, 25) / 10;
  temp2 = temp2 + random(-25, 25) / 10;
  temp3 = temp3 + random(-25, 25) / 10;
}

void drawSensorScreen() {
  tft.fillScreen(BLACK);

  tft.drawLine(tft.width() / 2., 0, tft.width() / 2., tft.height(), WHITE);
  tft.drawLine(0, tft.height() / 2., tft.width(), tft.height() / 2., WHITE);

  updateTemp();

  tft.setTextSize(1);
  // bouton centré X,Y
  menu_btn.initButton(&tft,  tft.width() / 2. - btnWidth - margin , tft.height() - btnHeight / 2., btnWidth, btnHeight, WHITE, GREY, BLACK, "MENU", 2);
  info_btn.initButton(&tft, tft.width() / 2. + btnWidth + margin, tft.height() - btnHeight / 2., btnWidth, btnHeight, WHITE, GREY, BLACK, "INFO", 2);
  menu_btn.drawButton(false);
  info_btn.drawButton(false);

  oldPage = currentPage;
}

void updateTemp() {
  //temp1
  if (parameter < temp0) { //(abs(parameter-temp0)<1){
    drawTextInRect(tft.width() / 4., tft.height() / 4., temp0, 5, GREEN, 255);
  } else {
    drawTextInRect(tft.width() / 4., tft.height() / 4., temp0, 5, RED, 255);
  }
  drawTextInRect(3 * tft.width() / 4., tft.height() / 4., temp1, 5, RED, 255);
  drawTextInRect(tft.width() / 4., 3 * tft.height() / 4., temp2, 5, RED, 255);
  drawTextInRect(3 * tft.width() / 4., 3 * tft.height() / 4., temp3, 5, RED, 255);
}

void drawCmdScreen() {
  tft.setRotation(1);            //PORTRAIT
  tft.setTextSize(1);
  tft.fillScreen(BLACK);

  back_btn.initButton(&tft,  60 , 20, btnWidth, btnHeight, BLACK, BLACK, WHITE, "<- Back", 2);

  // bouton centré X,Y
  on_btn.initButton(&tft,  tft.width() / 2. - btnWidth / 2. , btnY, btnWidth, btnHeight, WHITE, GREEN, BLACK, "ON", 2);
  off_btn.initButton(&tft, tft.width() / 2. + btnWidth / 2. + margin, btnY, btnWidth, btnHeight, WHITE, RED, BLACK, "OFF", 2);
  back_btn.drawButton(false);
  on_btn.drawButton(false);
  off_btn.drawButton(false);
  tft.fillRect(tft.width() / 2. - (btnWidth + 40) / 2, btnY - 4 * margin - (btnHeight) / 2 - (btnHeight + 40), btnWidth + 40, btnHeight + 40, RED);
  oldPage = currentPage;
}

void validateScreen() {
  tft.setRotation(1);
  tft.fillScreen(BLACK);
  tft.setTextSize(5);
  tft.setTextColor(BLACK, GREEN);
  tft.setCursor(tft.width() / 2. - 6 * 6 * 4, tft.height() / 2. - 1 * 6);
  tft.print(" VALIDE ");
}

void cancelScreen() {
  tft.setRotation(1);
  tft.fillScreen(BLACK);
  tft.setTextSize(5);
  tft.setTextColor(BLACK, RED);
  tft.setCursor(tft.width() / 2. - 6 * 6 * 4, tft.height() / 2. - 1 * 6);
  tft.print(" ANNULE ");
}

void drawParamScreen() {
  tft.setRotation(1);
  tft.fillScreen(BLACK);
  //Title
  tft.setTextSize(3);
  tft.setTextColor(WHITE, BLACK);
  tft.setCursor(tft.width() / 2. - 9 * 3 * 3, 50);
  tft.print("Parameter");

  ok_btn.initButton(&tft,  2 + btnWidth / 2., btnHeight / 2. + margin, btnWidth, btnHeight, WHITE, DARKGREEN, BLACK, "Valider", 2);
  cncl_btn.initButton(&tft, tft.width() - btnWidth / 2 - 2, btnHeight / 2. + margin, btnWidth, btnHeight, WHITE, RED, BLACK, "Annuler", 2);
  ok_btn.drawButton(false);
  cncl_btn.drawButton(false);

  drawTextInRect(tft.width() / 2., 60 + 3 * 4 + 6 * 8, parameter, 4, RED, BLACK);
  plus_btn.initButton(&tft,  tft.width() / 2. - btnWidth / 2. , 60 + 3 * 4 + 6 * 8 + (btnWidth - 30), btnWidth - 20, btnWidth - 30, WHITE, GREEN, BLACK, "+", 5);
  minus_btn.initButton(&tft, tft.width() / 2. + btnWidth / 2. + margin, 60 + 3 * 4 + 6 * 8 + (btnWidth - 30), btnWidth - 20, btnWidth - 30, WHITE, GREEN, BLACK, "-", 5);
  plus_btn.drawButton(false);
  minus_btn.drawButton(false);
  oldPage = currentPage;
}

void drawInfoScreen() {
  tft.setRotation(1);
  tft.fillScreen(BLACK);//(100, 155, 203)
  tft.drawRoundRect(10, 50, tft.width() - 20, tft.height() - 60, 5, GREEN); //tft.fillRect (10, 10, 60, 36);
  tft.setTextSize(2);
  tft.setTextColor(WHITE, BLACK);
  tft.setCursor(70, 18);
  tft.print("Information sur l'exemple");
  tft.setTextSize(2);
  tft.setTextColor(WHITE, BLACK);
  tft.setCursor(25, 80);
  tft.print("En cas de probleme avec ce tutoriel,\n  n'hesitez pas a nous contacter");
  tft.setCursor(20, 245);
  tft.print("www.aranacorp.com" );
  oldPage = currentPage;
}


/************************************************************************************
    UTILITY FUNCTION
*************************************************************************************/

void drawTextInRect(int x, int y, long temp, int tsize, unsigned int fColor, unsigned int bColor) {
  int marg = 10;
  char buf[12];
  int nbChar = strlen(itoa(temp, buf, 10)) + 2;
  if (bColor != 255) tft.fillRect(x - nbChar * 3 * tsize - marg, y - nbChar * 1 * tsize - marg, nbChar * 6 * tsize + 2 * marg, nbChar * 2 * tsize + 2 * marg, bColor);
  tft.setTextSize(tsize);
  tft.setTextColor(fColor, BLACK);
  //tft.setCursor(x-strlen(*text)*3*tsize+marg, y+rheight/2.+marg);
  tft.setCursor(x - nbChar * 3 * tsize, y - nbChar * 1 * tsize);
  tft.print(temp);
  //while(*text) tft.print(*text++);
  tft.write(0xF7);
  tft.print("C");
}

bool Touch_getXY(void)
{
  p = ts.getPoint();
  pinMode(YP, OUTPUT);      //restore shared pins
  pinMode(XM, OUTPUT);
  digitalWrite(YP, HIGH);
  digitalWrite(XM, HIGH);
  bool pressed = (p.z > MINPRESSURE && p.z < MAXPRESSURE);
  if (pressed) {
    if (tft.width() <= tft.height()) { //Portrait
      pixel_x = map(p.x, TS_LEFT, TS_RT, 0, tft.width()); //.kbv makes sense to me
      pixel_y = map(p.y, TS_TOP, TS_BOT, 0, tft.height());
    } else {
      pixel_x = map(p.y, TS_TOP, TS_BOT, 0, tft.width());
      pixel_y = map(p.x, TS_RT, TS_LEFT, 0, tft.height());
    }
  }
  return pressed;
}
Applications
- Créer une interface graphique pour piloter votre projet Arduino
Sources
- https://www.arduino.cc/en/reference/SD
- Adafruit-GFX-Library Github
- Adafruit-GFX Library documentation
- MCUFRIEND_kbv Github
Retrouvez nos tutoriels et d’autres exemples dans notre générateur automatique de code
La Programmerie


Il faut renommer MCUFRIEND_kbv_master en MCUFRIEND_kbv sinon les exemples ne fonctionnent pas .
Bonjour,
quels exemples?
Salut, et merci pour le tuto.
J’ai un probléme dès la calibration.
J’ai un message d’erreur sur l’ecran tft
« Touch calibration failed
Unable to read the position of the press.
This is a hardware issue and can not be corrected in software.
check XP,XM pins with a multimeter.
check YP, YM pins with a multimeter
should be about 300 ohms »
Mon ecran n’est pas un Kuman, c’est un sans marque mais il est totalement identique.
Avez vous une idée pour resoudre mon probléme?
Bonjour, Avez-vous essayé de mesurer la résistance entre les broches XM,XP et YP,YM comme indiqué?
C’est écrit que c’est un problème matériel. Peut-être une soudure mal faite ou un composant endommagé.
Bonjour, j’ai une erreur à la compilation du programme de calibration: « amp was not declared… ». Que dois-je faire? Merci d’avance.
Bonjour,
Merci pour l’info. une coquille s’est insérée dans la fonction « copy ».
Vous pouvez tout remplacer par « & » avec Ctrl+F « & » -> « & »
ou recopier le code à partir du site. C’est corrigé.
J’ai téléchargé sur le site. Plus d’erreur de compilation. Merci.
bonjour , j’ai tester votre code exemple de menu avec un tft shield 2.8 .
j’aimerai avoir trois petite touche en haut ,un peu comme un onglet ou je pourrais passer d’un ecran à l’autre .
j’ai beau regarder le code mais je ne comprend pas comment faire ces touches .
d’avance merci.
Bonjour,
comme dans l’exemple, vous devez créer un bouton par page en plaçant vos boutons en haut de l’écran à l’aide de la fonction initButton dans laquelle vous spécifiez position x,y, largeur, hauteur, etc.
vous devez ensuite programmer l’apparence et la fonction du bouton lorsqu’il est sélectionné
Ces boutons doivent être visibles sur toutes les pages pour cela vous pouvez: