Neste tutorial, veremos como realizar o reconhecimento de objetos com o Yolo e o OpenCV usando uma rede neural pré-treinada usando o aprendizado profundo.
Vimos num tutorial anterior como reconhecer formas simples utilizando a visão por computador. Este método só funciona para certas formas simples predefinidas. Se quiser reconhecer uma maior variedade de objectos, a forma mais fácil é utilizar a inteligência artificial.
Hardware
- Um computador com uma instalação Python3
- Uma câmara
Princípio
A inteligência artificial é um domínio da informática em que o próprio programa aprende a realizar determinadas tarefas. O reconhecimento visual, em particular. Neste tutorial, vamos utilizar uma rede neural treinada para reconhecer formas específicas.
São necessários muitos dados para poder treinar corretamente uma rede neural. Foi demonstrado que a aprendizagem é mais rápida numa rede neuronal treinada para outra coisa. Por exemplo, uma rede neuronal treinada para reconhecer cães será treinada mais facilmente para reconhecer gatos.
A Ultralytics oferece os modelos YOLO, que são fáceis de utilizar e bastante eficazes na deteção, classificação e monitorização.
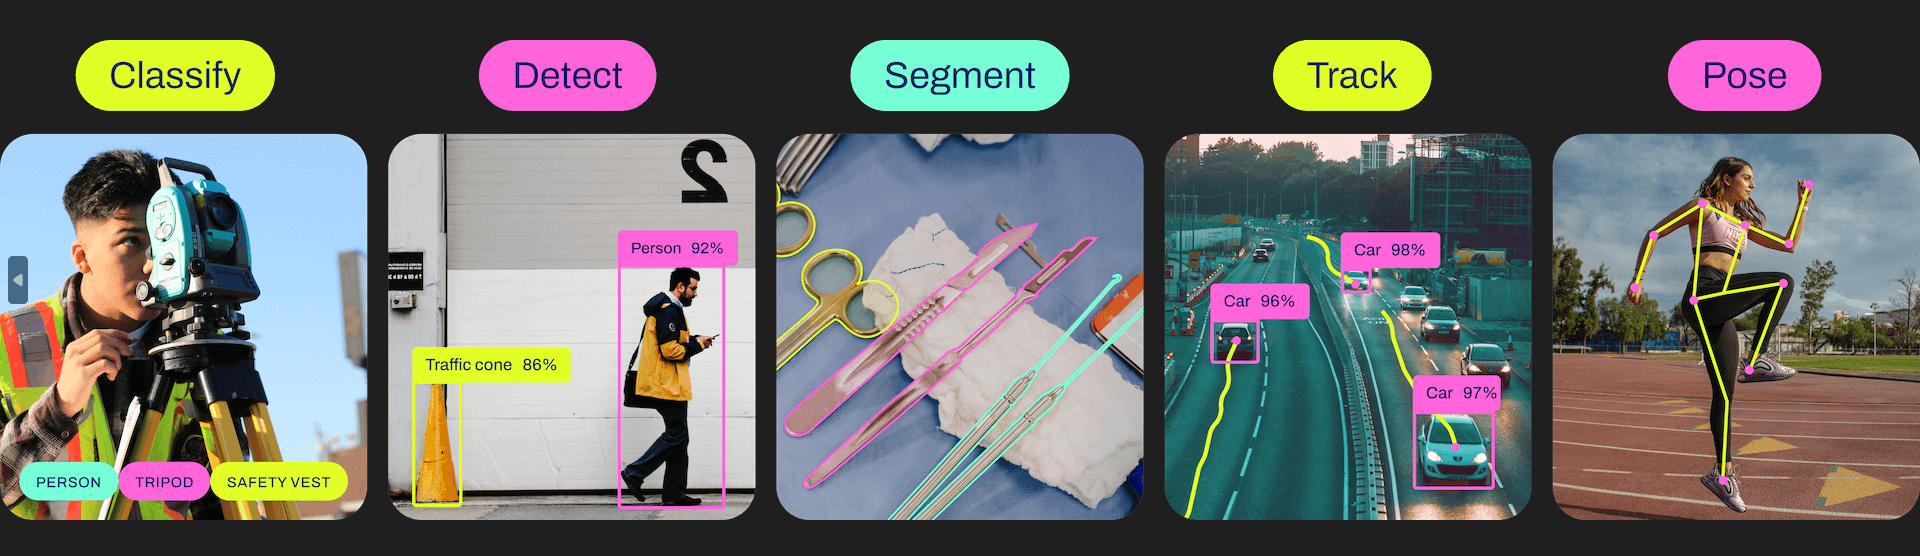
Para cada versão, existem diferentes modelos, desde o mais leve e menos potente até ao mais potente mas mais pesado.
| YOLOv5n | YOLOv5s | YOLOv5m | YOLOv5l | YOLOv5x |
| YOLOv8n | YOLOv8s | YOLOv8m | YOLOv8l | YOLOv8x |
Configurar o Python
Caso contrário, pode descarregar e instalar o Python 3
Pode então instalar as bibliotecas necessárias: imutils, OpenCV, ultralytics, etc.
python3 -m pip install imutils opencv-python ultralytics
Recuperar um modelo pré-treinado
É possível obter um modelo pré-treinado a partir do script pyhton
# load the pre-trained YOLOv8n model
model = YOLO("yolov8n.pt")
Script Python para reconhecimento de objectos
Em primeiro lugar, criamos um fluxo de vídeo (vs) utilizando a biblioteca imutils, que irá obter as imagens da câmara.
vs = VideoStream(src=0, resolution=(1600, 1200)).start()
Inicializamos uma rede neural com os parâmetros do modelo utilizando a biblioteca YOLO (yolov5, v8, etc.).
model = YOLO("yolov8n.pt")
Em seguida, criaremos um ciclo que, em cada iteração, lerá a imagem da câmara e passá-la-á para a entrada da rede neural para deteção e reconhecimento de objectos.
while True:
	# start time to compute the fps
	start = datetime.datetime.now()

	#ret, frame = video_cap.read()
	#frame = vs.read(); ret=True


	# if there are no more frames to process, break out of the loop
	if not ret:
		break

	# run the YOLO model on the frame
	detections = model(frame)[0]
Por fim, o código apresenta a caixa de deteção na imagem, a probabilidade de reconhecimento e a posição.
	# loop over the detections
	for box in detections.boxes:
		#extract the label name
		label=model.names.get(box.cls.item())

		# extract the confidence (i.e., probability) associated with the detection
		data=box.data.tolist()[0]
		confidence = data[4]

		# filter out weak detections
		if float(confidence) < CONFIDENCE_THRESHOLD:
			continue

		# if the confidence is greater than the minimum confidence
		xmin, ymin, xmax, ymax = int(data[0]), int(data[1]), int(data[2]), int(data[3])
		cv2.rectangle(frame, (xmin, ymin) , (xmax, ymax), GREEN, 2)

		#draw confidence and label
		y = ymin - 15 if ymin - 15 > 15 else ymin + 15
		cv2.putText(frame, "{} {:.1f}%".format(label,float(confidence*100)), (xmin, y), cv2.FONT_HERSHEY_SIMPLEX, 0.5, GREEN, 2)
Código completo de reconhecimento de objectos com OpenCV e YOLO
#!/usr/bin/env python
# -*- coding: utf-8 -*-
#

import datetime
from ultralytics import YOLO
import cv2
from imutils.video import VideoStream
#from helper import create_video_writer


# define some constants
CONFIDENCE_THRESHOLD = 0.8
GREEN = (0, 255, 0)


# load the pre-trained YOLOv8n model
model = YOLO("yolov8n.pt")
#model = YOLO("yolov5n.pt")
"""
#detect on image
frame= cv2.imread('./datasets/two-boats.jpg');ret= True #from image file
detections = model(frame)[0]
# loop over the detections
#for data in detections.boxes.data.tolist():
for box in detections.boxes:
	#extract the label name
	label=model.names.get(box.cls.item())

	# extract the confidence (i.e., probability) associated with the detection
	data=box.data.tolist()[0]
	confidence = data[4]

	# filter out weak detections by ensuring the
	# confidence is greater than the minimum confidence
	if float(confidence) < CONFIDENCE_THRESHOLD:
		continue

	# if the confidence is greater than the minimum confidence,
	# draw the bounding box on the frame
	xmin, ymin, xmax, ymax = int(data[0]), int(data[1]), int(data[2]), int(data[3])
	cv2.rectangle(frame, (xmin, ymin) , (xmax, ymax), GREEN, 2)

	#draw confidence and label
	y = ymin - 15 if ymin - 15 > 15 else ymin + 15
	cv2.putText(frame, "{} {:.1f}%".format(label,float(confidence*100)), (xmin, y), cv2.FONT_HERSHEY_SIMPLEX, 0.5, GREEN, 2)

# show the frame to our screen
cv2.imshow("Img", frame)
"""
#detect on video
# initialize the video capture object
#vs = VideoStream(src=0, resolution=(1600, 1200)).start()
video_cap = cv2.VideoCapture("datasets\\Splash - 23011.mp4")
# initialize the video writer object
#writer = create_video_writer(video_cap, "output.mp4")

while True:
	# start time to compute the fps
	start = datetime.datetime.now()

	#ret, frame = video_cap.read()
	#frame = vs.read(); ret=True


	# if there are no more frames to process, break out of the loop
	if not ret:
		break

	# run the YOLO model on the frame
	detections = model(frame)[0]

	# loop over the detections
	#for data in detections.boxes.data.tolist():
	for box in detections.boxes:
		#extract the label name
		label=model.names.get(box.cls.item())

		# extract the confidence (i.e., probability) associated with the detection
		data=box.data.tolist()[0]
		confidence = data[4]

		# filter out weak detections by ensuring the
		# confidence is greater than the minimum confidence
		if float(confidence) < CONFIDENCE_THRESHOLD:
			continue

		# if the confidence is greater than the minimum confidence,
		# draw the bounding box on the frame
		xmin, ymin, xmax, ymax = int(data[0]), int(data[1]), int(data[2]), int(data[3])
		cv2.rectangle(frame, (xmin, ymin) , (xmax, ymax), GREEN, 2)

		#draw confidence and label
		y = ymin - 15 if ymin - 15 > 15 else ymin + 15
		cv2.putText(frame, "{} {:.1f}%".format(label,float(confidence*100)), (xmin, y), cv2.FONT_HERSHEY_SIMPLEX, 0.5, GREEN, 2)
		#cv2.circle(frame, (int(X)-15, int(Y)), 1, GREEN, 2)
		#cv2.putText(frame, poslbl, (int(X), int(Y)),cv2.FONT_HERSHEY_SIMPLEX, 0.5, GREEN, 2)

	# end time to compute the fps
	end = datetime.datetime.now()
	# show the time it took to process 1 frame
	total = (end - start).total_seconds()
	print(f"Time to process 1 frame: {total * 1000:.0f} milliseconds")

	# calculate the frame per second and draw it on the frame
	fps = f"FPS: {1 / total:.2f}"
	cv2.putText(frame, fps, (50, 50),
				cv2.FONT_HERSHEY_SIMPLEX, 2, (0, 0, 255), 4)

	# show the frame to our screen
	cv2.imshow("Frame", frame)
	#writer.write(frame)
	if cv2.waitKey(1) == ord("q"):
		break

video_cap.release()
vs.stop()
#writer.release()
cv2.destroyAllWindows()
Fontes de imagem para deteção de objectos
Pode utilizar este script com diferentes fontes de imagem. Para tal, é necessário adaptar ligeiramente o código anterior para modificar a variável “img” que contém a imagem a analisar.
- A câmara Web do seu computador
vs = VideoStream(src=0, resolution=(1600, 1200)).start()
while True:
	frame = vs.read()
O fluxo de vídeo deve ser interrompido no final do guião com vs.stop()
- A câmara IP
vc = cv2.VideoCapture('rtsp://user:password@ipaddress:rtspPort')
while True:
	ret, frame=vc.read() #from ip cam
Certifique-se de que pára a captura de vídeo no final do guião com vc.release()
- O Raspberry Pi Picam
vs = VideoStream(usePiCamera=True, resolution=(1600, 1200)).start()
while True:
	frame = vs.read()
Lembre-se de parar o fluxo no final do script com vs.stop()
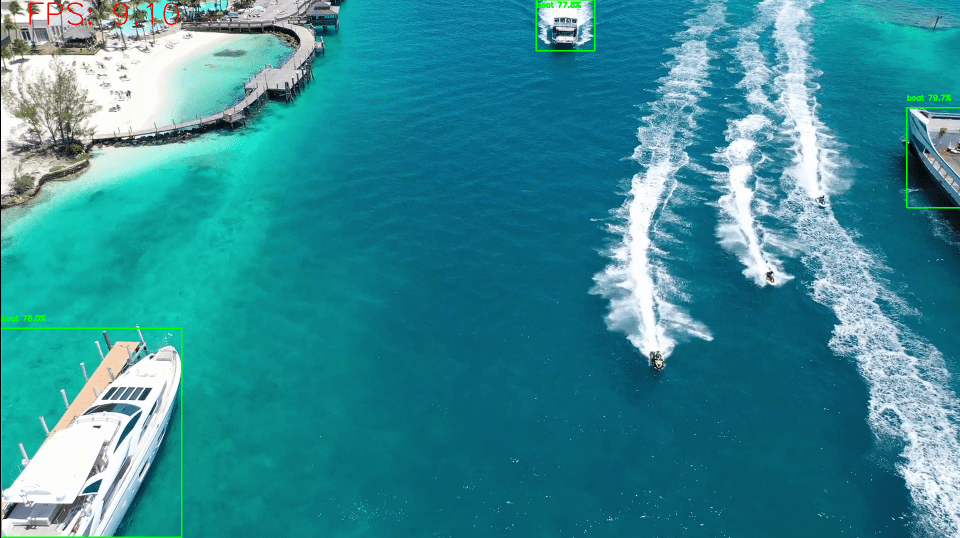
- Um ficheiro de vídeo
vc = cv2.VideoCapture('./datasets/Splash - 23011.mp4') #from video
while True:
	ret, frame=vc.read() #from video
- Um ficheiro de imagem
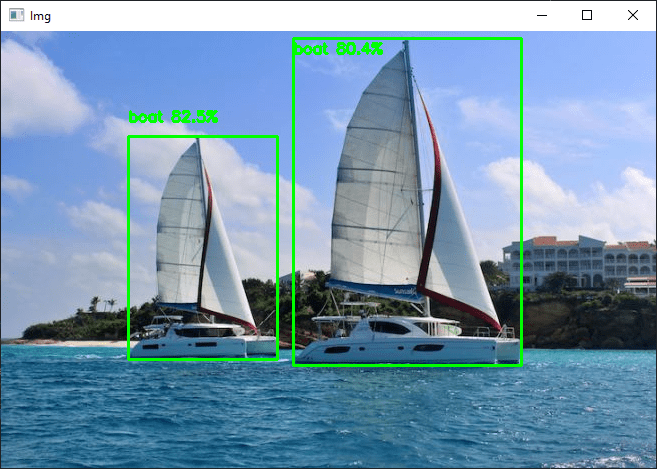
frame= cv2.imread('./datasets/two-boats.jpg')
Resultados
Para este exemplo, enviamos uma imagem de dois barcos como entrada para a rede neural, que são corretamente reconhecidos. Para obter resultados ligeiramente diferentes, pode modificar o parâmetro de confiança para evitar falsos positivos.
Pode testar este código com a sua webcam ou com fotografias, por exemplo, para ver o desempenho do modelo e do reconhecimento de objectos.
Quando o script estiver a funcionar, pode treinar o modelo para detetar outros objectos.