Nous allons voir dans ce tutoriel comment faire de la reconnaissance d’objet avec Yolo et OpenCV en utilisant un réseau de neurones pré-entrainé grâce au deep learning.
Nous avons vu dans un précédent tutoriel comment reconnaitre des formes simples avec la vision par ordinateur. Cette méthode ne fonctionne que pour certaines formes simples prédéfinies. Si vous souhaitez reconnaitre une plus grande variété d’objets, le plus simple est d’utiliser l’intelligence artificielle.
Matériel
- Un ordinateur avec une installation de Python3
- Une caméra
Principe
L’intelligence artificielle est un domaine de l’informatique dans lequel le programme apprend par lui-même à effectuer certaines tâches. Notamment de la reconnaissance visuelle. Dans ce tutoriel, nous allons utiliser un réseau de neurones entrainé pour reconnaitre des formes particulières.
Il faut de nombreuse données pour pouvoir entrainer correctement un réseau de neurone. Il a été démontré que l’apprentissage était plus rapide sur un réseau de neurones entrainé pour autre chose. Par exemple, un réseau de neurones entrainé pour reconnaitre les chiens s’entrainera plus facilement à reconnaitre les chats.
Ultralytics propose les modèles YOLO qui sont simples d’utilisation et assez efficace pour la détection, la classification et le suivit
Pour chaque version, il existe différents modèle du plus léger et moins performant au plus performant mais plus lourd
| YOLOv5n | YOLOv5s | YOLOv5m | YOLOv5l | YOLOv5x |
| YOLOv8n | YOLOv8s | YOLOv8m | YOLOv8l | YOLOv8x |
Configuration de Python
Si ce n’est pas le cas, vous pouvez télécharger et installer Python 3
Vous pouvez ensuite installer les librairies nécessaires imutils, OpenCV, ultralytics
python3 -m pip install imutils opencv-python ultralyticsRécupérer un modèle pré-entrainé
Il est possible de récupérer un modèle pré-entrainé à partir du script pyhton
# load the pre-trained YOLOv8n model
model = YOLO("yolov8n.pt")
Script Python pour la reconnaissance d’Objet
Tout d’abord, nous créons un flux vidéo (vs) à l’aide de la librairie imutils qui va récupérer les images de la caméra.
vs = VideoStream(src=0, resolution=(1600, 1200)).start()Nous initialisons un réseau de neurones avec les paramètres du modèle à l’aide de la librairie YOLO (yolov5, v8, etc.).
model = YOLO("yolov8n.pt")Nous allons, ensuite, créer une boucle qui à chaque itération va lire l’image de la caméra et la passer en entrée du réseau de neurone pour faire la détection et reconnaissance d’objet.
while True:
	# start time to compute the fps
	start = datetime.datetime.now()

	#ret, frame = video_cap.read()
	#frame = vs.read(); ret=True


	# if there are no more frames to process, break out of the loop
	if not ret:
		break

	# run the YOLO model on the frame
	detections = model(frame)[0]
Enfin, le code affiche sur l’image la boite de détection, la probabilité de reconnaissance ainsi que la position
	# loop over the detections
	for box in detections.boxes:
		#extract the label name
		label=model.names.get(box.cls.item())

		# extract the confidence (i.e., probability) associated with the detection
		data=box.data.tolist()[0]
		confidence = data[4]

		# filter out weak detections
		if float(confidence) < CONFIDENCE_THRESHOLD:
			continue

		# if the confidence is greater than the minimum confidence
		xmin, ymin, xmax, ymax = int(data[0]), int(data[1]), int(data[2]), int(data[3])
		cv2.rectangle(frame, (xmin, ymin) , (xmax, ymax), GREEN, 2)

		#draw confidence and label
		y = ymin - 15 if ymin - 15 > 15 else ymin + 15
		cv2.putText(frame, "{} {:.1f}%".format(label,float(confidence*100)), (xmin, y), cv2.FONT_HERSHEY_SIMPLEX, 0.5, GREEN, 2)
Code complet de reconnaissance d’objet avec OpenCV et YOLO
#!/usr/bin/env python
# -*- coding: utf-8 -*-
#

import datetime
from ultralytics import YOLO
import cv2
from imutils.video import VideoStream
#from helper import create_video_writer


# define some constants
CONFIDENCE_THRESHOLD = 0.8
GREEN = (0, 255, 0)


# load the pre-trained YOLOv8n model
model = YOLO("yolov8n.pt")
#model = YOLO("yolov5n.pt")
"""
#detect on image
frame= cv2.imread('./datasets/two-boats.jpg');ret= True #from image file
detections = model(frame)[0]
# loop over the detections
#for data in detections.boxes.data.tolist():
for box in detections.boxes:
	#extract the label name
	label=model.names.get(box.cls.item())

	# extract the confidence (i.e., probability) associated with the detection
	data=box.data.tolist()[0]
	confidence = data[4]

	# filter out weak detections by ensuring the
	# confidence is greater than the minimum confidence
	if float(confidence) < CONFIDENCE_THRESHOLD:
		continue

	# if the confidence is greater than the minimum confidence,
	# draw the bounding box on the frame
	xmin, ymin, xmax, ymax = int(data[0]), int(data[1]), int(data[2]), int(data[3])
	cv2.rectangle(frame, (xmin, ymin) , (xmax, ymax), GREEN, 2)

	#draw confidence and label
	y = ymin - 15 if ymin - 15 > 15 else ymin + 15
	cv2.putText(frame, "{} {:.1f}%".format(label,float(confidence*100)), (xmin, y), cv2.FONT_HERSHEY_SIMPLEX, 0.5, GREEN, 2)

# show the frame to our screen
cv2.imshow("Img", frame)
"""
#detect on video
# initialize the video capture object
#vs = VideoStream(src=0, resolution=(1600, 1200)).start()
video_cap = cv2.VideoCapture("datasets\\Splash - 23011.mp4")
# initialize the video writer object
#writer = create_video_writer(video_cap, "output.mp4")

while True:
	# start time to compute the fps
	start = datetime.datetime.now()

	#ret, frame = video_cap.read()
	#frame = vs.read(); ret=True


	# if there are no more frames to process, break out of the loop
	if not ret:
		break

	# run the YOLO model on the frame
	detections = model(frame)[0]

	# loop over the detections
	#for data in detections.boxes.data.tolist():
	for box in detections.boxes:
		#extract the label name
		label=model.names.get(box.cls.item())

		# extract the confidence (i.e., probability) associated with the detection
		data=box.data.tolist()[0]
		confidence = data[4]

		# filter out weak detections by ensuring the
		# confidence is greater than the minimum confidence
		if float(confidence) < CONFIDENCE_THRESHOLD:
			continue

		# if the confidence is greater than the minimum confidence,
		# draw the bounding box on the frame
		xmin, ymin, xmax, ymax = int(data[0]), int(data[1]), int(data[2]), int(data[3])
		cv2.rectangle(frame, (xmin, ymin) , (xmax, ymax), GREEN, 2)

		#draw confidence and label
		y = ymin - 15 if ymin - 15 > 15 else ymin + 15
		cv2.putText(frame, "{} {:.1f}%".format(label,float(confidence*100)), (xmin, y), cv2.FONT_HERSHEY_SIMPLEX, 0.5, GREEN, 2)
		#cv2.circle(frame, (int(X)-15, int(Y)), 1, GREEN, 2)
		#cv2.putText(frame, poslbl, (int(X), int(Y)),cv2.FONT_HERSHEY_SIMPLEX, 0.5, GREEN, 2)

	# end time to compute the fps
	end = datetime.datetime.now()
	# show the time it took to process 1 frame
	total = (end - start).total_seconds()
	print(f"Time to process 1 frame: {total * 1000:.0f} milliseconds")

	# calculate the frame per second and draw it on the frame
	fps = f"FPS: {1 / total:.2f}"
	cv2.putText(frame, fps, (50, 50),
				cv2.FONT_HERSHEY_SIMPLEX, 2, (0, 0, 255), 4)

	# show the frame to our screen
	cv2.imshow("Frame", frame)
	#writer.write(frame)
	if cv2.waitKey(1) == ord("q"):
		break

video_cap.release()
vs.stop()
#writer.release()
cv2.destroyAllWindows()
Sources d’image pour la détection d’objet
Vous pouvez utiliser ce script avec différentes sources d’image. Pour cela, il faut légèrement adapter le code précédent afin de modifier la variable « img » contenant l’image à analyser.
- La webcam de votre ordinateur
vs = VideoStream(src=0, resolution=(1600, 1200)).start()
while True:
	frame = vs.read()
Le stream vidéo doit être arrêté à la fin du script avec vs.stop()
- Une caméra IP
vc = cv2.VideoCapture('rtsp://user:password@ipaddress:rtspPort')
while True:
	ret, frame=vc.read() #from ip cam
Veillez à arrêter la capture vidéo à la fin du script avec vc.release()
- La Picam du Raspberry Pi
vs = VideoStream(usePiCamera=True, resolution=(1600, 1200)).start()
while True:
	frame = vs.read()
Pensez à arrêter le stream à la fin du script avec vs.stop()
- Un fichier vidéo
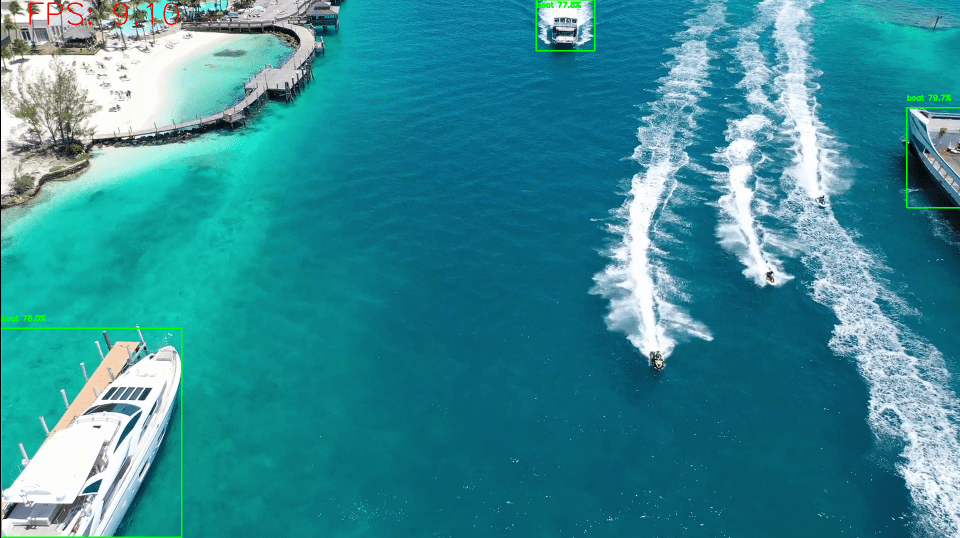
vc = cv2.VideoCapture('./datasets/Splash - 23011.mp4') #from video
while True:
	ret, frame=vc.read() #from video
- Un fichier image
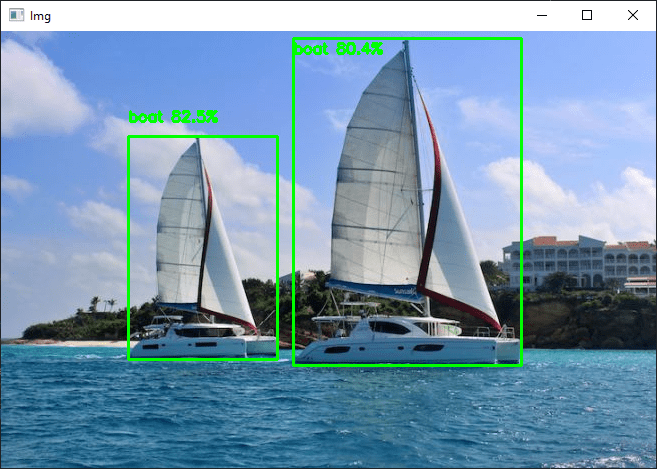
frame= cv2.imread('./datasets/two-boats.jpg')
Résultats
Pour cet exemple nous envoyons en entrée du réseau de neurones une image de deux bateaux qui sont reconnus correctement. Pour obtenir des résultats légèrement différents, vous pouvez modifier le paramètre confidence pour éviter les faux positifs.
Vous pouvez tester ce code avec votre webcam ou avec des photos, par exemple, pour voir les performances du modèle et de la reconnaissance d’objet.
Une fois que votre script fonctionne, vous pouvez entrainer votre modèle pour qu’il puisse détecter d’autres objets.