La libraire OpenCV est utilisée pour faire du traitement d’image notamment de la reconnaissance de forme et de couleur. La librairie possèdent des fonction d’acquisition et des algorithmes de traitement d’image qui permettent notamment de faire de la reconnaissance d’image assez simplement sans avoir à passer par de l’intelligence artificielle. C’est ce que nous allons voir dans ce tutoriel.
Ce tutoriel peut être appliqué à n’importe quel ordinateur possédant une installation de Python avec OpenCV et une Caméra. Notamment le Raspberry Pi.
Matériel
- Ordinateur avec une installation de python3
Préparation de l’environnement de travail
Pour réaliser le script de reconnaissance de forme, nous installons les modules OpenCV, numpy et imutils pour manipuler et traiter les images.
pip3 install opencv-python numpy imutilsLa détection des couleurs se fait à l’aide des modules webcolors et scipy (KDTree)
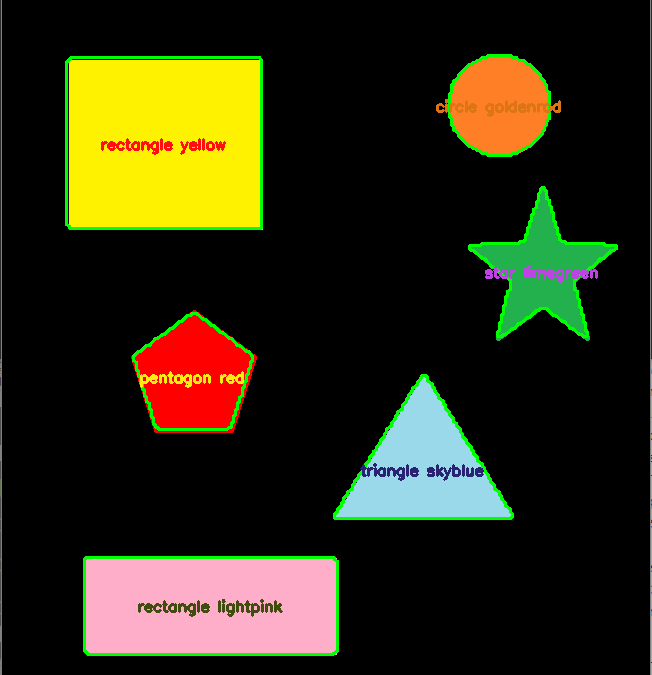
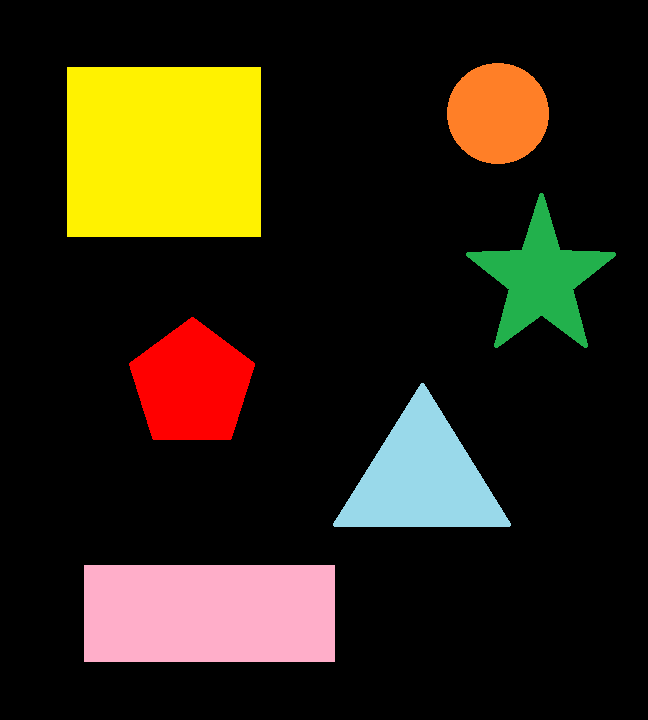
pip3 install webcolors scipyAfin de tester et valider l’algorithme, nous créons une image contenant des objets de formes et de couleurs différentes. Vous pouvez créer votre propre image avec Paint ou utiliser celle-ci:
Principe de fonctionnement
Dans le code suivant, nous allons créer un classe détection de forme qui va nous permettre de sélectionner une forme en fonction du nombre de contours trouvé. Puis nous allons définir une fonction permettant de retrouver le nom de la couleur en fonction de son code RGB. Enfin nous allons utiliser OpenCV pour charger, filtrer et masquer l’image afin de détecter les formes et les couleurs contenues dans l’image.
Code complet de reconnaissance de forme simple et de couleur
Vous devez créer le fichier python ObjectDetection.py dans le même dossier que l’image que vous souhaitez analyser.
#!/usr/bin/env python
# -*- coding: utf-8 -*-

# import the necessary packages
import cv2
import numpy as np
import imutils

#colors
from webcolors import rgb_to_name,CSS3_HEX_TO_NAMES,hex_to_rgb #python3 -m pip install webcolors
from scipy.spatial import KDTree

def convert_rgb_to_names(rgb_tuple):
    # a dictionary of all the hex and their respective names in css3
    css3_db = CSS3_HEX_TO_NAMES#css3_hex_to_names
    names = []
    rgb_values = []
    for color_hex, color_name in css3_db.items():
        names.append(color_name)
        rgb_values.append(hex_to_rgb(color_hex))

    kdt_db = KDTree(rgb_values)
    distance, index = kdt_db.query(rgb_tuple)
    return names[index]

class ShapeDetector:
	def __init__(self):
		pass
	def detect(self, c):
		# initialize the shape name and approximate the contour
		shape = "unidentified"
		peri = cv2.arcLength(c, True)
		approx = cv2.approxPolyDP(c, 0.04 * peri, True)

		# if the shape is a triangle, it will have 3 vertices
		if len(approx) == 3:
			shape = "triangle"
		# if the shape has 4 vertices, it is either a square or
		# a rectangle
		elif len(approx) == 4:
			# compute the bounding box of the contour and use the
			# bounding box to compute the aspect ratio
			(x, y, w, h) = cv2.boundingRect(approx)
			ar = w / float(h)
			# a square will have an aspect ratio that is approximately
			# equal to one, otherwise, the shape is a rectangle
			shape = "square" if ar >= 0.95 and ar <= 1.05 else "rectangle"
		# if the shape is a pentagon, it will have 5 vertices
		elif len(approx) == 5:
			shape = "pentagon"
		elif len(approx) == 6:
			shape = "hexagon"
		elif len(approx) == 10 or len(approx) == 12:
			shape = "star"
		# otherwise, we assume the shape is a circle
		else:
			shape = "circle"
		# return the name of the shape
		return shape

if __name__ == '__main__':
	# load the image and resize it to a smaller factor so that
	# the shapes can be approximated better
	image = cv2.imread('python_shapes_detection_base.PNG')
	resized = imutils.resize(image, width=300)
	ratio = image.shape[0] / float(resized.shape[0])

	# convert the resized image to grayscale, blur it slightly,
	# and threshold it
	gray = cv2.cvtColor(resized, cv2.COLOR_BGR2GRAY)
	blurred = cv2.GaussianBlur(gray, (5, 5), 0)
	thresh = cv2.threshold(blurred, 60, 255, cv2.THRESH_BINARY)[1]

	# find contours in the thresholded image and initialize the
	# shape detector
	cnts = cv2.findContours(thresh.copy(), cv2.RETR_EXTERNAL,
		cv2.CHAIN_APPROX_SIMPLE)
	cnts = imutils.grab_contours(cnts)
	sd = ShapeDetector()

	# loop over the contours
	for c in cnts:
		# compute the center of the contour
		M = cv2.moments(c)
		cX = int((M["m10"] / M["m00"]) * ratio)
		cY = int((M["m01"] / M["m00"]) * ratio)

		#detect shape from contour
		shape = sd.detect(c)

		# resize the contour
		c = c.astype("float")
		c *= ratio
		c = c.astype("int")
		cv2.drawContours(image, [c], -1, (0, 255, 0), 2)

		#draw contour with mask
		mask = np.zeros(image.shape[:2], np.uint8)
		cv2.drawContours(mask, [c], -1, 255, -1)
		img = cv2.cvtColor(image, cv2.COLOR_BGR2HSV)

		#Convert to RGB and get color name
		imgRGB = cv2.cvtColor(image, cv2.COLOR_BGR2RGB)
		mean=cv2.mean(imgRGB, mask=mask)[:3]
		named_color = convert_rgb_to_names(mean)

		#get complementary color for text
		mean2 = (255-mean[0],255-mean[1],255-mean[2])

		#display shape name and color
		objLbl=shape+" {}".format(named_color)
		textSize = cv2.getTextSize(objLbl,cv2.FONT_HERSHEY_SIMPLEX,0.5,2)[0]
		cv2.putText(image, objLbl, (int(cX-textSize[0]/2),int(cY+textSize[1]/2)), cv2.FONT_HERSHEY_SIMPLEX,0.5,mean2, 2)

		#show image
		cv2.imshow("Image", image)
		#cv2.waitKey(0)
	cv2.waitKey(0)
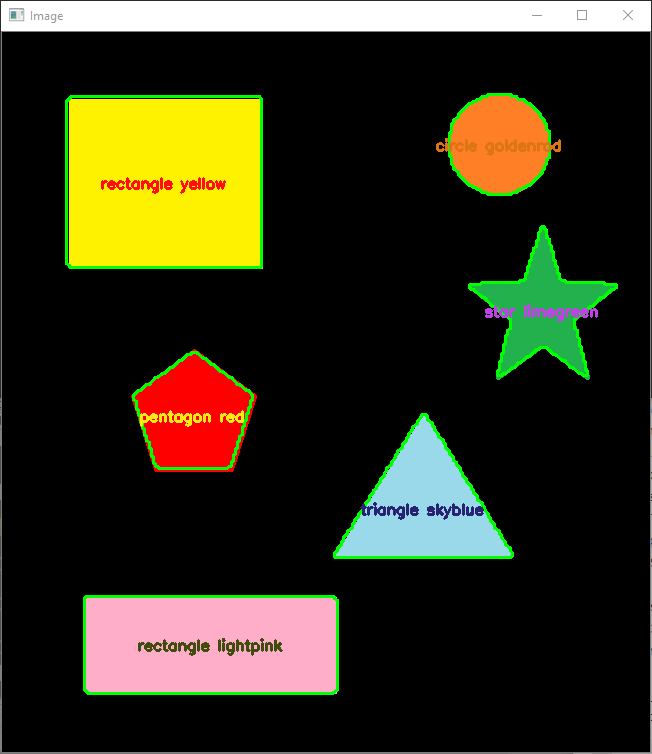
Résultat
Pour lancer le script, vous pouvez soit l’exécuter à partir de votre éditeur de code (comme Geany) ou bien lancer la commande suivante dans un terminal de commande ouvert dans votre dossier de travail.
$ python3 ObjectDetection.pyUne fois le code exécuté, l’image va s’afficher avec chacune des formes entourées de vert et un texte au centre de la forme contenant le nom et la couleur de la forme.
N.B.: Cet algorithme ne fonctionnera pas pour toute les formes. Pour détecter d’autres formes vous devez soit adapter la fonction detect de la classe ShapeDetector pour identifier tous les cas possibles soit passer par de l’intelligence artificielle.
Applications
- Fabriquer une machine de tri en fonction de la couleur ou de la forme
- Faire de la détection d’objets en temps réel à partir d’images d’une caméra