Cuando se trata con varios servomotores y se necesita un número adicional de salidas para operar su robot (para controlar Hexana, por ejemplo), una solución práctica es usar un controlador en serie como el Mini Maestro de Pololu.
Requisito previo: Programming with Arduino, Communicate with Arduino, Control a servo with Arduino
Material
- Computadora
- Arduino UNO
- Cable USB para conectar la placa a la computadora
- Cable USB mini B para conectar Maestro a la computadora
- 3x cable de puente M / M
- Controlador en serie Mini Maestro x1
- 1 o varios servomoteurs
Descripción general del controlador serie Maestro
Cuando se utilizan varios motores en un proyecto, generalmente el número de salidas necesarias excede la capacidad de la placa Arduino. En ese caso, es necesario usar un controlador de servo (que puede controlar hasta 32 servomotores) que se comunican con Arduino mediante un puerto serie y transmiten el PWM a los servomotores.
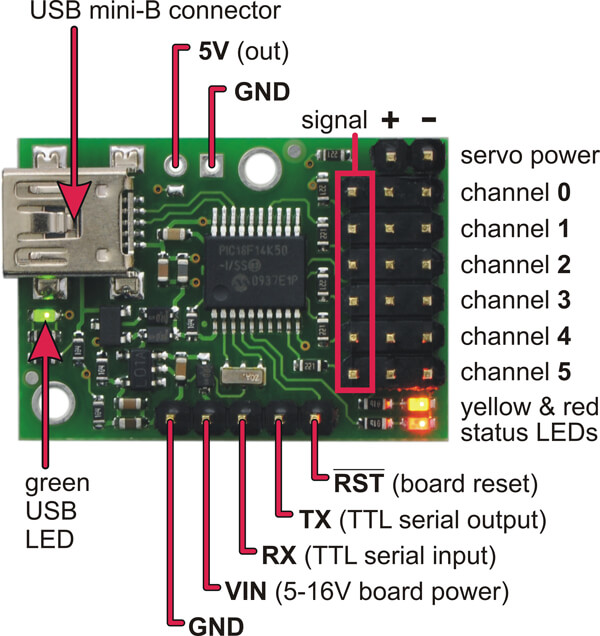
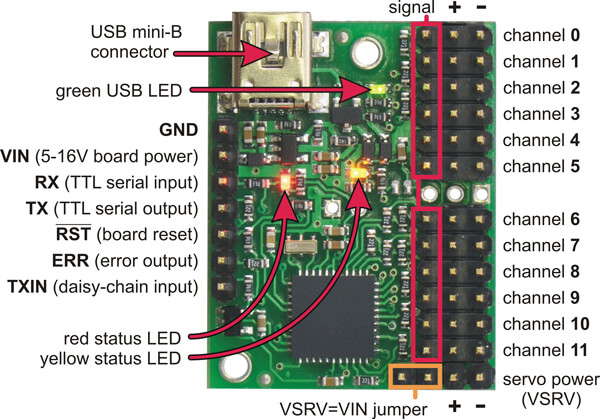
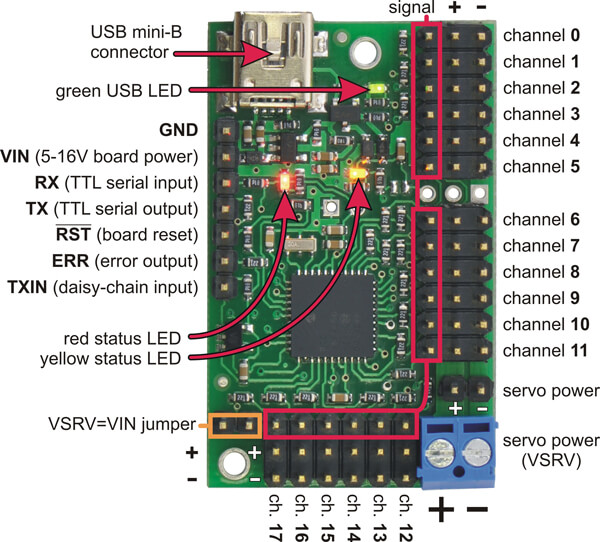
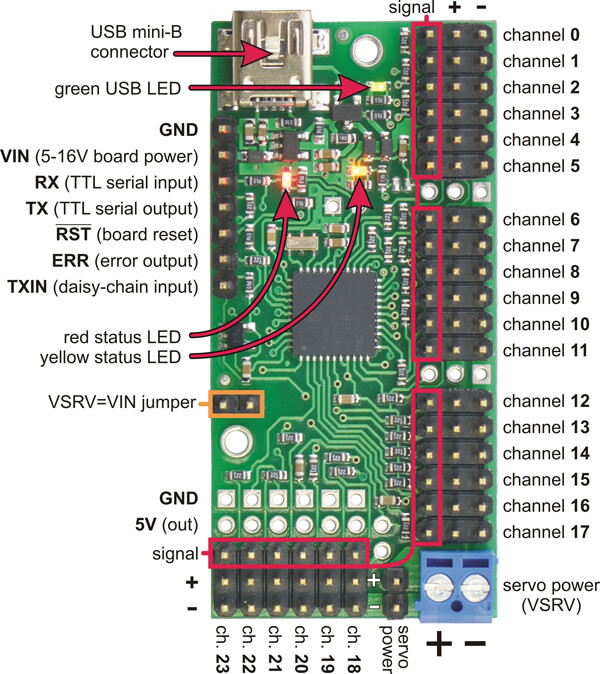
El que utilizamos en este ejemplo es un tablero Maestro propuesto por Pololu. Existe en diferentes formatos 4,12, 18 y 24 canales.
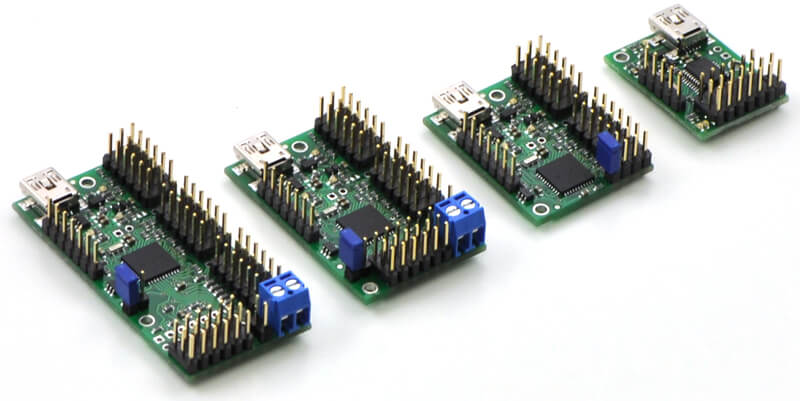
Con esta solución, la placa principal (Arduino o Raspberry Pi) envía órdenes al controlador (Maestro) a través del puerto serie que aplica potencia y comandos a los servomotores.
Esto presenta varias ventajas:
- proteger el material separando el circuito de alta potencia del circuito lógico
- reducir el costo al reducir el número de entrada / salida del microcontrolador principal
- utilizando una placa diferente para comunicarse con el servocontrolador
Más información sobre el controlador serie Mini Maestro en el sitio web de Pololu.
Configuración y prueba del controlador serie Maestro
Para configurar el controlador serie Maestro, debe descargar los controladores y el software para Windows (o Linux). Puede encontrar la guía de instalación siguiendo los enlaces de Windows y Linux.
Una vez que el Centro de control Maestro y los controladores estén instalados, conecte el maestro a su computadora.
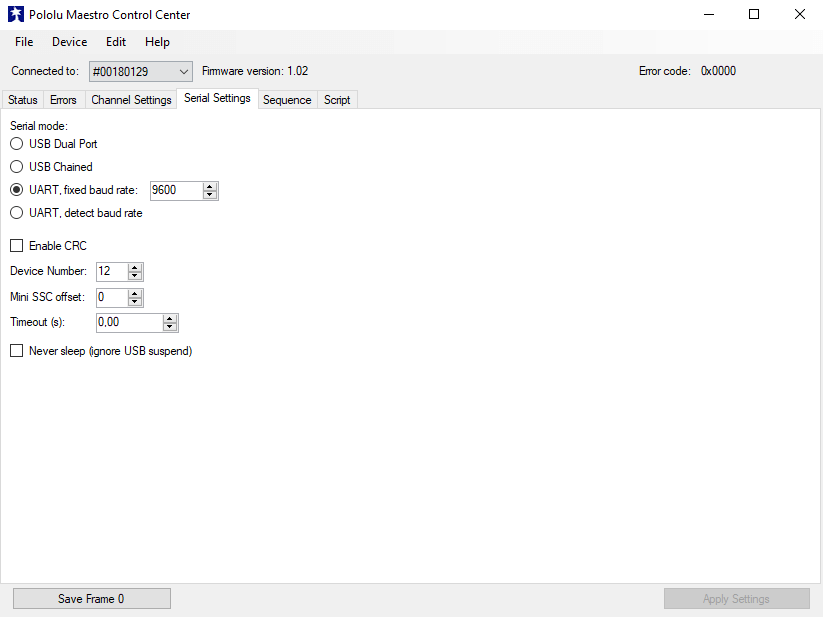
Cuando el controlador está conectado, su ID aparecerá en la parte superior derecha. Puede encontrar y modificar los parámetros de comunicación en la pestaña «Serial Settings».
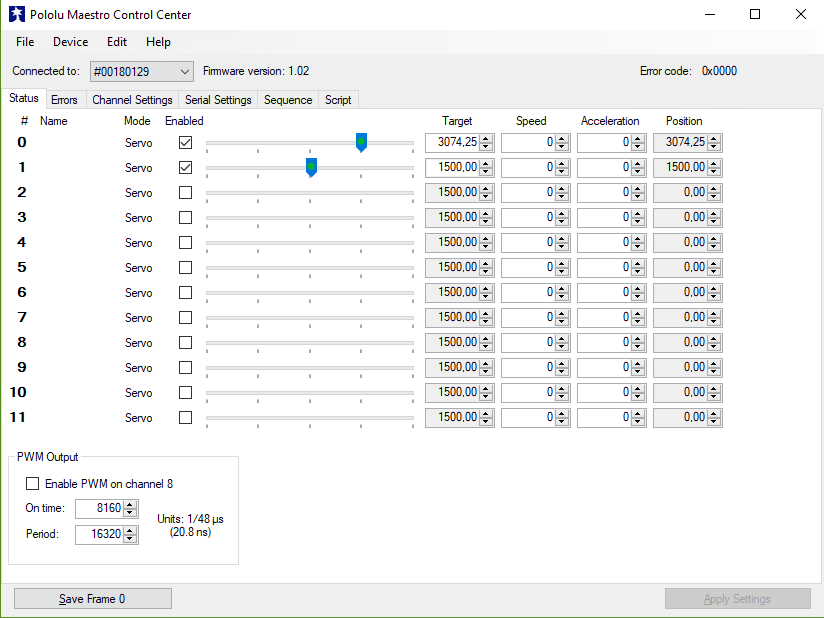
Puede probar el controlador serie Maestro y sus servomotores en la pestaña «Estado». No olvide alimentar sus servomotores con una fuente de alimentación externa.
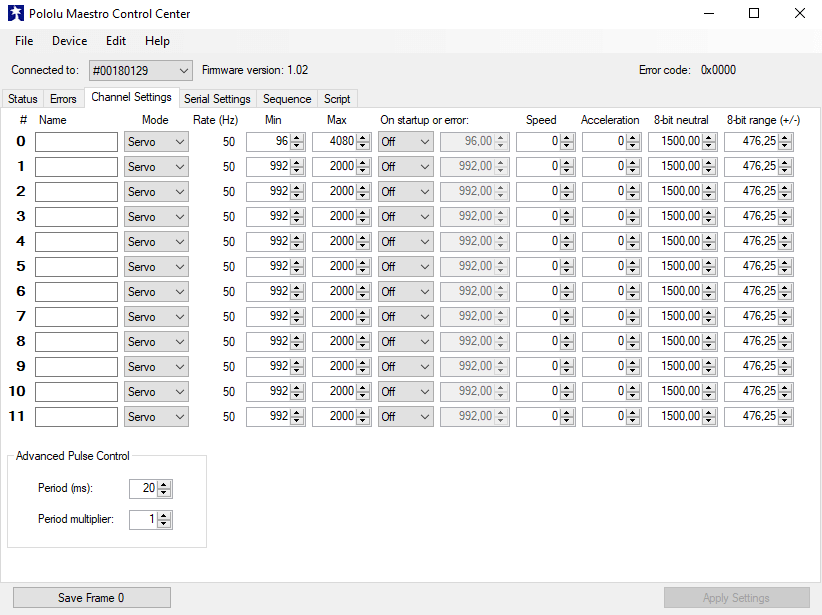
Los servomotores pueden tener diferentes parámetros. Puede modificar los parámetros de salida de Maestro en la pestaña «Channel Settings». Debe probar los parámetros que mejor se adaptan a sus servos.
Esquema
El Arduino se puede alimentar con una fuente de alimentación de 7 a 12V o mediante el puerto USB de la computadora. La lógica Maestro se alimenta con la salida de 5V del Arduino y los servomotores deben alimentarse con una batería externa. Si el voltaje nominal de los servomotores y el voltaje de la batería son demasiado diferentes, necesitará usar un regulador de voltaje (por ejemplo: una batería LiPo de 2 celdas suministra 7.4V mientras que el voltaje nominal del servomotor SG90 es 5V).
Los pines 2 (Rx) y 3 (Tx) están conectados respectivamente a los pines TX y RX del controlador serie Maestro.
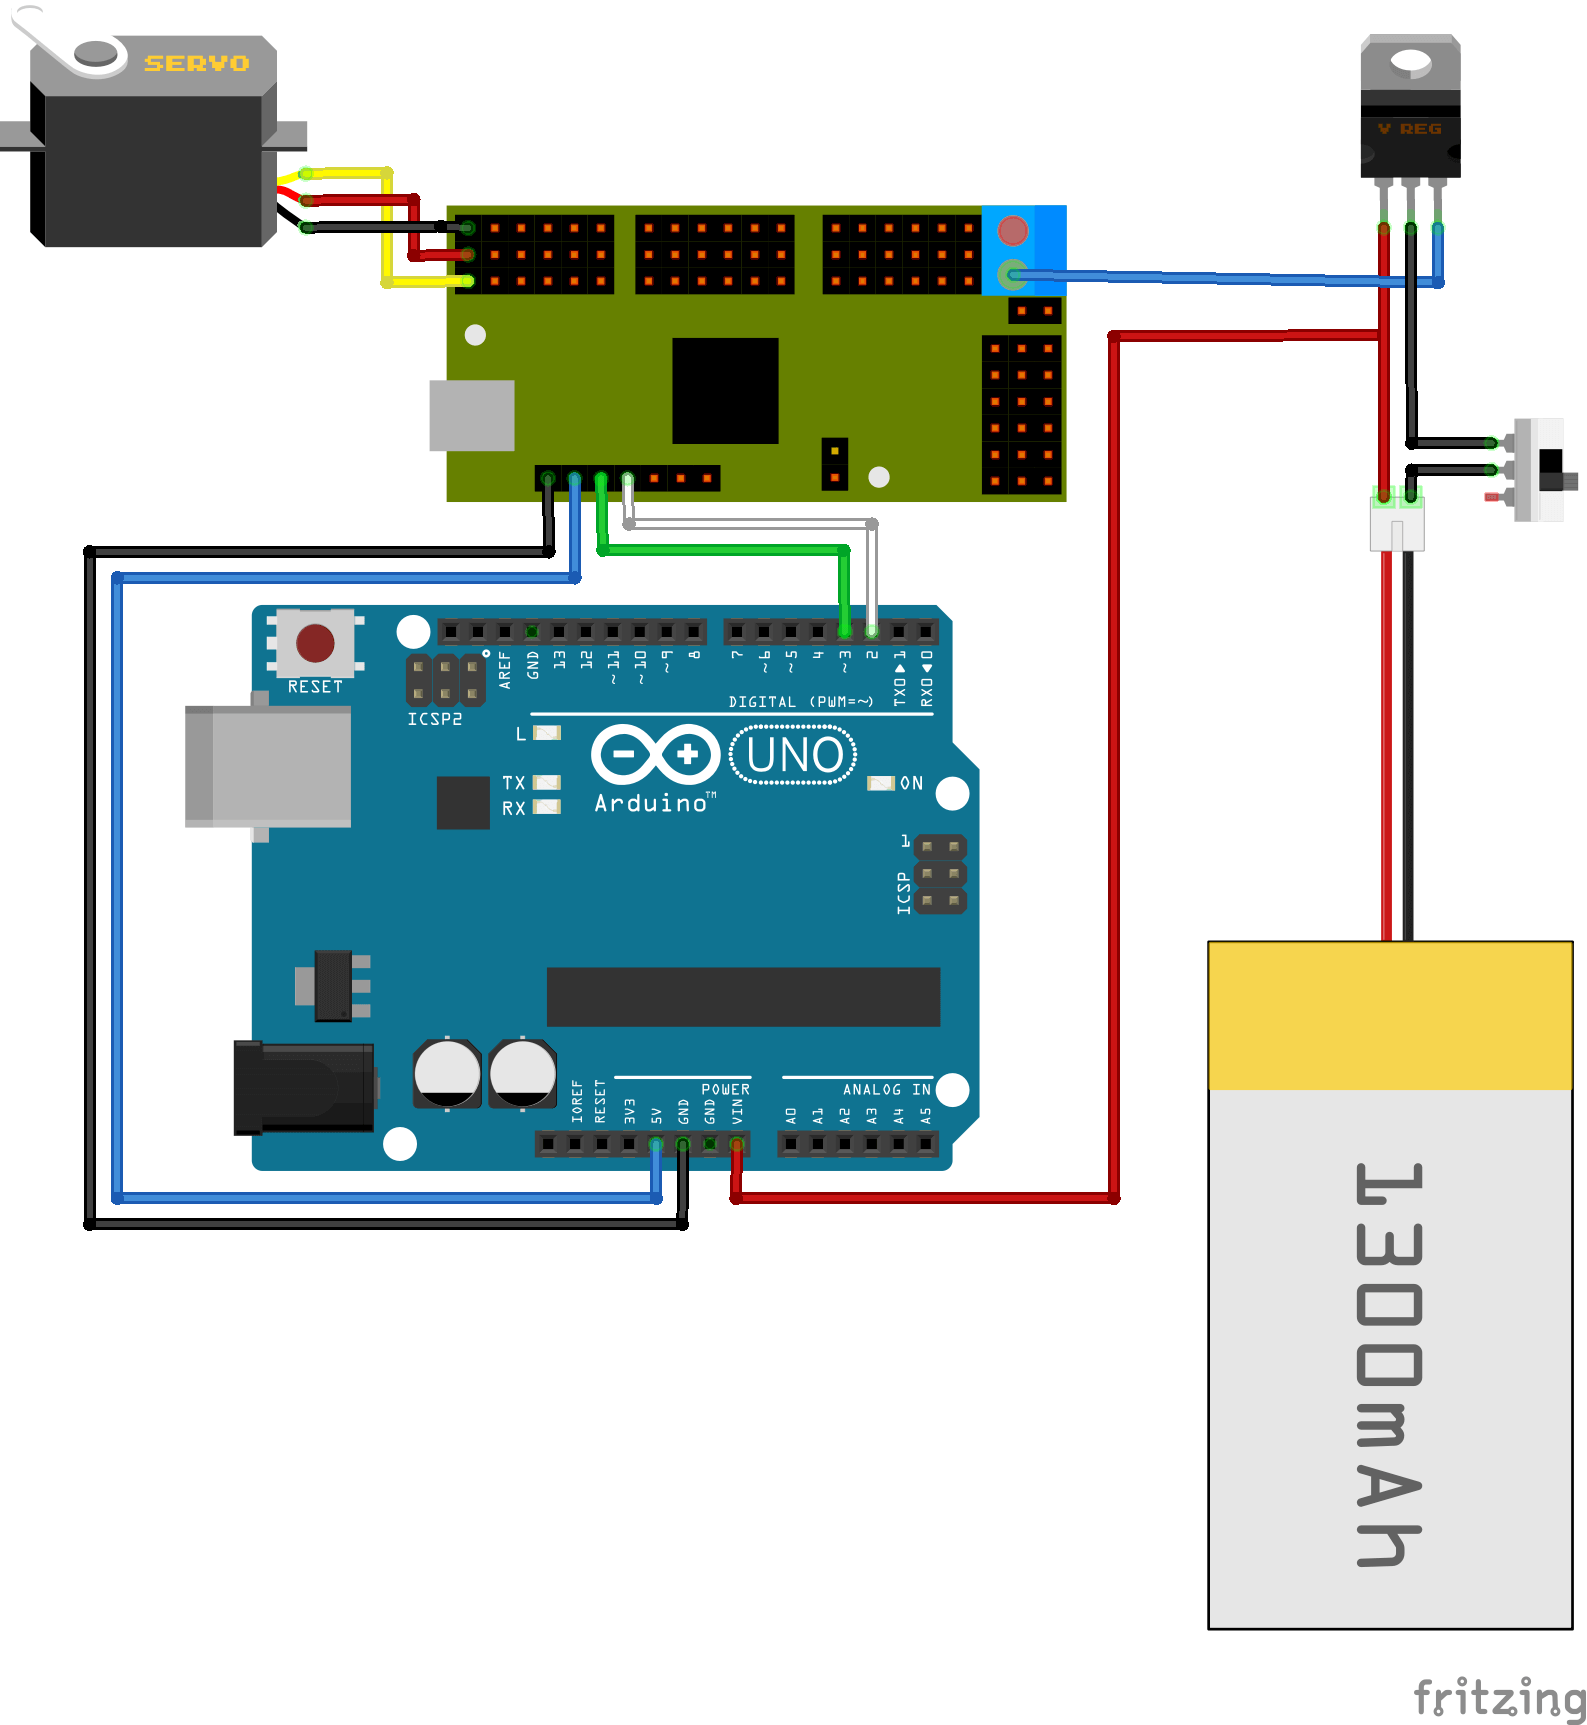
El cableado se puede adaptar fácilmente a los otros miembros de la familia Mini Maestro siguiendo los esquemas de pines.
Código básico para usar el controlador serie Maestro
Para comandar el controlador en serie con un Arduino, se debe enviar una secuencia de bytes a través del puerto en serie. El siguiente código permite al usuario enviar un comando de posición a los diversos canales de un Mini Maestro con el monitor serie Arduino.
Primero, el puerto serie para comunicarse con el Maestro está intiliazied.
#include <Maestro.h>
Maestro maestro(2,3);
Luego, escribimos una función que recibe datos del monitor en serie.
void readSerialPort(){
 while (Serial.available()) {
   delay(10);
   if (Serial.available() >0) {
     char c = Serial.read();  //gets one byte from serial buffer
     msg += c;
   }
 }
}
Por razones prácticas, solo enviamos un comando desde el monitor. Se necesita una función para separar la ID del servo del valor de posición usando el carácter «x».
void convertMsgToCmd(){
   if (msg.length() >0) {
     Serial.println(msg);
     sep = msg.indexOf('x');
     m1 = msg.substring(0, sep); //get servo id
     m2 = msg.substring(sep+1, msg.length()); //get servo pos

     servoId=-1;
     servoPos=-1;

     char carray1[6]; //magic needed to convert string to a number
     m1.toCharArray(carray1, sizeof(carray1));
     servoId = atoi(carray1);

     char carray2[6];
     m2.toCharArray(carray2, sizeof(carray2));
     servoPos = atoi(carray2);

     msg="";
 }
}
.
Finalmente, enviamos esos datos al Maestro utilizando elPololu protocol, que se resume mediante una secuencia de bytes que contiene la selección del protocolo, la ID de la placa, la selección del comando y el valor de posición.
void setTarget(unsigned char servo, unsigned int target){
  /* envoie la séquence de commande au contrôleur série Maestro pour actionner le servomoteur*/
  const int deviceId = 0x0C; //controller ID 12
  const int startByte = 0xAA; // Protocol selection
  const int targetCmd = 0x04; // Command ID

  maestro.write(startByte); //start byte
  maestro.write(deviceId); //device id
  maestro.write(targetCmd); //command number
  maestro.write(servo); //servo number
  maestro.write(target & 0x7F); // Send first 4bits
  maestro.write((target >> 7) & 0x7F); // Send last 4bits
  delay(3);
}
Todos juntos obtenemos el siguiente código:
/*----------------------------------------------------------------------------------------
 Ce programme permet de piloter différents servomoteurs à l'aide du moniteur série.
 Tapez YxZZZZ dans le terminal
 Y entre 0 et 5 pour Mini Maestro 6 voies (selon Maestro)
 ZZZZ entre 4000 et 8000 (selon servomoteur)

 Ex: Tapez 0x6000 dans le moniteur série

  Materiel:
  - 1x servomoteur ou plus
  - 1x Mini Maestro
  - 1x Arduino

 Auteur: Xavier Wiedmer
 http://www.aranacorp.com

----------------------------------------------------------------------------------------*/
#include "SoftwareSerial.h"
SoftwareSerial maestro(2,3);

String msg, m1, m2;
int sep, servoId=-1, servoPos=-1;


void setup() {
 Serial.begin(9600);
 pinMode(2, INPUT);
 pinMode(3, OUTPUT);
 maestro.begin(9600);
 Serial.println("Waiting for command (YxZZZZ): ");
}

void loop() {

 readSerialPort();
 convertMsgToCmd();

    //Apply command to servo
    if (servoId>=0 && servoPos>=0 && servoId<18 && servoPos>=500 && servoPos<=10000) {

       setTarget(servoId, servoPos);
       Serial.print("Command ");
       Serial.print(servoPos);
       Serial.print( " sent ");
       Serial.print("to servo ");
       Serial.println(servoId);

   servoId=-1;
   servoPos=-1;
   Serial.println("Waiting for command ... ");
 }
}

void setTarget(unsigned char servo, unsigned int target){
  /* envoie la séquence de commande au contrôleur série Maestro pour actionner le servomoteur*/
  const int deviceId = 0x0C; //controller ID 12
  const int startByte = 0xAA; // Protocol selection
  const int targetCmd = 0x04; // Command ID

  maestro.write(startByte); //start byte
  maestro.write(deviceId); //device id
  maestro.write(targetCmd); //command number
  maestro.write(servo); //servo number
  maestro.write(target & 0x7F); // Send first 4bits
  maestro.write((target >> 7) & 0x7F); // Send last 4bits
  delay(3);
}

void readSerialPort(){
  /*Permet de lire une commande provenant du terminal Arduino*/
 while (Serial.available()) {
   delay(10);
   if (Serial.available() >0) {
     char c = Serial.read();  //gets one byte from serial buffer
     msg += c;
   }
 }
}

void convertMsgToCmd(){
  /*convertit le message provenant du terminal en commande à envoyer au contrôleur série*/
   if (msg.length() >0) {
     Serial.println(msg);
     sep = msg.indexOf('x');
     // expect a string like 0x0021 containing the two servo positions
     m1 = msg.substring(0, sep); //get servo id
     m2 = msg.substring(sep+1, msg.length()); //get servo pos

     servoId=-1;
     servoPos=-1;

     char carray1[6]; //magic needed to convert string to a number
     m1.toCharArray(carray1, sizeof(carray1));
     servoId = atoi(carray1);

     char carray2[6];
     m2.toCharArray(carray2, sizeof(carray2));
     servoPos = atoi(carray2);

     msg="";
 }
}
Biblioteca para gestionar el controlador serie Maestro
Cuando se utilizan placas Maestro en varios proyectos, las reglas de las reglas de comunicación se pueden implementar fácilmente en una biblioteca para reutilizarlas en todos sus proyectos (más información aquí https://www.pololu.com/docs/0J40/all). Puede escribir su propia biblioteca o usar la escrita por Ryan Mulligan en Github.
Para crear una biblioteca, necesitamos escribir dos archivos y guardarlos en Documentos \ Arduino \ bibliotecas \ Maestro.
Archivo Maestro.h
/*****************************************************************\
* Library header : Maestro.h
* Author : X.Wiedmer
* Version : v00
* Date : 05/03/2015
* Revision :
*   v01 - 05/03/2015
* Description :
* Library to setup Maestro board
* www.aranacorp.com
\*****************************************************************/

#ifndef Maestro_h
#define Maestro_h
// Libraries
#include "Arduino.h"
#include "SoftwareSerial.h"

/******************************************************************\
* CLASS DESCRIPTION
\******************************************************************/
class Maestro
{
  public:
    Maestro(int pinRx, int pinTx);
	 //~Maestro();
    void setTarget(unsigned char servo, unsigned int target);
    void stop(unsigned char servo);
    void begin(unsigned int baudrate);

  private:
    int _pinRx;
    int _pinTx;
    int _id;
    SoftwareSerial *_maestroSerial;
};

#endif
Archivo Maestro.cpp
/*****************************************************************\
* Library : Maestro.cpp
* Author : X.Wiedmer
* Version : v00
* Date : 05/03/2015
* Revision :
* 	v01 - 05/03/2015
* Description :
* Library to setup Maestro board
* www.aranacorp.com
\*****************************************************************/

//Libraries
#include "Arduino.h"
#include "Maestro.h"
#include "SoftwareSerial.h"

// Parameters
#define DELAY_WRITE 3
//set up maestro configuration
#define deviceId 0x0C //12
#define startByte 0xAA //
// Command list
#define targetCmd 0x04 //


/******************************************************************\
* PRIVATE FUNCTION: Constructor
*
* PARAMETERS:
* ~ void
*
* DESCRIPTIONS:
* object constructor
\******************************************************************/
Maestro::Maestro(int pinRx, int pinTx)
{
  pinMode(pinRx, INPUT);
  pinMode(pinTx, OUTPUT);
  _pinRx = pinRx;
  _pinTx = pinTx;
  _maestroSerial = new SoftwareSerial(pinRx,pinTx);
}

/******************************************************************\
* PRIVATE FUNCTION: begin
*
* PARAMETERS:
* ~ baudrate (serial port speed)
*
* DESCRIPTIONS:
* Initialize serial port
\******************************************************************/
void Maestro::begin(unsigned int baudrate)
{
  _maestroSerial->begin(baudrate);
}
/******************************************************************\
* PRIVATE FUNCTION: setTarget
*
* PARAMETERS:
* ~ servo ID number, target specified with integer
*
* DESCRIPTIONS:
* Send sequence of command so that the maestro board send the right
* pwm value to set servo to the desired position
\******************************************************************/
void Maestro::setTarget(unsigned char servo, unsigned int target)
{
  _maestroSerial->write(startByte); //start byte
  _maestroSerial->write(deviceId) ; //device id
  _maestroSerial->write(targetCmd); //command number
  _maestroSerial->write(servo); //servo number
  _maestroSerial->write(target & 0x7F); // Send first 4bits
  _maestroSerial->write((target >> 7) & 0x7F); // Send last 4bits
  delay(DELAY_WRITE);
}

/******************************************************************\
* PRIVATE FUNCTION: stop
*
* PARAMETERS:
* ~ servo ID number
*
* DESCRIPTIONS:
* Send sequence of command so that the maestro send nothing to the
* the servo
\******************************************************************/
void Maestro::stop(unsigned char servo)
{
  _maestroSerial->write(startByte); //start byte
  _maestroSerial->write(deviceId) ; //device id
  _maestroSerial->write(targetCmd); //command number
  _maestroSerial->write(servo); //servo number
  _maestroSerial->write((byte)0x00); // Send first 4bits
  _maestroSerial->write((byte)0x00); // Send last 4bits
  delay(DELAY_WRITE);
}
Lo que cede al siguiente código:
/*----------------------------------------------------------------------------------------
 Ce programme permet de piloter différents servomoteurs à l'aide du moniteur série.
 Tapez YxZZZZ dans le terminal
 Y entre 0 et 5 pour Mini Maestro 6 voies (selon Maestro)
 ZZZZ entre 4000 et 8000 (selon servomoteur)

 Ex: Tapez 0x6000 dans le moniteur série

  Materiel:
  - 1 servomoteur ou plus
  - 1x Mini Maestro
  - 1x Arduino

 Auteur: Xavier Wiedmer
 http://www.aranacorp.com

----------------------------------------------------------------------------------------*/

#include <Maestro.h>
Maestro maestro(2,3);

String msg, m1, m2;
int sep, servoId=-1, servoPos=-1;

/************** Main Program **************/
void setup() {
 Serial.begin(9600);
 maestro.begin(9600);
 Serial.println("Waiting for command (YxZZZZ): ");
}

void loop() {

 readSerialPort();
 convertMsgToCmd();

    //Apply command to servo
    if (servoId>=0 && servoPos>=0 && servoId<18 && servoPos>=500 && servoPos<=10000) {

       maestro.setTarget(servoId, servoPos);
       Serial.print("Command ");
       Serial.print(servoPos);
       Serial.print( " sent ");
       Serial.print("to servo ");
       Serial.println(servoId);

   servoId=-1;
   servoPos=-1;
   Serial.println("Waiting for command ... ");
 }
}

/************** Functions **************/
void readSerialPort(){
 while (Serial.available()) {
   delay(10);
   if (Serial.available() >0) {
     char c = Serial.read();  //gets one byte from serial buffer
     msg += c;
   }
 }
}

void convertMsgToCmd(){
   if (msg.length() >0) {
     Serial.println(msg);
     sep = msg.indexOf('x');

     m1 = msg.substring(0, sep); //get servo id
     m2 = msg.substring(sep+1, msg.length()); //get servo pos

     servoId=-1;
     servoPos=-1; //declare as number

     char carray1[6]; //magic needed to convert string to a number
     m1.toCharArray(carray1, sizeof(carray1));
     servoId = atoi(carray1);

     char carray2[6];
     m2.toCharArray(carray2, sizeof(carray2));
     servoPos = atoi(carray2);

     msg="";
 }
}
No dude en dejar un comentario o escribir un mensaje si tiene algún problema con respecto a su controlador en serie.
Aplicaciones
- Controle robots de múltiples patas como quadripode, hexapode or octopode
Fuentes
- Servo referencia Arduino
- guía de usuario maestro
- Aprende a usar el puerto serie de Arduino
Encuentre otros tutoriales y ejemplos en el generador de código automático
Arquitecto de Código