En este tutorial vamos a ver cómo configurar un menú de navegación con diferentes pantallas en React Native. Para ello, vamos a utilizar la librería React Navigation
N.B.: Existe otra alternativa react-native-navigation pero no funciona con mi entorno.
Configuración del proyecto React Native
npm install @react-navigation/native
npm install @react-navigation/native-stack
A continuación, instale los siguientes paquetes
npm install --save react-native-screens react-native-safe-area-context
Para utilizar la navegación, debe actualizar el archivo MainActivity.java
android/app/src/main/java/<your package name>/MainActivity.javaAñade import android.os.Bundle; al principio del archivo
y la función onCreate en la clase MainActivity
  @Override
  protected void onCreate(Bundle savedInstanceState) {
    super.onCreate(null);
  }
MainActivity.java
package com.menuapp;

import com.facebook.react.ReactActivity;
import com.facebook.react.ReactActivityDelegate;
import com.facebook.react.defaults.DefaultNewArchitectureEntryPoint;
import com.facebook.react.defaults.DefaultReactActivityDelegate;

import android.os.Bundle;

public class MainActivity extends ReactActivity {

  /**
   * Returns the name of the main component registered from JavaScript. This is used to schedule
   * rendering of the component.
   */
  @Override
  protected String getMainComponentName() {
    return "MenuApp";
  }

  /**
   * Returns the instance of the {@link ReactActivityDelegate}. Here we use a util class {@link
   * DefaultReactActivityDelegate} which allows you to easily enable Fabric and Concurrent React
   * (aka React 18) with two boolean flags.
   */
  @Override
  protected ReactActivityDelegate createReactActivityDelegate() {
    return new DefaultReactActivityDelegate(
        this,
        getMainComponentName(),
        // If you opted-in for the New Architecture, we enable the Fabric Renderer.
        DefaultNewArchitectureEntryPoint.getFabricEnabled());
  }

  @Override
  protected void onCreate(Bundle savedInstanceState) {
    super.onCreate(null);
  }
}
Código principal de la aplicación
En el código principal de la aplicación, index.js o App.tsx, importamos el objeto NavigationContainer. Para utilizarlo, basta con rodear el código de renderización con la etiqueta correspondiente. En este ejemplo, definimos dos páginas, cada una con un botón que permite ir a la otra página.
import * as React from 'react';
import { View, Button, Text } from 'react-native';
import { NavigationContainer } from '@react-navigation/native';
import { createNativeStackNavigator } from '@react-navigation/native-stack';

function HomeScreen({ navigation }) {
  return (
    <View style={{ flex: 1, alignItems: 'center', justifyContent: 'center' }}>
      <Text>Home Screen</Text>
      <Button
        title="Go to Details"
        onPress={() => navigation.navigate('Details')}
      />
    </View>
  );
}

function DetailsScreen({ navigation }) {
  return (
    <View style={{ flex: 1, alignItems: 'center', justifyContent: 'center' }}>
      <Text>Details Screen</Text>
      <Button
        title="Go to Details... again"
        onPress={() => navigation.push('Details')}
      />
      <Button title="Go to Home" onPress={() => navigation.navigate('Home')} />
      <Button title="Go back" onPress={() => navigation.goBack()} />
    </View>
  );
}
const Stack = createNativeStackNavigator();

function App() {
  return (
    <NavigationContainer>
      <Stack.Navigator initialRouteName="Home">
        <Stack.Screen name="Home" component={HomeScreen} options={{ headerShown: false }}/>
        <Stack.Screen name="Details" component={DetailsScreen} />
      </Stack.Navigator>
    </NavigationContainer>
  );
}

export default App;
Nota: puede elegir si desea mostrar o no la barra de navegación mediante la opción headerShown: false.
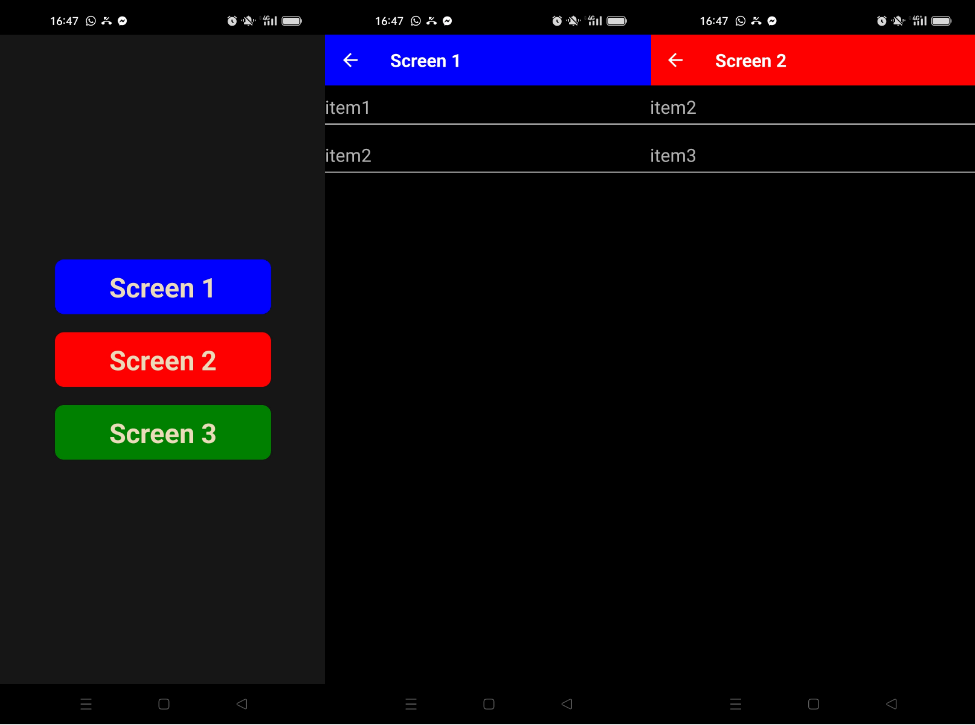
Ejemplo: Creación de un menú
En este ejemplo, vamos a crear una aplicación sencilla para mostrar diferentes pantallas. Estas pantallas se basan en el mismo componente, que se adapta en función de la información contenida en una lista.
Primero creamos una matriz que contiene toda la información que necesitamos
const screensArr = [
  {
    id: 1,
    color: "blue",
    text: "Screen 1",
    items: ["item1","item2"]
  },
  {
    id: 2,
    color: "red",
    text: "Screen 2",
    items: ["item2","item3"]
  },
  {
    id: 3,
    color: "green",
    text: "Screen 3",
    items: ["item1","item2","item3"]
  },
];
Componente principal
En el componente principal, creamos una lista de pantallas Stack.Screen a partir de la matriz screensArr
const Stack = createNativeStackNavigator();

function App() {

  const screensListArr = screensArr.map(buttonInfo => (
    <Stack.Screen
    key={buttonInfo.id}
    name={buttonInfo.text}
    component={DetailsScreen}
    options={{
      headerStyle: {
        backgroundColor: buttonInfo.color,
      },
      headerTintColor: '#fff',
      headerTitleStyle: {
        fontWeight: 'bold',
      },
    }}
    />
  ));

  return (
    <NavigationContainer>
      <Stack.Navigator initialRouteName="Home">
        <Stack.Screen name="Home" component={HomeScreen} options={{ headerShown: false }}/>
        {/*<Stack.Screen name="Details" component={DetailsScreen} />*/}
        {screensListArr}
      </Stack.Navigator>
    </NavigationContainer>
  );
}

export default App;
Pantalla de inicio
A continuación, creamos la pantalla principal, que contiene los botones para navegar a las demás pantallas
En esta pantalla, añadimos un botón para cada pantalla utilizando la función buttonListArr, que personalizamos con los datos contenidos en screensArr.
function HomeScreen({ navigation }) {
  const menuItemClick = (buttonInfo: { id: any; color?: string; text: any; }) => {
    console.log(buttonInfo.id,' clicked :',buttonInfo.text);
    navigation.navigate(buttonInfo.text,buttonInfo); //'Details')
  };

  const buttonsListArr = screensArr.map(buttonInfo => (
    <Button
    key={buttonInfo.id}
    text={buttonInfo.text}
    onPress={() => menuItemClick(buttonInfo)}
    btnStyle={[styles.menuBtn,{backgroundColor:buttonInfo.color}]}
    btnTextStyle={styles.menuText}
    />
  ));


  return (
      <ScrollView>
        <View style={styles.mainBody}>
        {buttonsListArr}
        </View>
      </ScrollView>

  );
}
N.B.: tenga en cuenta que existe una única función para gestionar varios botones menuItemClick(buttonInfo).
Pantalla de detalles
Por último, creamos la función DetailsScreen, que contendrá la información que se mostrará para cada página.
Pasamos los parámetros de la página cuando llamamos al cambio de página
navigation.navigate(buttonInfo.text,buttonInfo);
const buttonInfo = route.params;
function DetailsScreen({ route, navigation }) {
  const buttonInfo = route.params;

  const itemsListArr = buttonInfo.items.map(item => (
    <View key={item} style={{marginTop:10,marginBottom:10,flexDirection:'row', width: "100%", borderBottomWidth: 1,borderBottomColor:"white",}} >
      <Text style={{marginBottom:5,fontSize: 20,}}>{item}</Text>
    </View>
  ));

  return (
    <View style={{
      flex: 1,
      //justifyContent: 'center',
      alignItems: 'center',
      //minHeight: windowHeight,
      color: "white",
      backgroundColor: "black",
    }}>
      {itemsListArr}
      {/*<Button text="Go back" btnStyle={styles.deviceButton} btnTextStyle={styles.buttonText} onPress={() => navigation.goBack()} />*/}
    </View>
  );
}
Resultados
Una vez compilada la aplicación y cargada en el dispositivo, podemos navegar de una pantalla a otra.
Código de ejemplo completo
App.tsx
/**
 * npm install --save react-native-navigation NOK
 * npm install @react-navigation/native
 * npm install @react-navigation/native-stack
 * https://reactnavigation.org/docs/getting-started
 */

import React from 'react';
import {
  View,
  Text,
  ScrollView,
} from 'react-native';
import { NavigationContainer } from '@react-navigation/native';
import { createNativeStackNavigator } from '@react-navigation/native-stack';

import Button from './src/ui_comp';
import {styles} from './src/styles/styles';

const screensArr = [
  {
    id: 1,
    color: "blue",
    text: "Screen 1",
    items: ["item1","item2"]
  },
  {
    id: 2,
    color: "red",
    text: "Screen 2",
    items: ["item2","item3"]
  },
  {
    id: 3,
    color: "green",
    text: "Screen 3",
    items: ["item1","item2","item3"]
  },
];

function HomeScreen({ navigation }) {
  const menuItemClick = (buttonInfo: { id: any; color?: string; text: any; }) => {
    console.log(buttonInfo.id,' clicked :',buttonInfo.text);
    navigation.navigate(buttonInfo.text,buttonInfo); //'Details')
  };


  const buttonsListArr = screensArr.map(buttonInfo => (
    <Button
    key={buttonInfo.id}
    text={buttonInfo.text}
    onPress={() => menuItemClick(buttonInfo)}
    btnStyle={[styles.menuBtn,{backgroundColor:buttonInfo.color}]}
    btnTextStyle={styles.menuText}
    />
  ));


  return (
      <ScrollView>
        <View style={styles.mainBody}>
        {buttonsListArr}
        </View>
      </ScrollView>

  );
}

function DetailsScreen({ route, navigation }) {
  const buttonInfo = route.params;

  const itemsListArr = buttonInfo.items.map(item => (
    <View key={item} style={{marginTop:10,marginBottom:10,flexDirection:'row', width: "100%", borderBottomWidth: 1,borderBottomColor:"white",}} >
      <Text style={{marginBottom:5,fontSize: 20,}}>{item}</Text>
    </View>
  ));

  return (
    <View style={{
      flex: 1,
      //justifyContent: 'center',
      alignItems: 'center',
      //minHeight: windowHeight,
      color: "white",
      backgroundColor: "black",
    }}>
      {itemsListArr}
      {/*<Button text="Go back" btnStyle={styles.deviceButton} btnTextStyle={styles.buttonText} onPress={() => navigation.goBack()} />*/}
    </View>
  );
}

const Stack = createNativeStackNavigator();

function App() {

  const screensListArr = screensArr.map(buttonInfo => (
    <Stack.Screen
    key={buttonInfo.id}
    name={buttonInfo.text}
    component={DetailsScreen}
    options={{
      headerStyle: {
        backgroundColor: buttonInfo.color,
      },
      headerTintColor: '#fff',
      headerTitleStyle: {
        fontWeight: 'bold',
      },
    }}
    />
  ));

  return (
    <NavigationContainer>
      <Stack.Navigator initialRouteName="Home">
        <Stack.Screen name="Home" component={HomeScreen} options={{ headerShown: false }}/>
        {/*<Stack.Screen name="Details" component={DetailsScreen} />*/}
        {screensListArr}
      </Stack.Navigator>
    </NavigationContainer>
  );
}

export default App;
styles.jsx
/* ./src/styles/styles.jsx */
import {StyleSheet, Dimensions} from 'react-native';

//parameters
let BACKGROUND_COLOR = "#161616"; //191A19
let BUTTON_COLOR = "#346751"; //1E5128
let ERROR_COLOR = "#C84B31"; //4E9F3D
let TEXT_COLOR = "#ECDBBA"; //D8E9A8

const windowHeight = Dimensions.get('window').height;
const windowWidth = Dimensions.get('window').width;

export const styles = StyleSheet.create({
  mainBody: {
    flex: 1,
    justifyContent: 'center',
    alignItems: 'center',
    minHeight: windowHeight,
    color:TEXT_COLOR,
    backgroundColor: BACKGROUND_COLOR,
  },

  menuBtn: {
    backgroundColor: BUTTON_COLOR,
    paddingBottom: 10,
    paddingTop: 10,
    borderRadius: 10,
    margin: 10,
    //height: windowHeight/3,
    width: windowHeight/3,
    justifyContent: 'center',
  },

  menuText: {
    color: TEXT_COLOR,
    fontWeight: 'bold',
    fontSize: 30,
	  textAlign: 'center',
  },


  buttonText: {
    color: TEXT_COLOR,
    fontWeight: 'bold',
    fontSize: 12,
	  textAlign: 'center',
    textAlignVertical: 'center',
  },

  noDevicesText: {
    color: TEXT_COLOR,
    textAlign: 'center',
    marginTop: 10,
    fontStyle: 'italic',
  },
  deviceItem: {
    flexDirection: 'row',
    justifyContent: 'space-between',
    marginBottom: 2,
  },
  deviceName: {
    color: TEXT_COLOR,
    fontSize: 14,
    fontWeight: 'bold',
  },
  deviceInfo: {
    color: TEXT_COLOR,
    fontSize: 10,
  },
  deviceButton: {
    backgroundColor: BUTTON_COLOR,
    padding: 10,
    borderRadius: 10,
    margin: 2,
    paddingHorizontal: 20,
    fontWeight: 'bold',
    fontSize: 12,
  },

  inputBar:{
    flexDirection: 'row',
    justifyContent: 'space-between',
    margin: 5,
  },

  textInput:{
    backgroundColor: '#888888',
    margin: 2,
    borderRadius: 15,
    flex:3,
  },

  sendButton: {
  backgroundColor: BUTTON_COLOR,
  padding: 15,
  borderRadius: 15,
  margin: 2,
  paddingHorizontal: 20,
  },

  textOutput:{
    backgroundColor: '#333333',
    margin: 10,
    borderRadius: 2,
    borderWidth: 1,
    borderColor: '#EEEEEE',
    textAlignVertical: 'top',
  }

});
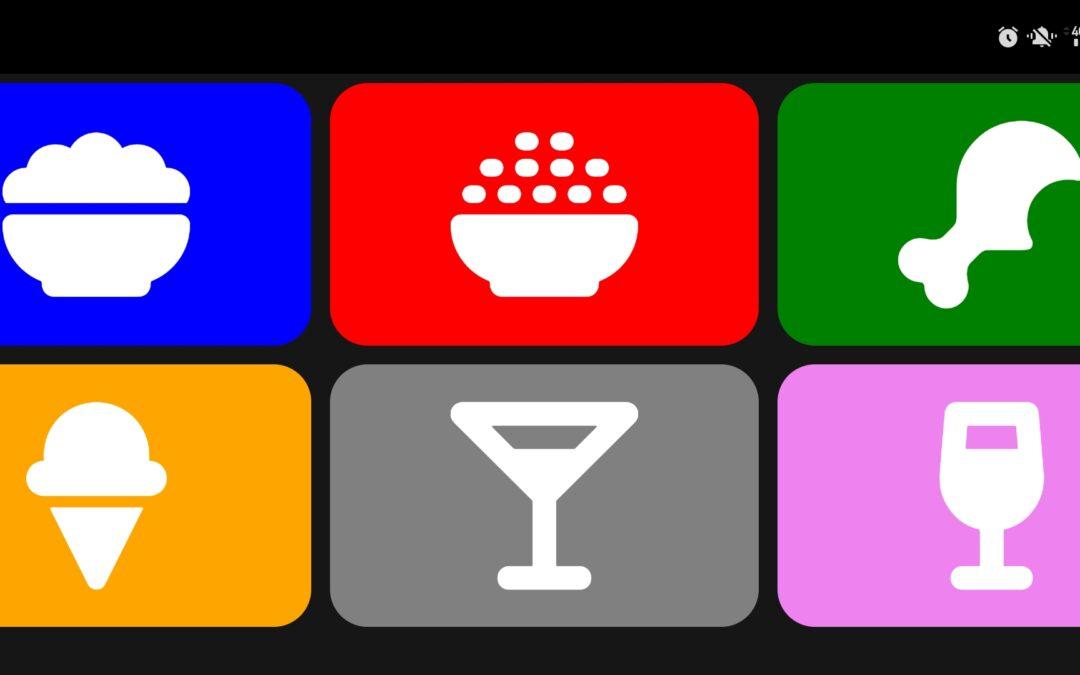
Bonus: Mostrar un icono en el botón
Puedes añadir o sustituir el texto por un icono.
npm install react-native-vector-icons --save
Para ello, debes importar cada banco de iconos. Busque los iconos que desea añadir y en qué banco
import Icon from 'react-native-vector-icons/FontAwesome6';
import IonIcon from 'react-native-vector-icons/Ionicons'
import MaterialIcon from 'react-native-vector-icons/MaterialIcons'
A continuación, puede colocar el objeto Icono correspondiente al banco que contiene el icono
<Button>
    <Icon name="ice-cream" size={icon_size} color={'white'} />
</Button>


