In this tutorial, we’ll look at how to set up a navigation menu with different screens in React Native. To do this, we’ll use the React Navigation library
N.B.: Another alternative react-native-navigation exists but does not work with my environment.
React Native project configuration
npm install @react-navigation/native
npm install @react-navigation/native-stack
Then install the following packages
npm install --save react-native-screens react-native-safe-area-context
To use navigation, you need to update the MainActivity.java file
android/app/src/main/java/<your package name>/MainActivity.javaAdd import android.os.Bundle; at the beginning of the file
and the onCreate function in the MainActivity class
  @Override
  protected void onCreate(Bundle savedInstanceState) {
    super.onCreate(null);
  }
MainActivity.java
package com.menuapp;

import com.facebook.react.ReactActivity;
import com.facebook.react.ReactActivityDelegate;
import com.facebook.react.defaults.DefaultNewArchitectureEntryPoint;
import com.facebook.react.defaults.DefaultReactActivityDelegate;

import android.os.Bundle;

public class MainActivity extends ReactActivity {

  /**
   * Returns the name of the main component registered from JavaScript. This is used to schedule
   * rendering of the component.
   */
  @Override
  protected String getMainComponentName() {
    return "MenuApp";
  }

  /**
   * Returns the instance of the {@link ReactActivityDelegate}. Here we use a util class {@link
   * DefaultReactActivityDelegate} which allows you to easily enable Fabric and Concurrent React
   * (aka React 18) with two boolean flags.
   */
  @Override
  protected ReactActivityDelegate createReactActivityDelegate() {
    return new DefaultReactActivityDelegate(
        this,
        getMainComponentName(),
        // If you opted-in for the New Architecture, we enable the Fabric Renderer.
        DefaultNewArchitectureEntryPoint.getFabricEnabled());
  }

  @Override
  protected void onCreate(Bundle savedInstanceState) {
    super.onCreate(null);
  }
}
Main application code
In the main application code, index.js or App.tsx, we import the NavigationContainer object. To use it, simply surround the rendering code with the corresponding tag. In this example, we define two pages, each with a button that takes you to the other page.
import * as React from 'react';
import { View, Button, Text } from 'react-native';
import { NavigationContainer } from '@react-navigation/native';
import { createNativeStackNavigator } from '@react-navigation/native-stack';

function HomeScreen({ navigation }) {
  return (
    <View style={{ flex: 1, alignItems: 'center', justifyContent: 'center' }}>
      <Text>Home Screen</Text>
      <Button
        title="Go to Details"
        onPress={() => navigation.navigate('Details')}
      />
    </View>
  );
}

function DetailsScreen({ navigation }) {
  return (
    <View style={{ flex: 1, alignItems: 'center', justifyContent: 'center' }}>
      <Text>Details Screen</Text>
      <Button
        title="Go to Details... again"
        onPress={() => navigation.push('Details')}
      />
      <Button title="Go to Home" onPress={() => navigation.navigate('Home')} />
      <Button title="Go back" onPress={() => navigation.goBack()} />
    </View>
  );
}
const Stack = createNativeStackNavigator();

function App() {
  return (
    <NavigationContainer>
      <Stack.Navigator initialRouteName="Home">
        <Stack.Screen name="Home" component={HomeScreen} options={{ headerShown: false }}/>
        <Stack.Screen name="Details" component={DetailsScreen} />
      </Stack.Navigator>
    </NavigationContainer>
  );
}

export default App;
N.B.: you can display or hide the navigation bar with the headerShown: false option.
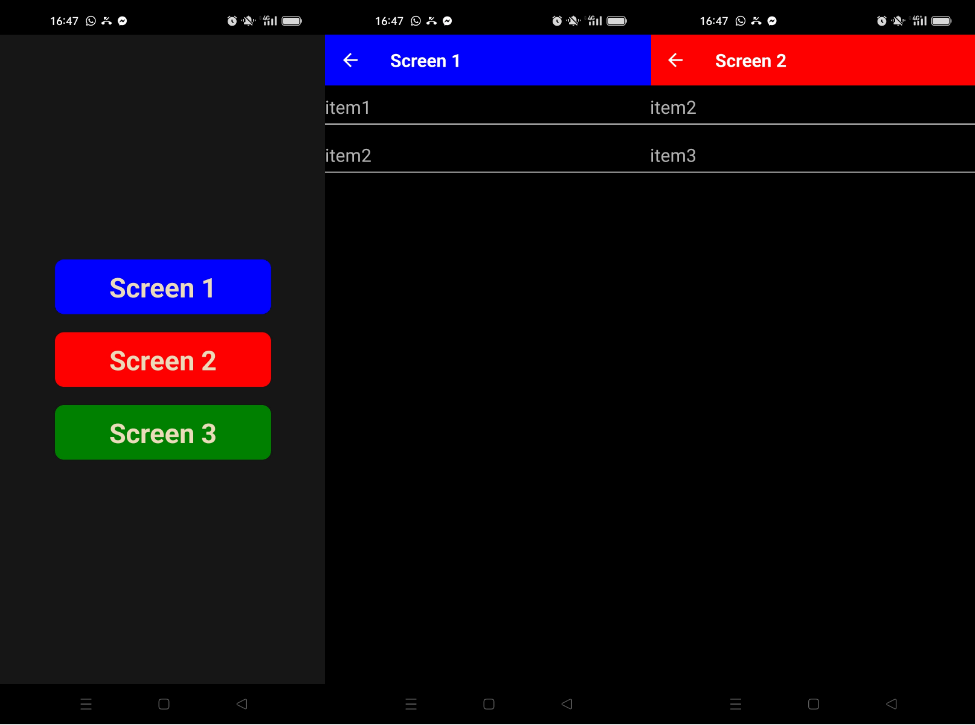
Example: Creating a menu
In this example, we’ll create a simple application to display different screens. These screens are based on the same component, which is adapted according to the information contained in a list.
First we create an array containing all the information we need
const screensArr = [
  {
    id: 1,
    color: "blue",
    text: "Screen 1",
    items: ["item1","item2"]
  },
  {
    id: 2,
    color: "red",
    text: "Screen 2",
    items: ["item2","item3"]
  },
  {
    id: 3,
    color: "green",
    text: "Screen 3",
    items: ["item1","item2","item3"]
  },
];
Main component
In the main component, we create a Stack.Screen screen list from the Array screensArr
const Stack = createNativeStackNavigator();

function App() {

  const screensListArr = screensArr.map(buttonInfo => (
    <Stack.Screen
    key={buttonInfo.id}
    name={buttonInfo.text}
    component={DetailsScreen}
    options={{
      headerStyle: {
        backgroundColor: buttonInfo.color,
      },
      headerTintColor: '#fff',
      headerTitleStyle: {
        fontWeight: 'bold',
      },
    }}
    />
  ));

  return (
    <NavigationContainer>
      <Stack.Navigator initialRouteName="Home">
        <Stack.Screen name="Home" component={HomeScreen} options={{ headerShown: false }}/>
        {/*<Stack.Screen name="Details" component={DetailsScreen} />*/}
        {screensListArr}
      </Stack.Navigator>
    </NavigationContainer>
  );
}

export default App;
Home screen
We then create the main screen, which contains buttons for navigating to the other screens
On this screen, we add a button for each screen with the buttonListArr function, which we customize with the data contained in screensArr.
function HomeScreen({ navigation }) {
  const menuItemClick = (buttonInfo: { id: any; color?: string; text: any; }) => {
    console.log(buttonInfo.id,' clicked :',buttonInfo.text);
    navigation.navigate(buttonInfo.text,buttonInfo); //'Details')
  };

  const buttonsListArr = screensArr.map(buttonInfo => (
    <Button
    key={buttonInfo.id}
    text={buttonInfo.text}
    onPress={() => menuItemClick(buttonInfo)}
    btnStyle={[styles.menuBtn,{backgroundColor:buttonInfo.color}]}
    btnTextStyle={styles.menuText}
    />
  ));


  return (
      <ScrollView>
        <View style={styles.mainBody}>
        {buttonsListArr}
        </View>
      </ScrollView>

  );
}
N.B.: note that there’s a single function to manage multiple menuItemClick(buttonInfo) buttons.
Details screen
Finally, we create the DetailsScreen function, which will contain the information to be displayed for each page.
We pass the page parameters when calling the page change function
navigation.navigate(buttonInfo.text,buttonInfo);
const buttonInfo = route.params;
function DetailsScreen({ route, navigation }) {
  const buttonInfo = route.params;

  const itemsListArr = buttonInfo.items.map(item => (
    <View key={item} style={{marginTop:10,marginBottom:10,flexDirection:'row', width: "100%", borderBottomWidth: 1,borderBottomColor:"white",}} >
      <Text style={{marginBottom:5,fontSize: 20,}}>{item}</Text>
    </View>
  ));

  return (
    <View style={{
      flex: 1,
      //justifyContent: 'center',
      alignItems: 'center',
      //minHeight: windowHeight,
      color: "white",
      backgroundColor: "black",
    }}>
      {itemsListArr}
      {/*<Button text="Go back" btnStyle={styles.deviceButton} btnTextStyle={styles.buttonText} onPress={() => navigation.goBack()} />*/}
    </View>
  );
}
Results
Once the application has been compiled and loaded onto the device, we can navigate from one screen to the next.
Full example code
App.tsx
/**
 * npm install --save react-native-navigation NOK
 * npm install @react-navigation/native
 * npm install @react-navigation/native-stack
 * https://reactnavigation.org/docs/getting-started
 */

import React from 'react';
import {
  View,
  Text,
  ScrollView,
} from 'react-native';
import { NavigationContainer } from '@react-navigation/native';
import { createNativeStackNavigator } from '@react-navigation/native-stack';

import Button from './src/ui_comp';
import {styles} from './src/styles/styles';

const screensArr = [
  {
    id: 1,
    color: "blue",
    text: "Screen 1",
    items: ["item1","item2"]
  },
  {
    id: 2,
    color: "red",
    text: "Screen 2",
    items: ["item2","item3"]
  },
  {
    id: 3,
    color: "green",
    text: "Screen 3",
    items: ["item1","item2","item3"]
  },
];

function HomeScreen({ navigation }) {
  const menuItemClick = (buttonInfo: { id: any; color?: string; text: any; }) => {
    console.log(buttonInfo.id,' clicked :',buttonInfo.text);
    navigation.navigate(buttonInfo.text,buttonInfo); //'Details')
  };


  const buttonsListArr = screensArr.map(buttonInfo => (
    <Button
    key={buttonInfo.id}
    text={buttonInfo.text}
    onPress={() => menuItemClick(buttonInfo)}
    btnStyle={[styles.menuBtn,{backgroundColor:buttonInfo.color}]}
    btnTextStyle={styles.menuText}
    />
  ));


  return (
      <ScrollView>
        <View style={styles.mainBody}>
        {buttonsListArr}
        </View>
      </ScrollView>

  );
}

function DetailsScreen({ route, navigation }) {
  const buttonInfo = route.params;

  const itemsListArr = buttonInfo.items.map(item => (
    <View key={item} style={{marginTop:10,marginBottom:10,flexDirection:'row', width: "100%", borderBottomWidth: 1,borderBottomColor:"white",}} >
      <Text style={{marginBottom:5,fontSize: 20,}}>{item}</Text>
    </View>
  ));

  return (
    <View style={{
      flex: 1,
      //justifyContent: 'center',
      alignItems: 'center',
      //minHeight: windowHeight,
      color: "white",
      backgroundColor: "black",
    }}>
      {itemsListArr}
      {/*<Button text="Go back" btnStyle={styles.deviceButton} btnTextStyle={styles.buttonText} onPress={() => navigation.goBack()} />*/}
    </View>
  );
}

const Stack = createNativeStackNavigator();

function App() {

  const screensListArr = screensArr.map(buttonInfo => (
    <Stack.Screen
    key={buttonInfo.id}
    name={buttonInfo.text}
    component={DetailsScreen}
    options={{
      headerStyle: {
        backgroundColor: buttonInfo.color,
      },
      headerTintColor: '#fff',
      headerTitleStyle: {
        fontWeight: 'bold',
      },
    }}
    />
  ));

  return (
    <NavigationContainer>
      <Stack.Navigator initialRouteName="Home">
        <Stack.Screen name="Home" component={HomeScreen} options={{ headerShown: false }}/>
        {/*<Stack.Screen name="Details" component={DetailsScreen} />*/}
        {screensListArr}
      </Stack.Navigator>
    </NavigationContainer>
  );
}

export default App;
styles.jsx
/* ./src/styles/styles.jsx */
import {StyleSheet, Dimensions} from 'react-native';

//parameters
let BACKGROUND_COLOR = "#161616"; //191A19
let BUTTON_COLOR = "#346751"; //1E5128
let ERROR_COLOR = "#C84B31"; //4E9F3D
let TEXT_COLOR = "#ECDBBA"; //D8E9A8

const windowHeight = Dimensions.get('window').height;
const windowWidth = Dimensions.get('window').width;

export const styles = StyleSheet.create({
  mainBody: {
    flex: 1,
    justifyContent: 'center',
    alignItems: 'center',
    minHeight: windowHeight,
    color:TEXT_COLOR,
    backgroundColor: BACKGROUND_COLOR,
  },

  menuBtn: {
    backgroundColor: BUTTON_COLOR,
    paddingBottom: 10,
    paddingTop: 10,
    borderRadius: 10,
    margin: 10,
    //height: windowHeight/3,
    width: windowHeight/3,
    justifyContent: 'center',
  },

  menuText: {
    color: TEXT_COLOR,
    fontWeight: 'bold',
    fontSize: 30,
	  textAlign: 'center',
  },


  buttonText: {
    color: TEXT_COLOR,
    fontWeight: 'bold',
    fontSize: 12,
	  textAlign: 'center',
    textAlignVertical: 'center',
  },

  noDevicesText: {
    color: TEXT_COLOR,
    textAlign: 'center',
    marginTop: 10,
    fontStyle: 'italic',
  },
  deviceItem: {
    flexDirection: 'row',
    justifyContent: 'space-between',
    marginBottom: 2,
  },
  deviceName: {
    color: TEXT_COLOR,
    fontSize: 14,
    fontWeight: 'bold',
  },
  deviceInfo: {
    color: TEXT_COLOR,
    fontSize: 10,
  },
  deviceButton: {
    backgroundColor: BUTTON_COLOR,
    padding: 10,
    borderRadius: 10,
    margin: 2,
    paddingHorizontal: 20,
    fontWeight: 'bold',
    fontSize: 12,
  },

  inputBar:{
    flexDirection: 'row',
    justifyContent: 'space-between',
    margin: 5,
  },

  textInput:{
    backgroundColor: '#888888',
    margin: 2,
    borderRadius: 15,
    flex:3,
  },

  sendButton: {
  backgroundColor: BUTTON_COLOR,
  padding: 15,
  borderRadius: 15,
  margin: 2,
  paddingHorizontal: 20,
  },

  textOutput:{
    backgroundColor: '#333333',
    margin: 10,
    borderRadius: 2,
    borderWidth: 1,
    borderColor: '#EEEEEE',
    textAlignVertical: 'top',
  }

});
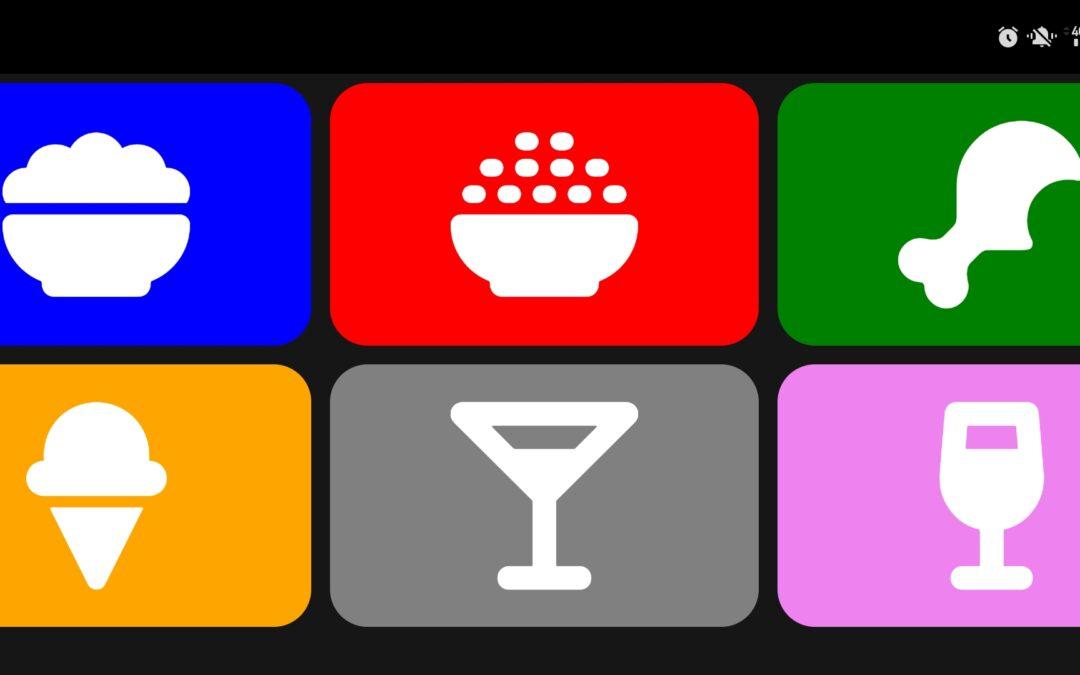
Bonus: Display an Icon on the button
Text can be added or replaced by an icon.
npm install react-native-vector-icons --save
To do this, you need to import each icon bank. Find the icons you want to add and in which bank
import Icon from 'react-native-vector-icons/FontAwesome6';
import IonIcon from 'react-native-vector-icons/Ionicons'
import MaterialIcon from 'react-native-vector-icons/MaterialIcons'
You can then place the Icon object corresponding to the bank containing the icon
<Button>
    <Icon name="ice-cream" size={icon_size} color={'white'} />
</Button>


