,
In this tutorial, we’ll look at how to set up two ESP8266s for communication using the ESP-NOW protocol. The ESP8266 is a development board integrating Bluetooth and WiFi. It can therefore connect and exchange data with devices connected to the same network.
Hardware
- Computer
- NodeMCU ESP8266 or Wemos x2
- USB A Male to Mini B Male cable x2
Description ESP-NOW
ESP-NOW is a communication protocol developed by Espressif, enabling wireless communication between several devices without the need for a specific network. It enables high-speed exchange of small data packets over 2.4GHz frequency bands, up to 200m away. It requires an initial pairing, but once this is done, communication is persistent and establishes itself when the ESP8266 starts up. One of the great advantages of this system, apart from the fact that it uses a dedicated network, is that one or more ESP8266 stations can connect to the Wifi in parallel.
EPS-NOW also enables communication between several ESP8266 and ESP32 cards. All you need to do is adapt the code to the type of card.
Code
To test ESP-NOW communication between two ESP8266 boards, we’ll use the espnow.h library, available when you install the board manager. We will define and send a data structure between the master and slave boards. This structure must be identical between the two boards for the data to be understood correctly.
Sender code
For the sending card to be able to communicate with another ESP8266 card, it needs its MAC address. You can retrieve this address when the receiving card starts up from messages sent using the setup() function (Serial.println(WiFi.macAddress());). We’re going to define a function that runs after a message has been sent to check that the transmission was successful.
Don’t forget to set the role of esp to CONTROLLER in setup: esp_now_set_self_role(ESP_NOW_ROLE_CONTROLLER);
#include <espnow.h>//https://github.com/esp8266/Arduino/blob/master/tools/sdk/include/espnow.h
#include <ESP8266WiFi.h>

uint8_t broadcastAddress[] = {0xDC, 0x4F, 0x22, 0x58, 0xD2, 0xF5};// REPLACE WITH RECEIVER MAC ADDRESS
// Structure example to send data
// Must match the receiver structure
typedef struct struct_message {
 char a[32];
 int b;
 float c;
 String d;
 bool e;
} struct_message;
struct_message myData;

unsigned long previousTime=0;

// callback when data is sent
void OnDataSent(uint8_t *mac_addr, uint8_t status) {
 Serial.print(F("\r\n Master packet sent:\t"));
 Serial.println(status == 0 ? "Delivery Success" : "Delivery Fail");
}
void setup() {
 // Init Serial Monitor
 Serial.begin(115200);
 // Set device as a Wi-Fi Station
 WiFi.mode(WIFI_STA);
 // Init ESP-NOW
 if (esp_now_init() != 0) {
   Serial.println(F("Error initializing ESP-NOW"));
   return;
 }
 Serial.print(F("\nReciever initialized : "));
 Serial.println(WiFi.macAddress());

 // Define Send function
 esp_now_set_self_role(ESP_NOW_ROLE_CONTROLLER);
 esp_now_register_send_cb(OnDataSent);
 // Register peer
 esp_now_add_peer(broadcastAddress, ESP_NOW_ROLE_SLAVE, 1, NULL, 0);
}
void loop() {
  if((millis() -previousTime)>1000){
     // Set values to send
     strcpy(myData.a, "data type char");
     myData.b = random(1, 20);
     myData.c = 1.2;
     myData.d = "hello";
     myData.e = false;
     // Send message via ESP-NOW
     uint8_t result = esp_now_send(broadcastAddress, (uint8_t *) &myData, sizeof(myData));
     if (result == 0) {
       Serial.println(F("Sent with success"));
     }
     else {
       Serial.println(F("Error sending the data"));
     }
     previousTime=millis();
  }
}
Receiver code
In the receiver code, we’ll create a function that runs when a message is received. This function is used to process the information received. In this example, we display the data contained in the structure.
Don’t forget to define the role of esp as SLAVE in the setup: esp_now_set_self_role(ESP_NOW_ROLE_SLAVE);
#include <espnow.h>// https://github.com/esp8266/Arduino/blob/master/tools/sdk/include/espnow.h
#include <ESP8266WiFi.h>

// Structure example to receive data
// Must match the sender structure
typedef struct struct_message {
 char a[32];
 int b;
 float c;
 String d;
 bool e;
} struct_message;
struct_message myData;
// callback when data is received
void OnDataRecv(uint8_t * mac, uint8_t *incomingData, uint8_t len) {
 memcpy(&myData, incomingData, sizeof(myData));
 Serial.print("Bytes received: ");
 Serial.println(len);
 Serial.print("Char: ");
 Serial.println(myData.a);
 Serial.print("Int: ");
 Serial.println(myData.b);
 Serial.print("Float: ");
 Serial.println(myData.c);
 Serial.print("String: ");
 Serial.println(myData.d);
 Serial.print("Bool: ");
 Serial.println(myData.e);
 Serial.println();
}
void setup() {
 // Initialize Serial Monitor
 Serial.begin(115200);
 // Set device as a Wi-Fi Station
 WiFi.mode(WIFI_STA);
 // Init ESP-NOW
 if (esp_now_init() != 0) {
   Serial.println("Error initializing ESP-NOW");
   return;
 }
 Serial.print(F("\nReciever initialized : "));
 Serial.println(WiFi.macAddress());
 // Define receive function
 esp_now_set_self_role(ESP_NOW_ROLE_SLAVE);
 esp_now_register_recv_cb(OnDataRecv);
}
void loop() {
}
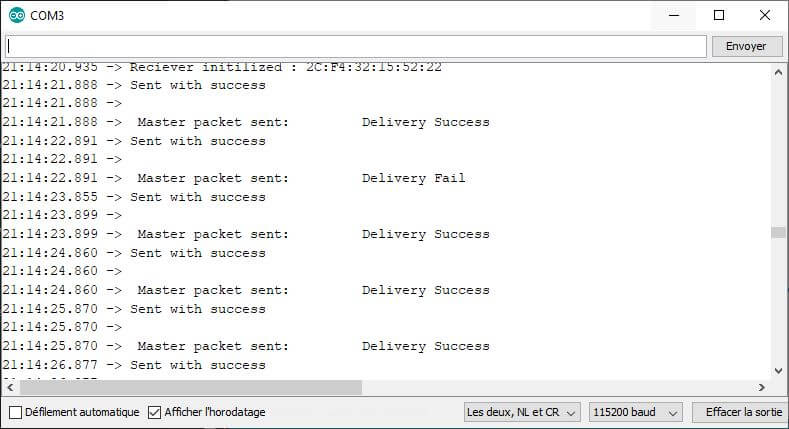
When you upload the code for the first time, pay close attention to the setup message containing the receiver’s MAC address. You need to place it in the transmitter code to ensure successful pairing and communication.
Results
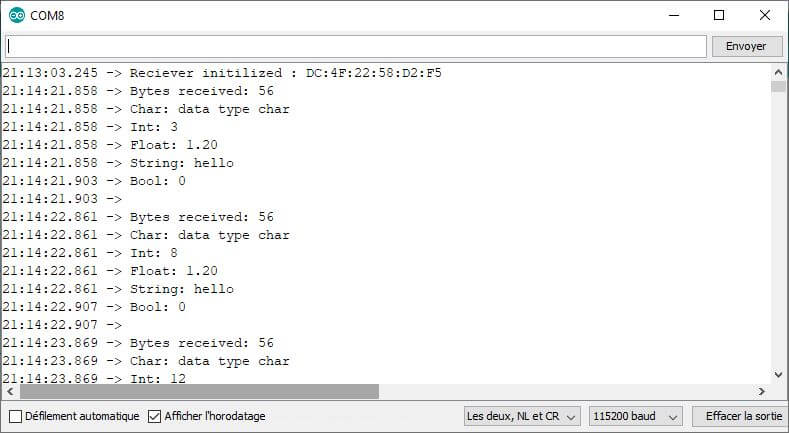
Once the MAC address of the receiving card has been defined and the codes uploaded to each card, communication is established and the structure is sent and decrypted correctly.
Bonus: Bidirectional communication between two ESP8266s
We’ve seen how to send data from one card to another using the ESP-NOW protocol. Now we’ll see how, by slightly modifying the codes, we can obtain two-way communication.
Code Transceiver
#include <espnow.h>//https://github.com/esp8266/Arduino/blob/master/tools/sdk/include/espnow.h
#include <ESP8266WiFi.h>

const char nom[10]="Master"; //or slave
uint8_t broadcastAddress[] = {0xDC, 0x4F, 0x22, 0x58, 0xD2, 0xF5};// REPLACE WITH OTHER STATION MAC ADDRESS

// Structure example to send data
// Must match the receiver structure
typedef struct struct_message {
  char a[32];
  int b;
  bool c;
} struct_message;
struct_message dataSent;
struct_message dataRcv;

unsigned long previousTime=0;

// callbacks for sending and receiving data
void OnDataSent(uint8_t *mac_addr, uint8_t status) {
  Serial.print("\r\n"+String(nom)+" packet sent:\t");
  Serial.println(status == 0 ? "Delivery Success" : "Delivery Fail");
}

void OnDataRecv(uint8_t * mac, uint8_t *incomingData, uint8_t len) {
  memcpy(&dataRcv, incomingData, sizeof(dataRcv));
  Serial.print("\r\nBytes received: ");
  Serial.println(len);
  Serial.print("From: ");
  Serial.println(dataRcv.a);
  Serial.print("Sensor: ");
  Serial.println(dataRcv.b);
  Serial.print("Status: ");
  Serial.println(dataRcv.c);
  Serial.println();
}
void setup() {
  // Init Serial Monitor
  Serial.begin(115200);

  // Set device as a Wi-Fi Station
  WiFi.mode(WIFI_STA);

  // Init ESP-NOW
  if (esp_now_init() != 0) {
    Serial.println(F("Error initializing ESP-NOW"));
    return;
  }
  Serial.print(F("Reciever initialized : "));
  Serial.println(WiFi.macAddress());

  // Define callback functions
  esp_now_set_self_role(ESP_NOW_ROLE_CONTROLLER); //ESP_NOW_ROLE_SLAVE if slave
  esp_now_register_send_cb(OnDataSent);
  esp_now_register_recv_cb(OnDataRecv);

  // Register peer
  esp_now_add_peer(broadcastAddress, ESP_NOW_ROLE_SLAVE, 1, NULL, 0); //ESP_NOW_ROLE_CONTROLLER if slave
}

void loop() {
  if((millis() -previousTime)>1000){
    // Set values to send
    strcpy(dataSent.a, nom);
    dataSent.b = random(100, 200);
    dataSent.c = false;

    // Send message via ESP-NOW
    uint8_t result = esp_now_send(broadcastAddress, (uint8_t *) &dataSent, sizeof(dataSent));

    previousTime=millis();
  }
}
N.B.: To obtain the same code for sender and receiver, we use the same data structure for both sent and received messages. It is possible to define different structures depending on the origin of the message. Bear in mind, however, that the receiving card needs to know the structure of the received message to be able to decrypt it.
- name of the station name[10] (Optional)
- argument to the esp_now_set_self_role function
- argument to the esp_now_add_peer function
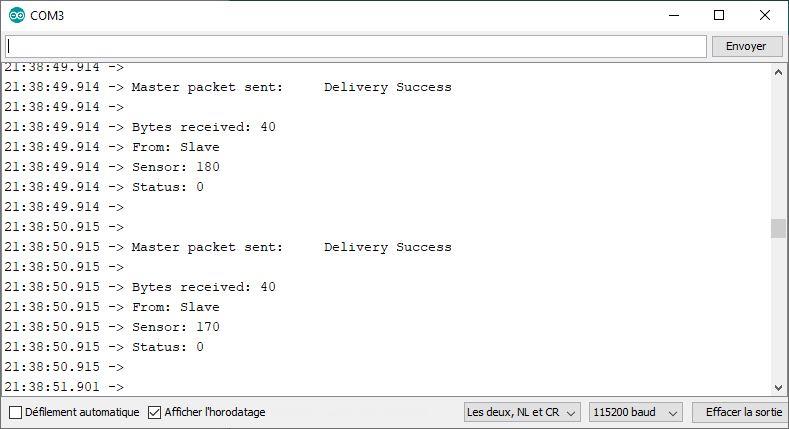
Results
Using the same code, with a few slight modifications, it is possible to establish bidirectional communication between two ESP8266