One of the main objectives of robotics is to articulate objects. And to do this, we can also act on the articulation of objects via user action directly on the system. In this article, we’ll look at how to program the Arduino board to drive servo motors with a joystick.
Prerequisites: Controlling a servomotor with Arduino, Using a joystick with Arduino
Hardware
- Computer
- Arduino Nano board
- USB cable to connect Arduino board to PC
- 4x female cables
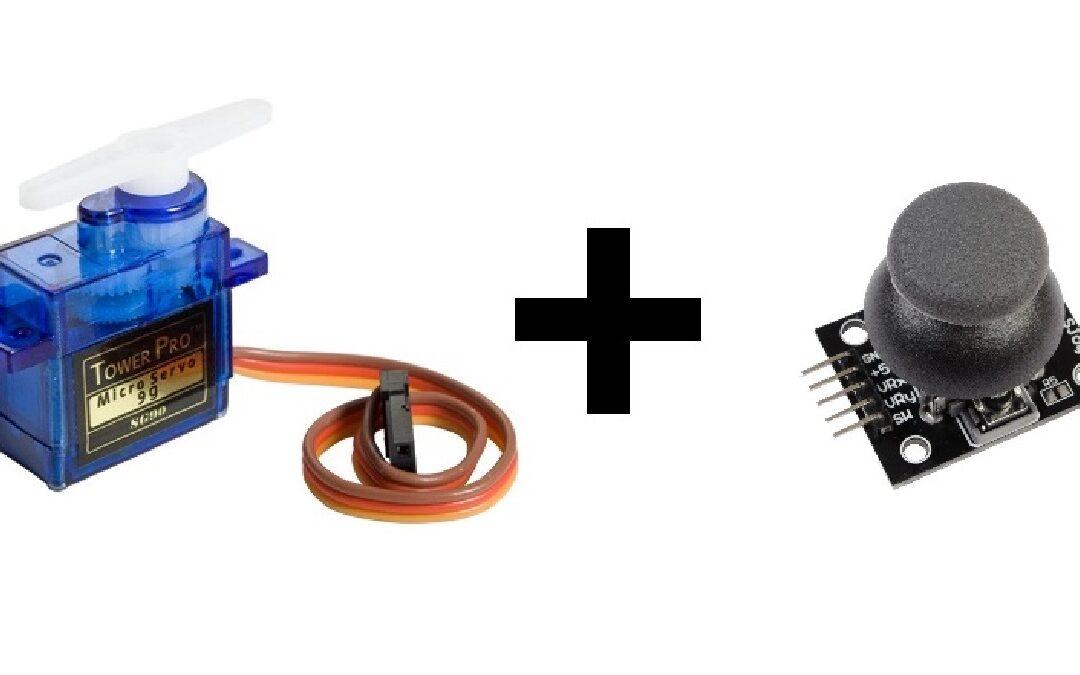
- 2x servomotor SG90 9G
- 1x Modulo KYO-23 joystick
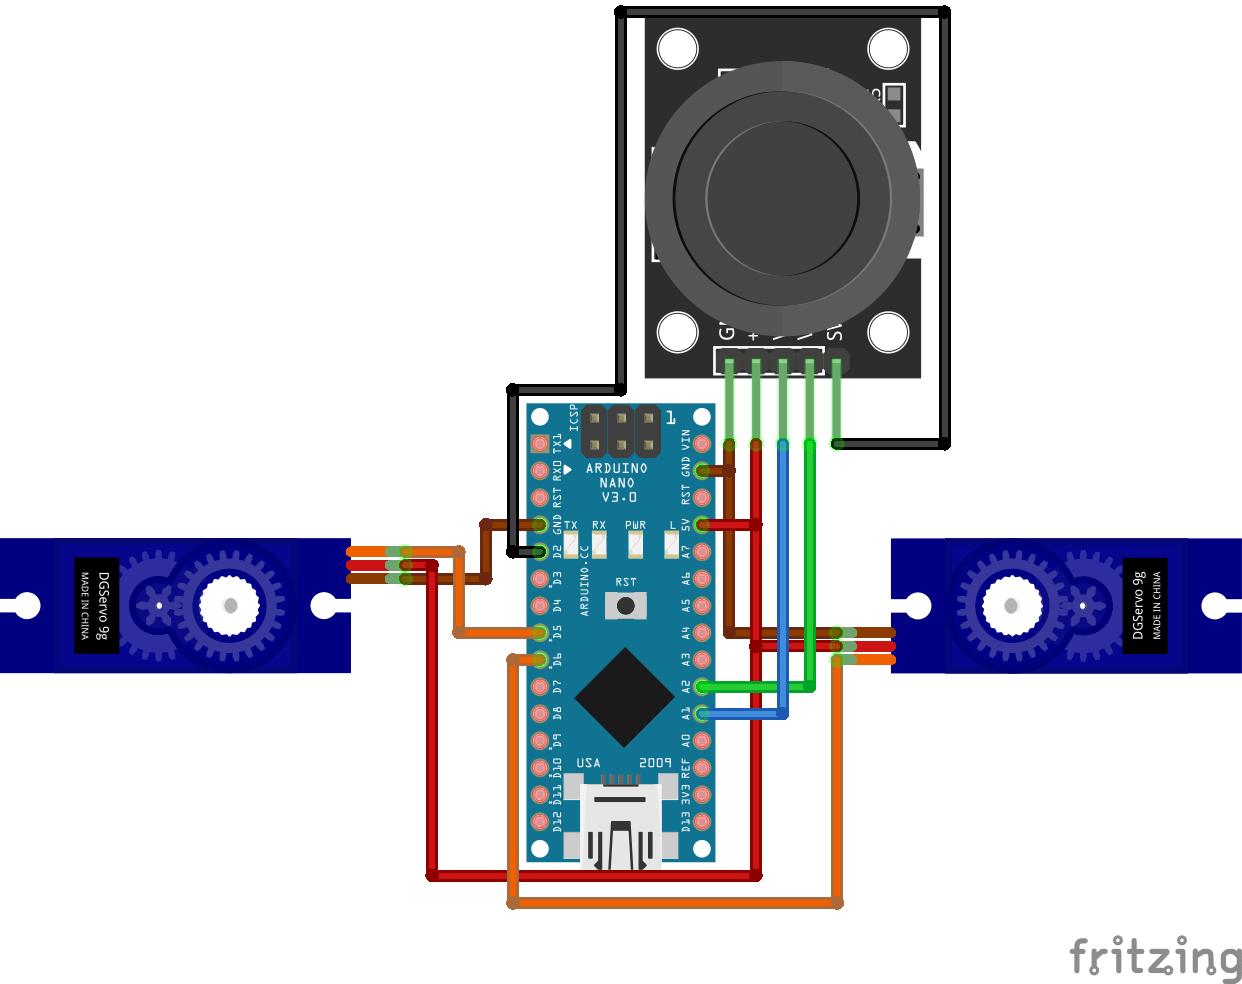
Connection diagram
The servomotors are supplied with voltage across the brown wires of the common ground (GND) and the red wires of the voltage source (5V). Here, they are connected directly to the Arduino Nano’s 5V voltage source, and are driven by PWM signals sent to the orange wires (terminal 5 and terminal 6). The joystick, also powered by a 5V voltage and common ground (GND), returns two analog values that we’ll connect to the microcontroller’s analog inputs. It also returns a digital value which we connect to pin 2 of the microcontroller.
Explanations and Code
We’re going to program the Arduino Nano board so that the Joystick directs the direction of rotation of the motors. To do this, we’ll interpret our 2 servo-motor connection as 2 motorized wheels whose direction depends on 2 analog values returned by the Joystick. These two values correspond to the Joystick’s YX coordinates, each ranging from 0 to 1023. To understand the logic of our program, we can represent it with a diagram on a YX plane:

Here, we can see that the Joystick coordinates correspond to system states, which in turn correspond to directives for controlling our servo-motors.
This joystick has a built-in pushbutton, which we’ll simply program to display a message when pressed. To control the servomotors, we’ll use the ServoLib.h library (which can be found at the end of this article).
// headers for library
#include <Arduino.h> //only used on PlatformIO IDE on VSCode. Not needed on Arduino IDE.
#include <ServoLib.h>

// function's prototypes used
void printing_results(int x, int y);
void motor_joystick_controlled(int xValue,int yValue);
void MotorAvancer();
void MotorReculer();
void MotorDroite();
void MotorGauche();
void MotorAvancerDroite();
void MotorAvancerGauche();
void MotorReculerDroite();
void MotorReculerGauche();
void MotorStop();

// declaration of pins used
#define joyX A1
#define joyY A2
const int joyBtn  = 2;

// Motors definition
ServoLib motorG;
const int motorGPin = 5;
const int motorGZero = 1500;
ServoLib motorD;
const int motorDPin = 6;
const int motorDZero = 1400;

// Variables
int Power = 400; //Motor velocity

// initialization
void setup()
{
  Serial.begin(9600); // open to communicate via serial port
  motorG.associePin(motorGPin);// pins assignment ...
  motorD.associePin(motorDPin);// ... for right and left motors
  pinMode(joyBtn,INPUT_PULLUP); // button initialization (TOR = 0 or 1)
  MotorStop(); // stop motors as initial state
}

// main loop
void loop()
{
  int xValue = analogRead(joyX); // read joystick ...
  int yValue = analogRead(joyY); // ... position
  printing_results(xValue, yValue); // display of Joystick coordinates
  motor_joystick_controlled(xValue,yValue); // definition of the state of the motors
                                            //according to the coordinates of the joystick
}

// function to display the position of the joystick as well as the state of the button if pressed
void  printing_results(int x, int y) // only used for debugging/monitoring the response of the joystick
{ Serial.print(x);
  Serial.print("\t");
  Serial.println(y);
  if (!digitalRead(joyBtn))
  {Serial.println(F("Joy Button pressed"));}//if the button is pressed, display "Joy Button pressed"
}

// motor status montoring function based on XY coordinates
void motor_joystick_controlled(int xValue,int yValue)
{
  if(639<xValue && 382<yValue && yValue<639)
  { MotorAvancer();
    Serial.println(F("avancer"));} //only used for debugging/monitoring the state of the motors

  else if(xValue<382 && 382<yValue && yValue<639)
  { MotorReculer();
    Serial.println(F("reculer"));} //only used for debugging/monitoring the state of the motors

  else if(382<xValue && xValue<639 && 639<yValue)
  { MotorDroite();
    Serial.println(F("tourner vers la droite"));} //only used for debugging/monitoring the state of the motors

  else if(382<xValue && xValue<639 && yValue<382)
  { MotorGauche();
    Serial.println(F("tourner vers la gauche"));} //only used for debugging/monitoring the state of the motors

  else if(639<xValue && 639<yValue)
  { MotorAvancerDroite();
    Serial.println(F("avancer et tourner a droite"));} //only used for debugging/monitoring the state of the motors

  else if(639<xValue && yValue<382)
  { MotorAvancerGauche();
    Serial.println(F("avancer et tourner a gauche"));}//only used for debugging/monitoring the state of the motors

  else if(xValue<382 && 639<yValue)
  { MotorReculerDroite();
    Serial.println(F("reculer et tourner à droite"));}//only used for debugging/monitoring the state of the motors

  else if(xValue<382 && yValue<382)
  { MotorReculerGauche();
    Serial.println(F("reculer et tourner a gauche"));}//only used for debugging/monitoring the state of the motors

  else
  { MotorStop();
    Serial.println(F("arret totale"));}//only used for debugging/monitoring the state of the motors
}

// function for forward state
void MotorAvancer()
{ motorG.appliquerImpulsion(motorGZero + Power);
  motorD.appliquerImpulsion(motorDZero - Power);}

// function for backward state
void MotorReculer()
{ motorG.appliquerImpulsion(motorGZero - Power);
  motorD.appliquerImpulsion(motorDZero + Power);}

// function for turn right state
void MotorDroite()
{ motorG.appliquerImpulsion(motorGZero + Power);
  motorD.appliquerImpulsion(motorDZero + Power);}

// function for turn left state
void MotorGauche()
{ motorG.appliquerImpulsion(motorGZero - Power);
  motorD.appliquerImpulsion(motorDZero - Power);}

// function for turn right and forward state
void MotorAvancerDroite()
{ motorG.appliquerImpulsion(motorGZero + Power);
  motorD.appliquerImpulsion(motorDZero);}

// function for turn left and forward state
void MotorAvancerGauche()
{ motorG.appliquerImpulsion(motorGZero);
  motorD.appliquerImpulsion(motorDZero - Power);}

// function for turn right and backward state
void MotorReculerDroite()
{ motorG.appliquerImpulsion(motorGZero - Power);
  motorD.appliquerImpulsion(motorDZero);}

// function for turn left and backward state
void MotorReculerGauche()
{ motorG.appliquerImpulsion(motorGZero);
  motorD.appliquerImpulsion(motorDZero + Power);}

// function for stop state
void MotorStop()
{ digitalWrite(motorDPin,LOW);
  digitalWrite(motorGPin,LOW);}
Results
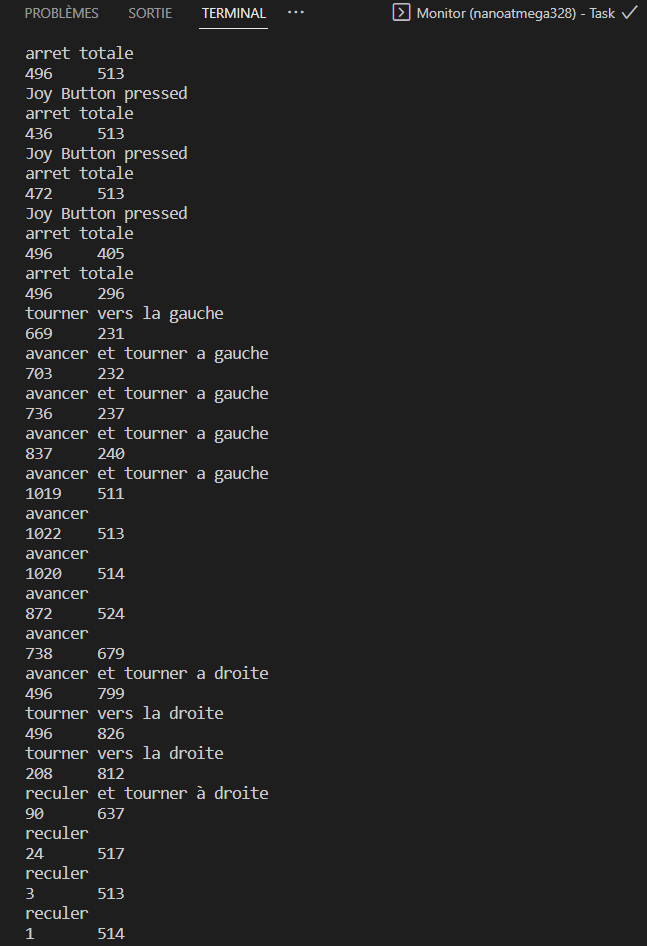
Once the code has been loaded into the microcontroller, you should see the values of X and Y evolve according to the position of the joystick, as well as the states of the corresponding motors and the message displayed when the button is pressed, on the serial port.
ServoLib.h library
To use this library, you need to create and place the following files in a folder created in the library directory of your programming software:
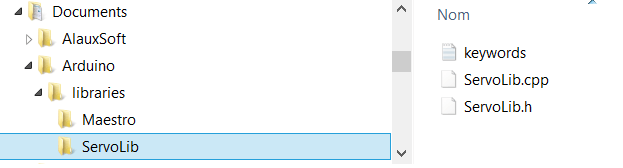
If you program in ¨Visual Studio Code with PlatformIO IDE, you will find your project library here: DocumentsPlatformIO\Projects\Servo_Joystick_Control\lib\ServoLib
ServoLib.cpp file :
//Librairie
#include <Servo.h>
//Déclaration des constantes
#define UPDATE_TIME 15
#define MAX_POS 180
#define MIN_POS 0
//Déclaration des paramètres
int servoPin = 9;
int pulse = 1500;
//Déclaration des variables
Servo myServo;  // création d'un objet Servo
// Sur la plupart des cartes, on peut créer jusqu'à douze objets
int pos=0;    // variable contenant la position du servomoteur
void setup() {
  myServo.attach(servoPin);
}
void loop() {
  for (pos = MIN_POS; pos <= MAX_POS; pos += 1) {
    myServo.write(pos);
    delay(UPDATE_TIME);
  }
  for (pos = MAX_POS; pos >= MIN_POS; pos -= 1) {
    myServo.write(pos);
    delay(UPDATE_TIME);
  }
}
ServoLib.h file :
#include <ServoLib.h>
ServoLib::ServoLib(){}
void ServoLib::associePin(int pin){
  servoPin=pin;
  pinMode(servoPin,OUTPUT);
}
void ServoLib::envoiePosition(int value){
  int pulse=0;
  if (value<MIN_POS)
    value=MIN_POS;
  else if (value>MAX_POS)
    value=MAX_POS;
  value=map(value,MIN_POS,MAX_POS,MIN_PULSE_WIDTH,MAX_PULSE_WIDTH);
  pulse=this->convertirAngleEnImpulsion(value);
  this->appliquerImpulsion(pulse);
}
void ServoLib::appliquerImpulsion(int pulse){
  digitalWrite(servoPin,HIGH);
  delayMicroseconds(pulse);
  digitalWrite(servoPin,LOW);
  delay(UPDATE_TIME);
}
int ServoLib::convertirAngleEnImpulsion(int ang){
  float a = 2500/180;
  float b = 500;
  return int(a*ang+b);
}
The keyword.txt file is optional. It is used to modify the color of function names in the program.
#######################################
# Syntax Coloring Map ServoLib
#######################################
#######################################
# Datatypes (KEYWORD1)
#######################################
ServoLib  KEYWORD1  ServoLib
#######################################
# Methods and Functions (KEYWORD2)
#######################################
associePin KEYWORD2
envoiePosition  KEYWORD2
convertirAngleEnImpulsion KEYWORD2
appliquerImpulsion KEYWORDS2
#######################################
# Constants (LITERAL1)
#######################################
UPDATE_TIME LITERAL1
MIN_POS LITERAL1
MAX_POS LITERAL1
MIN_PULSE_WIDTH LITERAL1
MAX_PULSE_WIDTH LITERAL1
Applications
- Create a remote control to drive your microcontroller
- Use one or more joysticks to control a robot arm articulated by servomotors


