In this tutorial we will see how to build a graphical interface with Processing. There are several tools to create a graphical interface:
- programming language (C, C++, Python, Java, etc.)
- Web language (HTML/CSS/PHP/Javascript)
- Software (LabView, Processing, etc.)
The Processing software uses a language similar to that of Arduino and allows to create software for PC or application for smartphone. This makes it a very powerful and easy to use tool when you already work with Arduino.
Installation of Processing
Go to the Processing.org download site and download the version that fits your computer.
You can then unzip the zip archive to the location where you want to save the software. In the unzipped folder you will find an executable EXE file. Double click on this file to open Processing.
Simple Code
As for Arduino, we will use a setup function that will be executed only once at the start of the program and a draw function that will be executed in a loop like the loop() function. Natively, there are functions to manage the software window, to display text or images, to create geometrical shapes and to manage the keyboard and mouse interactions.
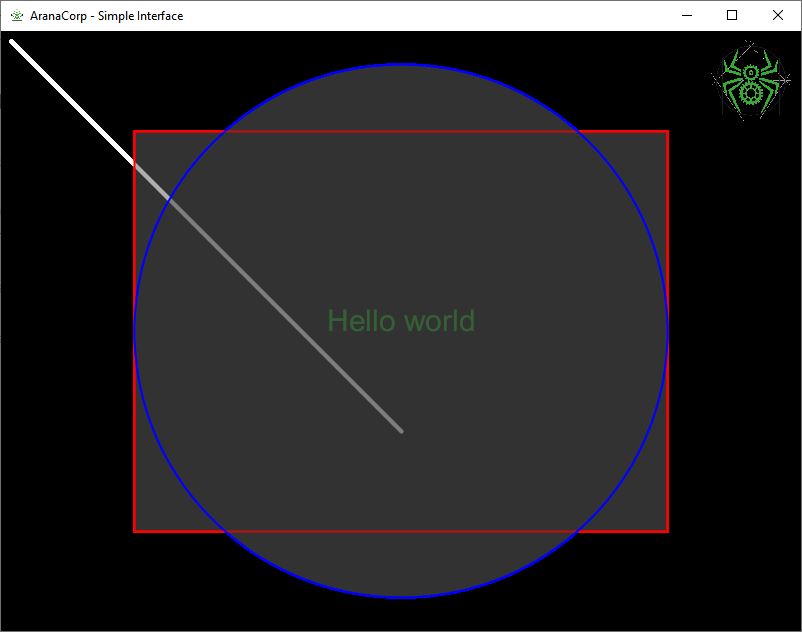
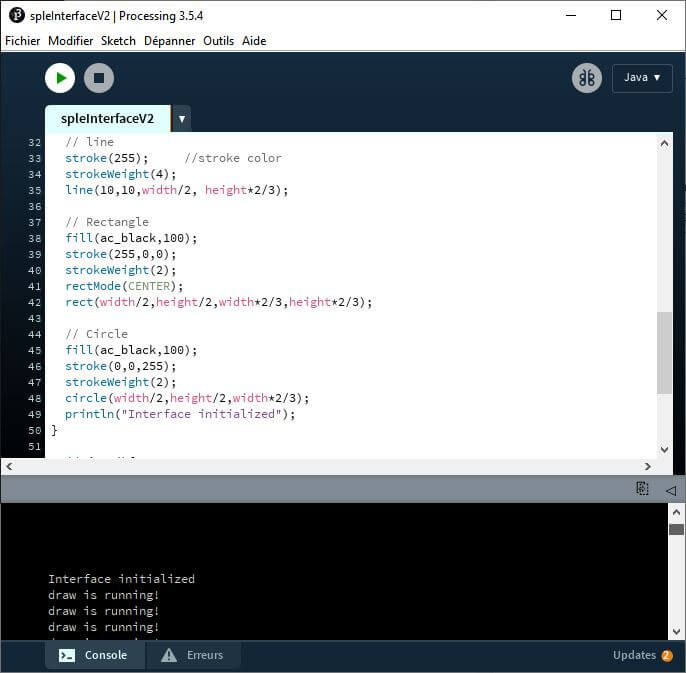
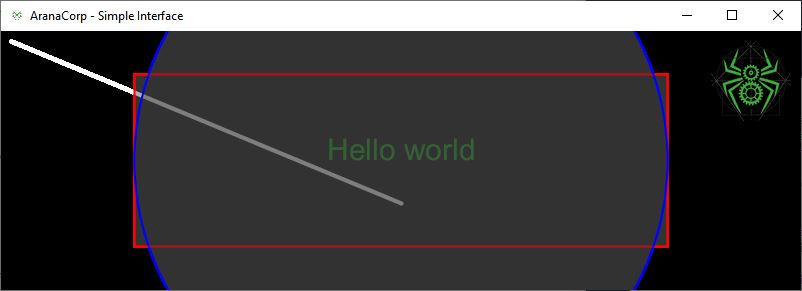
color ac_black=color(51,51,51);
color ac_green=color(58,170,53);

PFont f1;
PImage logo;

void setup()
{

  size(800, 600);   // set the window size

  surface.setTitle("AranaCorp - Simple Interface"); // set window title
  background(0); // set background to black
  //background(ac_black); // set background to color color
  smooth();

  logo = loadImage("https://www.aranacorp.com/wp-content/uploads/logo-100.png");
  //logo = loadImage("/img/logo-araignee1-RVB-72dpi.png");
  surface.setIcon(logo); //ad app icone

  image(logo,width-100,0,100,100); //add image

  // text
  f1 = createFont("Arial",30,true);
  textFont(f1);
  fill(ac_green);
  textAlign(CENTER); //RIGHT LEFT
  text("Hello world",width/2,height/2);


  // line
  stroke(255);     //stroke color
  strokeWeight(4);
  line(10,10,width/2, height*2/3);

  // Rectangle
  fill(ac_black,100);
  stroke(255,0,0);
  strokeWeight(2);
  rectMode(CENTER);
  rect(width/2,height/2,width*2/3,height*2/3);

  // Circle
  fill(ac_black,100);
  stroke(0,0,255);
  strokeWeight(2);
  circle(width/2,height/2,width*2/3);
  println("Interface initialized");
}

void draw(){
  println("draw is running!");
  delay(500);
}
Result
Create a responsive interface
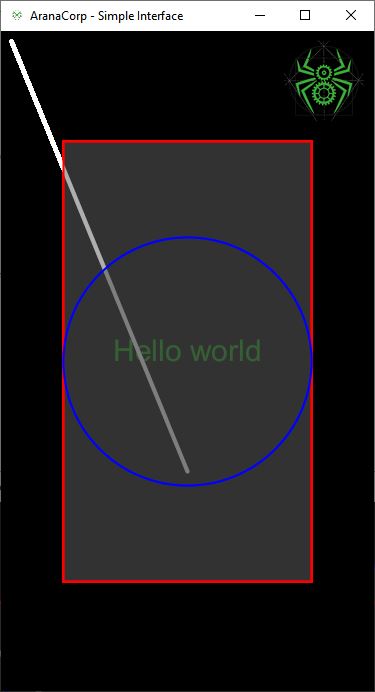
In the previous interface, the window dimensions are fixed. If you want to be able to change the window dimensions and have the interface appear correctly, you will have to make a responsive design! To do this, the critical dimensions must be defined according to the dimensions of the window width and height. Moreover, the code defining the shapes must be placed in the draw() function in order to take into account the change of dimensions.
Code Responsive
color ac_black=color(51,51,51);
color ac_green=color(58,170,53);

PFont f1;
PImage logo;

void setup()
{

  size(800, 600);   // set the window size
  surface.setResizable(true);
  surface.setTitle("AranaCorp - Simple Interface"); // set window title
  background(0); // set background to black
  //background(ac_black); // set background to color color
  smooth();

  logo = loadImage("https://www.aranacorp.com/wp-content/uploads/logo-100.png");
  //logo = loadImage("/img/logo-araignee1-RVB-72dpi.png");

  println("Interface initialized");
}

void draw(){
  drawInterface();
  println("width : "+str(width));
  println("height : "+str(height));

}

void drawInterface(){
  surface.setIcon(logo); //ad app icone

  image(logo,width-100,0,100,100); //add image

  // text
  f1 = createFont("Arial",30,true);
  textFont(f1);
  fill(ac_green);
  textAlign(CENTER); //RIGHT LEFT
  text("Hello world",width/2,height/2);


  // line
  stroke(255);     //stroke color
  strokeWeight(4);
  line(10,10,width/2, height*2/3);

  // Rectangle
  fill(ac_black,100);
  stroke(255,0,0);
  strokeWeight(2);
  rectMode(CENTER);
  rect(width/2,height/2,width*2/3,height*2/3);

  // Circle
  fill(ac_black,100);
  stroke(0,0,255);
  strokeWeight(2);
  circle(width/2,height/2,width*2/3);
}
Result
If you change the size of the window, the geometric shapes change size and position as well. The size of the text and the image are not modified because they do not depend on the size of the window.
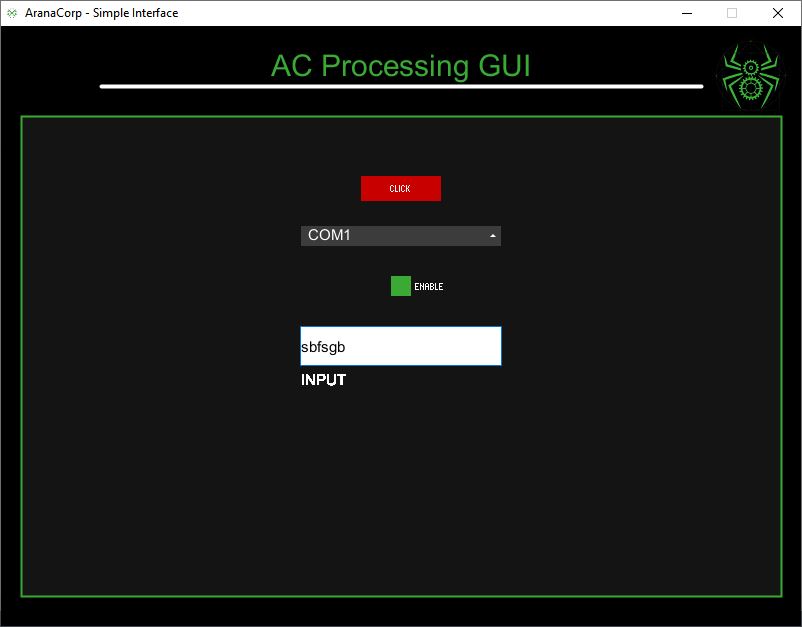
Using the controlP5 library
To create an interface with buttons or text boxes, you can create your own objects with classes. There are libraries to simplify your life like the ControlP5 library which contains widgets.
- button
- text area
- drop-down menu
- checkbox
import controlP5.*;
ControlP5 cp5;

color ac_black=color(51, 51, 51);
color ac_green=color(58, 170, 53);

PFont f1, f2;
PImage logo;

Button btn;
ScrollableList sl;
CheckBox chck;
Textfield txt;

void setup()
{
  cp5 = new ControlP5(this);
  size(800, 600);   // set the window size
  surface.setTitle("AranaCorp - Simple Interface"); // set window title

  logo = loadImage("https://www.aranacorp.com/wp-content/uploads/logo-100.png");
  //logo = loadImage("/img/logo-araignee1-RVB-72dpi.png");

  f1 = createFont("Arial", 30, true);
  f2 = createFont("Arial", 15, true);

  drawInterface();
  drawWidgets();

  println("Interface initialized");
}

void draw() {

}

void drawInterface() {
  background(0); // set background to black
  //background(ac_black); // set background to color color
  smooth();

  surface.setIcon(logo); //ad app icone

  image(logo, width-100, 0, 100, 100); //add image

  // text
  textFont(f1);
  fill(ac_green);
  textAlign(CENTER); //RIGHT LEFT
  text("AC Processing GUI", width/2, 50);

  // line
  stroke(255);     //stroke color
  strokeWeight(4);
  line(100, 50+10, width-100, 50+10);

  // Rectangle
  fill(ac_black, 100);
  stroke(ac_green);
  strokeWeight(2);
  rectMode(CENTER);
  rect(width/2, height/2+30, width-40, height-120);
}

void drawWidgets() {
  // Button
  fill(ac_black, 100);
  stroke(ac_green);
  strokeWeight(2);
  btn=cp5.addButton("Click")
    .setValue(26)
    .setPosition(width/2-80/2, 150)
    .setSize(80, 25)
    .setColorBackground( color( 200, 0, 0 ) ) //default color
    .setColorForeground( color( 255, 0, 0 ) ) // mouse-over
    .setColorActive( color(0, 150, 0 ) ); //button pressed

  //Scrollable List
  String clist[]={"COM1", "COM2", "COM3"};
  sl=cp5.addScrollableList("COM")
    .setPosition(width/2.-200/2, 200)
    .setSize(200, 100)
    .addItems(clist)
    .setItemHeight(22)
    .setBarHeight(20)
    .setBackgroundColor(color(190))
    .setColorBackground(color(60))
    .setColorActive(color(255, 128))
    .setFont(f2)
    .close()
    // .setType(ScrollableList.LIST) // currently supported DROPDOWN and LIST
    ;
  sl.getCaptionLabel().getStyle().marginLeft = 3;
  sl.getCaptionLabel().getStyle().marginTop = 3;


  // Checkbox
  chck = cp5.addCheckBox("checkBox")
    .setPosition(width/2-10, 250)
    //.setColorBackground(color(255))
    .setColorForeground(color(255))
    .setColorActive(ac_green)
    .setColorLabel(color(255))
    .setSize(20, 20)
    .setItemsPerRow(1)
    .setSpacingColumn(30)
    .setSpacingRow(20)
    .addItem("enable", 1)
    ;

  // Text field
  txt=cp5.addTextfield("input")
    .setPosition(width/2-100, 300)
    .setSize(200, 40)
    .setFont(f2)
    .setFocus(true)
    .setColorBackground(color(255, 255, 255))
    .setColor(color(0))
    ;
}

public void Click(int theValue) {
  println("a button was clicked: "+theValue);
}

void COM(int n) {
  print("ScrollableList event :  ");
  println(n, cp5.get(ScrollableList.class, "COM").getItem(n).get("name"));

  drawInterface();
}

void checkBox(float[] a) {
  print("Checkbox event :  ");
  println(a);
}

public void input(String theText) {
  // automatically receives results from controller input
  println("a textfield event : "+theText);
}
Interface initialized
ScrollableList event :  0 COM1
ScrollableList event :  2 COM3
Checkbox event :  [0] 1.0
Checkbox event :  [0] 0.0
a textfield event : qegert
a button was clicked: 26
Bonus: Create an executable .EXE file
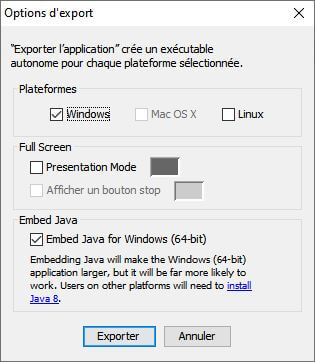
Once your interface is developed, it is easy to compile and share it using the “Export” function of the processing software. To do this go to the “File” menu and select “Export…”. You can then choose the OS you want and if you want to add a Java distribution in the executable.
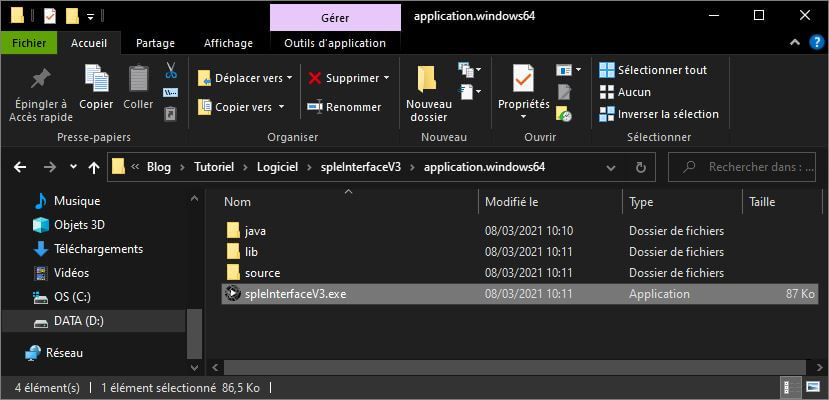
Two folders will appear in the script folder in which there are executables for 32 and 64bit versions of Windows.
This way, you can easily create and share graphical interfaces with Processing.
Applications
- Develop graphical interfaces to communicate via the USB port with Arduino, Raspberry Pi and NodeMCU
- Create smartphone applications and communicate via Bluetooth with Arduino boards
- Create graphical interfaces for wireless communication with Arduino, Raspberry Pi and NodeMCU


It was a great guide for me as a beginner.
Thank you so much.