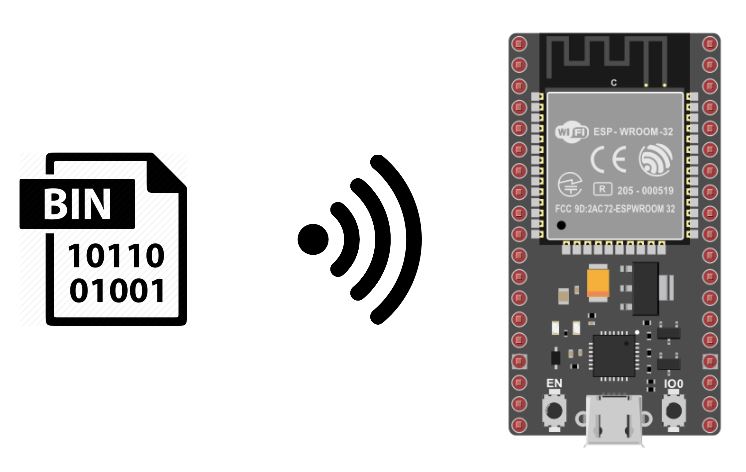
A very practical feature in the IoT field is the ability to program a connected microcontroller, such as an ESP32, via WiFi. This technique is called Over-The-Air (OTA) Programming.
Hardware
- NodeMCU ESP32
- Computer
- WiFi network
Operating principle
In principle, a program is downloaded to the NodeMCU ESP32 via a serial connection to the USB port. The computer communicates the program to the microcontroller. When two devices are connected to the same WiFi network, they can communicate with each other. So you can upload code over the Wifi network without having to connect to each microcontroller.
It is also possible to upload a code to the NodeMCU when it is configured as a Wifi Access Point. In this case, the computer used for programming must be connected to the NodeMCU network. The complete code is given at the end of this tutorial.
Add ArduinoOTA firmware
The ArduinoOTA library is available when you install the ESP32 manager. To enable OTA programming, you need to install the firmware. To do this, you can use the BasicOTA.ino example available in the Arduino IDE.
Be sure to replace ssid and password with your WiFi network credentials.
#include <WiFi.h>
#include <ESPmDNS.h>
#include <WiFiUdp.h>
#include <ArduinoOTA.h>

const char* ssid  = "*******";
const char* password  = "********";

unsigned long previousMillis;

void setup() {
  Serial.begin(115200);
  Serial.println("Booting");
  WiFi.mode(WIFI_STA);
  WiFi.begin(ssid, password);
  while (WiFi.waitForConnectResult() != WL_CONNECTED) {
    Serial.println("Connection Failed! Rebooting...");
    delay(5000);
    ESP.restart();
  }

    // Port defaults to 3232
  // ArduinoOTA.setPort(3232);

  // Hostname defaults to esp3232-[MAC]
  //ArduinoOTA.setHostname("esp3232");

  // No authentication by default
  // ArduinoOTA.setPassword("admin");

  // Password can be set with it's md5 value as well
  // MD5(admin) = 21232f297a57a5a743894a0e4a801fc3
  // ArduinoOTA.setPasswordHash("21232f297a57a5a743894a0e4a801fc3");

  ArduinoOTA
    .onStart([]() {
      String type;
      if (ArduinoOTA.getCommand() == U_FLASH)
        type = "sketch";
      else // U_SPIFFS
        type = "filesystem";

      // NOTE: if updating SPIFFS this would be the place to unmount SPIFFS using SPIFFS.end()
      Serial.println("Start updating " + type);
    })
    .onEnd([]() {
      Serial.println("\nEnd");
    })
    .onProgress([](unsigned int progress, unsigned int total) {
      Serial.printf("Progress: %u%%\r", (progress / (total / 100)));
    })
    .onError([](ota_error_t error) {
      Serial.printf("Error[%u]: ", error);
      if (error == OTA_AUTH_ERROR) Serial.println("Auth Failed");
      else if (error == OTA_BEGIN_ERROR) Serial.println("Begin Failed");
      else if (error == OTA_CONNECT_ERROR) Serial.println("Connect Failed");
      else if (error == OTA_RECEIVE_ERROR) Serial.println("Receive Failed");
      else if (error == OTA_END_ERROR) Serial.println("End Failed");
    });

  ArduinoOTA.begin();

  Serial.println("Ready");
  Serial.print("IP address: ");
  Serial.println(WiFi.localIP());
}

void loop() {
  ArduinoOTA.handle();
}
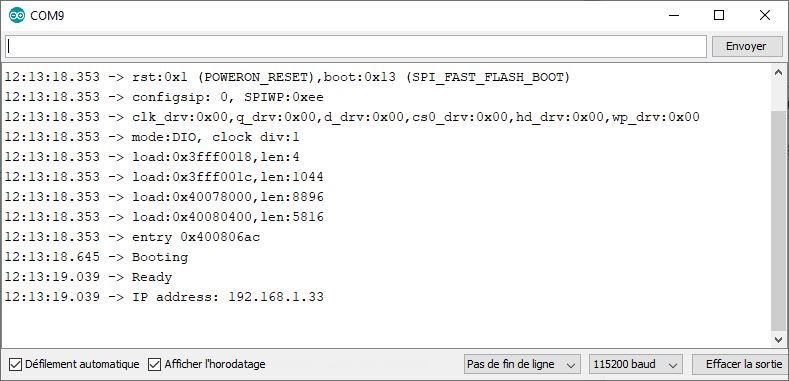
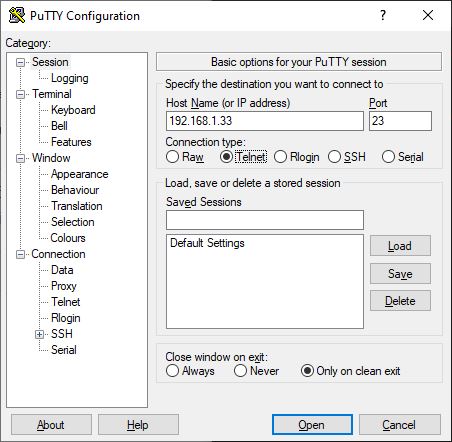
Please note the local IP address of the device (here: 192.168.1.33).
Once this code has been uploaded via serial communication, you will be able to upload code via Wifi. Press the RST or EN button on your ESP and restart the Arduino IDE.
Modify your program before uploading it
We place the initialization code in the initOTA() function. It will then be easy to copy it for other projects. And we’ll add a display on the serial port to check that the code has been modified.
ATTENTION: The ArduinoOTA initialization code must be present in all the code you upload, or you will lose the ability to make aerial transmissions.
#include <WiFi.h>
#include <ESPmDNS.h>
#include <WiFiUdp.h>
#include <ArduinoOTA.h>

const char* ssid  = "******";
const char* password  = "********";

unsigned long previousMillis;

void setup() {
  Serial.begin(115200);
  Serial.println("Booting");
  WiFi.mode(WIFI_STA);
  WiFi.begin(ssid, password);
  while (WiFi.waitForConnectResult() != WL_CONNECTED) {
    Serial.println("Connection Failed! Rebooting...");
    delay(5000);
    ESP.restart();
  }

  initOTA();

  Serial.println("Ready");
  Serial.print("IP address: ");
  Serial.println(WiFi.localIP());
}

void loop() {
  ArduinoOTA.handle();

  if (millis() - previousMillis >= 500) {
    previousMillis = millis();
    Serial.println(F("Code has been update"));
  }
}


void initOTA() {
  // Port defaults to 3232
  // ArduinoOTA.setPort(3232);

  // Hostname defaults to esp3232-[MAC]
  ArduinoOTA.setHostname("ESP32");

  // No authentication by default
  // ArduinoOTA.setPassword("admin");

  // Password can be set with it's md5 value as well
  // MD5(admin) = 21232f297a57a5a743894a0e4a801fc3
  // ArduinoOTA.setPasswordHash("21232f297a57a5a743894a0e4a801fc3");

  ArduinoOTA
  .onStart([]() {
    String type;
    if (ArduinoOTA.getCommand() == U_FLASH)
      type = "sketch";
    else // U_SPIFFS
      type = "filesystem";

    // NOTE: if updating SPIFFS this would be the place to unmount SPIFFS using SPIFFS.end()
    Serial.println("Start updating " + type);
  })
  .onEnd([]() {
    Serial.println("\nEnd");
  })
  .onProgress([](unsigned int progress, unsigned int total) {
    Serial.printf("Progress: %u%%\r", (progress / (total / 100)));
  })
  .onError([](ota_error_t error) {
    Serial.printf("Error[%u]: ", error);
    if (error == OTA_AUTH_ERROR) Serial.println("Auth Failed");
    else if (error == OTA_BEGIN_ERROR) Serial.println("Begin Failed");
    else if (error == OTA_CONNECT_ERROR) Serial.println("Connect Failed");
    else if (error == OTA_RECEIVE_ERROR) Serial.println("Receive Failed");
    else if (error == OTA_END_ERROR) Serial.println("End Failed");
  });

  ArduinoOTA.begin();
}
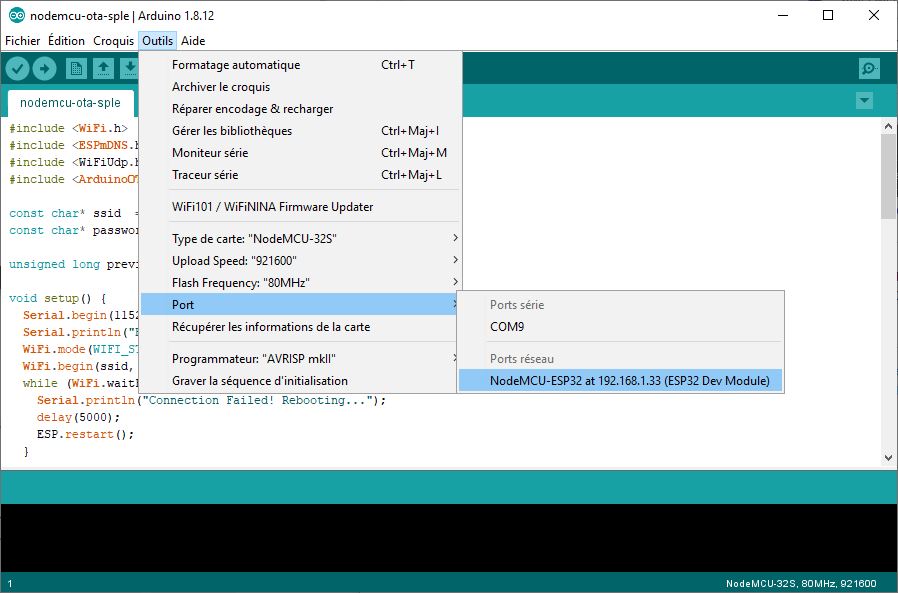
Depois de ter modificado o seu código, em “Ferramenta> Porta”, seleccione a sua placa nas portas de rede. (se a porta de rede não for apresentada, ver o capítulo seguinte)
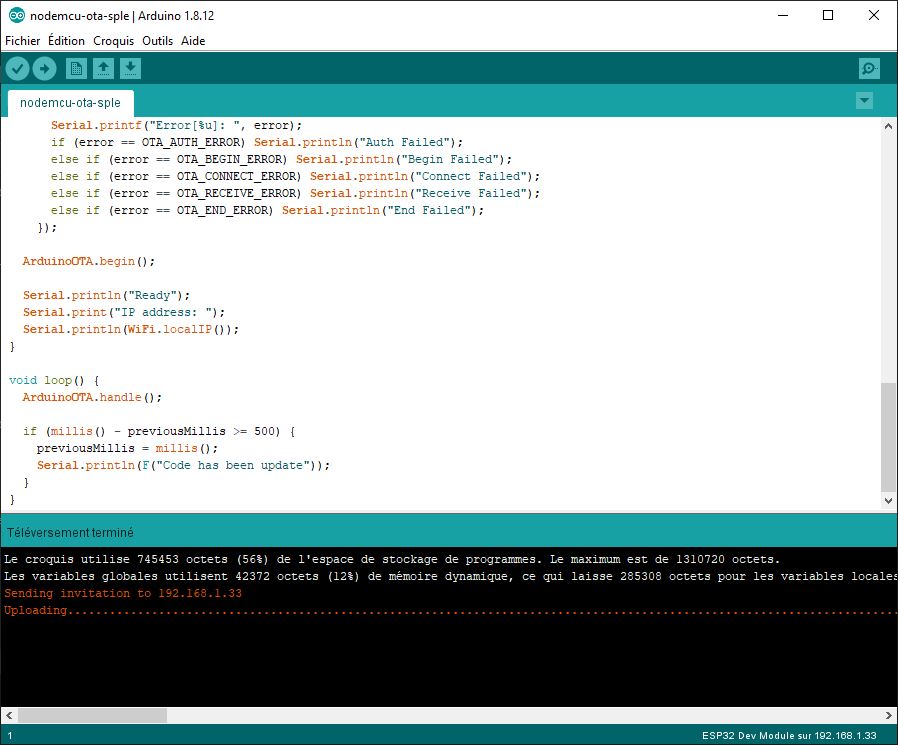
You can then upload your code as you would with serial communication.
Select the serial port again, then open the serial monitor to check that the code has been modified.

If the Network Port is not displayed in the Arduino IDE
If the network port is not present in the Arduino IDE options, you’ll need to perform a little manipulation. You need to go to the Network and Sharing Center
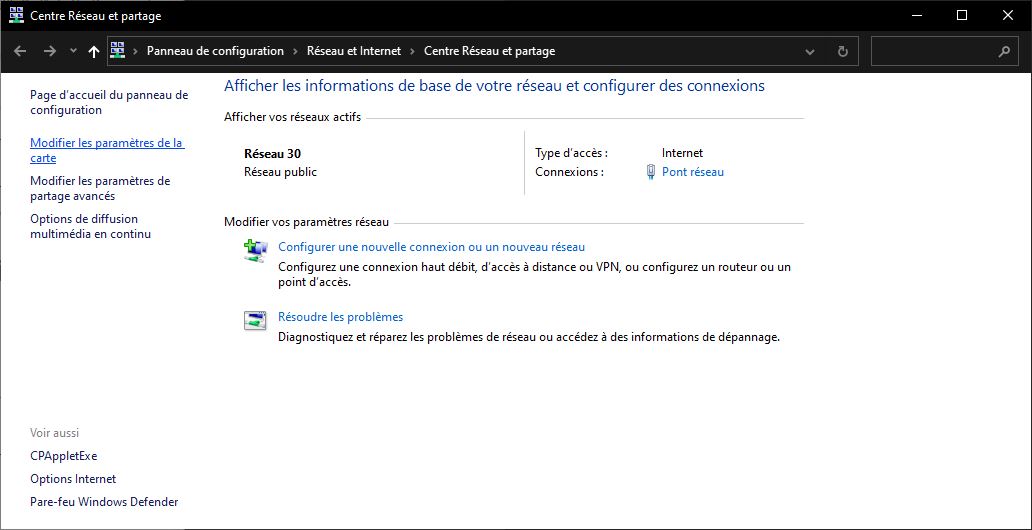
Then go to “Modify card parameters”.
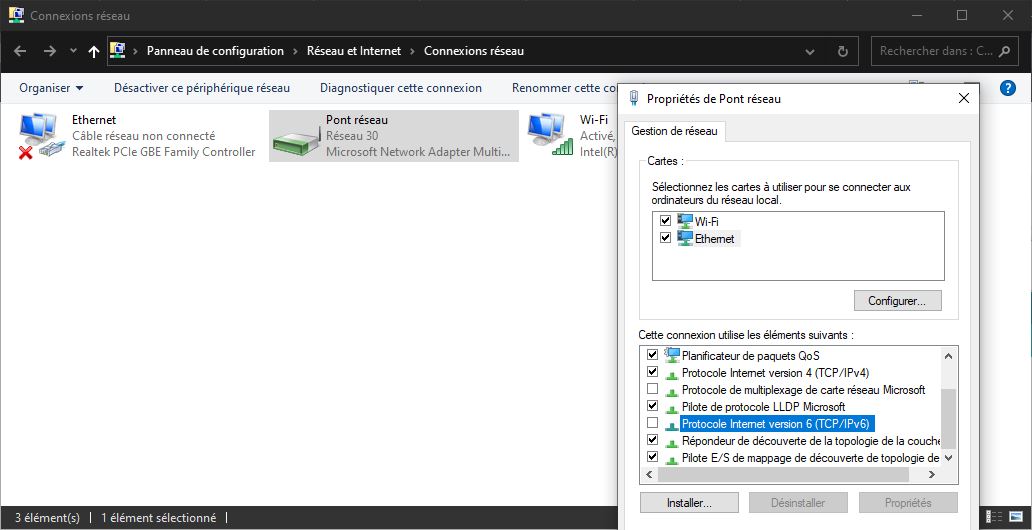
Right-click on your network, then go to properties
You can then uncheck the “Internet Protocol version 6 (TCP)” option.
If you return to the Arduino IDE after restarting it, in “Tool > Port” you should see the network port option displayed.
You can check IPv6 again once your network port is recognized.
Bonus: OTA serial message display
The possibility of uploading a program via WiFi is very welcome, but it’s worth noting that you lose the ability to debug with the serial monitor. A Web interface can be created to display information from the ESP32 NodeMCU.
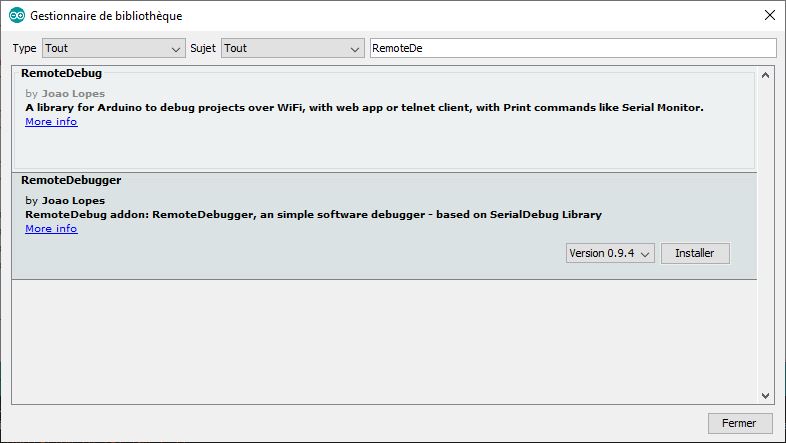
Here we’ll be using the RemoteDebug library to telnet to the microcontroller and retrieve the messages sent.
- Start by installing the library by downloading the ZIP file or via the library manager.
- Create a RemoteDebug Debug object; after including the library
- Initialize the debug with Debug.begin(“ESP32”);
- Then replace all Serial.print with Debug.print
#include <WiFi.h>
#include <ESPmDNS.h>
#include <WiFiUdp.h>
#include <ArduinoOTA.h>
#include <RemoteDebug.h>

const char* ssid  = "*******";
const char* password  = "*******";

RemoteDebug Debug;

unsigned long previousMillis;

void setup() {
  Serial.begin(115200);
  Serial.println("Booting");
  WiFi.mode(WIFI_STA);
  WiFi.begin(ssid, password);
  while (WiFi.waitForConnectResult() != WL_CONNECTED) {
    Serial.println("Connection Failed! Rebooting...");
    delay(5000);
    ESP.restart();
  }

  // init remote debug
  Debug.begin("ESP32");

  initOTA();

  Serial.println("Ready");
  Serial.print("IP address: ");
  Serial.println(WiFi.localIP());
}

void loop() {
  ArduinoOTA.handle();
  Debug.handle();

  if (millis() - previousMillis >= 500) {
    previousMillis = millis();
    Debug.println(F("Code has been update"));
  }
}


void initOTA() {
  // Port defaults to 3232
  // ArduinoOTA.setPort(3232);

  // Hostname defaults to esp3232-[MAC]
  ArduinoOTA.setHostname("ESP32");

  // No authentication by default
  // ArduinoOTA.setPassword("admin");

  // Password can be set with it's md5 value as well
  // MD5(admin) = 21232f297a57a5a743894a0e4a801fc3
  // ArduinoOTA.setPasswordHash("21232f297a57a5a743894a0e4a801fc3");

  ArduinoOTA
  .onStart([]() {
    String type;
    if (ArduinoOTA.getCommand() == U_FLASH)
      type = "sketch";
    else // U_SPIFFS
      type = "filesystem";

    // NOTE: if updating SPIFFS this would be the place to unmount SPIFFS using SPIFFS.end()
    Serial.println("Start updating " + type);
  })
  .onEnd([]() {
    Serial.println("\nEnd");
  })
  .onProgress([](unsigned int progress, unsigned int total) {
    Serial.printf("Progress: %u%%\r", (progress / (total / 100)));
  })
  .onError([](ota_error_t error) {
    Serial.printf("Error[%u]: ", error);
    if (error == OTA_AUTH_ERROR) Serial.println("Auth Failed");
    else if (error == OTA_BEGIN_ERROR) Serial.println("Begin Failed");
    else if (error == OTA_CONNECT_ERROR) Serial.println("Connect Failed");
    else if (error == OTA_RECEIVE_ERROR) Serial.println("Receive Failed");
    else if (error == OTA_END_ERROR) Serial.println("End Failed");
  });

  ArduinoOTA.begin();
}
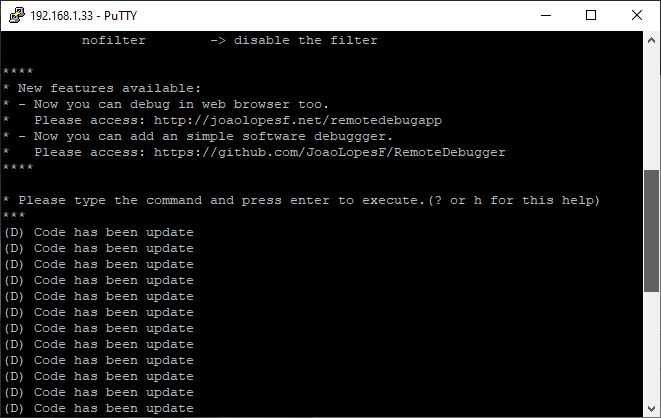
To view messages sent via RemoteDebug, we’re going to use the PuTTy software we’ve seen several times already. For this application, we’ll configure PuTTy via telnet, using the IP address retrieved from the serial monitor.
Bonus 2: OTA programming in Access Point mode
It is possible to use the network created by the NodeMCU ESP32 in Access Point mode. To do this, you can download the following code via the serial port. You’ll then need to connect your computer to the NodeMCU network to download a new code via WiFi.
#include <WiFi.h>
#include <ESPmDNS.h>
#include <WiFiUdp.h>
#include <ArduinoOTA.h>

const char *ssid = "AC-ESP32";
const char *passphrase = "123456789";

IPAddress local_IP(192,168,4,22);
IPAddress gateway(192,168,4,9);
IPAddress subnet(255,255,255,0);

unsigned long previousMillis;
void setup() {
 Serial.begin(115200);
 Serial.println("Booting");

 //AP config
 Serial.print("Setting soft-AP configuration ... ");
 Serial.println(WiFi.softAPConfig(local_IP, gateway, subnet) ? "Ready" : "Failed!");
 Serial.print("Setting soft-AP ... ");
 Serial.println(WiFi.softAP(ssid,passphrase) ? "Ready" : "Failed!");

 initOTA();
 Serial.println("Ready");
 Serial.print("IP address: ");
 Serial.println(WiFi.localIP());
}
void loop() {
 ArduinoOTA.handle();
 if (millis() - previousMillis >= 500) {
   previousMillis = millis();
   Serial.println(F("Code has been update via Wifi"));
 }
}
void initOTA() {
 // Port defaults to 3232
 // ArduinoOTA.setPort(3232);
 // Hostname defaults to esp3232-[MAC]
 ArduinoOTA.setHostname("ESP32");
 // No authentication by default
 // ArduinoOTA.setPassword("admin");
 // Password can be set with it's md5 value as well
 // MD5(admin) = 21232f297a57a5a743894a0e4a801fc3
 // ArduinoOTA.setPasswordHash("21232f297a57a5a743894a0e4a801fc3");
 ArduinoOTA
 .onStart([]() {
   String type;
   if (ArduinoOTA.getCommand() == U_FLASH)
     type = "sketch";
   else // U_SPIFFS
     type = "filesystem";
   // NOTE: if updating SPIFFS this would be the place to unmount SPIFFS using SPIFFS.end()
   Serial.println("Start updating " + type);
 })
 .onEnd([]() {
   Serial.println("\nEnd");
 })
 .onProgress([](unsigned int progress, unsigned int total) {
   Serial.printf("Progress: %u%%\r", (progress / (total / 100)));
 })
 .onError([](ota_error_t error) {
   Serial.printf("Error[%u]: ", error);
   if (error == OTA_AUTH_ERROR) Serial.println("Auth Failed");
   else if (error == OTA_BEGIN_ERROR) Serial.println("Begin Failed");
   else if (error == OTA_CONNECT_ERROR) Serial.println("Connect Failed");
   else if (error == OTA_RECEIVE_ERROR) Serial.println("Receive Failed");
   else if (error == OTA_END_ERROR) Serial.println("End Failed");
 });
 ArduinoOTA.begin();
}


