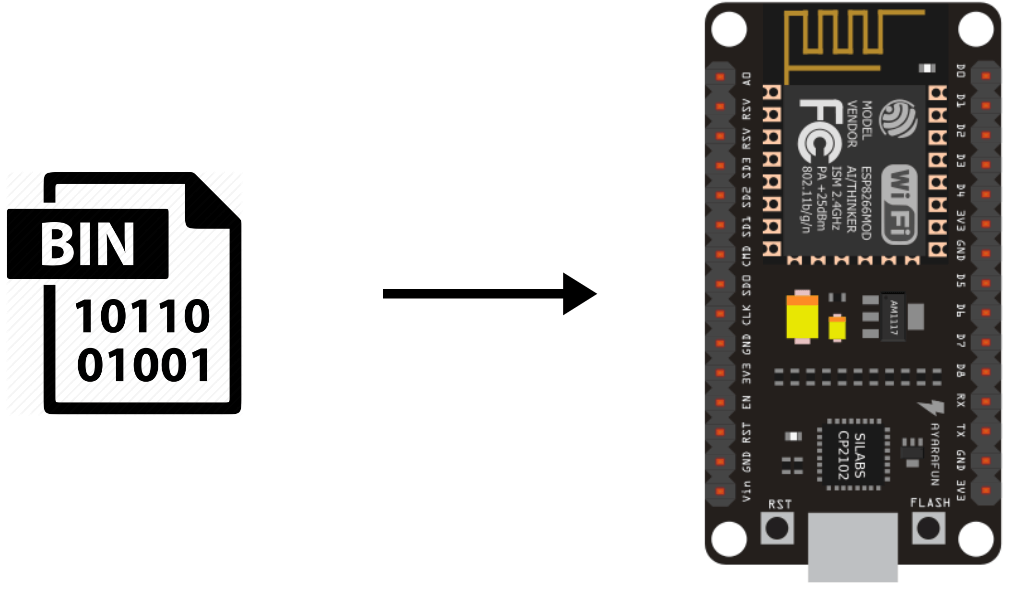
When you have a number of cards to flash with the same program, it can be interesting to flash the compiled BIN file directly into the ESP8266. This has two interests. It saves you time on uploading and it protects your source code if you share the program with others. It gives them the possibility to upload the program on other microcontrollers (in case of failure, for example) without risk of modifying the source code.
You should not need it every day but I will show you the method to generate the BIN file and upload it to an ESP8266 microcontroller. This method can be adapted for other microcontrollers like Arduino and ESP32 with other tools.
Generate the BIN file with the Arduino IDE
In the Arduino software, go to the File menu then Preferences.
Check the boxes “detailed results during” for compilation and upload (Verbose mode)
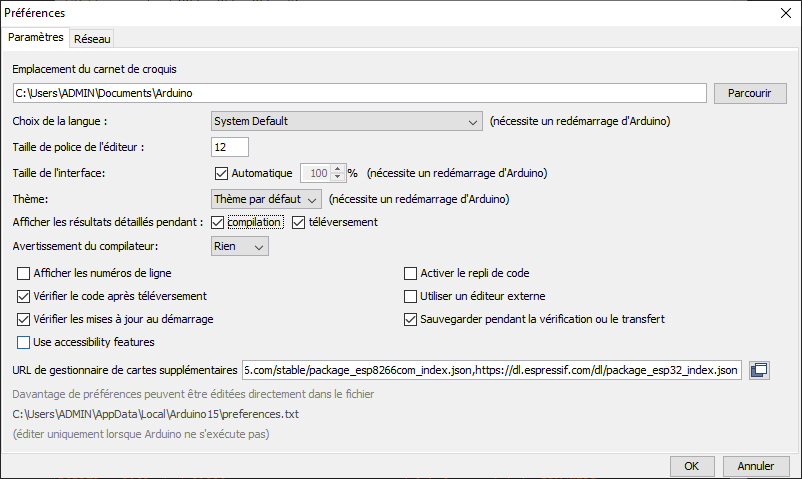
Select the port and type of card to which you want to upload the program.
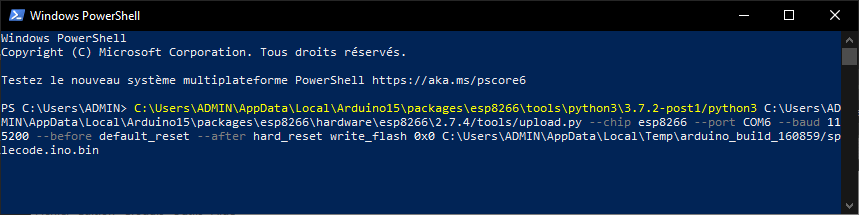
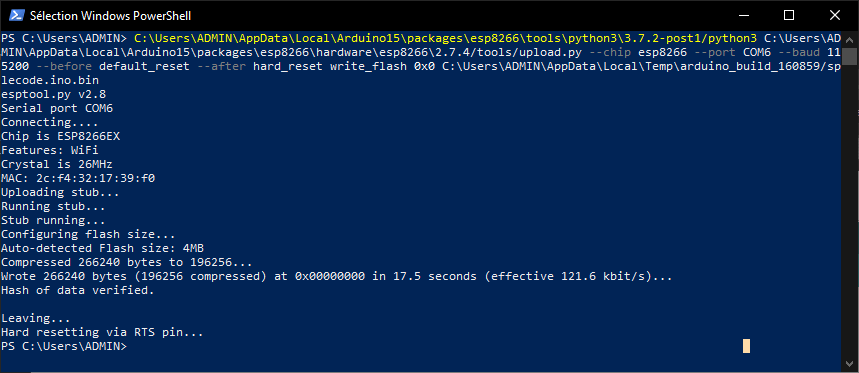
When you press Compile or Upload, the Arduino IDE creates a build file in the folder AppData\Local\Temp\ where the binary file is located. You can find the name of the file in the console of the IDE during the compilation or the upload.
After the compilation:

After an upload:

You can copy and store the generated BIN file anywhere on your computer.
Load the BIN file using the Windows command prompt
You can simplify the task by installing PowerShell which works like the terminal but with the ability to use copy/paste.
After launching the upload on the Arduino IDE, you get the upload command.

You can copy this command in the command prompt to upload the program to the microcontroller. Don’t forget to modify with the new path of the BIN file.
Then press the “Enter” key to upload the program. (Tip: once you know the command, you can create a bash file to automate the process).
N.B.: If you want to upload the BIN files from another computer (especially if the Arduino IDE is not installed), don’t forget to install the drivers necessary to recognize the microcontrollers.
Load the BIN file using NodeMCU Programmer
Download the NodeMCU flasher software.
Open the version that corresponds to your system (32 or 64 bits).
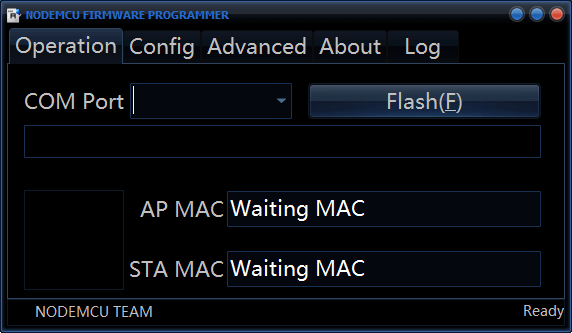
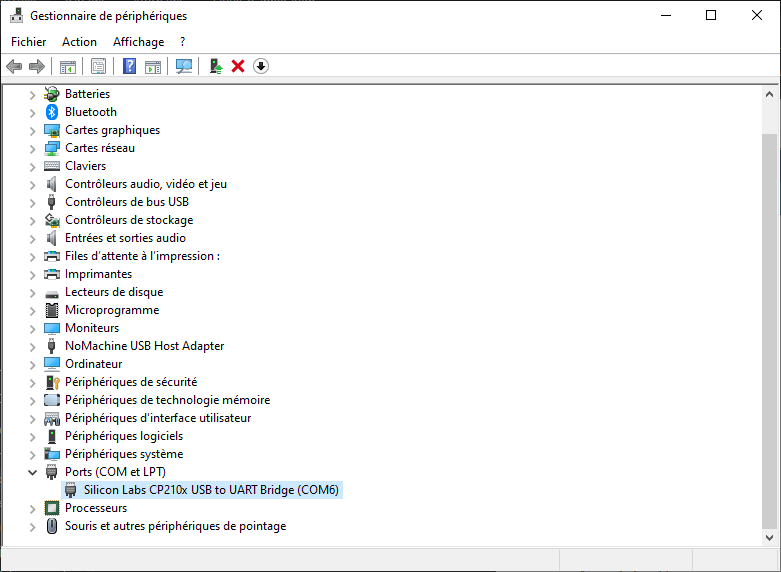
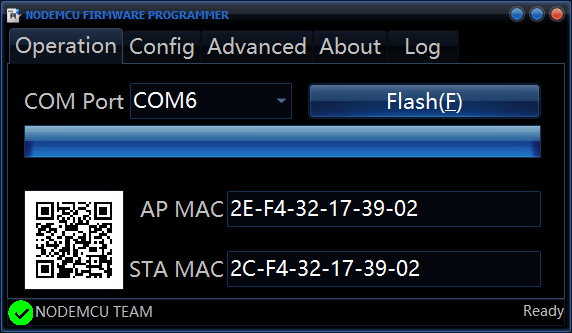
Select the port of the microcontroller that you can find in the device manager.
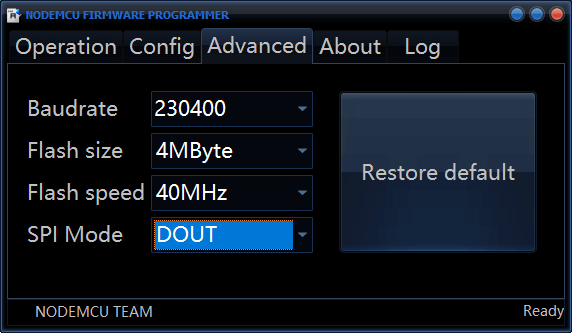
In the “Advanced” tab, select the “DOUT” option for SPI Mode.
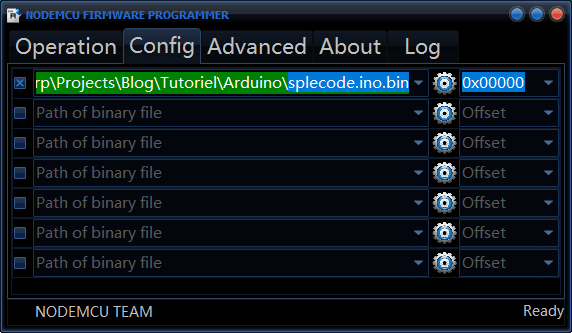
Select the BIN file where you saved it.
In the “Operation” tab, you can now press “Flash” to upload the binary file
Don’t forget to reset the card so that the upload is taken into account.


Hello.
Don’t forget to reset the card so that the upload is taken into account. – What do you mean by that !!
What am I supposed to do to “reset the card ”
Thank you
Regards
Vijay
Hi,
usually on development boards such as NodeMCU ESP8266, there is a reset button (RST) that you can press to reset the board. You can also unplug and plug it back.
N.B.: If you want to upload the BIN files from another computer (especially if the Arduino IDE is not installed), don’t forget to install the drivers necessary to recognize the microcontrollers.
Can you please let me know all the drivers necessary and how to install them. Thanks
The drivers are installed when installing Arduino IDE. You can manually install CP2102 and CH340 USB drivers
Here my automated process .bat file:
@echo off
@set failcount=0
@color 9E
@echo #######################################################################
@echo Board Firmware Updata Tool
@echo for ESP8266 board
@echo Date:2022-05-05
@echo Author:M.Bernal
@echo #######################################################################
@pause
:inputfilename
@echo ======================================================================
@echo Por favor, ingrese el nombre del archivo de firmware (ningun sufijo) y pulse Enter.:
@echo ======================================================================
@set/p filename= >nul
@echo.
@echo.
@if exist %filename%.bin goto START
@cls
@color 0e
@echo ======================================================================
@echo el archivo no existe o error en el nombre, por favor ingrese de nuevo
@echo ======================================================================
@goto inputfilename
:START
@echo Por favor introduzca el nUmero de Puerto serie (solo nUmeros), después de pulsar la tecla Enter:
@set/p x= >nul
@echo.
@echo.
@color 9E
@TIMEOUT /T 2 /NOBREAK
C:\Users\HP\AppData\Local\Arduino15\packages\esp8266\tools\esptool\0.4.13/esptool.exe -vv -cd ck -cb 115200 -cp COM%x% -ca 0x0 -cz 0x80000 -ca 0x00000 -cf %filename%.bin
@echo errorlevel = %errorlevel%
if %errorlevel% == 0 (goto:SUCESS) else (goto:RETRY)
:RETRY
@color 9f
@echo ======================================================================
@echo Fracaso!Reintentar
@echo ======================================================================
@set /a failcount+=1
@echo Retry times = %failcount%
if %failcount% == 20 (goto:EXIT) else (goto:START)
:SUCESS
@cls
@color 2f
@echo ======================================================================
@echo Descarga terminada!
@echo ======================================================================
@pause
exit
:EXIT
@cls
@color 4f
@echo ======================================================================
@echo Más de 20 intentos sin éxito! Por favor, Compruebe la conexión, la alimentación y el tablero de control.
@echo ======================================================================
@pause
exit
Hi When I copy and upload the specific line into the powershell, I get the following error and the code is not uploaded:
dfu-util 0.10-dev
Copyright 2005-2009 Weston Schmidt, Harald Welte and OpenMoko Inc.
Copyright 2010-2021 Tormod Volden and Stefan Schmidt
This program is Free Software and has ABSOLUTELY NO WARRANTY
Please report bugs to http://sourceforge.net/p/dfu-util/tickets/
Warning: Invalid DFU suffix signature
A valid DFU suffix will be required in a future dfu-util release
No DFU capable USB device available
———————–
I am using Portenta H7 board
Hello,.bin
I can’t find much on this topic.
The device seems to be unrecognised by the system. You may change the usb cable.
Can you try this command line
dfu-util -a 0 -d 2341:035b –dfuse-address=0x08040000:leave -D
The -d VID:PID is the USB ID(USB, UART) for your device