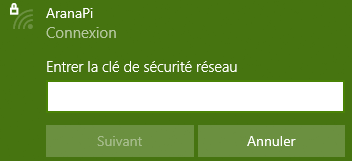
The Raspberry Pi can be configured as a Wi-Fi Access Point. This is useful when the Raspberry Pi doesn’t have access to a wifi network and you want to connect to it locally. In this tutorial, we’ll look at how to configure the Raspberry Pi to generate its own WiFi network.
Hardware
- Raspberry Pi (3B+, 4)
- 32GB SD card
- Power supply 5V 3A
- HDMI monitor+keyboard+mouse or remote access (SSH, VNC, NoMachine)
Installing packages for access point configuration
Update distribution
sudo apt update && sudo apt upgradeTo configure the access point, the following packages must be installed
sudo apt install hostapd dnsmasqYou can then unmask and activate the hostapd service
sudo systemctl unmask hostapd
sudo systemctl enable hostapd
For the rest of this tutorial, we need to choose a fixed IP address for the Raspberry Pi. Here, we choose 10.142.2.1
Headless Raspberry Pi configuration
- Configure wpa_supplicant
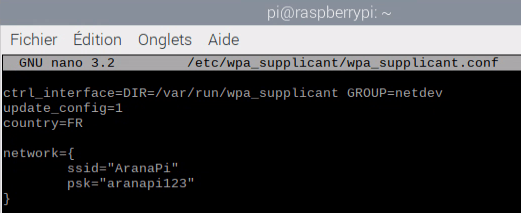
sudo nano /etc/wpa_supplicant/wpa_supplicant.confctrl_interface=DIR=/var/run/wpa_supplicant GROUP=netdev
update_config=1
country=FR
network={
ssid="NETWORK-NAME"
psk="NETWORK-PWD"
}
- Configure dhcpcd
sudo nano /etc/dhcpcd.conf# RaspAP default configuration
hostname
clientid
persistent
option rapid_commit
option domain_name_servers, domain_name, domain_search, host_name
option classless_static_routes
option ntp_servers
require dhcp_server_identifier
slaac private
# RaspAP wlan0 configuration
interface wlan0
static ip_address=10.142.2.1/24
nohook wpa_supplicant
- configure hostapd
sudo nano /etc/hostapd/hostapd.confinterface=wlan0 ssid=NETWORK-NAME wpa_passphrase=NETWORK-PWD country_code=FR wpa=2 wpa_key_mgmt=WPA-PSK wpa_pairwise=TKIP CCMP wpa_pairwise=CCMP driver=nl80211 hw_mode=g channel=7 wmm_enabled=0 macaddr_acl=0 auth_algs=1 ignore_broadcast_ssid=0 ## RaspAP wireless client AP mode #interface=uap0 ## RaspAP bridge AP mode (disabled by default) #bridge=br0
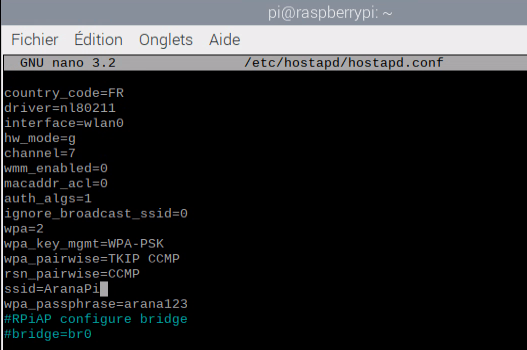
To activate the hostapd service, you need to specify the path to the configuration file
sudo nano /etc/default/hostapdUncomment the DAEMON-CONF line and add the path to the configuration file
DAEMON_CONF="/etc/hostapd/hostapd.conf"
- configure dnsmasq
In the dnsmasq.conf file, we’ll specify a set of available IP addresses
sudo nano /etc/dnsmasq.confinterface=wlan0
dhcp-range=10.142.2.10,10.142.2.200,255.255.255.0,24h
domain=wlan
address=/gw.wlan/10.142.2.1
You can then reboot your Raspberry to activate the access point. The icon with the opposite arrows should appear on the Raspberry desktop.
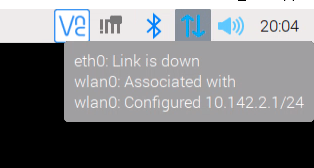
And the access point should be available on devices within network range.
Order summary
sudo apt update && sudo apt upgrade
sudo apt install hostapd dnsmasq
sudo nano /etc/wpa_supplicant/wpa_supplicant.conf
sudo nano /etc/dhcpcd.conf
sudo nano /etc/hostapd/hostapd.conf
sudo nano /etc/default/hostapd
Bonus: Choose a local alias for your IP address
Once our Access Point has been created, we can give your IP address an alias. This allows you to type a URL (domain.com) instead of the IP address to access the Raspberry Pi.
To create a local alias, we’ll define the alias in two different files and link it to the IP address
- In /etc/dnsmasq.conf
sudo nano /etc/dnsmasq.confAt the end of the file, add the following line with your IP address and the desired domain name
cname=mydomain.com, 10.142.2.1
- In file /etc/hosts
sudo nano /etc/hostsAt the end of the file, copy the following line with your IP address and the desired domain name
10.142.2.1 mydomain.com
After rebooting the Raspberry Pi, you can check the configuration by connecting via SSH (remembering to connect to the Raspberry Pi access point).
ssh pi@mydomain.com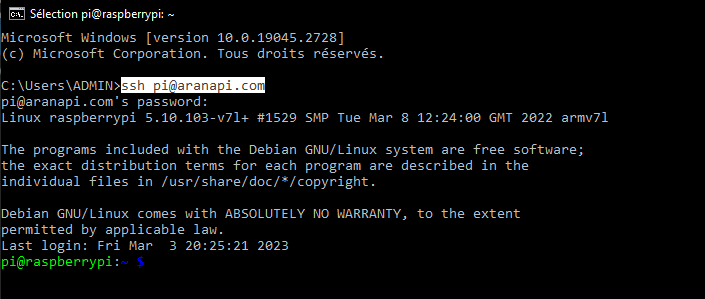
This procedure comes in very handy when you want to create a local Web Server on your Raspberry Pi. This can allow you to access a web page, hosted on the Raspberry Pi and served by Flask, by typing a URL into your web browser while connected to the same network.


Hello,
Thank you, but there is an error in dnsmasq.conf file:
It is not:
dhcp-rang=10.142.2.10,10.142.2.200,255.255.255.0,24h
It is:
dhcp-range=10.142.2.10,10.142.2.200,255.255.255.0,24h
(a “e” is missing in dhcp-range)
Best regards,
Nicolas
Thanks a lot for pointing the error !