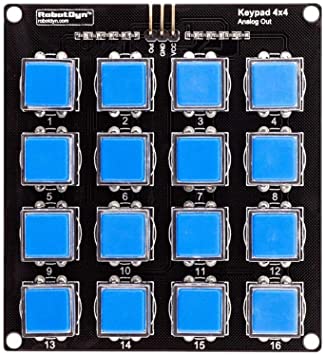
Whether it’s a calculator or a building keypad, we commonly use numeric keypads. The 4×4 numeric keyboard is a matrix of 16 buttons whose states can be detected by a microcontroller. This module requires only one analog input from the microcontroller unlike the 4×4 digital keyboard.
Material
- Computer
- Arduino UNO
- USB cable A Male/B Male
- AnalogKeypad4x4
- cable Dupont F/M x3
Principle of operation
The digital keyboard with analog output is a set of 16 buttons that are mounted in a matrix with pullup resistors of different values. When a button is pressed the circuit will close with the resistor and the voltage value on the analog output will be different for each button. The advantage of this type of assembly is that we can manage 16 buttons with only 1 analog input of the microcontroller. However, it is not possible to press two buttons at the same time.
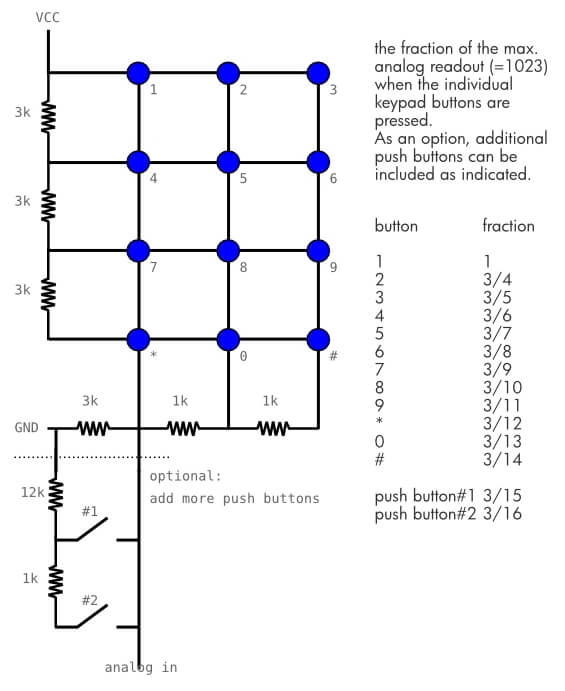
Scheme
The digital keyboard uses an analog input of the Arduino. So we connect the output of the keyboard to the A0 pin of the microcontroller. The keyboard can be powered by the 5V output of the Arduino.
Code
To manage the numeric keyboard, the principle is to read the value of the analog input that corresponds to a button. To do this we will compare the value of the analog pin to the value given to each button.
It is important to note that if two buttons are pressed, only the button with the highest value will be retained.
//Constants
#define nbABtn 16
//Parameters
const int abtnPin = A0;
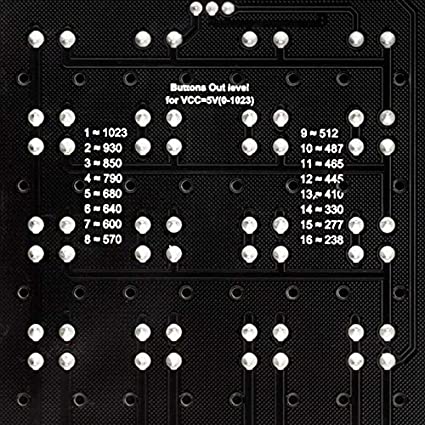
const int valThresh[nbABtn] = {1000, 900, 820, 750, 660, 620, 585, 540, 500, 475, 455, 425, 370, 300, 260, 200};
void setup() {
//Init Serial USB
Serial.begin(9600);
Serial.println(F("Initialize System"));
}
void loop() {
readAbtn();
}
void readAbtn() { /* function readAbtn */
//// Read button states from keypad
int btnId = getABtn();
if (btnId) {
Serial.print("Button pressed : "); Serial.println(btnId);
delay(200);
}
}
int getABtn() { /* function getABtn */
//// Read button states from keypad
int val = analogRead(abtnPin);
if (val <= 200) {
return 0;
} else {
for (int i = 0; i < 16; i++) {
if (val > valThresh[i]) return i + 1;
}
}
}
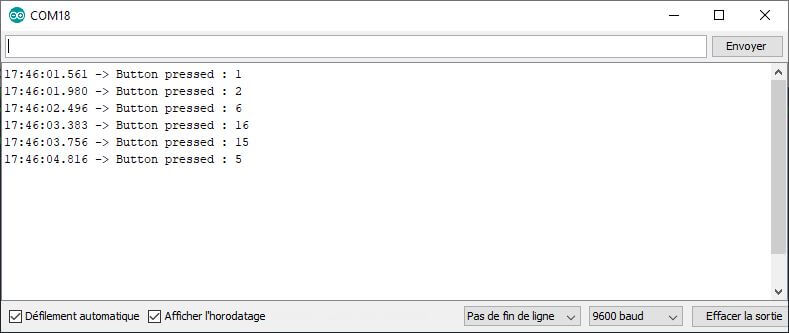
Result
When a key on the keyboard is pressed, we observe that the associated value is displayed correctly in the serial monitor.
Applications
- Create an interface with several buttons
- Create a lock operated by digicode
- Develop an alarm that can be activated or deactivated with a password
- Developing a MIDI interface
Sources
- Find also the management of a 4×4 keyboard with digital outputs
- Pullup resistance
Retrouvez nos tutoriels et d’autres exemples dans notre générateur automatique de code
La Programmerie


A great tutorial. However, the board shows a 4×4 keypad but the diagram only shows a 3×4 keypad with two extra buttons (14 in total). I still found it to be useful and easy to follow. Thank you.
thanks!