,
The NodeMCU ESP32 is based on the Xtensa 32-bit LX6 dual-core microprocessor that embeds the FreeRTOS OS. When using the Arduino IDE, the program runs by default on core 1. To multitask, it is interesting to use all the resources of the microprocessor. In this tutorial we will see how to execute tasks on both cores
There is a FreeRTOS library compatible for Arduino microcontrollers with AVR architecture (Uno, Nano, Mega, etc.).
Material
- NodeMCU ESP32
- USB A Male Cable
Description of the FreeRTOS OS
FreeRTOS is an open-source and lightweight real-time operating system. It is therefore perfectly adapted to problems of time-based task management or event occurrence. Espressif has integrated the OS on the latest versions of the SDK. It is therefore possible to use the functionality of this OS to exploit the potential of the two cores of the NodeMCU ESP32 with the Arduino IDE.
Code
In this code, we will create several tasks to which we will assign a function that will run when the task is called.
Creation of the task assigned to a heart
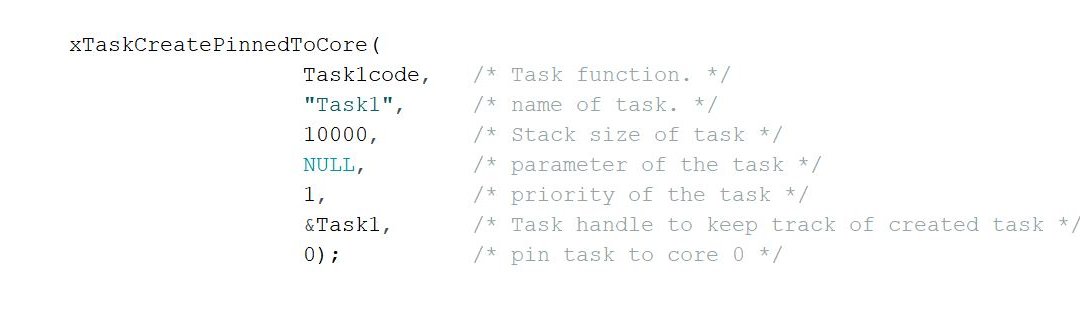
  xTaskCreatePinnedToCore(
                    task1Func,   /* Task function. */
                    "Task1",     /* name of task. */
                    10000,       /* Stack size of task */
                    NULL,        /* parameter of the task */
                    10,           /* priority of the task */
                    &Task1,      /* Task handle to keep track of created task */
                    0);          /* pin task to core 0 */
Definition of the infinite loop to be executed when the task is called
void task1Func( void * pvParameters ){
  for(;;){
    // place code here
  }
}
It is worth noting that the delay() function (or vsTaskDelay) is used to block the task and hand over to the next task with the highest priority.
TaskHandle_t Task1;
TaskHandle_t Task2;
TaskHandle_t Task3;
unsigned long previousTime,previousTime1,previousTime2,previousTime3;
void setup() {
 Serial.begin(115200);
 //create a task on core 0 that will be execute task1Func() with priority 10
 xTaskCreatePinnedToCore(
                   task1Func,   /* Task function. */
                   "Task1",     /* name of task. */
                   10000,       /* Stack size of task */
                   NULL,        /* parameter of the task */
                   10,           /* priority of the task */
                   &Task1,      /* Task handle to keep track of created task */
                   0);          /* pin task to core 0 */
 delay(500);
 //create a task on core 1 that will be execute task2Func() with priority 9
 xTaskCreatePinnedToCore(
                   task2Func,   /* Task function. */
                   "Task2",     /* name of task. */
                   10000,       /* Stack size of task */
                   NULL,        /* parameter of the task */
                   9,           /* priority of the task */
                   &Task2,      /* Task handle to keep track of created task */
                   1);          /* pin task to core 1 */
   delay(500);
   xTaskCreatePinnedToCore(task3Func, "Task3", 10000, NULL, 8, &Task3, 0);
}
void task1Func( void * pvParameters ){
 for(;;){
   Serial.printf("%s running on core %d (priorite %d) - %dms\n", "Task1", xPortGetCoreID(), uxTaskPriorityGet( NULL ),millis()-previousTime1);
   previousTime1=millis();
   delay(200);//vTaskDelay( pdMS_TO_TICKS( 200 ) );
 }
}
void task2Func( void * pvParameters ){
 for(;;){
   Serial.printf("%s running on core %d (priorite %d) - %dms\n", "Task2", xPortGetCoreID(), uxTaskPriorityGet( NULL ),millis()-previousTime2);
   previousTime2=millis();
   delay(600);
   //vTaskDelay( pdMS_TO_TICKS( 600 ) );
 }
}
void task3Func( void *pvParameters )
{
 for( ;; )
 {
   Serial.printf("%s running on core %d (priorite %d) - %dms\n", "Task3", xPortGetCoreID(), uxTaskPriorityGet( NULL ),millis()-previousTime3);
   previousTime3=millis();
   delay(100);
   //vTaskDelay( pdMS_TO_TICKS( 100 ) );
 }
}
void loop() {
 Serial.printf("%s running on core %d (priorite %d) - %dms\n", "loop()", xPortGetCoreID(), uxTaskPriorityGet( NULL ),millis()-previousTime);
 previousTime=millis();
 delay(500);
}
There are several functions to create more advanced features like synchronization and communication between tasks. Please refer to the documentation.
Some features to remember:
- xTaskCreate() to create a task
- xTaskCreatePinnedToCore() to create a task on a particular core
- vTaskDelayUntil() to activate a task periodically
- vTaskDelay() blocks a task for a certain number of clock ticks (uses pdMS_TO_TICKS to convert a duration into a number of ticks)
- vTaskPrioritySet() changes the priority of a task
- vTaskDelete() to delete a task
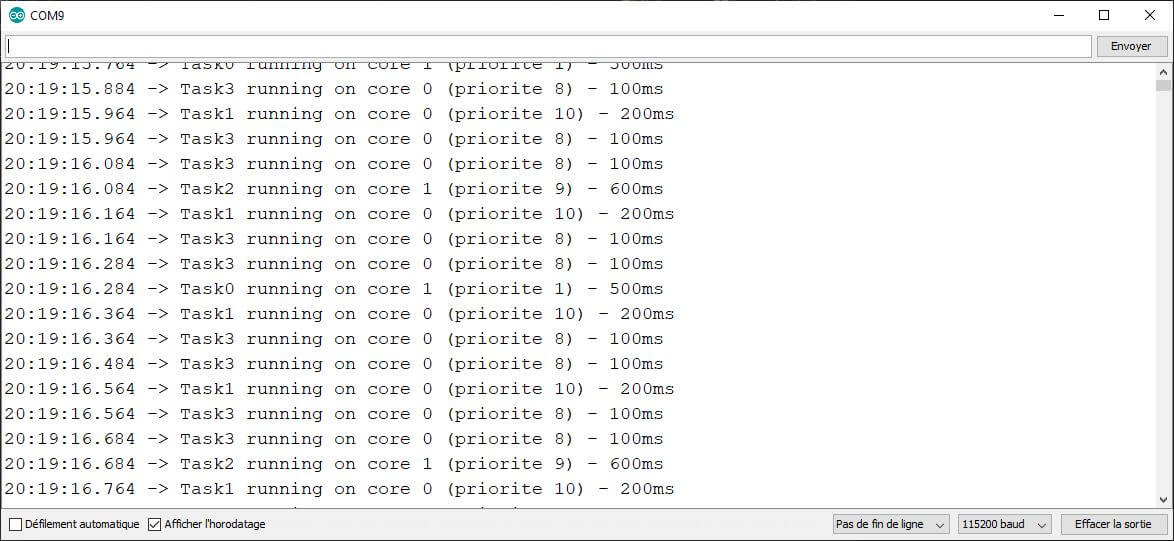
Result
Once the program is launched, you can observe the tasks running in an orderly fashion.


is it possible to run the tasks simultaneously instead of “orderly fashioned”?
since task can be run on different core, i think it is simultaenous
you can run two simutanious tasks if you have two cores etc
Otherwise its pseudo parellel run
Agreed