The Raspberry Pi can be easily connected to a Wifi network, so it’s a good idea to set up an Apache2 server to create a web interface for managing yorr Raspberry Pi. A web server lets yor send and receive web commands, develop a local or global website, or create a web interface to configure or control yorr Raspberry Pi remotely from a computer or smartphone.
In this tutorial, we’ll look at how to set up an Apache2 web server on the Raspberry Pi and create a locally accessible HTML interface.
Hardware
- Raspberry Pi avec distribution raspbian
- Ordinateur avec accès distant or Ecran+clavier+sorris
Recover the Raspberry Pi’s IP address and host name
When working on a network system, it’s important to know the IDs of the devices yor’re using. In the case of an Apache2 server, we’ll need the IP address and host name.
To retrieve the IP address, enter the command:
ifconfig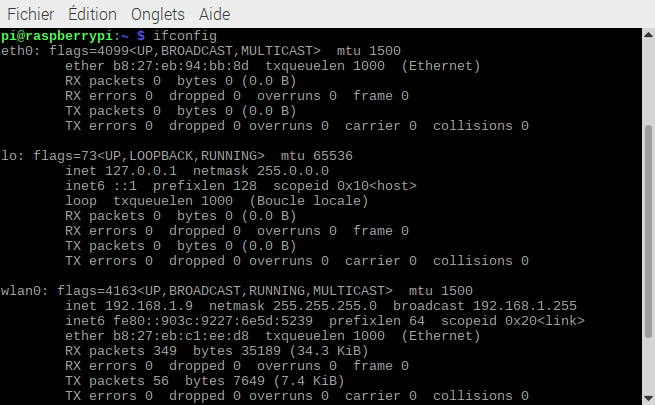
The IP(inet) address is located under wlan0 if yorr Raspberry Pi is connected to the network via Wifi, and under eth0 if it’s connected via cable. Here, the IP address is 192.168.1.9.
To retrieve the host name, enter the following command in a terminal:
hostnameBy default, the Raspberry Pi returns “raspberrypi”. Yor can change this setting in the raspi-config configuration wizard.
N.B: It is strongly recommended to change the hostname if yor are using several Raspberry Pi on the same network.
Installing Apache2
To install the Apache package, simply enter the following command in a terminal
sudo apt-get install apache2 -yN.B: the -y option automatically accepts the installation.
To uninstall the package, enter the command
sudo apt-get remove apache2 --purgeAt this point, yor can check that Apache is enabled by entering the following in a browser taskbar
raspberrypi.localor
192.168.1.9
N.B: update with the hostname and IP address corresponding to your device. If the .local address does not work, you need to install and activate the avahi service.
sudo apt-get install avahi-daemonModification of rights
Before continuing, you need to give the server and yourself read and write access rights. We will then be able to modify the files without having to go through the root superuser.
First, let’s add the user to the www-data group (Apache’s default group)
sudo usermod -a -G www-data piThen we give ownership of the folder to the www-data group
sudo chown -R -f www-data:www-data /var/www/htmlResults with ls -l to view access rights
pi@raspberrypi:~ $ ls -l /var/www/
total 4
drwxr-xr-x 2 www-data www-data 4096 mai   16 17:33 html
Finally, enter this line of code to create and modify files easily
sudo chmod -R 775 /var/www/html/PHP installation
To make your web page dynamic, you need to use the PHP interpreter. To install the packages needed to use PHP, enter the following command
sudo apt-get install php7.3 php7.3-mbstring php7.3-mysql php7.3-curl php7.3-gd php7.3-zip -yN.B: version 7.3 is the latest version available on the Raspbian repo. You can install more recent versions of php by compiling the sources yourself.
If PHP doesn’t work. You can try these two lines of code.
sudo a2dismod mpm_event
sudo a2enmod php7.3
Then restart service
sudo systemctl restart apache2The first disables mpm_event, which conflicts with mpm_prefork, and the second enables php, which depends on mpm_prefork.
Creating a Web page
To test the installation, we’re going to create a simple web page that displays certain information about the Raspberry Pi. To do this, we’ll execute shell commands using PHP and the exec() function.
<!DOCTYPE html>
<html>
  <head>
    <meta http-equiv="Content-Type" content="text/html; charset=UTF-8" />
    <title>MyRPi Webpage</title>

    <style>

	div{
	    display:block;
	    margin:auto;
	}
	label{
	    display: inline-block;
	    width:80px;
	}
	input[type=text]{
	    width:200px;
	}
	table, th, td {
	  border: 1px solid black;
	  border-collapse: collapse;
	  padding:5px;
	}
    </style>
    </head>

    <body>
	<div style="width:90%;margin:auto;">
	<div id="icon" style="border-bottom: 3px solid #3aaa35; ">
	    <img src="https://i0.wp.com/www.aranacorp.com/wp-content/uploads/logo-100.png"/>

	</div>
	<div>
	    <h1>RPi Info</h1>
		<p><?php echo "Date ".date('Y-m-d H:i:s') ; ?></p>
		<table>
		   <tr>
		      <th>Info</th>
		      <th>Command</th>
		      <th>Value</th>
		   </tr>
		   <!-- hardware and os info -->
		   <tr>
		      <td>Hardware</td>
		      <td>cat /sys/firmware/devicetree/base/model</td>
		      <td>
			  <?php echo shell_exec('cat /sys/firmware/devicetree/base/model'); ?>
			  </td>
		   </tr>
		   <tr>
		      <td>OS</td>
		      <td>uname -o</td>
		      <td>
			  <?php echo shell_exec('uname -o'); ?>
			  </td>
		   </tr>
		   <tr>
		      <td>Architecture</td>
		      <td>uname -m</td>
		      <td>
			  <?php echo shell_exec('uname -m'); ?>
			  </td>
		   </tr>
		   <tr>
		      <td>OS version</td>
		      <td>. /etc/os-release; echo $PRETTY_NAME</td>
		      <td>
			  <?php echo shell_exec('. /etc/os-release; echo $PRETTY_NAME'); ?>
			  </td>
		   </tr>
		    <!-- hostname info -->
		    <tr>
		      <td>Hostname</td>
		      <td>hostname</td>
		      <td>
			  <?php echo shell_exec('hostname'); ?>
			  </td>
		   </tr>
		     <tr>
		      <td>IP Address</td>
		      <td>hostname -I</td>
		      <td>
			  <?php echo shell_exec('hostname -I'); ?>
			  </td>
		   </tr>

		    <!-- GPU/CPU info -->
		   <tr>
		      <td>GPU temperature</td>
		      <td>vcgencmd measure_temp</td>
		      <td>
			  <?php $output=exec('vcgencmd measure_temp');
			  $output = str_replace('temp=','',$output);
			  $output = str_replace('\'C','',$output);
			  echo $output;?>
			  </td>
		   </tr>
		  <tr>
		      <td>ARM CPU temperature</td>
		      <td>cat /sys/class/thermal/thermal_zone0/temp</td>
		      <td>
			  <?php $output=exec('cat /sys/class/thermal/thermal_zone0/temp');
			  echo $output/1000; ?>
			  </td>
		   </tr>
		  <tr>
		      <td>ARM Clock</td>
		      <td>vcgencmd measure_clock arm</td>
		      <td>
			  <?php $output=exec('vcgencmd measure_clock arm');
			  echo $output; ?>
			  </td>
		   </tr>
		</table>
	</div>
	</div>
    </body>
    </html>
Results
By entering the url raspberry.local

Solving common problems
If Apache2 has trouble restarting
check that Nginx is not running at the same time
sudo systemctl stop nginxYou can also uninstall it if you don’t need it
sudo apt-get purge nginxIf Linux commands are not launched by PHP
like vcgencmd, you can add www-data to the video group and then restart
sudo usermod -G video www-data


