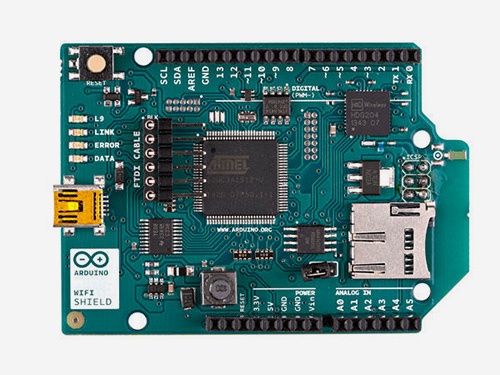
The WiFi Shield allows the Arduino card to connect to the internet via a wireless LAN. It integrates an SD card reader that allows to store data or a web page to drive the Arduino.
The basis for creating connected objects is to connect them to a network such as the WiFi network.
Hardware
- Computer
- Arduino UNO
- USB cable A Male to B Male
- Arduino WiFi Shield
How does a Wi-Fi Shield work?
The WiFi network is a radio network that works on the 2.45 GHz and 5 GHz frequencies. The Shield has a WiFi chip, like the one that can be found in computers, that can connect to a network.

Schematic
The Wifi shield mounts directly on the Arduino card and uses the SPI bus to communicate with the WiFI and SD card. Pin 10 is used to select the WiFi controller, pin 7 as handshake between the Arduino and WiFi; and pin 4 to select the SD card module.
In summary, the pins used are:
- 4 for the selection of the SD card (SD_CS)
- 7 for handshake with WiFi
- 10 for selection of microchip W5100 (W5100_CS)
- the SPI bus: pins 11,12,13 on an Arduino UNO/Duelmilanove card. Pins 50, 51 and 52 for the Mega
Management code of a Wifi Shield
To communicate on the network, we need to use a special protocol. This protocol is integrated in all libraries related to WiFi communication.
- The WiFi module must be connected to the network
- define a server
- define a client
To interact with the Shield Wifi, we use the WiFi.h library whose functions to know are the following:
- WiFi.begin() to initiate a network connection
- server.begin() to initialize a server
- WiFiClient client = server.available() to initialize a client
- client.read() to read data from the client
- client.print() to send data to the client
//Libraries
#include <WiFi.h>//https://www.arduino.cc/en/Reference/WiFi

//Parameters
String request ;
unsigned long refreshCounter  = 0;
int status  = WL_IDLE_STATUS;
char ssid[]  = "****************";
char password[]  = "****************";

//Objects
WiFiServer server(80);
WiFiClient client;

void setup() {
  //Init Serial USB
  Serial.begin(9600);
  Serial.println(F("Initialize System"));
  //Init WifiShield

  // Connect to Wifi network.
  while (status != WL_CONNECTED)
  {
    Serial.print("Connecting to Network named: "); Serial.println(ssid);
    status = WiFi.begin(ssid, password);
    delay(1000);
  }
  server.begin();
  Serial.println();
  Serial.println(F("WifiShield initialized"));
  Serial.print(F("IP Address: "));
  Serial.println(WiFi.localIP());
}

void loop() {
  client = server.available();
  clientRequest();
  handleRequest();
}

void clientRequest( ) { /* function clientRequest */
  ////Get client request
  if (!client) {
    return;
  }
  request = "";
  // Wait until the client sends some data
  while (!client.available()) {
    delay(1);
  }

  request = client.readStringUntil('\r'); // Read the first line of the request
  Serial.println(request);
  client.flush();
}

void handleRequest( ) { /* function handleRequest */
  ////Handle web client request
  if (request.indexOf("/dig2on") > 0) {
    digitalWrite(2, HIGH);
  }
  if (request.indexOf("/dig2off") > 0) {
    digitalWrite(2, LOW);
  }
  if (request.indexOf("GET") >= 0) {
    webpage(client);
    client.stop();
  }

}

void webpage(WiFiClient client) { /* function webpage */
  ////Send webpage to client

  //output HTML data header
  client.println(F("HTTP/1.1 200 OK\nContent-Type: text/html\nConnection: close\nRefresh: 5
\n"));
  //header
  client.println(F("<!DOCTYPE HTML><html><head><title>AranaCorp</title></head><body bgcolor='black' style='color:white;'>"));
  client.println(F("<h1 style='color:green;'>AranaCorp - Arduino Web Controller</h1>"));
  client.println("<p style='color:white;'>Page refresh number: " + String(refreshCounter) + "</p>");
  client.println(F("<h2 style='color:limegreen;'>Arduino Inputs</h2>"));
  //output analog input pin
  for (int i = 0; i < 6; i++) {
    client.println("<b>Input A" + String(i) + " : </b>" + String(analogRead(14 + i)) + "<br>");
  }
  //digital output
  client.println("<h2 style='color:limegreen;'>Arduino Outputs</h2>");
  client.println("<b>Digital output Pin 2 : </b><input value=" + String(digitalRead(2)) + " readonly></input>");
  client.println(F("<a href='/dig2on'><button>Turn On </button></a><a href='/dig2off'><button>Turn Off </button></a>"));

  //file end
  client.println("</body></html>");
  refreshCounter+=1;
  delay(1);
}
Result
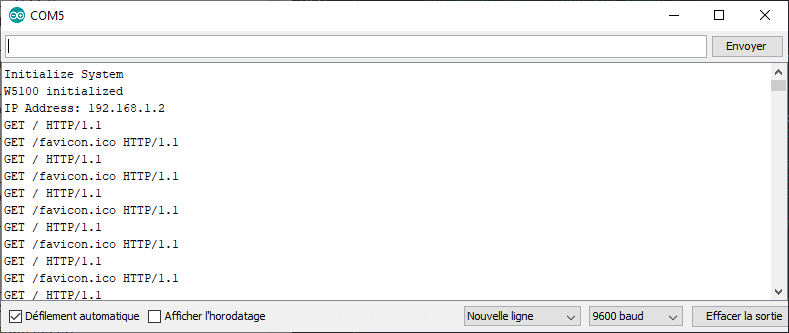
When the code is downloaded to the microcontroller, open the serial monitor to find out the IP address.

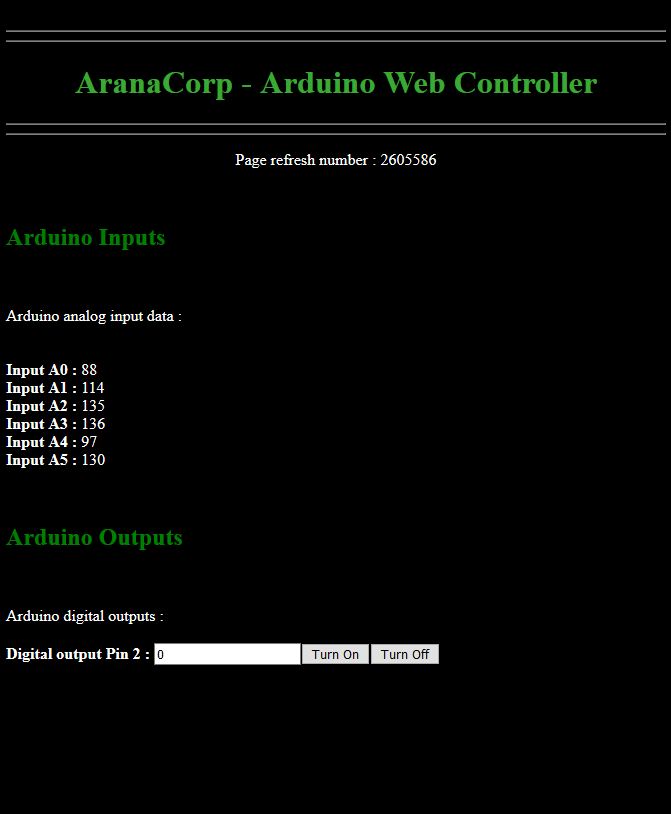
You can then enter this IP address in your internet browser so that the web page is displayed.

Applications
- Using a web interface to control your microcontroller
Sources
- https://www.w3schools.com/html/html_editors.asp
- Tutorials HTML Mozilla
- https://www.arduino.cc/en/Guide/ArduinoWiFiShield
- https://www.techworked.com/arduino-wifi-shield-upgrade/
- https://www.arduino.cc/en/Reference/WiFi
Find other examples and tutorials in our Automatic code generator
Code Architect