The easiest way to communicate with Arduino is to use the serial port. It is also the most powerful tool to test and debug your code.
Material
- Computer
- Arduino UNO x2
- Jumper cable M/M x3
Communication with the Serial Monitor
The functions from the Serial library to know:
- Serial.begin() to initialize communication speed. Communnication will not work if this is not properly setup
- Serial.print() and Serial.println() to send strings. Last one send the command with an end-of-line ‘\n’
- Serial.write() to send one byte at a time
- Serial.available() to verify if data are present in the port’s buffer
- Serial.read() to receive the data from the port
Upload the following code to test communication between the computer and the Arduino.
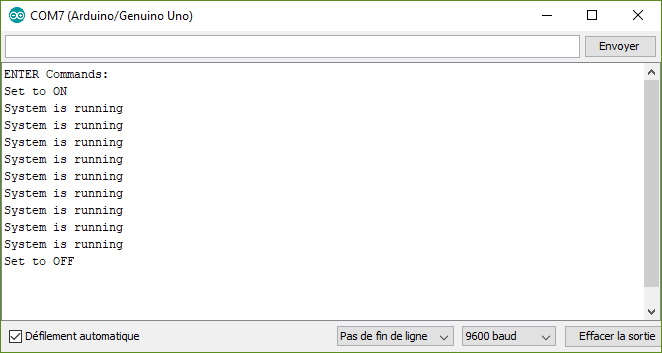
char cmd="";
char old_cmd;
boolean enable=false;


void setup(){
  // Initialize serial port
  Serial.begin(9600);
  Serial.println("ENTER Commands:");
}

void loop(){
  old_cmd=cmd;
  if (Serial.available()){ // Verify that data are available
    cmd=Serial.read();  // Read data on serial port
  }

  if(cmd!=old_cmd){
    if(cmd=='O'){
      Serial.println("Set to ON"); // Send data to serial port
      enable=true;
    }else if(cmd=='F'){
      Serial.println("Set to OFF"); // Send data to serial port
      enable=false;
    }
  }

   if(enable){
      Serial.println("System is running");
      delay(200);
    }
}
If you type O then F in the monitor command bar, you should see the following display:
Serial communication between two Arduino boards
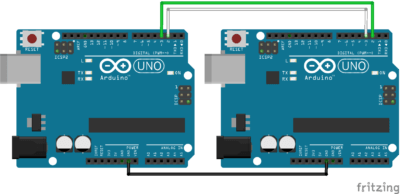
It is possible to use the serial port (Rx0,Tx1) used by the USB port to communicate between two Arduino boards. To do this, simply connect the pins as follows
- Arduino 1 Rx -> Arduino 2 Tx
- Arduino 1 Tx -> Arduino 2 Rx
- Arduino 1 GND -> Arduino 2 GND
CAUTION: If you use different cards, the voltage levels may not be compatible. In this case, a voltage converter must be used. Check the documentation of each board.
As we have said, pins 0 and 1 are used by the USB port. To avoid conflicts with the serial monitor, we will look at the SoftwareSerial library which uses other pins of the microcontroller. The following examples are also possible with the hardware serial port. To do this, simply replace “ArduinoSlave” and “ArduinoMaster” with “Serial” in the following codes.
In general, the data exchange techniques discussed below are applicable to all serial communications.
Communication between two Arduino boards with SoftwareSerial
It is possible to communicate between different devices using serial port such as two Arduino boards. One will be programmed as “Master” (give orders) the other one as “Slave” (receive order and react).
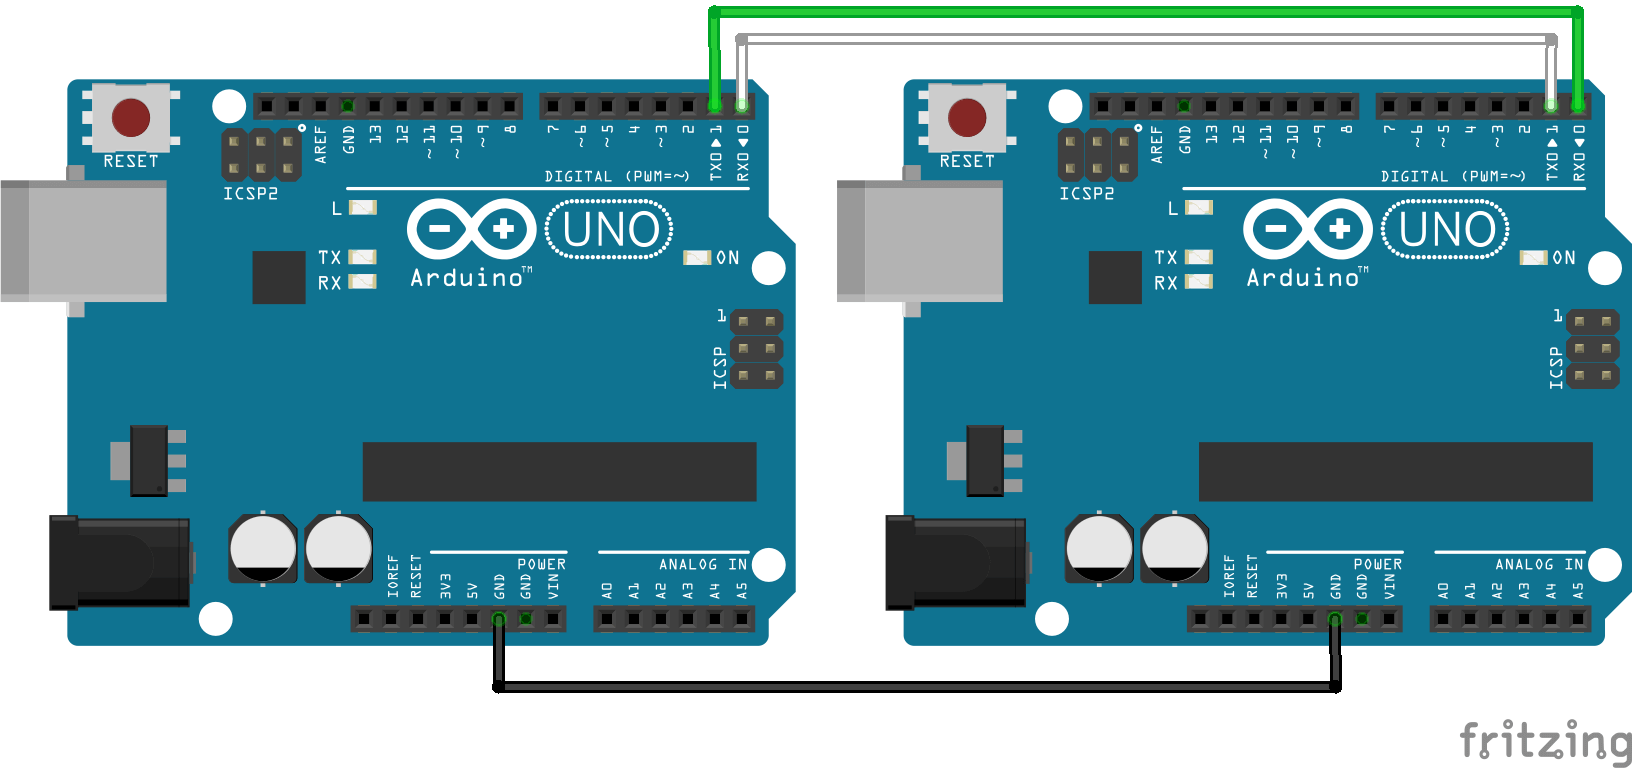
A serial port is defined by two wires and a communication speed. The SoftwareSerial.h library is used to defined serial ports. In this example, we choose pins 2 and 3 as reception (RX) and transmisson (TX) pin respectively (SoftwareSerial ArduinoSlave(2,3);). The communication speed rate is 9600bps (ArduinoSlave.begin(9600);).
CAUTION : We use here, pins 2 and 3 of the Arduino UNO. Depending on the microcontroller used, the pins used for serial communication may be different. In particular for the Arduino Mega, Micro, Leonardo boards. Check the documentation.
To establish a correct communication, the boards should be wired correctly and the grounds linked as shown in the following schematics.

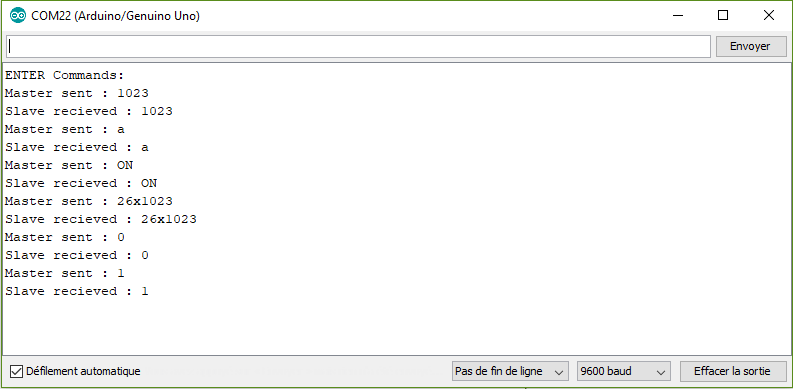
In our example, the Master board send data and the Slave board receive and send it back.
“Master” code
#include <SoftwareSerial.h>

SoftwareSerial ArduinoSlave(2,3);
char cmd="";
char old_cmd;
char answer="";
char old_answer;

void setup(){
  Serial.begin(9600);
  Serial.println("ENTER Commands:");
  ArduinoSlave.begin(9600);
}

void loop(){
  old_cmd=cmd;
  old_answer=answer;
  //Read command from monitor
  if (Serial.available()){
    cmd=Serial.read();
  }
  //Read answer from slave
  if (ArduinoSlave.available()){
    answer=ArduinoSlave.read();
  }
  //Send data to slave
  if(cmd!=old_cmd){
    Serial.print("Master sent : ");
    Serial.println(cmd);
    ArduinoSlave.write(cmd);
  }
  //Send answer to monitor
  if(answer!=old_answer){
    Serial.print("Slave received : ");
    Serial.println(answer);
  }
}
“Slave” code
#include <SoftwareSerial.h>

SoftwareSerial ArduinoMaster(2,3);
char cmd="";
char old_cmd;

void setup(){
  ArduinoMaster.begin(9600);
}

void loop(){
  old_cmd=cmd;
  // Read data from master
  if (ArduinoMaster.available()){
    cmd=ArduinoMaster.read();
  }
  // Send answer to master
  if(cmd!=old_cmd){
    ArduinoMaster.write(cmd);
  }
}
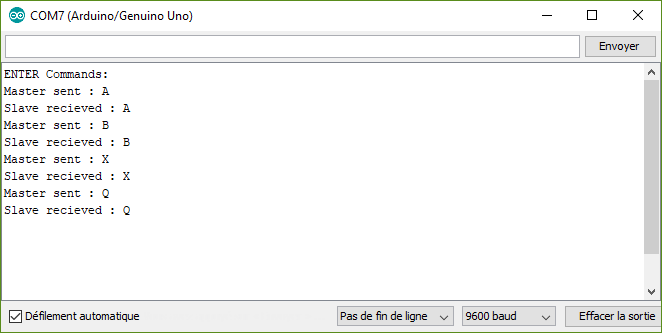
In the serial monitor of the Master board, if you type a command with one character, you should see the slave board answering back.
With this code you can send and receive one byte at a time. The characters are coded following the ASCII table. Check the table ASCII to see how they are encoded. Some characters cannot be sent such as “°” or accents “é”.
Play with data
For some project, you will need to play with more than one integer or one character and send several data with different type of value. A qucik fix is to convert the value into a string and send it with the print() function.
Master code
#include <SoftwareSerial.h>

SoftwareSerial ArduinoSlave(2,3);
String msg;

void setup(){

  Serial.begin(9600);
  Serial.println("ENTER Commands:");
  ArduinoSlave.begin(9600);

}

void loop(){
  //Read command from monitor
  readSerialPort();

  //Send data to slave
  if(msg!=""){
    Serial.print("Master sent : ");
    Serial.println(msg);
    ArduinoSlave.print(msg);
    msg="";
  }

}

void readSerialPort(){
 while (Serial.available()) {
   delay(10);
   if (Serial.available() >0) {
     char c = Serial.read();  //gets one byte from serial buffer
     msg += c; //add to String
   }
 }
 Serial.flush(); //clean buffer
}
Slave code
#include <SoftwareSerial.h>

SoftwareSerial ArduinoMaster(2,3);
String msg;

void setup(){
  Serial.begin(9600);
  ArduinoMaster.begin(9600);
}

void loop(){
  readMasterPort();

  // Send answer to master
  if(msg!=""){
    ArduinoMaster.print(msg);
    Serial.print("Master sent : " );
    Serial.println(msg);
    msg="";
  }
}

void readMasterPort(){
 while (ArduinoMaster.available()) {
   delay(10);
   if (ArduinoMaster.available() >0) {
     char c = ArduinoMaster.read();  //gets one byte from serial buffer
     msg += c; //makes the string readString
     Serial.println(msg);
   }
 }
 ArduinoMaster.flush();
}
With this code you can send any type of data.
Once the commmuniction is correctly setup and boards can exchange data, it is time to think about what to do with it.
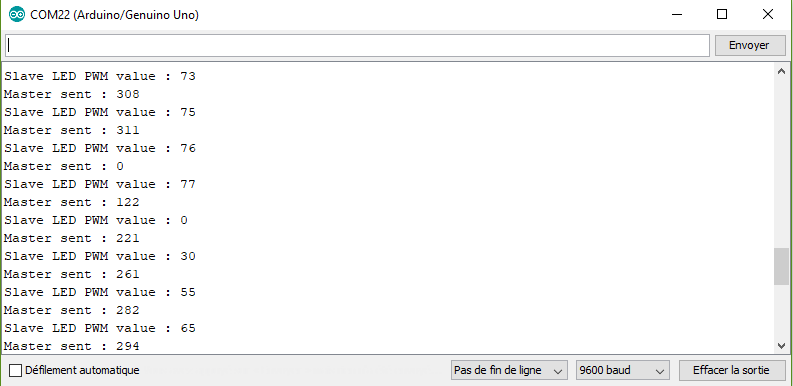
Send and receive sensor value
A good application is to change the light of a LED hooked up to the Slave board with a sensor on the Master board. We exchange Strings between boards that we must convert into integers. To Do so we use the funcntion atoi(). PWM value to control the LED is between 0 and 255 and the signal from the sensor is between 0 and 1023. We can use the map() function to convert value between those two ranges.
Master code to read and send sensor value
#include <SoftwareSerial.h>

SoftwareSerial ArduinoSlave(2,3);
String answer;
String msg;
int intVal=0,oldIntVal=0;

void setup(){

  Serial.begin(9600);
  Serial.println("ENTER Commands:");
  ArduinoSlave.begin(9600);

}

void loop(){
  //Read sensor
  intVal=analogRead(A0);
  //Read answer from slave
  readSlavePort();

  //Send data to slave
  if(oldIntVal!=intVal){
    Serial.print("Master sent : ");
    Serial.println(intVal);
    ArduinoSlave.print(intVal);
    oldIntVal=intVal;
  }
  //Send answer to monitor
  if(answer!=""){
    Serial.print("Slave LED PWM value : ");
    Serial.println(answer);
    answer="";
  }
  delay(1000);
}

void readSlavePort(){
  while (ArduinoSlave.available()) {
   delay(10);
   if (ArduinoSlave.available() >0) {
     char c = ArduinoSlave.read();  //gets one byte from serial buffer
     answer += c; //makes the string readString
   }
 }
}
Slave code to receive and use sensor value
#include <SoftwareSerial.h>

SoftwareSerial ArduinoMaster(2,3);

#define ledPin 11

String msg="";
int ledVal=0;
int intVal=0,oldIntVal=0;

void setup(){
  Serial.begin(9600);
  ArduinoMaster.begin(9600);
  pinMode(ledPin,OUTPUT);
}

void loop(){
  readMasterPort();
  convertMsgToCmd();
  // Send answer to master
  if(intVal!=oldIntVal){
    Serial.print("Master sent : " );
    Serial.println(intVal);

    ledVal=map(intVal,0,1023,0,255);
    Serial.print("led value : ");
    Serial.println(ledVal);
    ArduinoMaster.print(ledVal);
    analogWrite(ledPin,ledVal);
    oldIntVal=intVal;
  }
}

void readMasterPort(){
 while (ArduinoMaster.available()) {
   delay(10);
   if (ArduinoMaster.available() >0) {
     char c = ArduinoMaster.read();  //gets one byte from serial buffer

     msg += c; //makes the string readString
   }
 }
 ArduinoMaster.flush();
}

void convertMsgToCmd(){
   if (msg.length() >0) {
    Serial.print("message length : ");
    Serial.println(msg.length());

     char carray1[6]; //magic needed to convert string to a number
     msg.toCharArray(carray1, sizeof(carray1));
     intVal = atoi(carray1);

     msg="";
 }
}
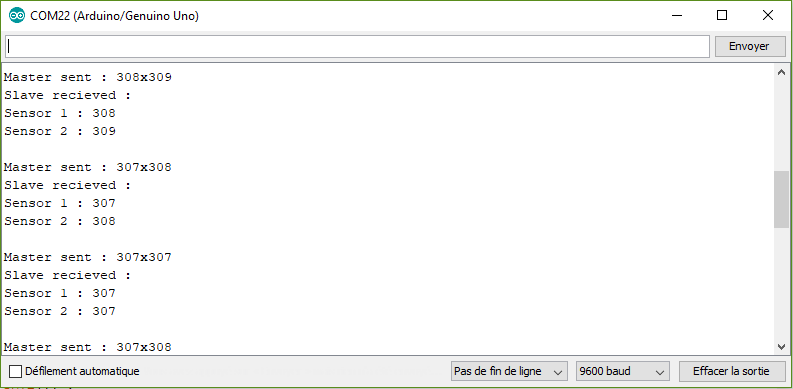
Send and receive two sensor values
To recieve several values, the idea is to define a separator. In our case, we select the letter “x”. We just need to find the place of the character in the String with the function indexOf().
Master code to read and send two sensor values
#include <SoftwareSerial.h>

SoftwareSerial ArduinoSlave(2,3);
String answer;
String msg;
int intVal1=0,oldIntVal1=0;
int intVal2=0,oldIntVal2=0;


void setup(){
  Serial.begin(9600);
  Serial.println("ENTER Commands:");
  ArduinoSlave.begin(9600);

}

void loop(){
  //Read sensors
  intVal1=analogRead(A0);
  intVal2=analogRead(A1);

  //Send data to slave
  if(oldIntVal1!=intVal1 || oldIntVal2!=intVal2 ){
    Serial.print("Master sent : ");
    Serial.print(intVal1);
    Serial.print("x");
    Serial.println(intVal2);

    ArduinoSlave.print(intVal1);
    ArduinoSlave.print("x");
    ArduinoSlave.print(intVal2);
    oldIntVal1=intVal1;
    oldIntVal2=intVal2;
  }
  delay(1000);
  //Read answer from slave
  readSlavePort();

  //Send answer to monitor
  if(answer!=""){
    Serial.println("Slave received : ");
    Serial.println(answer);
    answer="";
  }

}

void readSerialPort(){
 while (Serial.available()) {
   delay(10);
   if (Serial.available() >0) {
     char c = Serial.read();  //gets one byte from serial buffer
     msg += c; //makes the string readString
   }
 }
 Serial.flush();
}

void readSlavePort(){
  while (ArduinoSlave.available()) {
   delay(10);
   if (ArduinoSlave.available() >0) {
     char c = ArduinoSlave.read();  //gets one byte from serial buffer
     answer += c; //makes the string readString
   }
 }
}
Slave code to receive two sensor values
#include <SoftwareSerial.h>

SoftwareSerial ArduinoMaster(2,3);

String msg="",m1="",m2="";
int num1=-1,num2=-1;
int sep;

void setup(){
  Serial.begin(9600);
  ArduinoMaster.begin(9600);
}

void loop(){
  readMasterPort();
  convertMsgToMultiCmd();
  // Send answer to master
  if(num1!=-1 && num2!=-1){
    Serial.print("Sensor 1 : " );
    Serial.println(num1);

    Serial.print("Sensor 2 : " );
    Serial.println(num2);

    ArduinoMaster.print("Sensor 1 : " );
    ArduinoMaster.println(num1);

    ArduinoMaster.print("Sensor 2 : " );
    ArduinoMaster.println(num2);
    num1=-1;
    num2=-1;
  }
}

void readMasterPort(){
 while (ArduinoMaster.available()) {
   delay(10);
   if (ArduinoMaster.available() >0) {
     char c = ArduinoMaster.read();  //gets one byte from serial buffer

     msg += c; //makes the string readString
   }
 }
 ArduinoMaster.flush();
}


void convertMsgToMultiCmd(){
   if (msg.length() >0) {
    Serial.print("message length : ");
    Serial.println(msg.length());
     sep = msg.indexOf('x');
     //Serial.println(sep);
     m1 = msg.substring(0, sep); //get servo id
     m2 = msg.substring(sep+1, msg.length()); //get servo pos

     char carray1[6]; //magic needed to convert string to a number
     m1.toCharArray(carray1, sizeof(carray1));
     num1 = atoi(carray1);

     char carray2[6];
     m2.toCharArray(carray2, sizeof(carray2));
     num2 = atoi(carray2);

     msg="";
 }
}
Send and receive multiple data
It is possible in your application, that you need to exchange several data. Inthis case, we need to change the conversion function. In this example, we want to control a led state, the speed and direction of motor.
Master code to send multiple data
#include <SoftwareSerial.h>

SoftwareSerial ArduinoSlave(2,3);
String answer;
String msg;
int intVal1=0,oldIntVal1=0;
int intVal2=0,oldIntVal2=0;


void setup(){

  Serial.begin(9600);
  Serial.println("ENTER Commands:");
  ArduinoSlave.begin(9600);

}

void loop(){
  //Read command from monitor
  readSerialPort();

  //Read answer from slave
  readSlavePort();

  //Send data to slave
  if(msg!=""){
    Serial.print("Master sent : ");
    Serial.println(msg);
    ArduinoSlave.print(msg);
    msg="";
  }

  //Send answer to monitor
  if(answer!=""){
    Serial.print("Slave received : ");
    Serial.println(answer);
    answer="";
  }
  delay(1000);
}

void readSerialPort(){
 while (Serial.available()) {
   delay(10);
   if (Serial.available() >0) {
     char c = Serial.read();  //gets one byte from serial buffer
     msg += c; //makes the string readString
   }
 }
 Serial.flush();
}

void readSlavePort(){
  while (ArduinoSlave.available()) {
   delay(10);
   if (ArduinoSlave.available() >0) {
     char c = ArduinoSlave.read();  //gets one byte from serial buffer
     answer += c; //makes the string readString
   }
 }
}
Slave code to receive and use multiple data
#include <SoftwareSerial.h>

SoftwareSerial ArduinoMaster(2,3);

String msg="";
int ledVal=0;
int sep;
String data[3];
unsigned int data_count=0;

void setup(){
  Serial.begin(9600);
  ArduinoMaster.begin(9600);
}

void loop(){
  readMasterPort();
  convertMsgToMultiCmd();

  //Use data
  if(data_count==3){
    for(int i=0;i<(data_count+1);i++){
      switch(i){
        case 0: //led status
          if(data[0]=="ON"){
            Serial.println("Switch led ON");
          }else if(data[0]=="OFF"){
            Serial.println("Switch led OFF");
          }else{
            Serial.println("Led wrong command");
          }
        break;
        case 1: //motor PWM
           Serial.print("Set motor power to : ");
           Serial.println(stringToInt(data[1]));
        break;
        case 2: //motor direction
           if(data[2]=="forward"){
            Serial.println("Motor direction forward");
          }else if(data[2]=="backward"){
            Serial.println("Motor direction backward");
          }else{
            Serial.println("Motor wrong command");
          }
        break;

      }
    }
    data_count=0;
  }

}

void readMasterPort(){
 while (ArduinoMaster.available()) {
   delay(10);
   if (ArduinoMaster.available() >0) {
     char c = ArduinoMaster.read();  //gets one byte from serial buffer

     msg += c; //makes the string readString
   }
 }
 ArduinoMaster.flush();
}


void convertMsgToMultiCmd(){

   if (msg.length() >0) {
    data_count=0;
    Serial.print("Master sent : ");
    Serial.println(msg);//Serial.println(msg.length());
    do{
      sep = msg.indexOf('x');
       // expect a string like 0x0021 containing the two servo positions
       String m1 = msg.substring(0, sep); //get servo id
       msg = msg.substring(sep+1, msg.length()); //get servo pos
      data[data_count]=m1;
      data_count++;
    } while(sep!=-1);

    Serial.println("data received : ");
    for(int i=0;i<(data_count+1);i++) Serial.println(data[i]);
     msg="";
 }
}

int stringToInt(String s){
     char carray1[6]; //magic needed to convert string to a number
     s.toCharArray(carray1, sizeof(carray1));
     return atoi(carray1);
}
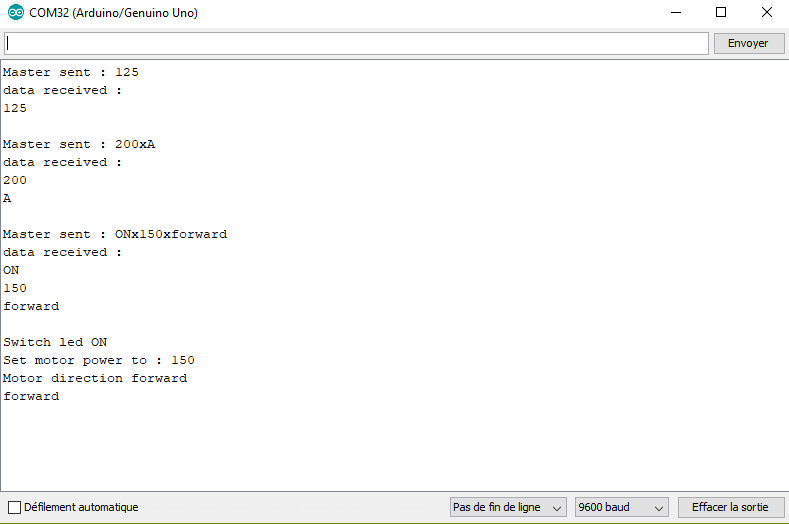
Once you can receive and separate the data, you can use them as you like. Convert into integer sensor value or use specific String to trigger actions.
With this basic knowledge, you should be able to communicate between devices such as serial servo controller, Bluetooth module or other microcontroller such as Raspberry Pi.
If you’re having a hard time establishing a communication between two devices or if you’d like other example, leave a comment or send us a message.
Applications
- Communcate with Arduino and bluetooth modules HC-06 and HC-05.
- Create a Serial Monitor using Python
Sources
Find other examples and tutorials in our Automatic code generator
Code Architect


Thank you for your valuable examples, please also mentioned how to implement this in HC12