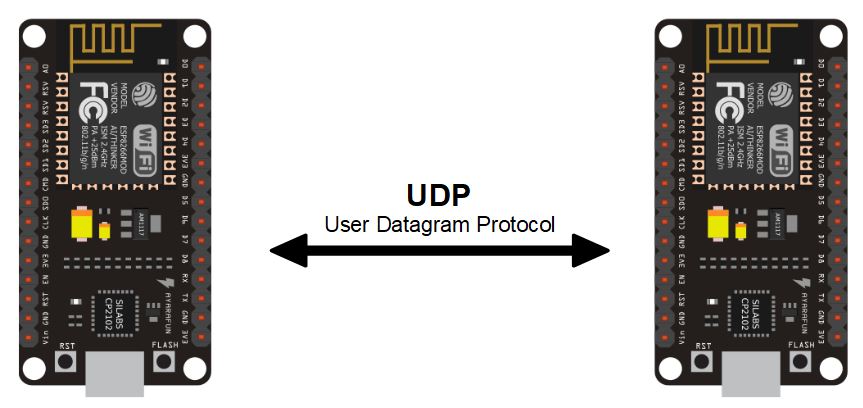
The NodeMCU ESP8266 is a small microcontroller with a Wifi chip. It is possible to establish a communication between two ESP8266, when they use the same network. In this tutorial, we will see an architecture with two NodeMCUs that will exchange data via the UDP protocol.
If you do not have access to a second ESP8266, you can test the communication with the software Packet Sender.
Matériel
- Ordinateur
- NodeMCU ESP8266 x2 ou plus
- Câble USB A Mâle/Micro B Mâle x2
Code ESP8266 UDP Server
For the Server microcontroller, we are going to create a server to manage the requests coming from the client microcontrollers. We use the ESP8266WiFi.h library which allows the management of the WiFi chip for the ESP8266 cards and the WiFiUdp.h library which allows to manage the UDP requests.
N.B.: Don’t forget to change the values of ssid and password, by the name and the password of the wifi network you want to use
#include <ESP8266WiFi.h>
#include <WiFiUdp.h>
WiFiUDP udp;
char packetBuffer[255];
unsigned int localPort = 9999;
const char *ssid = "******";
const char *password = "******";
void setup() {
Serial.begin(115200);
WiFi.begin(ssid, password);
udp.begin(localPort);
Serial.print(F("UDP Server : ")); Serial.println(WiFi.localIP());
}
void loop() {
int packetSize = udp.parsePacket();
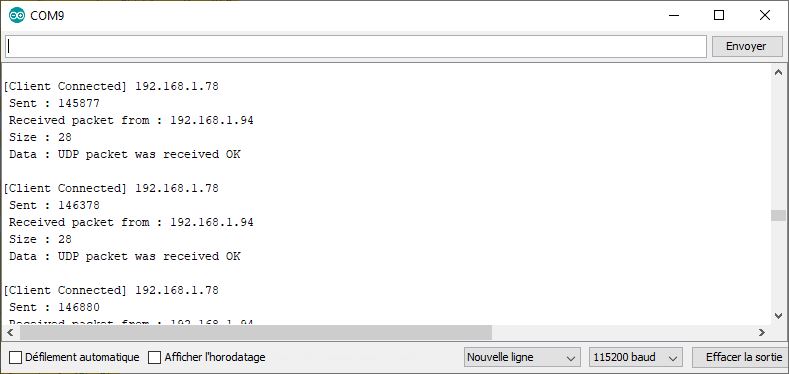
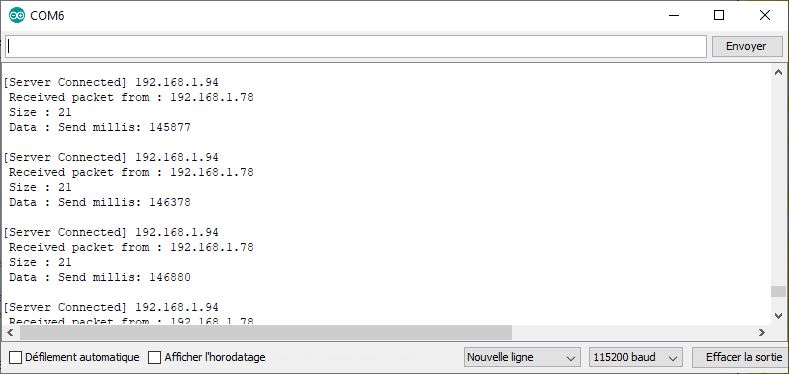
Serial.print(" Received packet from : "); Serial.println(udp.remoteIP());
Serial.print(" Size : "); Serial.println(packetSize);
Serial.print(" Data : ");
if (packetSize) {
int len = udp.read(packetBuffer, 255);
if (len > 0) packetBuffer[len - 1] = 0;
Serial.print(packetBuffer);
udp.beginPacket(udp.remoteIP(), udp.remotePort());
udp.write("UDP packet was received OK\r\n");
udp.endPacket();
}
Serial.println("\n");
delay(500);
Serial.print("[Server Connected] ");
Serial.println (WiFi.localIP());
}
Code ESP8266 UDP Client
In the client code, we will connect to the server using the previously used IP address.
N.B.: Don’t forget to modify and use the same ssid and password values as in the Server module so that the two ESP8266 cards connect to the same network.
#include <ESP8266WiFi.h>
#include <WiFiUdp.h>

WiFiUDP udp;

char packetBuffer[255];
unsigned int localPort = 9999;

const char *ssid = "********";
const char *password = "***********";

void setup() {
  Serial.begin(115200);
  WiFi.begin(ssid, password);

  udp.begin(localPort);

  Serial.print(F("UDP Client : ")); Serial.println(WiFi.localIP());
}

void loop() {
  int packetSize = udp.parsePacket();

  Serial.print(" Received packet from : "); Serial.println(udp.remoteIP());
  Serial.print(" Size : "); Serial.println(packetSize);
  Serial.print(" Data : ");
  if (packetSize) {
    int len = udp.read(packetBuffer, 255);
    if (len > 0) packetBuffer[len - 1] = 0;
    Serial.print(packetBuffer);
  }
  Serial.println("\n");
  delay(500);

  Serial.print("[Client Connected] ");
  Serial.println(WiFi.localIP());

  udp.beginPacket("192.168.1.94", 9999);
  udp.write("Send millis: ");
  char buf[20];
  unsigned long testID = millis();
  sprintf(buf, "%lu", testID);
  Serial.print(" Sent : "); Serial.println(buf);

  udp.write(buf);
  udp.write("\r\n");
  udp.endPacket();
}
Result
When the microcontrollers connect to the Wifi and the communication between the two ESP8266 is established, we can see that information is exchanged between the two cards. It is then possible to control a device connected to the client from the server or vice versa.
Applications
- Create a network of Esp8266 NodeMCUs to manage different devices or sensors


very good and learning tutorial.
THANKS
Good morning
I don’t understand how the “client” knows what address to send the UDP packet to.
The server, after connecting to the wifi network, can have any address.
e.g. 192.168.1.109 or 192.168.1.155 or any other.
However, the connection works, I checked.
I’m stuck.
I do not give the “client” the address of the server and he knows where to send the packet anyway.
Of course, the server, after receiving the packet, knows what address it came from and sends the response.
Hello,
If you’re not specifying an IP address, it may broadcast on the overall network
O thx.
I changed one line of code
from:
udp.beginPacket(“192.168.1.94”, 9999);
to:
udp.beginPacket(udp.remoteIP(), 9999);
and i was wondering why it works.
🙂
Do you have code for 2-way udp comms over Wifi?
Hello, in both code you have udp.write() and udp.read() functions. This already a 2-way communication. You can adapt to your needs