Connection between Arduino and internet is possible with the Ethernet Shield W5100. The basis for creating connected objects, is to connect them over a network such as the WiFi network.
Communication via the Ethernet network is very convenient when you want to connect a device to Wifi.
For a wireless connection, you should use a Wifi Shield or another board with embedded Wifi chip
Hardware
- Computer
- ArduinoUNO
- USB A Male/B Male
- Ethernet cable RJ45
- Ethernet Shield W5100
Operating principle of an Ethernet Shield W5100
The communication network uses the Ethernet which can be linked to local Wifi network. To access the Arduino board without having to connect to the Internet router, it is necessary to create a bridge between wifi and ethernet connection in your computer. For this, we must:
- Go to the Network and Sharing Center.
- Go to “Change adapter settings”
- Select Ethernet and Wifi/(internet source) and right click.
- Click “Create Bridge”.
In Windows, the control terminal, type “arp -a” to see the IP addresses used on the network.
The Ethernet Shield W5100 uses Microchip W5100 as Ethernet controller.

Schematics
The Ethernet Shield W5100 is compatible with the Arduino UNO and Mega microcontroller. The W5100 and SD card use the SPI bus to communicate with the Arduino board. The pin 10 is used to select the ethernet controller W5100, pin 9 as RESET to the W5100 and pin 4 to select the SD card module.
In summary, the pins used are:
- 4 to select the SD card (SD_CS)
- 9 for the reset of the W5100 microchip (W5100_RST)
- 10 to select the W5100 microchip (W5100_CS)
- SPI bus: 11,12,13 pins on an Arduino UNO board/Duelmilanove. The pins 50, 51 and 52 for the Mega
Code for an Ethernet Shield W5100
To communicate over the network, we need to use a particular protocol. This protocol is integrated in Arduino libraries dealing with WiFi communication.
- You need to connect the WiFi module or Ethernet network
- set a server
- define a Customer
//Libraries
#include <Ethernet.h>//https://github.com/CisecoPlc/Arduino-W5100-W5200/tree/master/Ethernet

//Parameters
String request ;
unsigned long refreshCounter  = 0;
byte mac [6] = {0x54, 0x34, 0x41, 0x30, 0x30, 0x31};

//Objects
EthernetServer server(80);
IPAddress ip(192, 168, 1, 179);
EthernetClient client;

void setup() {
  //Init Serial USB
  Serial.begin(9600);
  Serial.println(F("Initialize System"));
  //Init W5100
  Ethernet.begin(mac, ip);
  while (!Ethernet.begin(mac)) {
    Serial.println(F("failed. Retrying in 5 seconds."));
    delay(5000);
    Serial.print(F("Starting W5100..."));
  }
  pinMode(2, OUTPUT);
  server.begin();
  Serial.println(F("W5100 initialized"));
  Serial.print(F("IP Address: "));
  Serial.println(Ethernet.localIP());
}

void loop() {
  client = server.available();
  clientRequest();
  handleRequest();
}

void clientRequest( ) { /* function clientRequest */
  ////Get client request
  if (!client) {
    return;
  }
  // Wait until the client sends some data
  while (!client.available()) {
    delay(1);
  }

  request = client.readStringUntil('\r'); // Read the first line of the request
  Serial.println(request);
  client.flush();
}

void handleRequest( ) { /* function handleRequest */
  ////Handle web client request
  if (request.indexOf('GET') >= 0) {
    {
      webpage(client);
      client.stop();
    }
  }
  if (request.indexOf("/dig2on") > 0) {
    {
      digitalWrite(2, HIGH);
    }
  }
  if (request.indexOf("/dig2off") > 0) {
    {
      digitalWrite(2, LOW);
    }
  }
}

void webpage(EthernetClient client) { /* function webpage */
  ////Send webpage to client

  //output HTML data header
  client.println(F("HTTP/1.1 200 OK"));
  client.println(F("Content-Type: text/html"));
  client.println();
  //header
  client.print(F("<!DOCTYPE HTML><html><head><title>AranaCorp</title>"));
  client.print(F("<meta http-equiv='content-type' content='text/html; charset=UTF-8'>"));
  //meta-refresh page every x seconds
  client.print(F("<meta http-equiv='refresh' content='2'>"));
  client.print(F("</head><body bgcolor='black'><br>"));
  client.print(F("<hr/><hr>"));
  client.print(F("<h1 style='color : #3AAA35;'><center> AranaCorp - Arduino Web Controller </center></h1>"));
  client.print(F("<hr/><hr>"));
  client.print("<center><p style='color:white;'>");
  client.print(F("Page refresh number : "));
  client.print(refreshCounter); //current refresh count
  client.print("</p></center><br>");
  client.print(F("<h2 style='color:green;'>Arduino Inputs</h2>"));
  client.print("<p style='color:white;'>");
  client.print("<br><br>");

  //output analog input pin
  for (int i = 0; i < 6; i++) {
    client.print("<b>Input A");
    client.print(i);
    client.print(" : </b>");
    client.print(analogRead(14 + i)); //A0=14, A1=15 ,etc.
    client.print(F("<br>"));
  }
  client.print(F("</p><br>"));

  //digital output
  client.print(F("<h2 style='color:green;'>Arduino Outputs</h2>"));
  client.print(F("<p style='color:white;'>"));
  client.print(F("<br><br>"));
  client.print(F("<b>Digital output Pin 2 : </b>"));
  client.print("<input value=" + String(digitalRead(2)) + " readonly></input>");
  client.print(F("<a href='/dig2on'><button>Turn On </button></a>"));
  client.print(F("<a href='/dig2off'><button>Turn Off </button></a><br />"));

  client.print(F("</p><br>"));

  //file end
  client.print(F("<br></body></html>"));
  refreshCounter += 1;
}
Result
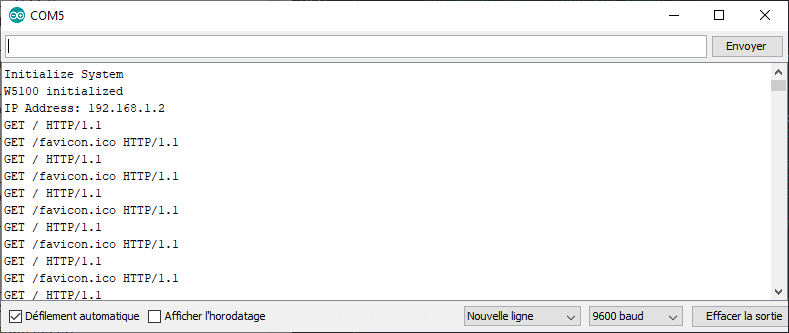
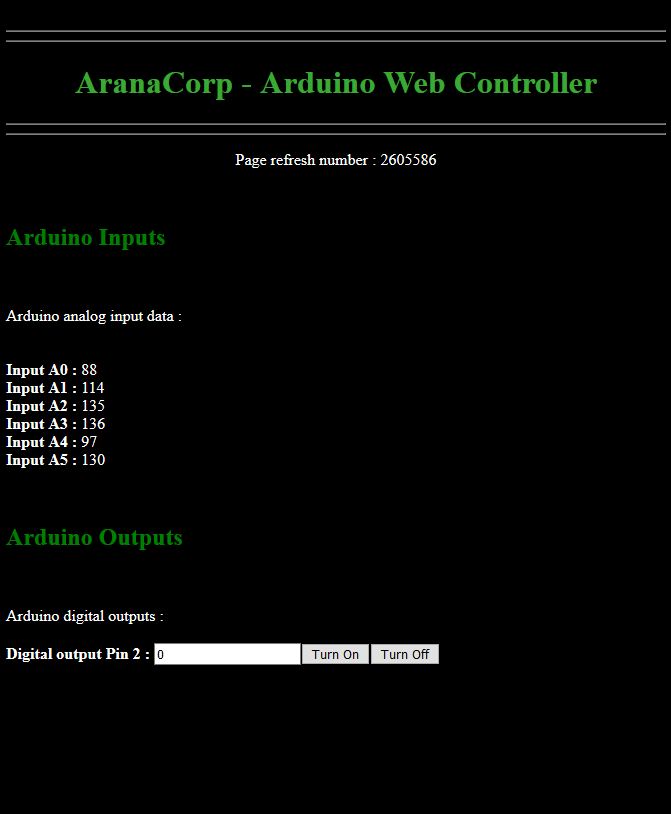
We can see that the Ethernet Shield W5100 initializes correctly. When you enter the IP address in the browser address bar, the web page described in the function appears.
Once the page loads, the analog input values vary with each refresh and the status of the pin 2 can be changed by pressing the corresponding buttons.
Applications
- Use a web interface to control your Arduino


Does not appear to work. I have tried many other sketches and they all do but, this sketch you show will not bring up any page nor anything show in serial monitor. Any ideas?
The 5100 shield is good..
thanks,
Hi Dave, I’ve just tested the code just to be sure with a simple copy/paste and it worked well. Did you change the IP address to match your local network?
The phrase “Initialize System” should at least appear in the serial monitor after reset. If it doesn’t you may have an issue with the Arduino or setup.
there is minor change…
Change byte mac [6] = {0x54, 0x34, 0x41, 0x30, 0x30, 0x31}; to
byte mac[] = {0xDE, 0xAD, 0xBE, 0xFE, 0xED};
In the Ethernetserver, place an ipaddress within your LAN. if your arduino ip address is 192.168.254.120, make your Ethernetserver IP set to 192.168.254.130.
.. then compile and upload…..
last, Open a webpage with 192.168.254.130 address to see a working communication.
Hi Robby,
Thanks for the comment. You needed this modification to make it work on your setup?