
To test and use the MQTT protocol, you can install an MQTT server with Mosquitto on a Windows or Linux computer. A common application is to install Mosquittoon a Raspberry Pi and use it as an MQTT server for IoT and home automation.
MQTT protocol description
MQTT (Message Queue Telemetry Transport) is a communication protocol specified for small data exchanges over networks with long delays and low bandwidth.
The protocol consists of an MQTT server (broker) to which clients connect. Clients can publish or subscribe to a topic. Messages published on topics can then be exchanged between clients.
Mosquittois an open-source MQTT server that makes it easy to use the MQTT protocol between different devices connected to the same network.
Installing the MQTT server under Linux
On Linux, Mosquittocan be installed using the following commands
sudo apt-get update
sudo apt-get install mosquitto mosquitto-clients
Once the service has been installed, it can be managed with the following commands
sudo systemctl stop mosquitto   #arrêter
sudo systemctl start mosquitto  #démarrer
sudo systemctl restart mosquitto #redémarrer
sudo systemctl status mosquitto #connaitre le status
Server configuration is performed using the file
sudo nano /etc/mosquitto/mosquitto.conf
sudo nano /etc/mosquitto/conf.d/default.conf
Example of a configuration file
 # Place your local configuration in /etc/mosquitto/conf.d/
 #
 # A full description of the configuration file is at
 # /usr/share/doc/mosquitto/examples/mosquitto.conf.example

 pid_file /var/run/mosquitto/mosquitto.pid

 persistence true
 persistence_location /var/lib/mosquitto/

 log_dest file /var/log/mosquitto/mosquitto.log

 port 1883
 allow_anonymous true

 include_dir /etc/mosquitto/conf.d
Installing the MQTT server under Windows
On Windows, download and install Mosquitto
Once installed, enter the following command in a command prompt to start the service
mosquittoTo check that the service has been launched:
netstat -an | find str 1883C:\Users\ADMIN>netstat -an | findstr 1883
TCP 127.0.0.1:1883 0.0.0.0:0 LISTENING
TCP [::1]:1883 [::]:0 LISTENINGThe server configuration file is located in the installation folder
C:\Program Files\mosquitto\mosquitto.confTest MQTT
You can also use mosquitto directly from the command line. In a terminal, enter the following command
mosquitto_sub -h localhost -t test_topicIn another terminal
mosquitto_pub -h localhost -t test_topic -m "Hello World!"N.B.: Run subscriber code before publisher code
Test MQTT avec Python
In the following example, we’ll use mosquitto with Python to exchange MQTT messages between two Python scripts.
python -m pip install paho-mqttSubscriber Python script
#!/usr/bin/env python
# -*- coding: utf-8 -*-
import paho.mqtt.client as mqtt #import library
import time

MQTT_BROKER = "localhost"   #specify the broker address, it can be IP of raspberry pi or simply localhost
MQTT_TOPIC = "test_channel" #this is the name of topic

global messageReceived
messageReceived=False

# callback called when client receives a CONNACK response
def on_connect(client, userdata, flags, rc):
    if rc==0:
        client.subscribe(MQTT_TOPIC)
        print("subscribe to {}".format(MQTT_TOPIC))
    else:
        syslog.syslog("bad connection {}".format(rc))

# callback called when a PUBLISH message is received
def on_message(client, userdata, msg):
    print(msg.topic+" "+str(msg.payload.decode("utf-8")))

    global messageReceived
    messageReceived=True

client = mqtt.Client()
client.on_connect = on_connect
client.on_message = on_message

client.connect(MQTT_BROKER)
client.loop_forever()# use this line if you don't want to write any further code. It blocks the code forever to check for data

"""
client.loop_start()  #use this line if you want to write any more code here
delay=0.001
counter=120/delay #2min
while messageReceived==False and counter>0:
	time.sleep(delay)
client.loop_stop()
"""
Python publisher script
To publish on a topic, simply specify the server address (MQTT_BROKER) and the topic name (MQTT_TOPIC).
#!/usr/bin/env python
# -*- coding: utf-8 -*-
import paho.mqtt.client as mqtt #import library
import time
MQTT_BROKER = "localhost"
MQTT_TOPIC = "test_channel"
client = mqtt.Client("pyScript")
client.connect(MQTT_BROKER)
msg="Hello World!!"
client.publish(MQTT_TOPIC,msg)
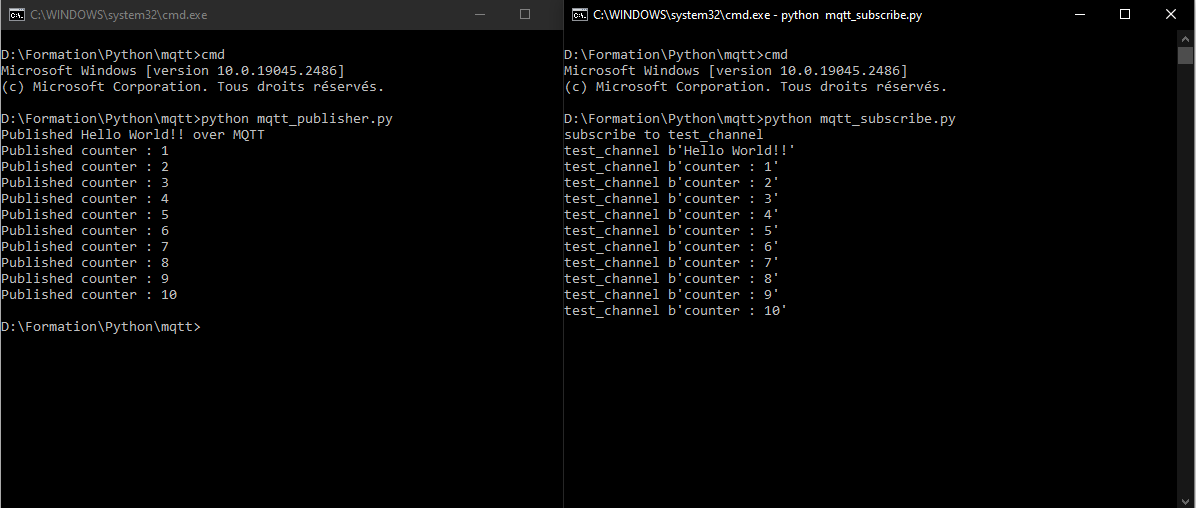
print("Published {} over MQTT".format(msg))
counter=0
while counter<10:
counter+=1
client.publish(MQTT_TOPIC,"counter : {}".format(counter))
print("Published counter : {}".format(counter))
time.sleep(0.001)
client.disconnect()
Send a group of ordered data with JSON
The python JSON package is a handy library for storing and exchanging data in the form of JSON files.
Script to send a JSON
The JSON file is simply in dictionary format
import paho.mqtt.client as mqtt #import library
import time
import json

MQTT_BROKER = "localhost"
MQTT_TOPIC = "test_channel"

client = mqtt.Client("10.3.141.1")
client.connect(MQTT_BROKER)
json_data = {}
json_data['msg'] = "hello World"
json_data['index'] = 12
json_data['value'] = 49.3
json_data['list'] = ["alpha","bravo","charlie"]

client.publish(MQTT_TOPIC,str(json_data))

print("Published json over MQTT")
Script to receive a JSON
In the reception script, we will add the decoding of the json in the form of a dictionary
	if "{" in msgrec: #decode json
		data = json.loads(msgrec.replace("'",'"'))
		for key in data:
			print("{} : {}".format(key,data[key]))
#!/usr/bin/env python
# -*- coding: utf-8 -*-
import paho.mqtt.client as mqtt #import library
import time
import json

MQTT_BROKER = "localhost"   #specify the broker address, it can be IP of raspberry pi or simply localhost
MQTT_TOPIC = "test_channel" #this is the name of topic

global messageReceived
messageReceived=False

# The callback for when the client receives a CONNACK response from the server.
def on_connect(client, userdata, flags, rc):
	if rc==0:
		client.subscribe(MQTT_TOPIC)
		print("subscribe to {}".format(MQTT_TOPIC))
	else:
		syslog.syslog("bad connection {}".format(rc))

# The callback for when a PUBLISH message is received from the server.
def on_message(client, userdata, msg):
	msgrec=str(msg.payload.decode("utf-8"))
	print(msg.topic+" "+msgrec)

	if "{" in msgrec: #decode json
		data = json.loads(msgrec.replace("'",'"'))
		for key in data:
			print("{} : {}".format(key,data[key]))

	global messageReceived
	messageReceived=True

client = mqtt.Client()
client.on_connect = on_connect
client.on_message = on_message

client.connect(MQTT_BROKER)
client.loop_forever()


