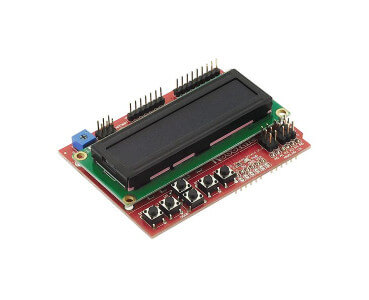
One of the most widely used information display elements in the Arduino world is the 16×2 LCD (Liquid Crystal Display). When manufacturing an electronic system, it can be interesting to have it give us some information about its status without having to connect it to a computer or to another system such as a smartphone. The 16×02 LCD screen is supplied with a large number of Arduino kits and is very sufficient for a large number of applications.
The 16×2 LCD screen can be found mounted on a shield with the bonus of a few buttons to create simple programmable interfaces to display values and control your Arduino project. All this while making the installation much easier.
Hardware
- Computer
- Arduino UNO
- USB cable A Male to B Male
- LCD Shield
Principle of operation

Liquid crystal displays make use of the light modulation property of liquid crystals. Liquid crystal displays consist of two layers of polarizers, with perpendicular polarization directions, sandwiching two glass plates between which the liquid crystals are placed. On the glass plates is a matrix of electrodes for each pixel. A voltage applied between the electrodes of a pixel causes a change in the orientation of the molecules and thus the transparency of the pixel, which may or may not allow the light of the backlight to pass through.
Schematic
The LCD shield is compatible with Arduino UNO and Mega cards and is placed directly on the card.
In summary, the pins used are:
- A0 for button reading
- pins 8, 9, 4, 5, 6, 7 for LCD management
The RST button is directly connected to the reset button of the Arduino board.
Code
Once your module is correctly connected, you can modify the following code to obtain the desired functionality. In the following example, we define a function that will read the value of the buttons and execute an action according to the button pressed.
For each button pressed, the name and value of the button are displayed. Your shield may be different depending on the supplier and version. If this is the case, this code will allow you to easily modify the button detection values.
To manage the 16×2 LCD screen in the programme, the library used is LiquidCrystal.h whose functions are as follows:
- LiquidCrystal lcd(rs, en, d4, d5, d6, d7) to define the 4bits communication
- lcd.begin(16, 2); to intialize the screen
- lcd.print() to display an ASCII character string
- lcd.write() to display data, one byte at a time.
- lcd.setCursor(x, y) to place the cursor (column x: 0-16, line y:0-2).
- lcd.clear() erase what is displayed on the screen
//Libraries
#include <LiquidCrystal.h>//https://arduino.cc/en/Reference/LiquidCrystal

//Parameters
const int btnsPin  = A0;
int btnsVal  = 0;

//Objects
LiquidCrystal lcd(8, 9, 4, 5, 6, 7);;

//Enums
enum {
  BUTTON_NONE,
  BUTTON_UP,
  BUTTON_DOWN,
  BUTTON_LEFT,
  BUTTON_RIGHT,
  BUTTON_SELECT,
};

void setup() {
  //Init Serial USB
  Serial.begin(9600);
  Serial.println(F("Initialize System"));
  //Init LCD16x2 Shield
  lcd.begin(16, 2);
  lcd.print(F("Hello World "));
  delay(2000);
  lcd.clear();
  lcd.print(F("Button pressed: "));
}

void loop() {
  btnListener(getBtnPressed());
}

void btnListener(byte btnStatus) { /* function btnListener */
  //// Get button value when pressed
  lcd.setCursor(0, 1);
  switch (btnStatus) {
    case BUTTON_UP:
      lcd.print(F("UP     "));
      lcd.print(btnsVal);
      break;

    case BUTTON_DOWN:
      lcd.print(F("DOWN   "));
      lcd.print(btnsVal);
      lcd.print("   ");
      break;

    case BUTTON_LEFT:
      lcd.print(F("LEFT   "));
      lcd.print(btnsVal);
      lcd.print("   ");
      break;

    case BUTTON_RIGHT:
      lcd.print(F("RIGHT  "));
      lcd.print(btnsVal);
      lcd.print("   ");
      break;

    case BUTTON_SELECT:
      lcd.print(F("SELECT "));
      lcd.print(btnsVal);
      lcd.print("   ");
      break;

    default://case BUTTON_NONE:
      //lcd.print(F("       "));
      break;
  }
  delay(100);
}

byte getBtnPressed() { /* function getBtnPressed */
  //// Get button value when pressed
  btnsVal = analogRead(btnsPin);
  if (btnsVal < 50)
    return BUTTON_RIGHT;
  else if (btnsVal < 250)
    return BUTTON_UP;
  else if (btnsVal < 350)
    return BUTTON_DOWN;
  else if (btnsVal < 450)
    return BUTTON_LEFT;
  else if (btnsVal < 650)
    return BUTTON_SELECT;
  else
    return BUTTON_NONE;
}
Applications
- Create a simple interface for your Arduino project
Sources
- https://media.digikey.com/pdf/Data%20Sheets/DFRobot%20PDFs/DFR0009_Web.pdf
- https://arduino.cc/en/Reference/LiquidCrystal
- Managing a 16×2 LCD screen with Arduino
Find other examples and tutorials in our Automatic code generator
Code Architect


