In order to get information from the Arduino without connecting it to the computer, it is common to use an interface like the 4×7 segment display. We will see in this tutorial how to connect and program the Arduino to display information on the display.
It is possible to connect the 7-segment display directly to the pins of the Arduino. In order to keep the pins free for other functionalities, we use a 74HC595 shift register.
Material
- Computer
- Arduino UNO
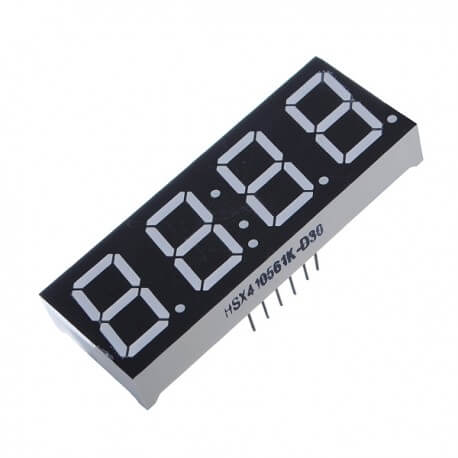
- 4×7 segment display
- Shift register 74HC595
- Dupont cable
- Breadboard
Principle of operation
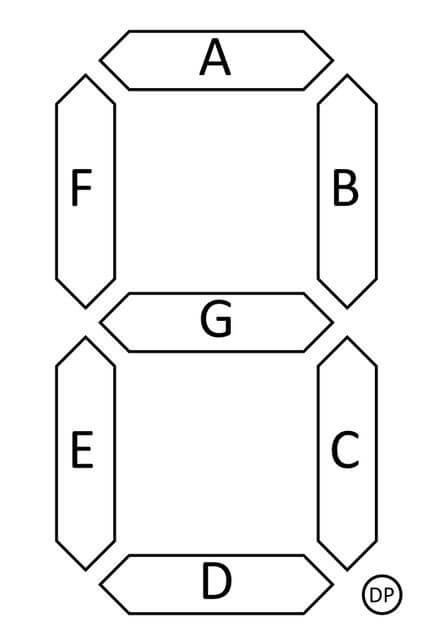
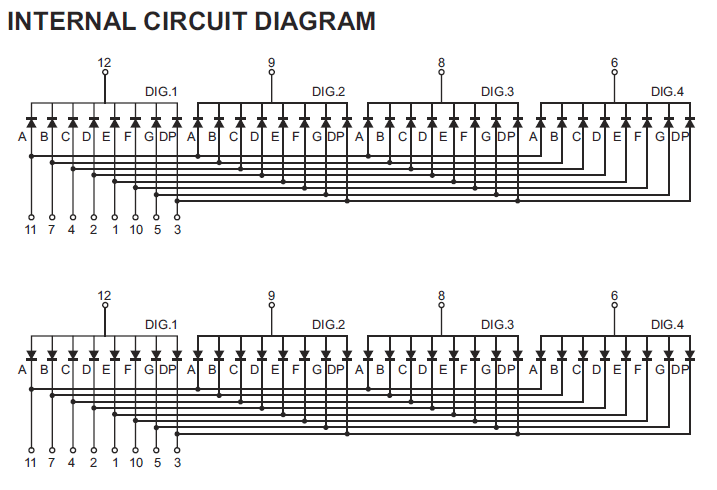
The 7-segment displays consist of a series of LEDs placed to form numbers. These LEDs are managed via the display pins (1-12).
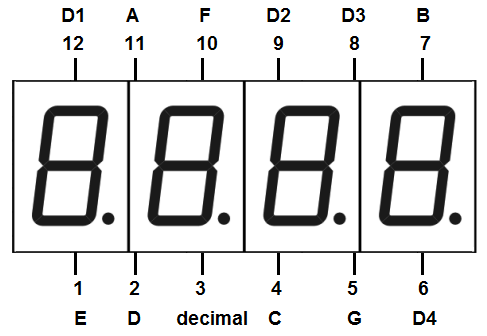
The groups of LEDs or digits are activated via pins D1, D2, D3, D4 and the LEDs are lit via pins A, B, C, D, E, F, G and DP for the decimal point.
There are two types of displays, with common cathode (series A on top) or with common anode (series B on bottom). For the anode series, you have to connect the common to 5V to activate the digit and switch the pin to LOW to light an LED. In the case of a common cathode, you must connect the common to the ground and switch the pin to the HIGH state to turn on the LED.
Be sure to check the model you have. In this tutorial, we use the 4×7 segment 5461BS display with common anode.
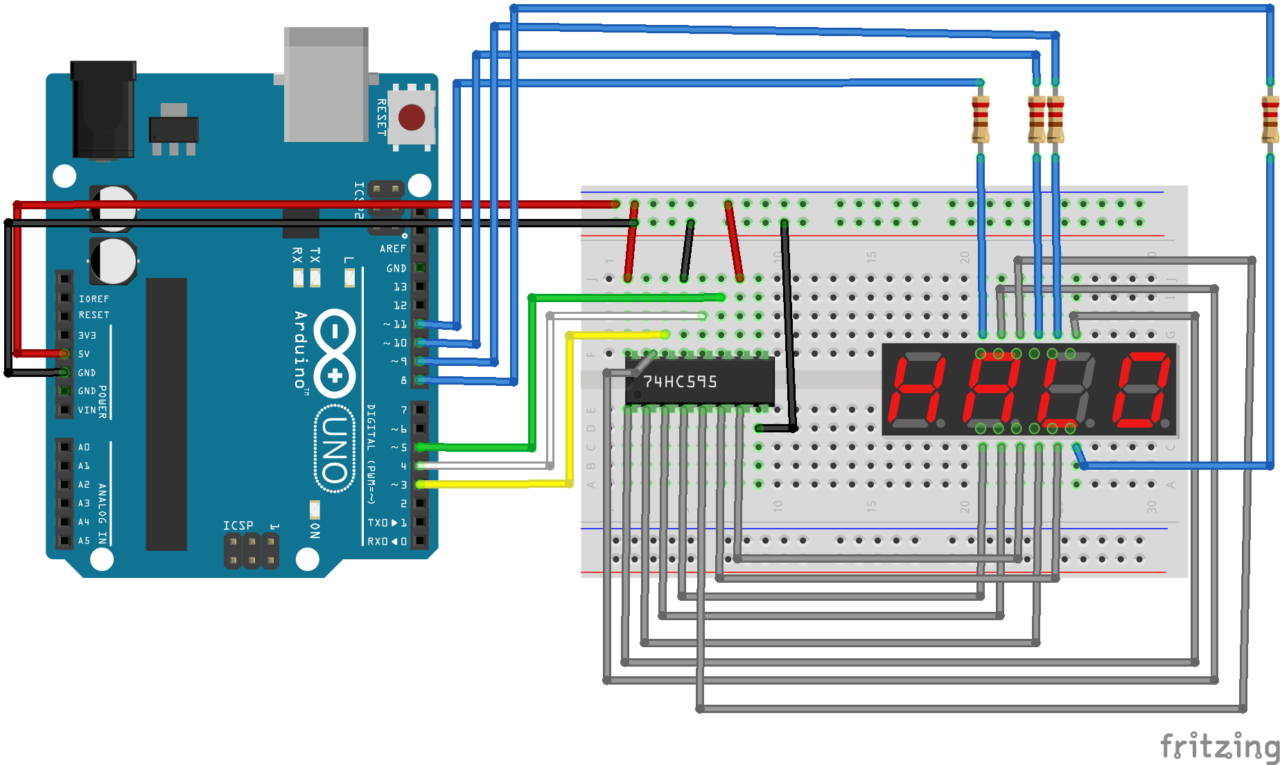
Scheme
We use a 74HC595 shift register whose outputs Q0-6 and Q7 we connect to the inputs of the A-F and DP display respectively.
Code
#define NUM_OF_DIGITS 4

int latch = 4; //74HC595  pin 9 STCP
int cs = 5; //74HC595  pin 10 SHCP
int data = 3; //74HC595  pin 8 DS
int dPins[4] = {11, 10, 9, 8};

//  DP G F E D C B A
//0: 1 1 0 0 0 0 0 0 0xc0
//1: 1 1 1 1 1 0 0 1 0xf9
//2: 1 0 1 0 0 1 0 0 0xa4
//3: 1 0 1 1 0 0 0 0 0xb0
//4: 1 0 0 1 1 0 0 1 0x99
//5: 1 0 0 1 0 0 1 0 0x92
//6: 1 0 0 0 0 0 1 0 0x82
//7: 1 1 1 1 1 0 0 0 0xf8
//8: 1 0 0 0 0 0 0 0 0x80
//9: 1 0 0 1 0 0 0 0 0x90
unsigned char table[] =
{0xc0, 0xf9, 0xa4, 0xb0, 0x99, 0x92, 0x82, 0xf8, 0x80, 0x90};

void setup() {
  Serial.begin(115200);
  pinMode(latch, OUTPUT);
  pinMode(cs, OUTPUT);
  pinMode(data, OUTPUT);
  for (int j = 0; j < NUM_OF_DIGITS; j++) pinMode(dPins[j], OUTPUT);
}

void loop() {
  //Count from 0 to 9 on each digit
  for (int i = 0; i < NUM_OF_DIGITS; i++) {
    for (int j = 0; j < 10; j++) {
      Display(i, j);
      delay(500);
      Serial.println(j);
    }
    delay(500);
  }
}

void Display(int id, unsigned char num)
{
  digitalWrite(latch, LOW);
  shiftOut(data, cs, MSBFIRST, table[num]);
  digitalWrite(latch, HIGH);
  for (int j = 0; j < NUM_OF_DIGITS; j++) digitalWrite(dPins[j], LOW);
  digitalWrite(dPins[id], HIGH);
}
Once the code is uploaded, the display should count from 0 to 9 on each digit.
Bonus: 4-digit display
In order to display a number on 4 digits, we will convert the number into 4 digits of base 10 using the following instructions:
      number = k;
      for (int i = 0; i < NUM_OF_DIGITS; i++)
      {
        digit_data[i] = number % 10;
        number /= 10;
      }
We will also use the millis() function to ensure that the display is refreshed correctly.
#define NUM_OF_DIGITS 4

int latch = 4; //74HC595  pin 9 STCP
int cs = 5; //74HC595  pin 10 SHCP
int data = 3; //74HC595  pin 8 DS

int dPins[4] = {11, 10, 9, 8};

//  DP G F E D C B A
//0: 1 1 0 0 0 0 0 0 0xc0
//1: 1 1 1 1 1 0 0 1 0xf9
//2: 1 0 1 0 0 1 0 0 0xa4
//3: 1 0 1 1 0 0 0 0 0xb0
//4: 1 0 0 1 1 0 0 1 0x99
//5: 1 0 0 1 0 0 1 0 0x92
//6: 1 0 0 0 0 0 1 0 0x82
//7: 1 1 1 1 1 0 0 0 0xf8
//8: 1 0 0 0 0 0 0 0 0x80
//9: 1 0 0 1 0 0 0 0 0x90
unsigned char table[] =
{0xc0, 0xf9, 0xa4, 0xb0, 0x99, 0x92, 0x82, 0xf8, 0x80, 0x90};


int digit_data[NUM_OF_DIGITS] = {0};

unsigned int number = 0;
unsigned long previousUpdate = 0, updateTime = 200;

void setup() {
  Serial.begin(115200);
  pinMode(latch, OUTPUT);
  pinMode(cs, OUTPUT);
  pinMode(data, OUTPUT);

  for (int j = 0; j < NUM_OF_DIGITS; j++) pinMode(dPins[j], OUTPUT);
}

void loop() {
  //Count from 0 to 999 on each digit
  unsigned int k = 0;
  while (k < 1000) {
    updateDigits();
    if (millis() - previousUpdate > updateTime) {
      k++;
      previousUpdate = millis();
      number = k;
      Serial.print(k); Serial.print(" (");
      for (int i = 0; i < NUM_OF_DIGITS; i++)
      {
        digit_data[i] = number % 10;
        number /= 10;
        Serial.print(digit_data[i]);
      }
      Serial.println(")");
    }
  }
}

void Display(int id, unsigned char num)
{
  digitalWrite(latch, LOW);
  shiftOut(data, cs, MSBFIRST, table[num]);
  digitalWrite(latch, HIGH);
  for (int j = 0; j < NUM_OF_DIGITS; j++) digitalWrite(dPins[j], LOW);
  digitalWrite(dPins[id], HIGH);
}

void updateDigits() {
  for (int j = 0; j < NUM_OF_DIGITS; j++)
  {
    Display(j, digit_data[j]);
    delay(5);
  }
}
The number should increment every 200 milliseconds and be displayed on all 4 digits.
Sources
Retrouvez nos tutoriels et d’autres exemples dans notre générateur automatique de code
La Programmerie


