The RC522 RFID module is a smart card reader which, among other things, allows to activate a mechanism when the right card is presented to the reader. In this tutorial, we will see the management of an RC522 RFID module with a NodeMCU ESP8266 card.
Prerequisite: Program your NodeMCU with Arduino
Material
- Computer
- ESP8266 NodeMCU Board
- USB cable male B/male micro B
- RFID module RC522
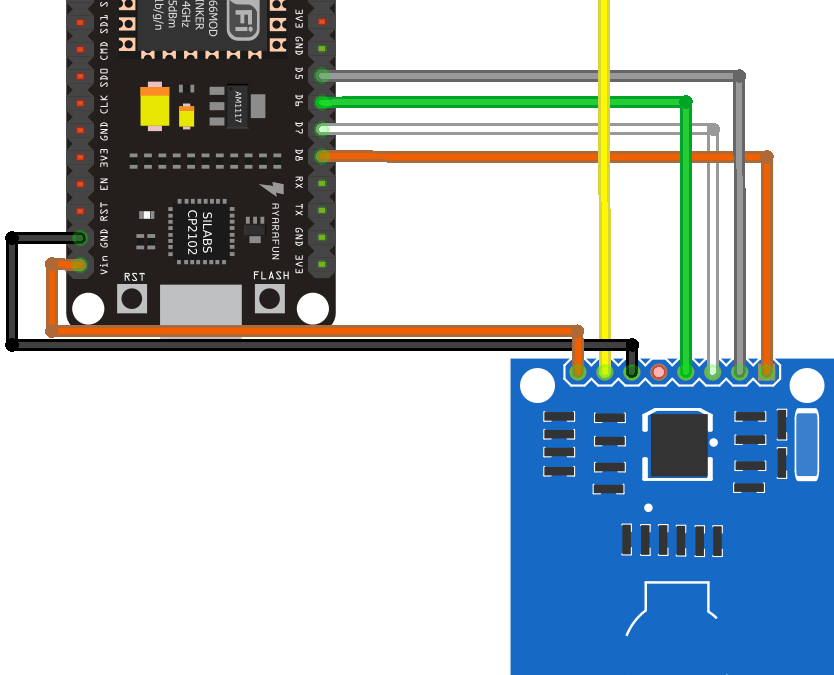
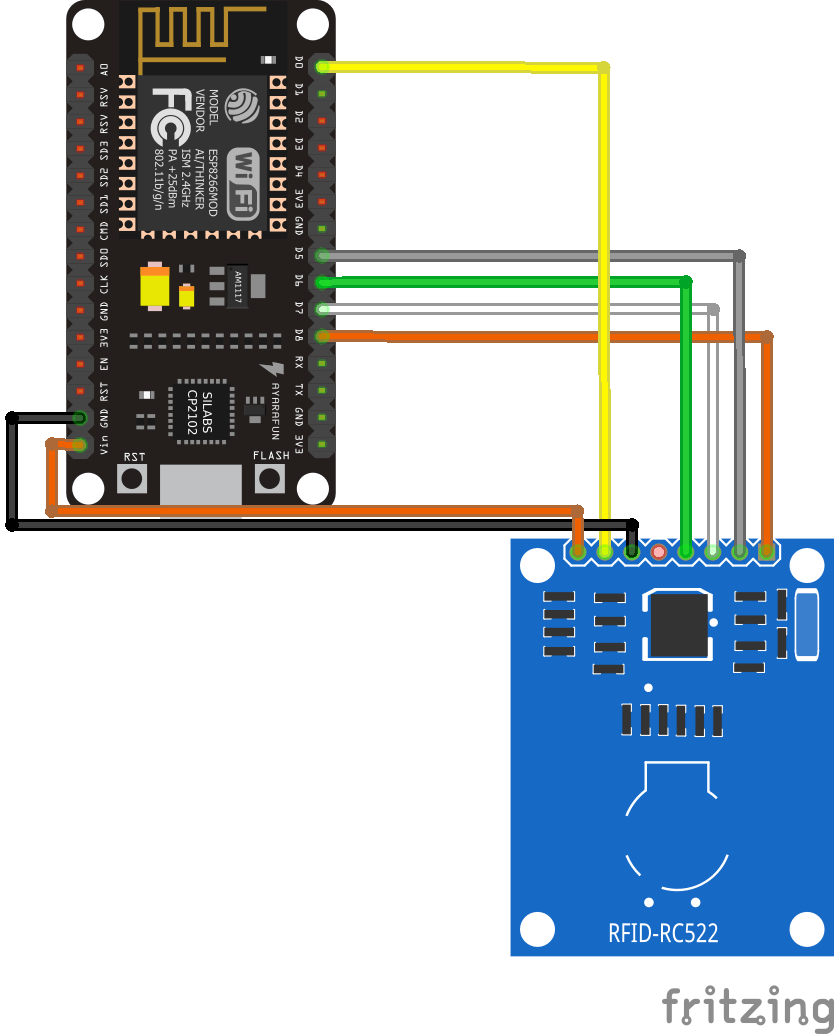
Scheme
The RC522 RFID module uses the SPI protocol to communicate with the ESP8266. The SPI communication uses specific boxes on this type of microcontroller.
The pinout is as follows (left side RC522, right side ESP8266):
- Vcc <-> 3V3 (or Vin(5V) depending on the module version)
- RST (Reset) <-> D0
- GND (Ground) <-> GND
- MISO (Master Input Slave Output) <-> D6
- MOSI (Master Output Slave Input) <-> D7
- SCK (Serial Clock) <-> D5
- SS/SDA (Slave select) <-> D8
Warning: Depending on the version of the RFID module, the power supply voltage may be different (3.3V or 5V). Please check the power supply voltage of your module.
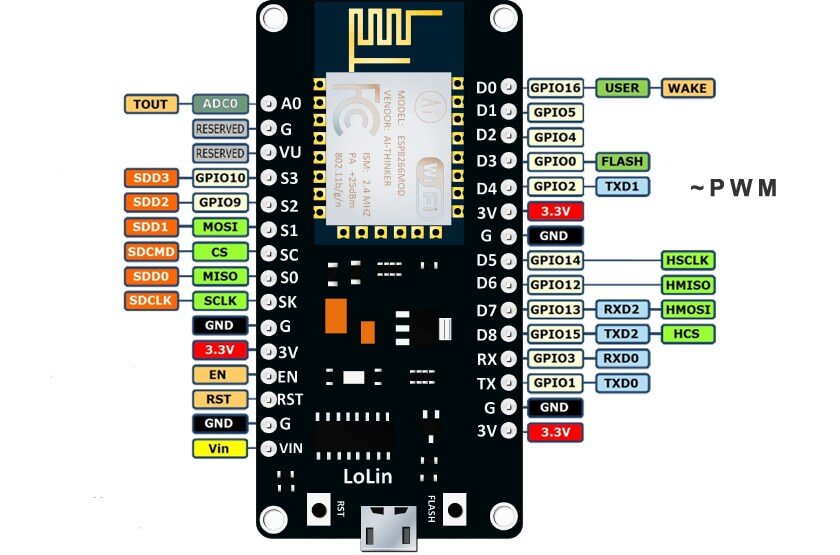
As a reminder, here is the pinout diagram of the ESP8266 board.
Code to read an RFID card
To use the RFID RC522 module we use the SPI.h library which will allow us to establish the communication between the ESP8266 card and the module; and the MFRC522.h library which will allow us to dialogue with the module.
#include <SPI.h>
#include <MFRC522.h>

#define SS_PIN D8
#define RST_PIN D0

MFRC522 rfid(SS_PIN, RST_PIN); // Instance of the class

MFRC522::MIFARE_Key key;

// Init array that will store new NUID
byte nuidPICC[4];

void setup() {
  Serial.begin(115200);
  SPI.begin(); // Init SPI bus
  rfid.PCD_Init(); // Init MFRC522
  Serial.println();
  Serial.print(F("Reader :"));
  rfid.PCD_DumpVersionToSerial();

  for (byte i = 0; i < 6; i++) {
    key.keyByte[i] = 0xFF;
  }
  Serial.println();
  Serial.println(F("This code scan the MIFARE Classic NUID."));
  Serial.print(F("Using the following key:"));
  printHex(key.keyByte, MFRC522::MF_KEY_SIZE);
}

void loop() {

  // Reset the loop if no new card present on the sensor/reader. This saves the entire process when idle.
  if ( ! rfid.PICC_IsNewCardPresent())
    return;

  // Verify if the NUID has been readed
  if ( ! rfid.PICC_ReadCardSerial())
    return;

  Serial.print(F("PICC type: "));
  MFRC522::PICC_Type piccType = rfid.PICC_GetType(rfid.uid.sak);
  Serial.println(rfid.PICC_GetTypeName(piccType));

  // Check is the PICC of Classic MIFARE type
  if (piccType != MFRC522::PICC_TYPE_MIFARE_MINI &&
      piccType != MFRC522::PICC_TYPE_MIFARE_1K &&
      piccType != MFRC522::PICC_TYPE_MIFARE_4K) {
    Serial.println(F("Your tag is not of type MIFARE Classic."));
    return;
  }

  if (rfid.uid.uidByte[0] != nuidPICC[0] ||
      rfid.uid.uidByte[1] != nuidPICC[1] ||
      rfid.uid.uidByte[2] != nuidPICC[2] ||
      rfid.uid.uidByte[3] != nuidPICC[3] ) {
    Serial.println(F("A new card has been detected."));

    // Store NUID into nuidPICC array
    for (byte i = 0; i < 4; i++) {
      nuidPICC[i] = rfid.uid.uidByte[i];
    }

    Serial.println(F("The NUID tag is:"));
    Serial.print(F("In hex: "));
    printHex(rfid.uid.uidByte, rfid.uid.size);
    Serial.println();
    Serial.print(F("In dec: "));
    printDec(rfid.uid.uidByte, rfid.uid.size);
    Serial.println();
  }
  else Serial.println(F("Card read previously."));

  // Halt PICC
  rfid.PICC_HaltA();

  // Stop encryption on PCD
  rfid.PCD_StopCrypto1();
}


/**
   Helper routine to dump a byte array as hex values to Serial.
*/
void printHex(byte *buffer, byte bufferSize) {
  for (byte i = 0; i < bufferSize; i++) {
    Serial.print(buffer[i] < 0x10 ? " 0" : " ");
    Serial.print(buffer[i], HEX);
  }
}

/**
   Helper routine to dump a byte array as dec values to Serial.
*/
void printDec(byte *buffer, byte bufferSize) {
  for (byte i = 0; i < bufferSize; i++) {
    Serial.print(buffer[i] < 0x10 ? " 0" : " ");
    Serial.print(buffer[i], DEC);
  }
}
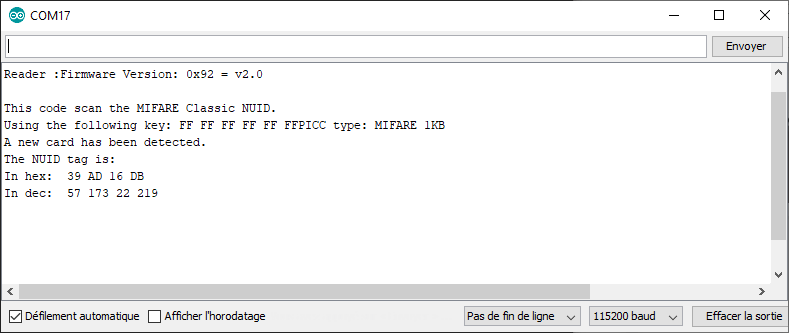
Result
When a card, badge or RFID chip is passed in front of the module, the identification address of the badge is displayed on the serial monitor.
Applications
- Develop a web interface that is only activated when the right badge is passed in front of the module


There was an error in the code “D8 was not declared in this scope”
Did you change the board in Arduino IDE before loading the code?
I had the same error using both the Arduino IDE and PlatformIO.
ESP8266_RC522:3:16: error: ‘D8’ was not declared in this scope; did you mean ‘s8’?
3 | #define SS_PIN D8
| ^~
C:\Users\zoso2\Documents\Arduino\ESP8266_RC522\ESP8266_RC522.ino:5:14: note: in expansion of macro ‘SS_PIN’
5 | MFRC522 rfid(SS_PIN, RST_PIN); // Instance of the class
| ^~~~~~
ESP8266_RC522:4:17: error: ‘D0’ was not declared in this scope; did you mean ‘A0’?
4 | #define RST_PIN D0
| ^~
C:\Users\zoso2\Documents\Arduino\ESP8266_RC522\ESP8266_RC522.ino:5:22: note: in expansion of macro ‘RST_PIN’
5 | MFRC522 rfid(SS_PIN, RST_PIN); // Instance of the class
| ^~~~~~~
exit status 1
‘D8’ was not declared in this scope; did you mean ‘s8’?
Upon changing it to 8 and 0, however, I get a different situation where it is stuck in a boot loop.
ets Jan 8 2013,rst cause:4, boot mode:(3,6)
wdt reset
load 0x4010f000, len 3460, room 16
tail 4
chksum 0xcc
load 0x3fff20b8, len 40, room 4
tail 4
chksum 0xc9
csum 0xc9
v00043580
~ld
You need to select the correct board or change the pin names to match your board(Program your NodeMCU with Arduino)
Just change
#define SS_PIN D8
#define RST_PIN D0
to
#define SS_PIN 15
#define RST_PIN 16
That happens because Generic ESP8266 Module core doesn’t contain macro definitions of board pins, so you must use their GPIO numbers. Try to find “ESP8266 pinout” for reference.
This code scan the MIFARE Classic NUID.
02:44:59.503 -> Using the following key: FF FF FF FF FF FFrl
02:45:18.856 -> Reader :Firmware Version: 0xFF = (unknown)
02:45:18.856 -> WARNING: Communication failure, is the MFRC522 properly connected?
What is your question?
It might be a connection issue
Muy buena publicación, me ha ayudado.
I got the same problem wire is connected well, the module is correct, and my esp8266 is able to connect to the firebase also present and available, do you have another solution?
How to interface 3 RFID Sensors with ESP9266 is this possible ?
Hi,Yes
you need to wire each slave select pin to a different pin of the esp
ex:
SS1/SDA (Slave select) <-> D8
SS2 (Slave select) <-> D4
SS3 <-> D3
the other wire of the SPI bus can remain the same