In this project, we’re going to build an automatic gate using an infrared sensor and a servomotor controlled by Arduino.
Objective
Using an Arduino program, we’re going to make the automatic barrier rise when an object passes through, and lower when the passage is clear.
Hardware
- Computer
- Arduino Nano
- Nano Expansion Shield
- Infrared sensor GP2Y0A21
- USB A Male cable
Arduino software installation
If you haven’t already done so, please install the Arduino software on your computer by following this tutorial. Once the software is installed, you can check that the Arduino board is recognized by the computer.
Uploading code to the Arduino
We’re now going to check that we can upload code to the Arduino Nano.
To do this, open a new Arduino file.
void setup() {
  // put your setup code here, to run once:

}

void loop() {
  // put your main code here, to run repeatedly:

}
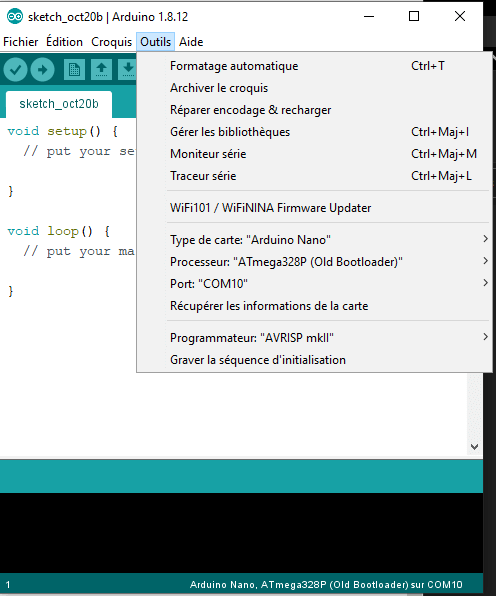
In the “Tools” menu, select the card type, processor and port corresponding to your card.
In this project, we’re using an Arduino-compatible Nano board with the CH340 driver and the old Bootloader.
So we select “Arduino Nano”, processor: “Old Bootloader” and the port used. Here, “COM10”.
Vous pouvez ensuite cliquer sur la flèche (->) en haut à gauche ou dans le menu « Croquis>Téléverser » pour charger le code sur la carte. Si le logiciel affiche « Téléversement terminé », c’est que tout fonctionne correctement.
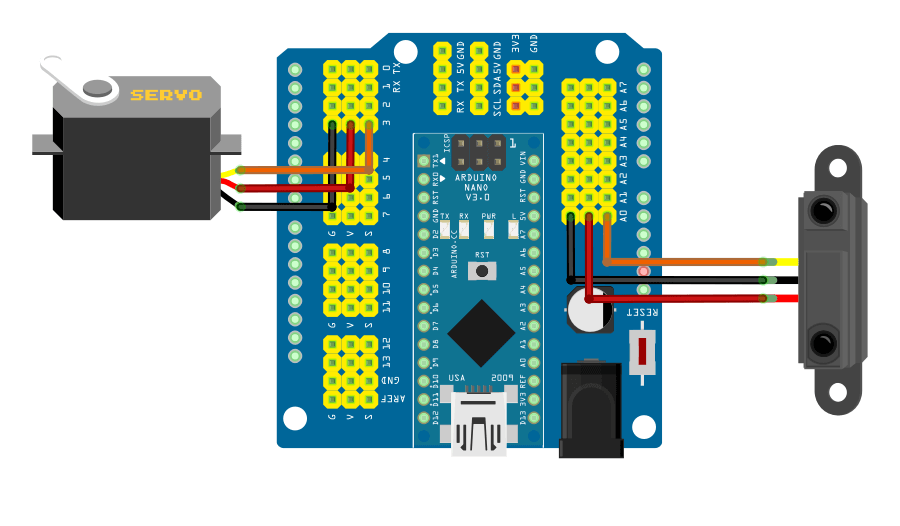
Diagram
In this project, we’ll connect the infrared sensor to Analog pin A0 and the servomotor to pin 3. Since we’re using an expansion shield, connecting the pins is easy. Be sure to check the direction of the pins to avoid damaging the hardware (SVG, S-signal, V- 5V voltage, G- ground).
Sensor test code
To determine the distance from the object to the sensor at which the barrier lifts, we’ll test the operation of the infrared sensor. Load the following code, then move your hand in front of the sensor to set the trigger threshold values. Modify the DETECT_VAL and CLEAR_VAL values to obtain the desired behavior.
//Parameters
#define DETECT_VAL 300
#define CLEAR_VAL 200

//Constants
const int gp2y0a21Pin  = A0;

//Variables
int gp2y0a21Val  = 0;
bool object=false,oldStatus=true;
String comment ="";

void setup() {
  //Init Serial USB
  Serial.begin(9600);
  Serial.println(F("Initialize System"));
  //Init ditance ir
  pinMode(gp2y0a21Pin, INPUT);
}

void loop() {
  readSensor();
  delay(500);
}

void readSensor() { /* function testGP2Y0A21 */
  ////Read distance sensor
  gp2y0a21Val = analogRead(gp2y0a21Pin);

  if (gp2y0a21Val > DETECT_VAL) {
    object=true;
    comment="Obstacle detected";
  }
  if(gp2y0a21Val < CLEAR_VAL){
    object=false;
    comment="No obstacle";
  }

  if(oldStatus!=object){
    Serial.print(F("Valeur du capteur : "));Serial.print(gp2y0a21Val);
    Serial.print(F(" -> "));Serial.println(comment);
  }
  oldStatus=object;
}
Servomotor test code
To find out the gate’s up and down positions, we’ll test the servomotor. We’ll send two commands to the actuator, one representing the “up” position and the other the “down” position. Modify the UP and DOWN values according to the actual position observed.
//Librairie
#include <Servo.h>

//Déclaration des constantes
#define UPDATE_TIME 15
#define HAUT 180
#define BAS 90

//Déclaration des paramètres
int servoPin = 3;
//Déclaration des variables
Servo myServo;  // création d'un objet Servo

int pos=BAS;    // variable contenant la position du servomoteur

void setup() {
  Serial.begin(9600);
  myServo.attach(servoPin);
}

void loop() {
  for (pos = BAS; pos <= HAUT; pos += 1) {
    myServo.write(pos);
    delay(UPDATE_TIME);
  }
  Serial.print(F("Servo position HAUT : "));Serial.println(HAUT);
  delay(500);
  for (pos = HAUT; pos >= BAS; pos -= 1) {
    myServo.write(pos);
    delay(UPDATE_TIME);
  }
  Serial.print(F("Servo position BAS : "));Serial.println(BAS);
  delay(500);
}
Automatic barrier code
We’re going to combine the two codes and make a few modifications to achieve the desired behavior. We’ll create two functions, fenceDown() and fenceUp(). One to lower the fence and the other to raise it. When the “object” variable (obstacle detected) is set to true (1-True), we’ll call the fenceUp() function, and when it’s set to false (0-False), we’ll call fenceDown() to lower the barrier.
//Librairie
#include <Servo.h>

//Parameters
#define DETECT_VAL 300
#define CLEAR_VAL 200
#define UPDATE_TIME 15
#define HAUT 180
#define BAS 90

//Constants
const int gp2y0a21Pin  = A0;
const int servoPin = 3;

//Variables
int gp2y0a21Val  = 0;
bool object=false,oldStatus=true;
String comment ="";
int pos=BAS;    // variable contenant la position du servomoteur

Servo myServo;  // création d'un objet Servo

void setup() {
  //Init Serial USB
  Serial.begin(9600);
  Serial.println(F("Initialize System"));
  pinMode(gp2y0a21Pin, INPUT);
  myServo.attach(servoPin);

}

void loop() {
  readSensor();
}

void readSensor() { /* function testGP2Y0A21 */
  ////Read distance sensor
  gp2y0a21Val = analogRead(gp2y0a21Pin);
  if (gp2y0a21Val > DETECT_VAL) {
    object=true;
    comment="Obstacle detected";
  }
  if(gp2y0a21Val < CLEAR_VAL){
    object=false;
    comment="No obstacle";
  }

  if(oldStatus!=object){
    Serial.print(F("Valeur du capteur : "));Serial.print(gp2y0a21Val);
    Serial.print(F(" -> "));Serial.println(comment);
    if(object==true){
      fenceUp();
    }else{
      fenceDown();
    }
  }
  oldStatus=object;
}

void fenceUp(){
    for (pos = pos; pos <= HAUT; pos += 1) {
    myServo.write(pos);
    delay(UPDATE_TIME);
  }
  Serial.print(F("Servo position HAUT : "));Serial.println(HAUT);
}

void fenceDown(){
  for (pos = pos; pos >= BAS; pos -= 1) {
    myServo.write(pos);
    delay(UPDATE_TIME);
  }
  Serial.print(F("Servo position BAS : "));Serial.println(BAS);
}
Next steps
- Add a safety device so that the gate lifts up when an object is present, even if it hasn’t finished lowering.
- Add a traffic light to the barrier
- Add an RFID card reader to open the gate only with the right badge


